Arranging a bathroom in a house made of aerated concrete is a responsible task. It is necessary to ensure comfort for users, and at the same time protect the material from contact with water and steam.
A bathroom is an essential element of any home, ensuring hygiene and cleanliness for the owner and his family. The specific purpose and presence of water in the form of liquid and steam put forward special requirements for the design and finishing of the bathroom. In a house made of aerated concrete, these requirements become more stringent - if under normal conditions it is necessary to ensure the strength of the connection between the base and the finish, then aerated concrete needs reliable and hermetically sealed off from contact with moisture in any form. This is not an easy task, since finishing of aerated concrete is carried out according to its own rules.
Laying gas foam blocks
For laying walls made of gas foam blocks, it is best to use special glue.
It is applied in a layer of only 2-3 mm, which allows the blocks to be pressed tightly against each other. Installation instructions:
- Prepare a container for stirring, into which add water at a rate of approximately 0.25 liters per 1 kg of mixture (see the exact quantity on the packaging). Add the dry mixture to the water and mix thoroughly with a mixer until a homogeneous solution without lumps.
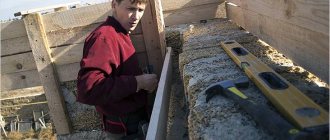
- The first row must be laid on cement mortar with a layer of 1-2 cm, since it will be subject to maximum load.
The first row of masonry is done using cement mortar.
Dimensions of foam blocks for construction
- The solution is applied in a thin layer evenly using a notched trowel. To ensure a tight fit, the blocks are tapped with a rubber hammer.
- You should regularly check the evenness of the masonry using a bubble or laser level.
- Every 3-4 rows you need to do reinforcement using masonry mesh or reinforcement. Since it is thick, grooves must be made to install it.
Masonry reinforcement
- Concrete lintels are made over window and door openings.
- To install floor or roof slabs, it is necessary to cast a 10-20 cm monolithic reinforced concrete belt.
Formwork for armored belt
The process of laying walls is shown in detail in the video in this article.
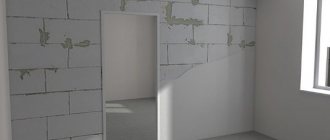
Protection of foam concrete from moisture
It is recommended to apply the plaster mixture over a reinforcing mesh attached to a wall made of foam blocks.
The bathroom is considered the dampest room in the house, so the foam block masonry must be reliably protected from moisture penetration into the concrete body.
This is done in several ways:
Since foam concrete is a rather soft material, it is recommended to attach a fiberglass reinforcing mesh to the walls before applying the plaster mortar. This is necessary for better adhesion of the solution to the surface of the foam blocks and obtain a better coating.
It is produced using a frame or frameless method. In the first case, a frame is mounted under the panels, on which the panels are hung; in the second version, the slabs are glued directly to the wall.
With this finishing, the masonry of foam blocks in the bathroom will be especially susceptible to dampness, so it is necessary to attach a vapor barrier membrane to the walls under the frame or facing material, which will not allow moisture to penetrate inside the masonry, but will lead it out.
In a separate toilet, it is not necessary to take such measures, but experts still recommend laying a vapor barrier at least spot-on, in problem areas - around pipes, ventilation holes, doorways, where condensation is possible.
One of the ways to protect a foam block from moisture is by covering it with ceramic tiles: reliable and beautiful.
In this case, the tiles will perfectly protect the foam concrete from dampness; only it is advisable to make the seams between the tiles as thin as possible and caulk them with a special grout containing moisture-resistant components. When using a simple mixture, mold or mildew may develop. But for ideal installation of tiles, it is advisable to level the walls and impregnate them with special deep penetration compounds.
Disadvantages of foam concrete
However, with all the positive characteristics, there are a number of disadvantages of foam concrete that you need to pay attention to when choosing a suitable material. It is worth noting that one of the main disadvantages of foam concrete is the fraud of private industries
In order to save money, dishonest manufacturers sometimes use low-quality sand and cement, and also add a significant amount of synthetic substances. Such substances have an extremely negative impact on the health of people living in a house made of low-quality foam concrete. In addition, there are other disadvantages of this building material:
- When constructing walls from foam concrete blocks, a frame construction method is used, which also complicates the construction process. This process is extremely labor-intensive and is usually performed by a person with the necessary qualifications.
- The porous structure of the material allows the structure to “breathe,” but at the same time, foam concrete blocks also absorb moisture.
- Additional cladding will be required: external and internal.
- A small mass can be a plus and a minus of foam blocks. When building a large structure, it is worth considering that foam blocks have lower strength than brick.
- It is advisable to carry out finishing work only after a few months. This set period is determined by the reaction of the components included in this building material. At the same time, foam concrete blocks require coating with special plaster and paints.
- During the construction process, the use of reinforcement will necessarily be required. Otherwise, further work will be considered unreliable.
The advantages of this building material stated that foam concrete blocks continue to gain strength for a long time. This also simultaneously applies to the advantages and disadvantages of foam blocks.
The main disadvantage of foam blocks is that due to insufficient strength, the material sometimes experiences severe shrinkage, which will subsequently lead to cracks in the building. Foam concrete blocks are recommended to be laid only on a solid foundation. However, there is still a danger that the material will crack or sag due to groundwater.
Depending on the wall material
The specific type of plaster we choose will depend on the material of the walls. Let's consider the possible options.
Professional finishers often have to apply plaster directly to the concrete surface, since it is a very common material for building houses. For concrete walls, one of two types of cement plaster is usually chosen:
- traditional cement-lime;
- more modern polymer cement.
The last option is a regular cement mortar with the addition of plasticizers, which make the mass more elastic.
For best results, before plastering, concrete walls can be reinforced with special meshes made of metal or fiberglass.
Brick walls are quite undemanding, so they can be plastered using a variety of compositions. Most often, for finishing work on bricks, one of the following types of plaster mixtures is chosen:
- cement;
- cement-lime;
- sand-lime;
- lime-gypsum (it is better not to use this option in the bathroom).
The quality of the finish is affected by the hardening speed of the plaster mixture. Gypsum plaster dries very quickly, so you should work at the appropriate speed. The hardening time of lime plasters is much shorter, but they are much more flexible.
If it is necessary to lay a thick layer of plaster mixture, reinforce the walls with a special mesh.
Foam concrete walls have a porous surface, so they must be leveled. The advantage is that the plaster adheres very well to a textured surface, as opposed to a smooth one. But, in order to make the work easy, you need to choose special plaster mixtures, since the usual ones are not suitable for such walls. Experts also do not recommend using universal formulations.
Information that the plaster is intended for work on foam concrete is indicated on the packaging. There are now quite a lot of companies producing such mixtures, so finding a suitable one will not be difficult. Synthetic reinforcing additives are often added to the composition of such plasters.
Gypsum blocks
Gypsum partitions are not the best solution for a bathroom, since this material does not like high air humidity. However, provided that the walls are made of modern, high-quality, moisture-resistant (!) gypsum blocks, this option can be considered quite acceptable.
Only gypsum plaster mixtures are suitable for gypsum blocks, since cement mortar simply will not hold on such a surface. To avoid the damaging effects of moisture on the plastered surface, the walls must be treated with a special waterproofing compound, and only after that the cladding must be laid.
Cost of foam concrete and aerated concrete (which is cheaper)
Foam concrete is 20% cheaper than aerated concrete of the same brand. It is cheaper because... Cheaper materials and equipment are used in its production. This also leads to the appearance of a large amount of falsified material.
However, when calculating the cost of construction, you should not take into account only the purchase price of the blocks. It is also necessary to take into account the price and consumption of the adhesive mixture, finishing materials, the need for additional materials (rebar, reinforcing mesh, additional insulation, water repellents, etc.)
Only after this can we say with confidence whether aerated concrete or foam concrete is cheaper.
Protection of foam concrete from moisture
It is recommended to apply the plaster mixture over a reinforcing mesh attached to a wall made of foam blocks.
The bathroom is considered the dampest room in the house, so the foam block masonry must be reliably protected from moisture penetration into the concrete body.
This is done in several ways:
Since foam concrete is a rather soft material, it is recommended to attach a fiberglass reinforcing mesh to the walls before applying the plaster mortar. This is necessary for better adhesion of the solution to the surface of the foam blocks and obtain a better coating.
Disadvantages of foam blocks
The main disadvantages of foam concrete blocks are associated with a number of difficulties during construction and the fragility of structures. Because of this, mounting samples is accompanied by a number of problems.
Construction Features
All foam concrete structures require careful reinforcement on the 4-5th row and near the openings, even when constructing 1-story buildings. This contributes to high-quality installation of the sling and ceiling system.
When constructing buildings in mid-latitudes, there is a requirement for the thickness of the masonry - it must be at least 640 mm. Standard blocks are 500 mm thick.
Fragility
In order to minimize production costs, unscrupulous companies use low-quality cement mixture. Therefore, when choosing a material, you need to request a certificate of conformity.
To check the brand strength, you can drive a nail 10 cm into the sample. If it cannot be removed with bare hands, then the product corresponds to the declared quality.
Fastening Features
Nails and screws are screwed into the foam block, just like into wood. However, due to the fragility of the material, they are poorly retained in it. If you want to secure heavy objects to the wall, using standard anchors or dowels is problematic.
If you are installing furniture, plumbing or electrical equipment, you have to use a special type of fasteners. It consists of a metal base, nylon or plastic. Chemical anchors secured with an adhesive mixture are also common.
Fastening with reinforced anchor.
Other publications in the “Bathroom Renovation” section
The seams are covered with grout to match the color of the tiles. It is advisable to seal the seams after the glue has completely dried using special means for sealing seams. After removing excess mortar from the surface, let the seams dry for 15-20 minutes. Finally, wipe the tiles with a damp sponge, and after 4-5 hours - dry.
If you glue tiles to hardboard, chipboard, drywall or a painted surface, you can use hot melt adhesive. It is convenient because it instantly fixes the tiles. At the same time, for greater reliability, you can use liquid nails.
The tiles can be laid on concrete, brick, blocks, gypsum base, painted surface. If the walls are smooth and plastered, it is enough to prime the surface. It is better to knock down the old tiles and then level the surface. Draw a straight line from one wall to the other and lay the tiles up and down from there.
Advantages and disadvantages
Foam blocks have undoubted advantages in comparison with other building materials. These include:
- Light weight. This is a very important indicator, as it allows you to save on labor costs, foundation construction, etc. when constructing objects.
- Low thermal conductivity. Houses made from foam blocks are warm. Sometimes they are even used as thermal insulation.
- Good sound insulation.
- Flexibility to processing. The blocks can be sanded, drilled, and even run wiring cables inside them.
- Good frost resistance.
- Fire resistance. Cellular concrete does not support combustion and can resist fire for up to 8 hours.
Experts say that, despite the porous structure, it is a fairly durable building material. Its warranty period is 50 years. A tangible advantage is also the relatively low price.
Considering all these advantages, the question arises: foam block - what is it, an ideal material for building a house or cottage? Maybe it is so. But these porous blocks also have disadvantages. These include:
- Excessively strong ability to absorb moisture. Foam blocks are a breathable material. But, at the same time, they tend to actively absorb moisture. Therefore, walls made of this material require mandatory external and internal finishing.
- Due to the lightness of the material, when constructing objects, experts recommend using the frame method. This requires additional costs and qualifications.
- Use only in low-rise construction, since the strength of this material is inferior to traditional types, such as cinder blocks, brick, etc.
Foam blocks have one more feature. They do not gain the necessary strength immediately, but gradually. They can be used only a month after production. And they acquire maximum strength throughout the first decade of operation.
Foam concrete partition materials
- The bathroom falls into the category of rooms with a high level of air humidity, therefore, for the construction of the partition, a material with minimal hygroscopicity is recommended. The problem can be solved by installing additional waterproofing, but in this case the cost of the project will increase at least twice.
- Despite its closed-cell structure, foam concrete intensively accumulates moisture in its volume, which it releases extremely reluctantly. It may take several weeks to dry a damp foam block wall, even with intensive ventilation.
- An equally significant drawback is the standard 200 mm thickness of wall foam blocks, which inevitably affects the reduction in volume and area of the room.
Lower cost, effective noise absorption and low thermal conductivity - all these advantages of foam block structures can be realized in fairly large rooms.
A more advanced material for creating a light, strong and durable partition is gypsum-polymer boards with a thickness of 8-10 and 12 cm. Private developers and homeowners appreciated the advantages of wall blocks when their sales began on the domestic construction market.
What kind of lamp should you buy?
Each master chooses a lamp based on personal preferences, budget, and planned load. There are 3 types of lamps intended for professional use:
- Tabletop ones, which have a low cost, but are not distinguished by mobility and convenience.
- Models on a clamp can be placed on any horizontal surface, which is convenient if you have a table or bedside table near the work couch. The most convenient are lamps with a magnifying glass and springs that fix the position of the device.
- Flooring products have the highest cost and require free space. They are chosen for large volumes of work, due to the ability to adjust the angle of inclination, height and rotation.
Diode lamps with several mounting options and the ability to be fixed in different positions are the most popular among experienced craftsmen.
Modern lamps are equipped with ice bulbs or LEDs. The luminous flux of an ice lamp can cause rapid eye fatigue; the products are expensive. The most popular models are those with extended bulbs. To prevent home dyeing from becoming a problem, find out in advance how to remove hair dye from your skin.
For electrical work
If the light goes out in a house or apartment, first check to see if the circuit breaker on the panel has tripped. Keep a working flashlight in an accessible place: in the dark it is difficult to go to the electrical panel or find candles if the light has gone out in the entire entrance (house, district, city).
An indicator screwdriver is your first friend when you have electrical problems. When you really want to touch a bare conductor, touch it first with an indicator screwdriver. If the neon light is on, go and turn off the packet. By the way, sometimes a sensitive indicator screwdriver helps to find hidden wiring when you need to screw a screw into the wall.
Indicator screwdriver
A soldering iron and the necessary accessories for it (rosin, tin) are rarely required, and the corresponding skill is needed. Therefore, if you have any idea what and how to do when soldering or simply tinning the ends of conductors, it is better to have this tool at home. And it won’t be superfluous if a smart person is nearby. So it's up to you.
Soldering iron, flux and solder, side cutters, round nose pliers, heat pipe.
Advantages and disadvantages of foam block
- Low density. Structures made of lightweight material exert the minimum possible pressure on the foundation (the density is 4 times less than that of expanded clay concrete).
- Strength. Allows the construction of load-bearing walls (in buildings up to 3 floors of grades from D900 and above).
- Thermal conductivity. 3-4 times lower than that of ordinary brick. Low thermal conductivity provides comfortable living conditions in any climate, keeping the room cool in summer and warm in winter. The consequence is energy saving.
- Soundproofing. An important factor in urban environments.
- Fire hazard. Foam concrete is a non-flammable material.
- Moisture resistance. Blocks made in accordance with GOST have almost no open pores and are able to float on the surface of water for days without absorbing it.
- Environmental friendliness. Foam block with organic foaming agents does not emit toxic substances.
The disadvantages include the unesthetic appearance of the building, which requires finishing. It is also necessary to monitor the geometry of the products. Due to the uneven surface, the width of the mortar joints increases. To prevent thermal conductivity from deteriorating, the parameter should not exceed 2 mm; Why is it more convenient to use glue?
Advantages of gypsum-polymer panel assortment
- Polymer additives in the gypsum structure of wall blocks are present in minimal quantities, so environmental performance assessments are not taken into account.
- The relatively light weight of gypsum partitions does not require reinforcement of the load-bearing floor frame, and to lay the first row it is enough to level its surface with a concrete screed.
- The tongue-and-groove connection of the blocks makes the structure more resistant to lateral loads. By independently arranging the partition on your own, the number of installation errors is reduced to a minimum.
- The ideally correct geometry of gypsum blocks makes it possible to realize the advantages of adhesive installation. The smooth surface of gypsum block masonry does not require special preparation before applying the external decorative coating.
The problems associated with affordable redevelopment of residential premises in private houses and apartments can be solved by tongue-and-groove blocks. The price per m2 of block masonry determines whether these materials belong to the budget group.
Tongue-and-groove slabs in the bathroom can accept any moisture-resistant decor, but the best option is facing tiles. Sealing the seams with moisture-resistant grout will allow you to use the hydrophobized base in more comfortable conditions.
In conclusion, about the cost of foam concrete and gypsum partition slabs. The increased price range of the gypsum assortment is compensated by the ability to choose the thickness of the partition, the moisture resistance of the gypsum structure, significant savings in space and volume of the bathroom, and minimal consumption of putty materials.
Buy high-quality moisture-resistant tongue-and-groove slabs from us today!
Optimal foam block sizes for load-bearing walls.
For Russia, the most popular sizes of wall foam blocks are 200x300x600 and 400x300x600.
The most popular of them, the size 200x300x600, is used universally for walls with a thickness of 200 and 300 (mm) both for external walls and for indoor partitions. Residential and commercial buildings are built from it. Two sides of the block are used in width and height; depending on the required wall thickness, these parameters can vary with each other. This block is used in construction (according to thermal conductivity standards) together with a layer of insulation.
The second widely used size 400x300x600 is used only for the construction of external walls of a building, while the outside of the wall may not be insulated, but only finished with a layer of plaster.
How to plaster bathroom walls under tiles?
Which plaster to use to level the walls in the bathroom depends on what materials the walls are made of and how they are treated. All plasters are divided into two large groups:
- Gypsum based plasters;
- Cement based plasters.
The former can only be used for interior finishing work, and they are absolutely not suitable for the bathroom, since gypsum does not tolerate moisture very well. The second type is more versatile; it is not susceptible to moisture, so it is great for decorating walls in the bathroom.
Block sizes
Once upon a time, the standard dimensions of foam blocks were 200x200x400 mm. However, over time, this standard began to lose ground. Nowadays only expanded clay concrete and sand concrete blocks can be found in such dimensions.
The dimensions of building foam blocks are usually much larger. Typically, the length is 600 mm, height - 300 mm and thickness - 200 mm. Blocks for internal partitions are often used with a thickness of 100 mm.
The standard length of 600 mm is determined by the specifics of the production of the material. Regardless of what technology is used, i.e. injection molded or dissected, the main mold box has a height of 600 mm. After sawing the massif or stripping the cassette form, the upper part becomes the side end of the foam block.
Types of technologies
As mentioned above, there are two types of technologies - injection and molding. Cut foam blocks are produced by cutting a large mass into equal parts using a cutting complex.
This technology has the following advantages:
- Has good geometry.
- Has no chips.
- Plaster is easier to apply to such material.
Mold blocks are produced by pouring the solution into a mold with partitions. They have only one advantage - their price is lower than cut material.
Partition masonry
Foam block weight
Types of sizes
It is quite difficult to say what sizes foam blocks are, since thanks to cutting production technology it is possible to obtain foam concrete blocks of different sizes. Often, customers ask manufacturers to produce blocks of non-standard dimensions.
Despite this, there is still a GOST for the size of a foam block. According to the regulations, there are 10 types of sizes for foam concrete blocks intended for masonry with glue and eight for masonry with cement mortar.
So, for glued masonry there are the following types of sizes:
- 188*300*588 mm
- 188*250*588 mm
- 288*200*588 mm
- 188*200*388 mm
- 288*250*288 mm
- 144*300*588 mm
- 119*250*588 mm
- 88*300*588 mm
- 88*250*588 mm
- 88*200*398 mm
The following types of sizes are provided for laying blocks on mortar:
- 198*295*598 mm
- 198*245*598 mm
- 298*195*598 mm
- 198*195*398 mm
- 298*245*298 mm
- 98*295*598 mm
- 98*245*598 mm
- 98*195*398 mm
As we can see, the maximum length of a foam concrete block, according to GOST 21520-89600, is 600 mm. There is also a note according to which the consumer can order blocks of other dimensions.
The most popular size of foam blocks, as mentioned above, is 600x300x200 mm. The popularity of such large dimensions of the material is explained by its low weight - 25 kg. For comparison, a sand concrete block of similar size would weigh 85 kg.
The low weight allows loading and masonry work to be carried out without any problems. And the large size increases the speed of laying the foam block.
Laying an external wall with glue
Purposes of building partitions
The choice of what to make a bathroom partition from can be influenced by the main function that the interior element will have to perform:
- decorative - used to enclose the area of the toilet or bidet, to maintain the style direction;
- zoning - this technique is used to separate both large and small rooms. It is better to enclose the shower area with solid and solid partitions to protect the space from splashes and leaks;
- disguise of communication systems - partitions are used to cover protruding pipes or other structures that cannot be hidden behind a screen. Shelves and lamps are often mounted in such a partition.
Therefore, you need to choose a partition for the bathroom taking into account the specifics of the premises and the main functional purpose.
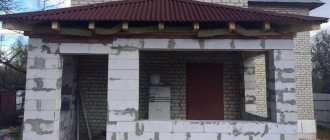
Building a house from foam blocks with your own hands, preparatory work and pouring the foundation
When starting to build a house from foam blocks with your own hands, it is worth studying the drawings, watching photographs and videos, and getting acquainted with the advice of experts. This will help you avoid mistakes and prepare everything you need before construction begins. Before this, you need to obtain all permits and approve the project
Additionally, it is worth taking into account the following aspects:
- get a calculation of the home's power supply;
- think over all issues regarding gasification of the house, if necessary;
- purchase a heating system project for a country house.
Before construction begins, it is already necessary to install electricity and water on the site and purchase the necessary building materials. If it is impossible to resolve the issue of centralized water supply, then it is necessary to provide water supply from a well or well.
Laying the foundation of a house includes the following steps:
- Clearing the construction site and planning the site.
- Removing the fertile layer of soil, which will later be used for landscaping.
- Performing markings for pouring a strip foundation or installing screw piles.
- Digging a pit and constructing formwork.
- Pouring a foundation measuring at least 50x70 cm.
When all the work on preparing the site and pouring the foundation is completed, you can begin building the walls. The foundation needs 10-14 days to dry and harden sufficiently. This time can be used to think through next steps, bring in building materials and recuperate.
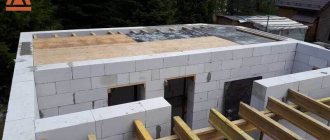
Construction of a house from foam blocks: construction of walls and roof
The construction of walls made of foam blocks is the most important stage, which should be taken seriously. The first row must be laid with frequent use of a level to check the quality of the masonry. The solution is applied with a special notched trowel, which allows the solution to be evenly distributed.
The construction of the external walls of a house from foam blocks is carried out in the following order:
- Waterproofing. Before starting to lay the walls, you need to lay a waterproofing layer on the foundation. You can use roofing felt. It is inexpensive and does its job well. Craftsmen recommend laying roofing felt overlapping in 2 layers.
- Laying blocks always starts from the corner of the building. To obtain a perfect plane, you need to use a rubber hammer and a level. The corner of the house is laid out to a height of approximately 5 rows, and then they begin laying the walls.
- Laying communications. When it becomes necessary to install wiring, gas pipes or water supply, recesses of the appropriate diameter are carefully made in the foam blocks.
- Each subsequent row is shifted by half a block to perform the dressing.
- Walls are strengthened using reinforcement. Reinforcement will protect the building during shrinkage and will prevent gaps and cracks from forming in the wall. Reinforcement is performed every 4 rows. 8 mm reinforcement is used for this.
- It is better to make the ceiling using a factory slab, but as an alternative it is recommended to use wooden beams and boards. Then they begin to build the roof.
At the final stage, you need to complete the exterior and interior decoration of the building. For this purpose, various building materials are used. Usually all work on building a house can be completed in 3-4 months.
Video about building a house from foam blocks with your own hands
Building a house from foam blocks with your own hands, videos, useful tips and construction stages are those aspects that interest novice builders. If you think through everything to the smallest detail, purchase materials and tools, then doing the job will be much simpler and easier. With a minimum expenditure of money and time, it will be possible to build a luxurious house from foam blocks, no worse than in the photo.
Bath on bricks. Some tricks.
Increasingly, bathtubs began to be installed on bricks or foam blocks.
Sometimes, first, they are mounted on the supplied factory structure - a metal profile with screws. And then they lay out bricks, which become the main support. This is practiced both for cheap metal baths and for expensive acrylic ones (pictured by RAVAK).
Brick support under an acrylic bathtub
If you have installation bolts, you can quickly and efficiently install the bricks, and then lay down the bricks, filling all the gaps with mortar, or better yet, glue. The glue is more flexible and fills all the cracks better. The strength of the adhesive is not inferior to that of grade 150 mortar.
What made you decide to use bricks?
- Often metal legs do not inspire confidence even after a quick inspection.
- The bathtub must stand very firmly. After all, if it wobbles or shifts, the insulating layer of silicone around the perimeter may burst.
- The height of the legs may not match the dimensions of the screen you choose.
- The nuts on the installed conductor may become loose over time (changes in temperature and water loads....)
When installing a bathtub on a foam block, it is advisable to protect the latter from moisture. First, impregnated with a primer, and then covered with ceramic tiles.
Covering the supports with ceramic tiles before installing the tank provides additional benefits:
- The foundation takes on a civilized appearance
- If the height of the brick support turns out to be low (after the next fitting), then this can be corrected during cladding by adding the missing value with tiles and glue. (Installation of the bathtub, in this case, occurs after the glue has completely dried).
Supports made of foam blocks, lined with tiles, under the bathtub
How to install a bathtub on bricks or foam blocks.
When installing the bath directly on a prepared support, the laid bricks should be located 1 cm below the installation mark. This value will then be filled with glue during installation. By pressing the bathtub with a rubber hammer, or pressing in the right place with your hands, we achieve the design mark. The adhesive is easy to press when applied to a primed surface. Dry brick quickly draws moisture from the mixture and bringing it to the marks requires effort. Check with a level for horizontalness. To do this, it is better to take a long level or level + rule. The surface of the bathtub can be uneven in some areas. And this does not allow you to set the capacity by level.
Glue on foam blocks before installing the bathtub
Instead of glue, you can use a solution. But the solution has disadvantages. It is less plastic and quickly loses moisture on bricks. And on dry mortar it is more difficult to seat to the desired mark.
Foam block
The development of construction technologies leads to improved construction quality. Time-tested materials are combined in new ways, creating unexpected combinations with impressive properties. This is what happened with concrete. The material, widely used by the builders of Ancient Rome, after a series of experiments became the ancestor of lightweight concrete. At the present time, foam block can be considered one of the most successful and widespread varieties of this group. Foam concrete blocks, the characteristics of which best meet the requirements of building regulations, allow you to make maximum use of the best properties of the material.
How to choose?
To understand which material is better, you should compare foam block and gas block according to several parameters:
- Structure. Foam blocks have large and closed cells with weak water absorption. Their surface is gray. Gas silicate blocks have smaller pores. They have weaker thermal insulation and require additional finishing.
- Strength characteristics. Aerated concrete blocks are less dense (200-600 kg/cube) than foam concrete blocks (300-1600 kg/cube). Despite this, foam concrete is inferior to aerated concrete, since its structure is heterogeneous.
- Frost resistance. Autoclaved aerated concrete blocks are more frost-resistant and vapor-permeable than other similar materials.
- Features of application. Cellular foam concrete is used in low-rise construction. It is also used in the construction of monolithic buildings (here it is used as an additional insulating layer). Aerated concrete materials are used as the main structural and thermal insulation materials. Houses of varying complexity are built from them.
Production. It is much easier to run into low-quality foam concrete than poor aerated concrete. This is due to the fact that the former is often made at home, while the process of creating aerated concrete materials is more high-tech and is often carried out in factory conditions. Price. Price is the most obvious difference between foam blocks and gas blocks. The latter will cost more, since foam concrete blocks are made from cheap raw materials. Soundproofing. Foam concrete blocks have better soundproofing characteristics than aerated concrete options. Life time. On average, foam concrete lasts no more than 35 years, and aerated concrete – more than 60 years
This is another important difference that needs to be taken into account when choosing the right material. Shrinkage
The degree of shrinkage of foam blocks is greater than this parameter of gas silicate materials. It is 2.4 (and aerated concrete - 0.6).
It is not so difficult to distinguish aerated concrete from foam concrete
It is enough to pay attention to their surfaces. Foam blocks are smooth, and gas blocks are slightly rough
It is more difficult to say with confidence which building material is better, since both have their pros and cons. However, you need to take into account the opinion of experts who claim that gas blocks are stronger and their frost-resistant characteristics are better. As for foam blocks, they are warmer and cheaper.
We must not forget that low-quality foam concrete is more common than second-grade aerated concrete, as evidenced by reviews from many consumers. Be that as it may, the choice remains with the buyer
It is important to decide in advance what qualities you are looking for in these building materials before you go shopping for them.
Comparison of a gas block with a foam block is in the next video.
Source
Interior partitions made of aerated concrete
How to make partitions from aerated concrete?
Aerated concrete blocks are a popular material for constructing internal walls and partitions. They are suitable for low-rise buildings made of aerated concrete and for multi-storey new buildings with open floor plans.
What is the secret of the popularity of aerated concrete partitions?
- The blocks are relatively cheap, an excellent option for budget housing.
- The blocks are lightweight (weigh several times less than bricks) and therefore easy to transport, unload and install. One person can build masonry from aerated concrete blocks. Due to the low weight of the partitions, the load on the floors and foundations is reduced, which means the costs of the building structure are reduced.
- The blocks can be easily cut with a hand or electric hacksaw. You can drill them without any problems, cut out elements of complex shapes from them, make bevels, etc.
- The blocks are laid on a thin-layer cement mortar or polyurethane foam adhesive. These installation methods, combined with the low weight of the blocks and the ease of their processing, lead to a high speed of installation of partitions.
- The lines of leading aerated concrete manufacturers (for example, Xella Russia, YTONG brand) include products that allow you to implement the most unusual architectural solutions. In particular, there are arched blocks for creating semicircular partitions. Or O-blocks for constructing noise-proof and heat-insulating shells for ventilation ducts or chimneys passing through the walls of a house. Such blocks are simply built into the wall masonry.
Partition thickness
Typically, internal walls and partitions are built from blocks 100-150 mm thick, less often - 200 mm. Density grade D500. It is better not to use less dense aerated concrete, as it has worse sound insulation properties. From D500 blocks with a thickness of 100-200 mm, you can build walls up to 3 m high and up to 7 m long (without openings) without additional reinforcement in the form of reinforcement.
If larger partitions are needed (for example, in a cottage with a second light, with a large number of doorways, etc.), then a structural stability calculation will be required, according to SP *. And the masonry may need to be strengthened. There are standard solutions for this:
- Reinforcement of every third row of blocks with a steel or composite rod with a diameter of 8-10 mm. The rod is placed in a groove with a cross-section of 20x20 mm, made on the upper surface of the masonry, and then filled with an adhesive solution. It can also be reinforced with perforated metal plates recessed into the adhesive joint.
- Attaching the wall to the upper ceiling. This method is also suitable when there is a danger of the wall tipping over under load. Or when, for one reason or another, reinforcement of the masonry was not carried out. But an aerated concrete wall can only be secured to a concrete floor (in the case of flooring with wooden beams, this technology is not feasible). There are two mounting options:
- Metal corners. They are fixed to the ceiling with ordinary dowels, and to the blocks - with special fasteners for aerated concrete. The corners are installed one per block, the standard step between them is 625 mm. During subsequent finishing, the corners are covered with plaster.
- Flexible connections. These are perforated stainless steel strips, which are placed at one end in a vertical adhesive seam (usually driven into the wall of the block with nails), and at the other end they are secured with dowels to the ceiling. The connection consumption is the same - 1 piece/block.
Masonry: quick and easy!
As already mentioned, the blocks are laid using thin-layer cement adhesive or polyurethane foam adhesive. Both options cost about the same amount, but foam glue has a number of advantages:
- It is more convenient for renovations in a multi-storey building or arrangement of a cottage where rough work has already been completed. Cement glue means dust, dirt, and high humidity in the room. Foam glue allows you to avoid all this.
- Laying blocks on foam glue is faster than on cement glue. We take a construction gun, insert a can of foam, apply one strip to the horizontal and vertical surfaces of the masonry - and fix the block. After 10 minutes, the foam hardens, firmly holding the block. Fast and easy!
- Foam glue seams have little elasticity and therefore prevent the appearance of cracks when the floor sag.
A few words about the block laying technology. The first row must be mounted on a regular cement-sand mortar to ensure the rigidity of the entire wall. If the work is carried out on the ground floor of the cottage, then a cut-off waterproofing made of roll or coating bitumen materials is provided between the masonry and the lower floor. This is protection against capillary penetration of moisture.
A gap of 30-50 mm is left between the wall and the upper ceiling, which is filled with polyurethane foam or other elastic material. The fact is that the floor slab may bend slightly as the building settles. For an aerated concrete wall, this is nothing critical, but the finishing may be damaged. To prevent this from happening, a gap is provided.
Non-load-bearing walls are attached to load-bearing walls made of aerated concrete using flexible connections - metal perforated strips: one for every third row. Such connections compensate for uneven settlement of the external and internal structures of the house. One end of the tape is mounted in the load-bearing wall, the other in the adhesive seam of the partition.
In addition, a small gap is left between the partition and the outer wall, which is filled with mounting foam or damper tape made of foamed polyethylene. This is necessary so that the plaster in the corners of the room does not crack when the building vibrates, caused, for example, by strong winds. Moreover, the damper tape also improves the sound insulation of the wall.
Large format Jumbo boards
To speed up installation, partitions can be made from large-format Jumbo aerated concrete slabs from YTONG. Their length and width are 750 x 625 mm, thickness - 75 or 100 mm.
Jumbo slabs have a number of advantages over standard aerated concrete blocks:
You can build partitions twice as fast.
The consumption of adhesive foam or thin-layer adhesive for masonry is half as much.
The slabs are easy to install due to their low weight - up to 32 kg.
Caution: strobe!
It is quite acceptable to vertically groove aerated concrete walls with a thickness of 100 mm or more, but horizontally - not because the grooves reduce their stability.
European standards allow horizontal gating of walls with a thickness of over 175 mm, but there are a number of reservations**. The grooves can be no more than 125 cm long and no more than 25 mm deep. Height from the floor – 40 cm. Distance to the nearest opening – at least 49 cm.
In cases where horizontal installation of electrical wiring is required, it is carried out in a rough finishing layer, for example, plaster.
Proper plaster
Heavy cement plaster can peel off because it and the wall have different elasticity and degree of settlement. Hence the recommendation: use light plasters - gypsum, cement-lime. Maximum density – 1300 kg/m3***.
How to secure heavy objects to the wall?
To hang heavy objects on an aerated concrete partition (boiler, kitchen furniture, heating radiators, etc.), you do not need to pre-install the embedded elements. Although the blocks are not very strong when stretched, they are quite capable of holding a large load when using special fasteners. Its most common options:
- Nylon dowels for aerated concrete in combination with metal screws. Depending on the manufacturer and model (shape, size), dowels can withstand weight from 50 to 700 kg. If you plan to hang particularly heavy objects on the dowel, do not forget that the wall itself must be sufficiently stable. You may have to secure it to the ceiling to prevent it from tipping over.
- Chemical anchors: metal pins combined with polymer glue. The main element of such an anchor is glue, which penetrates deeply into the pores of aerated concrete and, after curing, reliably holds the pin. Chemical anchors are designed for significant loads (up to 1.5 tons), but they are more difficult to install and much more expensive than conventional mechanical fasteners. If you intend to fasten something very heavy to the wall with such an anchor, it makes sense to first fix the wall to the ceiling.
The most common types of chemical anchors are:
- An ampoule designed for a certain depth and diameter of the hole. It is necessary to know in advance which holes will be needed.
- Large volume cartridge: glue is supplied from it using a special gun.
Detailed information about building a house from aerated concrete can be obtained from the course on construction from YTONG
* SP 15.13330.2012 “Stone and reinforced masonry structures”
** DIN 1053, part 1, table 10
*** STO NAAG 3.1-2013 “Structures using autoclaved aerated concrete in the construction of buildings and structures. Rules for design and construction", Appendix B3.
Technical characteristics of foam concrete blocks
This building material is characterized by many important parameters that determine the advantages and disadvantages of foam concrete. Thermal insulation, sound insulation, constant ventilation and strength directly depend on the technical characteristics and indicators.
| Characteristic | Index |
| Weight | Depends entirely on density and size. The average figure is that a 200x300x600 block weighs up to 20 kg. The weight of foam blocks varies from 6 to 24 kg. |
| Density | The density indicator is marked with the letter D. The value varies from 500-1300 kg/m?. |
| Dimensions | Foam concrete blocks come in different sizes. The length of one block is usually 600 mm, but the width and height are different. The standard size is a block of 200x300x600 mm. |
| Water absorption | 15% of the total mass |
| Thermal conductivity | 0.1 – 0.5 WM*k |
| Compressive strength | 2.0 – 7 MPa |
| Compound | Sand, water, cement and specially manufactured foam |
| Noise suppression | One foam concrete block, 100 mm thick, absorbs noise up to 40 dB |
| Price | From 3 to 4 thousand rubles |
During construction and repair, the advantages and disadvantages of foam concrete are determined by serious indicators, such as tensile strength and composition.
By size and height
The height of furniture and accessories in the bathroom also needs to be taken into account. If there are children in the family, and in most cases there is no separate bathroom for them, it is inconvenient for them to use a standardly located washbasin. The minimum height of the furniture and washbasin is 80 cm, the maximum is 110. The sink, as a rule, is located at a height of 90 cm, so the child can be offered a bench in front of the washbasin, and the handrails or hangers available in the bathroom can be attached lower.
Above the sink, everyone is accustomed to seeing an oval mirror or a cabinet with a mirrored door. If the mirror sheet can be installed close to the sink and the main inconvenience associated with this will be splashes of water, soap and toothpaste on it, then the installation height of the cabinet is of great importance. Typically, a distance of 40 cm from the sink to the cabinet is recommended for easy access to the faucet.
An important element is the height of the toilet bowl largely depends on the distance between the toilet itself and the riser, because if this distance is exceeded 50 cm, the drain pipe must have a slope of 2 cm per 1 meter of length. Accordingly, the pipe itself, which has a fairly large diameter, which is why it cannot be hidden in the wall, and the installation height of the bowl will greatly affect the entire bathroom decor.
Here, more than in any other area, you need to think about those who will use this plumbing convenience. For example, it is difficult for older people to get up from a low toilet or bidet, so these plumbing fixtures should be placed higher for them. At the same time, the high seat is uncomfortable for children. The seat height of a standard classic toilet is usually 38-40 cm, wall-hung models are higher - up to 50-60 cm, children's toilets have a seat height of about 30 cm.
It is convenient to place the toilet paper holder slightly in front of the front edge of the seat by 20-30 centimeters, and approximately 60-70 cm in height for the convenience of the seated person.
The best manufacturers
To purchase drills and be sure that the declared characteristics are completely true, you need to choose the right manufacturer.
Companies that value their reputation do not sell products of inadequate quality. Therefore, when choosing metal drills, you should give preference to manufacturers who have been on the market for a long time.
The best manufacturing companies:
1. Bosch - products of the German company have long proven themselves only on the positive side. Despite the rather high price of the products, when purchasing Bosch drills, you can rest assured of excellent quality. It is convenient and profitable to purchase tools from this company as a set.
Whatever set of drills you take, each one will contain only the highest quality products that will last for many years, provided they are properly stored and used.
2. “Zubr” is a domestic manufacturer whose products are maximally optimized in terms of price-quality ratio. You can purchase the products of this company either in a single copy or in the form of a set. The latter option will significantly save money, despite the significant cost of the kit.
3. Soviet-made drills - this category of cutting tools can be classified as an “endangered species.” With due diligence, you can purchase a rarity that has unsurpassed technical characteristics.
Video: