Strip foundation is one of the most successful engineering solutions in construction.
It has a high load-bearing capacity with minimal consumption of building materials and earthworks.
This combination made the tape the most attractive among alternative options.
Options have appeared using different materials, combinations with elements of other types of foundations or with different depths of immersion into the ground.
Let's consider one of the effective and economical options for implementing the foundation - a shallow strip foundation.
What is he like?
The depth of immersion in the soil of a regular tape should be below the level of soil freezing in winter. This is necessary so that the water located in the soil layers in direct contact with the foundation, when frozen, does not cause movements of the foundation and the building itself, threatening its integrity.
Construction on sandy soils that permeate water well has shown the possibility of immersing the foundation to a shallower depth, which is above the freezing level. This is due to the absence of reasons that could cause movement or destructive loads on the foundation.
The result is a number of noticeable advantages:
- Significant reduction in the cost of work - according to various estimates, costs fall three times due to a significant reduction in the amount of building materials.
- The construction time for the foundation is reduced.
- There is an opportunity to carry out work independently.
There are many design options for creating a shallow strip foundation, which expands the possibilities and allows you to choose the optimal option for given conditions.
The load-bearing capacity of this type of strip is somewhat lower, but given the high safety margin of strip foundations, the difference is not too noticeable. In any case, for relatively light buildings, no more than 2 floors high and made from lightweight building materials (cellular concrete), this type of foundation is quite suitable.
The use of a shallow foundation may be limited or contraindicated if the following conditions exist::
- Difficult hydrogeological situation in the area.
- Clay soils prone to heaving.
- The proximity of soil water to the surface.
NOTE!
In some cases, a shallow version of the tape can be used in quite difficult conditions, but it must be reinforced with additional supporting elements - piles.
Features of construction on heaving soils
If the soil on the site is prone to heaving, then a more impressive damper pad is laid under the foundation. Its width can exceed 1 m. The side walls are also covered with coarse sand in a layer of 20-30 cm. This will protect the tape from soil pressure when freezing.
It should be understood that building a house on a heaving site imposes obligations not only during the construction of the foundation, but also during the operation of the building. Even uneven snow removal can cause distortion and destruction, since the snow cover acts as insulation. It is unacceptable, for example, to pile snow under one wall, leaving others “bare”.
Pile-strip foundation
The design of such a foundation is a successful combination of two types of foundation. The main support comes from piles, immersed in the ground to the required depth and resting on dense, reliable layers.
The role of the tape is limited to uniform distribution of the load from the walls. In practice, it plays the role of a grillage, connecting point supports into a single support belt to equalize loads along the entire length .
This option is optimal for relatively light buildings, in particular for a house made of aerated concrete. The weight of the material is several times less than that of brick or ordinary concrete, so the load on supporting structures is significantly reduced, allowing the use of a lightweight version of the foundation and construction on problematic soils.
IMPORTANT!
Installing piles is a rather complex and time-consuming procedure that requires the use of special equipment, which increases the overall cost of creating a foundation.
Independent selection of parameters
When constructing independently without any geological surveys, calculations should be made based on average guidelines for a specific building area or based on the practice of neighboring buildings.
When choosing an option for the depth and thickness of the tape, you should proceed from the fact that a shallow foundation for a house with aerated concrete walls, not being built in a swamp, not in a flooded area, or at the cold pole, is the most economical option for founding a small house.
In the design practice of Soviet times, even respectable, competent engineers included in their calculations slightly larger parameters of strength and reliability than should be required by the standards, “just in case.” That is why temporary barracks stand for 60-70 years without major repairs, contrary to the operating standards of 30 years.
In other words: the developer must first calculate the approximate weight of the house with all its contents and a thick layer of snow on the roof. This is the load on the ground. Next - study the tabular data, talk with the builder from the neighboring house, and a rough sketch plan of the foundation will already be formed in your head. Then a control consultation with a familiar professional. And that’s it, let’s start construction.
House made of aerated concrete
The specificity of aerated concrete as a building material is its high heat-saving ability and low weight. Walls built from this material can be 2-3 times thinner than brick or concrete with the same level of thermal energy retention.
Choosing a conventional strip foundation for light construction is inappropriate, since the result will be an extra waste of money, building materials and time. Therefore, the best option is a shallow strip foundation, which has the most suitable set of performance qualities for a given case at a lower cost.
Concrete plinth - objection
Concrete is a universal and most common material for foundations. However, working with it is associated with certain difficulties.
What causes the difficulties of working with concrete:
- During individual construction, it is difficult to calculate the volume of the required mixture with an accuracy of up to a cubic decimeter.
- The limited volume of the solution, along with low plasticity, can prevent the leveling of the horizontal surface of the foundation.
- Homemade formwork does not always provide the ideal bowl shape. Moreover, the higher the height of the base, the higher the complexity of the preparatory work.
Due to these factors and a number of others, the surface of the poured concrete strip after hardening may turn out to be uneven.
In addition, concrete is not cheap. Pouring the foundation requires the use of expensive equipment. Work with the material should be carried out promptly - it cannot be stretched out over time.
The minimum pre-setting time for the concrete mixture is 28 days. However, in humid weather and low temperatures, the curing time of concrete can double.
For the reasons listed above, a low concrete plinth is first made, and after hardening its height is adjusted using other, more technologically advanced materials. Traditionally, the most convenient building material is brick.
General installation diagram
The procedure for creating a shallow strip foundation differs little from the usual method:
- The site is prepared, the turf is removed and the surface is leveled.
- The area is marked using pegs.
- A trench of the required size is dug.
- A drainage layer of sand and crushed stone is poured onto the bottom.
- The formwork is being assembled.
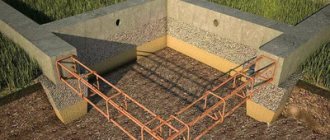
- Installation (knitting) of the reinforcement cage.
- Pouring the concrete strip, allowing it to gain sufficient hardness.
- Dismantling the formwork, holding until completely hardened.
- Carrying out further work.
Some stages of work are deliberately omitted (for example, waterproofing), since they can be combined with other actions.
List of articles
Tape
395
Technological solutions for a monolithic slab on a strip foundation
Tape
286
A balanced decision, or which foundation is better - pile or strip
Tape
943
How to make a strip foundation with your own hands?
Tape
338
Which strip foundation to choose for the construction of a two-story house?
Tape
385
The nuances of arranging a strip foundation on a slope
Tape
511
What is the cost of constructing a strip foundation and what factors influence the final estimate?
Tape
301
Methods and features of calculating strip foundations
Tape
157
Main types of strip foundations, their features and application
Tape
325
What are vents in a strip foundation, why and how are they made?
Pillow
A sand and gravel cushion is needed for drainage of the trench in the event of water appearing as a result of rising groundwater levels, heavy rains, heavy snow melting or other events. A layer of backfill made of materials that are highly permeable to water allows it to flow to the bottom of the trench and be discharged through the drainage outlet to the discharge point.
The usual composition of the pillow includes a layer of sand of about 15-20 cm, then a layer of crushed stone of the same thickness is poured and then, on top, another leveling layer of sand of about 5 cm. Some sources give other values, which is due to the dependence of the thickness of the backfill layer on the composition of the soil .
If the house is being built on sandy soil, the thickness of the backfill can be reduced by using only sand, but for less permeable soils, the thickness of the cushion must be increased.
NOTE!
When backfilling, each layer must be thoroughly compacted with water for maximum compaction.
How to make it yourself
Pouring a shallow foundation tape does not require specific skills. Required:
- To make calculations, you can hire a specialist.
- Clear and mark the area.
- Dig a trench.
- Build formwork.
- Install fittings.
- Fill the tape.
- Perform waterproofing.
Construction will take at least a month, since the concrete will take at least 28 days to dry.
Necessary calculations
To construct a foundation, it is necessary to calculate the soil resistance and the weight of the future building with its contents. It should be understood that the tape serves as a transmission link between the pressure of the house and the ability of the site to withstand it without displacement.
The calculation algorithm is as follows:
- The type of soil is determined. To do this, an examination of the composition is carried out using pits.
- Calculate the estimated weight of the building. The weight of finishing materials and internal contents is taken into account.
- Determine the bearing capacity of the earth.
- Calculate the required thickness and composition of the damper cushion.
- Determined by the thickness of the reinforcement and its quantity.
When making calculations, use reference data and recommendations of SNiP 2.02.01-83.
Preparatory work and marking
Preparing a site for construction involves clearing it of plant debris. The second stage is the removal of the fertile layer to a depth of 15-20 cm, depending on the fertility of the soil. The soil is stored separately.
Marking is carried out using twine and pegs. The parallelism of the walls is checked by the equality of the lengths of the diagonals. It should be marked along the border of the walls of the future foundation using two strings.
Digging a trench and arranging a cushion
The trench is dug manually or using machinery. Its width is twice the width of the future foundation. So, after installing the formwork, there will be enough space for hydro and thermal insulation. The depth is equal to the foundation plus the thickness of the damper base.
The sand or sand-gravel bed is poured in several stages. Each ten-centimeter layer is moistened and compacted thoroughly.
Formwork assembly
When constructing a shallow belt yourself, the formwork is made from edged boards. It is important that the walls are securely fastened. To do this, they make supports on the outside and lintels on the inside.
Reinforcement
The law also regulates the conditions for laying reinforcement when constructing a foundation. According to SNiP:
- The reinforcement should be a rectangle.
- For a small tape, one upper and one lower contour is enough.
- The rods should not reach 5-6 cm to the edge of the fill.
- The installation step between horizontal branches is no more than 40 cm.
- The reinforcement must have at least 2 longitudinal belts located symmetrically relative to the edge of the fill.
- Reinforcement of corners is carried out with overlap along the wall.
The reinforcement is fastened with a special knitting wire, the thickness of which is from 4 to 6 mm. Only grade C metal is allowed to be cooked.
Pouring concrete
The tape should be poured in one step. During the process of filling the formwork, the solution is mixed with a shovel or crowbar, removing possible voids. The laid concrete is subjected to vibration for better distribution.
MZLF dries in 28 days. It should not be touched before this period. To protect against bad weather, the tape is covered with polyethylene and boards.
Formwork removal and waterproofing
The formwork is removed after the concrete has completely hardened. The side walls are coated with waterproofing mastic and the voids between the foundation and the ground are filled with sand.
The top of the tape is lined with roofing felt. It can also be coated with tar first.
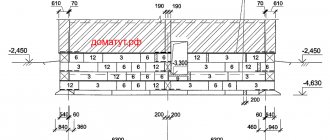
Depth and width
Calculating the parameters of a concrete strip is a rather complex task that requires certain preparation and practical experience. It is recommended to drill exploratory wells to determine the composition of the soil; it will be necessary to use a large number of special indicators and local coefficients.
Some values can be found in SNiP tables (for example, the depth of soil freezing in the region), you can contact the local geological department and find out the composition of the soil . But it is better to order general calculations from specialists or use an online calculator.
If none of the options is suitable, and the geological conditions are quite favorable (sandy or sandy loam soil), you can use standard tape sizes - width about 40 cm, height - 60 cm. This option is the most common, suitable for most buildings on shallow foundations.
The depth of the trench is about 60 cm (taking into account the thickness of the backfill).
The optimal type of concrete recommended by SNiP is M 300.
For reinforcement, hot-rolled metal reinforcement with a diameter of 12 mm and a smooth rod of 8 mm are selected .
You can use fiberglass (composite) reinforcement, which has many advantages over metal, but is not able to bend while maintaining its shape. Composite reinforcement has not yet gained widespread popularity; most builders, out of caution, prefer familiar materials.
Installation of formwork
The formwork is manufactured directly on site. Edged boards with a thickness of 25-40 mm are used, which are connected into panels with a length corresponding to the foundation plan and a height of 10-15 cm higher than the height of the tape .
The formwork is installed at the bottom of the trench, where a double layer of roofing felt waterproofing is previously laid. The panels are connected by crossbars that determine the width of the tape. The outside of the shields is reinforced with supports, but for strips of low height you can get by with pegs.
The assembly must be done tightly; gaps larger than 3 mm should not be allowed. If they do appear, tow is used or the gaps are clogged with slats.
Tape requirements
In order for the foundation to be sufficiently rigid and provide the house with protection from movement, it must give a settlement of no more than 2 mm per 1 meter. It will meet these requirements when built on a site with high-quality, non-problematic soil.
On difficult soils when using MZLF you need to:
- lay it below the freezing depth;
- lay a high-quality sand and crushed stone cushion;
- install a reliable drainage system around the perimeter of the building;
- if necessary, reduce freezing by insulating the foundation and blind area.
Reinforcement and knitting
The creation of a reinforcing frame is traditionally carried out by knitting with soft annealed steel wire with a diameter of 0.5-2 mm, depending on the size of the frame and the thickness of the rod. For knitting, a special tool is used - a hook, which is inserted into the loop and twisted, tightly connecting the rods.
The assembly turns out to be quite strong, considering that after pouring there is no point in connecting the rods - they work on their own.
Some builders use welding when assembling the frame. This is a completely acceptable option, but it is not suitable for fiberglass reinforcement.
Reinforcing structure
When constructing residential buildings, it is necessary to further increase the durability and strength of the structure. To increase strength, the process of installing reinforcing structures is used. For this purpose, reinforcing rods are used, which are tied together with wire. When using reinforcement in the manufacture of floors, the risk of cracks and chips is significantly reduced.
Concrete cannot cope with heavy loads. When there is a large load on concrete, it begins to stretch and therefore its integrity is compromised. This is why reinforcement is used. Concrete in conjunction with reinforcement creates a material that fully meets the requirements in construction and can withstand heavy loads.
Reinforcement can be made either from metal mesh or from broaching reinforcement.
To create a metal mesh, steel wire 5 mm thick is used. It is intertwined so that at the exit it presents a cellular structure. To create broaching reinforcement, steel rods, fiberglass and polypropylene are used.
Fill
For pouring, the easiest way is to order ready-made concrete in the required quantity. In terms of costs, this is not much more than making it yourself, but the time savings are significant.
If we take into account that a pause in pouring that lasts more than a day makes it necessary to wait for the casting to completely harden, after which work can continue, then the advantage of ordering ready-made high-quality concrete is obvious.
Filling is best done without interruptions and from several points. The surface is leveled with a special spatula. After pouring, the tape must be covered from the sun with plastic film, otherwise it will crack.
Which variety is the cheapest?
Pile foundations are cheaper than others. But you need to remember that piles cannot support heavy structures.
There is also a relatively cheap, columnar foundation. Nowadays it is used less and less because piles have replaced it.
In order to avoid making mistakes, you need to think about the size of the house being built, what materials to use, where the basement will be, and where the load-bearing walls will be. Building a foundation is not an easy job. And if you do it yourself, without a trained construction team, then it won’t hurt to have a right hand – an assistant. The most favorable time to build a platform for a house is summer, when the soil is warm, without dampness and moisture.
Options for finishing the facade of a house made of aerated concrete blocks
Types of foundations for a private house - which one is better
What brand of concrete is needed for the foundation of a private house
What dowels to use for walls made of aerated concrete blocks
Final stages of work
Drying of concrete is carried out in stages. For the first 3 days, you need to water the tape with water every 4 hours, then for 7 days, watering is done 3 times a day. This is necessary to equalize moisture in the thickness of the material and prevent the formation of cracks.
The formwork is removed after 10 days, and work can continue after a month. After this, waterproofing is applied, the sinuses are filled and preparations are made for the construction of walls.
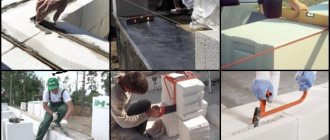
Laying the first row
The first row of aerated concrete blocks must be laid on a flat, waterproofed base. This is important, since capillary absorption of moisture in cellular types of concrete occurs very actively.
Procedure:
- The surface of the tape is leveled and, if necessary, plastered to obtain a perfectly flat and horizontal surface.
- A double layer of waterproofing is laid - usually roofing felt is used.
- The highest section of the tape is determined (usually one of the corners). Ideally there should be no difference.
- Aerated concrete blocks are laid in the corners and carefully aligned along the axes of the future walls and horizontally. If necessary, an increased thickness of the adhesive layer is used.
- Cords are stretched between the corner blocks and intermediate blocks are laid. Using the cords as a guide, their position is aligned along the axes of the walls and horizontally.
- The surface of the first row is reinforced.
- After this, you can proceed to laying the second row.
The technology for laying aerated concrete does not differ from the usual one; an important point is the high-quality and reliable separation from the foundation material, which prevents the penetration of moisture.
How to calculate the online calculator
The basis for calculation is simple arithmetic. To calculate the volume, you need to specify the width, length and height of the designed object. Established procedures and rules for individual structures selected for the project are taken into account.
The relevance of the price of the materials used, tools, equipment used and the labor of hired workers is taken into account. All calculations in the online calculator are based on real and approved projects. Thanks to this, when modeling private residential buildings, the most realistic result is obtained.
Regular practice in contracting activities makes it possible to take into account even minor resource costs. The authenticity of the calculation of the foundation for an aerated concrete house is guaranteed by summing up individual calculations for each stage of construction:
- laying the supporting structure;
- building walls and slabs;
- installation of stairs, doors and windows;
- installation of the roof with preparation of the chimney;
- façade finishing.