- rigid connection using reinforcement;
- expansion joint.
Each of the options for connecting the main foundation to the base of the extension has its own characteristics and nuances that should be considered more thoroughly.
Important points before docking
Before you begin work on increasing the area of your home with extensions, you need to obtain the appropriate permits. All distances from nearby buildings and neighboring properties must be taken into account and maintained.
The extension can be built as an independent building or integrated into an existing one. It is important to note that the building already in use must be older than 1 year. During this period of time, it will give the necessary shrinkage and will not carry away the new foundation built nearby.
The old and newly constructed foundations must be of the same type. If a residential building is installed on a strip foundation, the extension must be built on the same one. This will significantly reduce the risk of deformation of the combined, docked base.
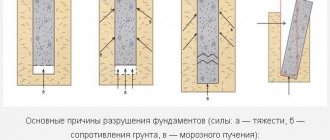
Why does deformation occur?
Deformation during foundation shrinkage
Different foundations behave differently when in contact with soils susceptible to heaving. Therefore, if the base is strip, then the new one should be the same. Another important rule: you cannot lower the new foundation below the main one.
How to determine the width of the sole of the strip base:
- You need to take a metal rod, the end of which is bent at a right angle.
- We push the rod under the structure so that the hook is positioned horizontally.
- After the rod passes the base, we unfold it so that the hook is positioned vertically, with the tip up.
- Pull the rod towards you until it stops.
- Let's make a mark.
- Unfold and pull out the rod.
- The segment from the mark to the fold is equal to the width of the sole.
Reasons for shrinkage of the extension:
- The main building has usually already settled down, but the new extension is just beginning to sink.
- Part of the attached foundation rests on imported soil, and part on “native” soil. This leads to complex deformation displacements, causing the formation of cracks in the most unpredictable places.
The consequences of natural shrinkage can be minimized by extending the construction period. To do this, we allow the foundation to stand for at least one season. The extra weight will cause some shrinkage, but not as much.
Tools and materials for work
To build the foundation, a significant amount of excavation work will be required, as well as reinforcement and concreting.
Tools you will need:
- Bayonet and shovel shovels;
- Scrap;
- A stretcher or garden wheelbarrow for moving soil;
- Hook for tying wire;
- Tape measure, marker, pegs, rope for marking the site;
- A bubble or water level, but a level is the best choice.
Materials you will need:
- Reinforcement bars with a cross section of 8-10 mm;
- Knitting wire;
- Cement grade not lower than M400;
- Sand and crushed stone of the middle fraction for preparing cement-sand mortar and forming a shock-absorbing “cushion”;
- Metal studs (you can use reinforcement with a cross-section of 12 mm) to connect the new foundation to the old one.
Design options
Bonded board
The units of material used for strapping can have different shapes. These can be logs, solid beams or made up of several layers of boards.
Cohesive board
For tying boards, lumber that is high-quality impregnated with an antiseptic composition is suitable. If you couldn’t get such raw materials, you can take larch. Its resin has disinfecting properties. You should not skimp on the quality of the material - structures made from rotting wood quickly become unusable.
For strapping, materials are used consisting of 3-4 boards fastened together with a cross-section of 0.05 by 0.2 meters. They must be carefully calibrated in size; If possible, you should do this yourself. The use of unplaned raw materials is allowed. The boards are mounted by nailing or screwing them with fasteners in the manner of chess.
timber
Beam
Solid timber can have dimensions of 0.15x0.15, 0.15x0.2 or 0.2x0.2 meters. The last two options are considered equivalent to three and four bonded boards with dimensions of 0.05x0.2 m, respectively. If one of the sides of the block is 0.2 m, it is placed on the heads with its smaller side - then the structure will have a height of 0.2 m.
The raw materials used should not have a moisture content higher than 12%, rotten or knotty. The beams must be subject to chemical treatment. For this purpose, antifungal compounds, antiseptics, and agents that prevent fire and moisture penetration are used. Because spruce wood has many knots, it is less suitable for work than cedar or pine.
You can connect adjacent elements in different ways. The “half-tree” method is popular: in this case, notches of half the thickness are cut in adjacent bars. Another method involves creating cuts at a beveled angle so that when fastening, gaps do not form. A tongue-and-groove lock is also used. To make the cuts more accurate, you should buy or rent a plane.
Log
Untreated logs are strong and can bear weight best. This material has the lowest cost, but the logs are difficult to install due to their irregular shape, which makes it difficult to fit, strengthen on the base and install walls.
Connection steps
In order to properly combine the two foundations, you need to think through in advance all the nuances of each stage of work. It is necessary to choose a method for “ligating” the bases. Several options are possible.
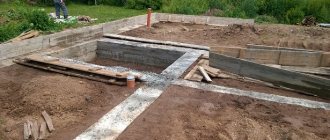
Method number 1: “tape-tape”. Used to build a foundation of similar width and depth. It is carried out in several stages.
They are marking the site for the construction of an extension.
A ditch is dug around the perimeter of such a width that it can accommodate the formwork for pouring the tape of the required parameters. Level the bottom and walls of the dug trench using shovels.
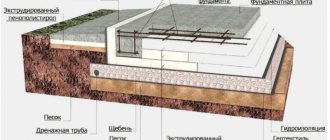
A sand-crushed stone fill is made, consisting of 5-7 cm of compacted sand and 10-15 cm of crushed stone, which is also compacted.
Tamping is done with a vibrating plate and available materials. For example, a barrel half filled with stones, a piece of timber.
Formwork is assembled in a trench from any suitable lumber.
A reinforcing belt is made, consisting of two tiers of mesh with a mesh size of 15x15 or 20x20 cm, connected to each other by vertical metal rods.
A gap of 1.5-2.5 cm wide is left between the foundations, which is filled with mineral wool. The formwork is limited at the junction of the bases with a wooden or metal shield.
Using a concrete mixer, a cement-sand solution is prepared in a 1:3 ratio (1 part cement and 3 parts sand, water and filler in the form of crushed stone or gravel).
Concrete is poured into the formwork in layers. They pierce it repeatedly with a rod of reinforcement so that all the air comes out of the solution. After the concrete has set, the formwork is dismantled.
The damper joint of the foundations is closed with a rubber band or waterproofed in another way.
This method of tying the bases allows you to be sure that the new one will shrink and carry the old one with it. After the strip foundation shrinks, it is increased in height so that it is in the same plane as the base of the residential building.
Method number 2: “plate-tape”. It is carried out similarly to the previous one, with the only difference that the damper seam is made longer: along the entire slab.
Builders do not recommend rigidly tying both foundations to each other.
This joining method is optimal only for stable soils, when there is confidence that there will be no significant subsidence of the extension after its construction.
Separate supports
If there is a large discrepancy in the weight of the old and new structures, the degree of shrinkage of these structures will differ significantly in magnitude. In such cases, it is not recommended to make a rigid connection for the foundations - it is necessary to choose separate construction of the supporting elements. It is possible to attach other types of foundation to the existing foundation and to do this use the principle of connection through an expansion joint.
The weight of the ceilings and walls of the extension should be distributed over its own support area, without creating tearing forces for the main foundation of the building.
Depending on the operating conditions, the expansion joint can be:
Rigid connection
To rigidly tie two foundations, you will need to connect them using reinforcement bars. You will need at least 20 rods per 1 m2.
To install metal rods, holes are drilled in the old foundation, reinforcement is placed in them and concreting is carried out.
Rods are also laid on the side of the new foundation and the joints are filled with concrete.
Extension on stilts
Light buildings, regardless of the nature of the base of the main building, can be erected on stilts. Various combinations and options for junction points are possible:
- Tape - piles. It is impossible to rigidly connect a “hanging” grillage to a monolithic structure, and the abutments of the facades are separated by a “warm” expansion joint.
- Piles - piles. For example, this is a common type of foundation for a foam block or frame house. Technically, grillages can be rigidly tied under the “boxes” of buildings. With wooden beams and metal profiles there are no problems with tying. And reinforced concrete beams can be tied together with reinforcement bars if their thickness allows holes to be drilled.
Finally. The connection between the extension and the main building can be done in several ways. And the choice of a particular one depends on many factors: type of foundation, nature of the soil, groundwater level, cumulative loads. It is also worth taking into account the rafter systems of both buildings, the type of roofing, and even the construction budget.
Construction of a columnar foundation
The best choice for building an extension would be to install it on poles. The soles of the supports should be located 15-20 cm below the freezing point of the soil, which will prevent them from moving during soil movements during periods of freezing and thawing.
If a columnar base is built, the house and the extension are connected at the level of the lower floors.
A comment
- Registration: Feb 2010
- Posts: 35
Answer: How to combine two strip foundations?
[QUOTE=Alexandrov;19555]The brow above the foundation will have a reinforced monolithic base. It will perform the function of a monolithic belt. In fact, it’s like a monolithic foundation on blocks.
And how do you think a monolithic belt will save two foundations from skewing and will it stand level on the one that is higher?
PS I can get confused and send a photo of one barn and its extension on different foundations and one monolithic strip after this winter, if you believe the word, the crack is 15 cm wide: wink:
VRE added 04/29/2010 at 13:34
What is an expansion joint? what function does it perform, what does this thing look like, in general I feel in my gut that “Adding a foundation” is not worth it, but if this is the only option for an extension, how best to organize it, what I mean is that Alex and I discussed adding a boiler room to the house? how to do it better? The soil is clay and about a meter on top is artificially filled with sand.
In fact, you get two separate structures close together.
Is it possible to do this: destroy parts of the foundation at the points of contact, connect it to the existing one with a reinforcing belt and fill in this letter “p”? and to be safe, dig holes in the corners and build something like “filled piles”?
Where the soil is heaving, no reinforcement or concrete will save you! If the ground freezes more than 1 m, everything will be warped, no matter what you build there.
VRE added 04/29/2010 at 13:49
If you had thought to set the marks in the fall, you could have seen from your own example in the spring how much the foundation has risen. Now I propose to put the marks now and compare them with what will happen in June when the ground completely thaws.
Knitting methods (patterns)
First, about the tools for knitting. They will speed up and improve quality. Basic:
Crochet hook (there are two types). Buy a factory one or make your own.
Reinforcement gunThe tying gun automatically grips the bar and automatically ties it. Super! True, you won’t buy it for homework. If you know a builder, contact him for such a thing. To build a bathhouse or a house, it is needed only once, so the investment is unprofitable.
They also use a screwdriver with an attachment: twist quickly, but sometimes it’s not convenient...
Well, now the diagram, or rather the diagrams. Watch your hands, as the magician said:
- a) knitting in a bun without pulling;
- b) tying knots in the corners;
- c) double-row knot;
- d) cross knot;
- e) the node is blind;
- e) fastening the connection. element:
1, 3 – rods, 2 – connecting element. I – front view; II – rear view.
That's all. I hope the article was useful and answers the main questions posed.
Anecdote: - Sir, what an unusual sword you have. - This is fittings, sir...
Subscribe to news, success and the right “tricks” for you!
Wisdom Quote: Laziness makes everything difficult.