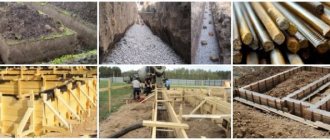
Any home starts with a foundation. You can hire specialists who will dig a trench or foundation pit, according to the project, or you can evaluate your strength and cope with the excavation work yourself.
In the article we will describe how to dig a trench under the foundation correctly, what you should pay attention to, and to what depth the holes need to be dug depending on the type of soil.
Digging the foundations yourself: main features of the work
If you decide to dig the foundation for a house yourself, remember and follow the following important requirements:
Scheme for correct foundation excavation.
- all work must be carried out only in accordance with a correctly drawn up project, developed specifically for your specific home and for construction on the site of your choice. Other people's advice and experience cannot replace the qualified work of an experienced design engineer;
- All work on digging a pit, installing a concrete base, performing backfill and further erection of walls must be carried out continuously. If you cannot afford to build a “box” of a house during one summer season, it is better to postpone construction;
- any foundation for a house must be protected from contact with moisture in the ground and from surface and ground water. For this purpose, high-quality waterproofing is arranged;
- When carrying out work by builders, it is necessary to ensure strict and strict adherence to the project, and not to agree to simplifications and design changes, even if such changes promise significant cost savings.
To mark the future foundation, pegs are used, between which a thread is pulled, then the excavation of the foundation begins.
The foundation for a house is the basis of your future home. If you decide to dig a pit yourself and carry out further work, remember that only you bear full responsibility for the future fate of the house.
If you decide to dig the foundation yourself, prepare the simplest tools for this:
- shovels;
- spades;
- thrombus agents;
- wheelbarrows for removing soil;
- pegs;
- roulette.
Possible problems
To avoid the most obvious problems, it is necessary to reduce work time to a minimum. Otherwise, precipitation will saturate the soil and the density of the entire structure will be questionable.
If it was not possible to prevent the lack of precipitation, then to eliminate the effects of moisture it will be necessary to remove an additional layer of soil until the ground is dry. For this reason, the construction of the foundation will require more materials and time for work. This will require increasing the size of the cushion that separates the foundation and the soil. It is the rain factor that is the main reason for choosing construction equipment to speed up the process.
Winter excavations
During winter excavations, one common problem is encountered - freezing of the top layer of soil. All work must be completed even faster than in summer, since over time the ground quickly freezes. If the bottom or walls freeze before finishing the masonry or pouring, this will result in low stability of the structure. You also need to take into account that the excavated soil must be stored in a place where it will not have time to freeze in a few days, which will make it difficult to clean up.
Therefore, construction equipment is used to reduce time. Earthmoving machines help to achieve the required speed, despite the hardness of the soil. At the same time, the quality of work will not suffer.
Methods for pouring and methods for saving the foundation of a house
Depending on the use of your own labor, you can pour the foundation in three ways:
- Lay the foundation yourself, using only your own labor. This is, of course, a labor-intensive process, but not so much that it cannot be handled on your own. Ideally, 2-3 people will cope with all stages without much effort.
- Partially use someone else’s labor for some stages of pouring the foundation. This method is most common when building houses on your own; it involves the use of hired workers during particularly difficult stages of work. This will allow you to save on your own labor, but financially it will be a little more expensive.
- Entrust the pouring of the foundation for the house to professional workers. This is the most expensive method of pouring, but in this case you will not have to do anything except come to the site and control the process of laying the foundation, because even professionals sometimes do not adhere to strict technology for their own benefit.
Tips for saving on foundation
- If you hire workers to perform individual stages of pouring the foundation for a house, then you should take into account that the most expensive stage is digging the soil and pouring concrete. If we talk about digging, then it’s up to you to decide whether this is a labor-intensive process and whether it’s worth saving on it. Well, you can save a decent amount on pouring the foundation if you invite a friend to help. In fact, pouring concrete is a dirty, but not very complicated process, which two or three people can easily handle in half a day, saving about 500 rubles each. from a cube of concrete.
- With a strip foundation, you can save on deepening; if you have a not heavy and small house (wooden, for example), then instead of a deep one, you can make a shallow strip foundation.
- You can save money on a slab foundation by making it thinner, but with stiffeners. I talked about a slab foundation with stiffeners in my previous articles.
- When laying a columnar foundation, you can only save on labor, because it is already the least stable compared to its brothers.
- In some cases, fiberglass reinforcement and its use will allow you to save a little on the foundation.
Digging with an excavator
Manual excavation will save money, but not time.
Among the advantages of mechanized digging, the most significant are:
- High speed, accuracy of work;
- Immunity to weather and climatic conditions, type and condition of the soil;
- Fewer people involved in the work;
- Ability to quickly move excess soil.
In many trucking companies, prices for excavator services are quite affordable. It is important to immediately clarify how payment is made - hourly or for the volume of work performed. The second option is preferable.
Site marking
In cadastral documents, marking data is recorded using the JPS device. Using a level on the site, zero points are determined. Markings are made according to established requirements. The distance to a residential building does not exceed three meters, to outbuildings – one meter.
A full list of norms and rules is stated in the document “Planning and Development of Individual Housing Construction Areas.” A rectangular plot is the most convenient option for the appropriate use of the property.
You will need twine, tape measure and a square. According to the project, the first stakes are driven in. A cable or fishing line is pulled along the perimeter between the marks. The optimal distance from the facade is 5 meters. Dimensions can be adjusted depending on the material used.
The sides are measured, then the diagonals are checked. After hammering in the pegs, a control measurement of the diagonals is made. At a distance of the planned width of the foundation, the second cable is pulled. They dig a trench along it.
Preparing the tools
When building a foundation, good tools are important. Since it includes several types of work, you will need a lot of tools.
When marking the site, the following will be useful:
- Geodetic level;
- Building level;
- A tape measure at least 20 meters long;
- Stakes, strong thread or fishing line.
Excavation work and installation of formwork is impossible without the following items:
- Bayonet and shovel shovels or mechanized digging tools;
- Containers for transporting soil;
- Tape measure, meter ruler, marker;
- Boards, wooden beams and slats;
- Nails, wood screws;
- Hammer, mallet;
- Screwdriver or screwdriver.
In the next stages, you will need tools for working with reinforcement and concrete, as well as auxiliary materials with which they are linked to each other.
Foundation width and depth: what do you need to know?
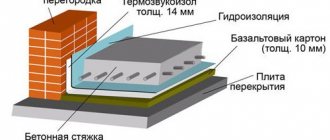
Scheme of a monolithic reinforced concrete strip foundation.
Most foundations erected in low-rise construction belong to the strip class. The most common type of foundation is monolithic reinforced concrete strip foundations. The main parameters of such a foundation are: strip width and laying depth.
The width of the tape is determined in accordance with the width of the future walls. With the depth to which you need to dig the foundation, everything is far from so simple. Some developers rely on the experience of neighbors, i.e. The depth of the tape for the house on the neighboring plot is the same as the depth of the foundation laid in their own area. When there are no areas with buildings nearby, the depth of construction is determined on the advice of the construction workers. Quite often, in order to save concrete, a sand-gravel or gravel cushion is poured into a dug pit or trench.
As for the reinforcement, in the absence of a design, builders usually simply limit themselves to a few steel rods thrown to the bottom of the pit. The process of installing a strip base ultimately looks like this: a trench is dug, half filled with gravel, scraps of reinforcement are thrown onto the gravel, and the whole thing is filled with concrete. As a rule, the width of such tapes is 40-50 cm.
To understand what is wrong with the technology described above for constructing strip bases, you need to take a closer look at each point.
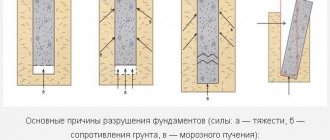
The laying depth and width of the tape are calculated during the design process of the house, and depend on the load on the base.
First of all, the laying depth and width of the tape are by no means determined at random. These parameters are calculated during the design process of the building and depend, first of all, on the load on the foundation and soil conditions. In the case of construction on solid soils, a tape of small width will be sufficient under the base of a concrete foundation. And vice versa, if the bearing capacity of the foundation is insufficient, even a fairly wide tape will not save the house from tilting and significant settlement.
A gravel or sand cushion is placed under the foundation to ensure uniform transfer of load from the belt to the soil. In the process of developing a trench manually or with an excavator, its bottom becomes uneven. For leveling, sand or gravel is used, which must be compacted during installation. If the sand and gravel are not compacted, then over time they will certainly settle and voids will appear under the foundation.
For the same reason, the cushion is rarely made thicker than 15 cm. In some cases, in order to replace weak soils under the foundation of a house, backfilling with sand and gravel mixture is performed. The thickness of such a pillow can reach 1 m or more. However, it is arranged only in cases of extreme and urgent need. Such a pillow is compacted in layers. For this purpose, vibrating platforms or vibrating rollers are used. If you poured 50 cm of sand and gravel mixture into a pit or trench at once, then even a massive roller will not be able to compact it efficiently and correctly. Therefore, do not expect that the front loader doing the dumping will be able to compact such a bed simply by driving over it a few times.
The strength and reliability of the foundation of a house depends on the reinforcement of the concrete base; the main thing is to correctly position the rods in the body of the concrete structure.
Its reliability and strength directly depend on how well the reinforcement of the concrete foundation under the house is done. The thing is that when the foundation is unevenly loaded or settles, tensile stresses appear in it. In any reinforced concrete structures, it is the reinforcement that is responsible for the perception of tensile loads. Concrete only works in compression
As a result, it turns out that if very strong concrete was used to construct the tape, but sufficient attention was not paid to the quality reinforcement of the foundation, then after the construction of the house, cracks may begin to appear. And foundation cracks, in turn, will certainly cause cracks to appear in the overlying structures
That is why it is very important not only to add reinforcement to the concrete, but also to select the correct diameter and correctly position the rods in the body of the concrete structure
Where to start - reconnaissance
Before you start purchasing material for the foundation, you need to familiarize yourself with the characteristics of the soil. Based on this information, the depth will be calculated. Under no circumstances should you save money based on your home. If the foundation turns out to be too flimsy for the structure, the consequences can be disastrous. First of all, everything depends on the soil at the construction site. Typically the layers are arranged in this order:
- The plant soil is dark, loose, with roots, beetles, and worms. This layer must be completely removed along the entire perimeter. It is completely unstable and gets wet from water.
- The peat bog is even worse than the previous layer. It's soft and crumbles in your hands
- Sand is an excellent base for construction. This layer is suitable for a minimum fill of half a meter thick.
- The finest sand. A conductor of groundwater that can deform a structure.
- Clay – suitable for foundations only if the water content is minimal.
Deep trench for foundation
Necessary actions when constructing a trench manually
Remove the turf from the area before digging trenches.
In accordance with the design dimensions, mark the area, and do not forget to add an external 0.2 meters to the width. Marking begins from the corners. They drive in reinforcement or stakes, tighten the fishing line and, checking the degree of the angle, determine the length of the walls. After marking, everything is measured again, including the diagonal size.
When marking the strip foundation, it is necessary to determine the lowest level of the perimeter. This is easy to do using a water level. A drainage system is installed at this point.
So, having marked the area for digging, but before you start digging the foundation manually, you must:
- clear the construction site of any objects, as well as tree roots;
- remove the turf along the inner perimeter of the foundation;
- move the top fertile soil layer into the garden;
- determine a location for dumping soil from the trench.
When digging a trench, throw the soil 1.5 m from the hole
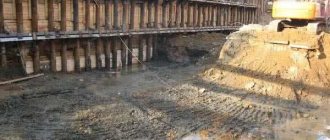
The soil is thrown at a distance of up to 1.5 m from the edge of the pit. They start digging from the outer perimeter, then dig transverse trenches under the base for load-bearing walls. If necessary, compact the bottom of the trench, fill it with water, add a sand cushion and compact it again.
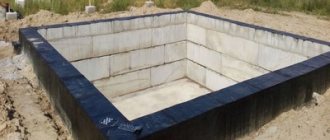
After this, waterproofing material is laid or formwork walls are installed to prevent collapse of the trench walls.
Some practical tips:
- It is not recommended to dig a foundation pit for an extension, removing soil from under the adjacent foundation of the finished building.
- When installing a drainage system, expand the trench taking into account the diameter of the pipe, adding 20 to 30 cm to the value.
- In loose soils, it is worth digging a trench in a trapezoidal shape with an expansion towards the top. In this case, the calculated width must correspond to the bottom of the trench. For details about marking the foundation and digging a trench, watch this video:
Correctness of calculations
Before starting excavation work, it is necessary to properly assess the soil. The type of soil determines to what depth the trench should be deepened, what shape is best to dig the foundation for the house and how it should be secured. In addition, you should firmly know the groundwater level and the depth of soil freezing in the area.
Digging of trenches is intended for the implementation of work on the installation of deep and shallow strip foundations:
| Base type | Depth | Soil type | House weight |
| deep-seated | below the soil freezing level (up to 2 m) | any | no restrictions |
| shallow | 0.5-0.7 m | sandy | light buildings |
When constructing a shallow foundation, a sand cushion about 25 cm deep is usually poured under the waterproofing tape. On loose soils, the walls must be immediately strengthened to avoid crumbling.
Choosing a location on the site
The construction site must ensure the safety, durability of the building, and ease of use.
Simply put, the house should not create discomfort for you and your neighbors. To ensure this, just follow a few simple tips:
It is better to build on a plain or a small hill, avoiding lowlands and steep slopes on which the foundation will be washed away by water. The shadow from tall buildings should not block your and your neighbors' green spaces, gardens, and vegetable gardens - this will have a bad effect on the condition of the plants. The house must be correctly oriented to the cardinal directions so that sunlight evenly illuminates the rooms. On large plots, it is important to think in advance about the convenience of driveways to the house, as well as its connection with household buildings and other household elements. The location of the house should not interfere with existing and planned utilities (water and gas pipelines, sewerage, power supply networks). The house will be much more comfortable if the view from the windows is not blocked by trees, terrain elements and other buildings.
Some nuances of choosing a location for the foundation are dictated by the features of the project. First of all, this is the shape and estimated weight of the building. On gentle slopes it is possible to build wide low-rise buildings, but not narrow and high buildings.
How to speed up soil development work?
The fastest result can be obtained if:
- Use earth-moving machines: excavator or tractor.
- Prepare the area for soil storage in advance and organize prompt removal using dump trucks.
- Start work in late spring or early summer, when the earth has warmed up but has not yet dried out. Avoid rainy days.
- Take clear measurements using technical devices.
- Install the formwork immediately, strengthen the walls if necessary.
If the amount of work is modest, it is faster to complete it manually. This way the trenches will be neater and no modifications will be required.
Excavation procedure (vertical layout)
Depending on the foundation on which the house is planned to be supported, a foundation pit or trenches are made. When determining the size of the trenches, it is necessary to take into account that the width of the excavation consists of the following values:
- foundation strip of the house - the dimensions are indicated in the project, on the ground the structure is indicated by three cords (outer, inner surface, wall axis);
- footing – at least twice as wide as the tape (increasing the size of the trench in both directions by the same distance);
- drainage - wall drainage is 1.6 - 4 m from the outer edge of the tape; for the axis of the ring drainage, the distance is calculated individually;
- trench sinuses - must provide access for workers when concreting screeds, installing formwork, applying roll, coating or plaster waterproofing to the side faces of the strip foundation after stripping (0.6 m minimum on both sides), insulation.
Thus, in order to dig trenches for a columnar or strip foundation, you need to take into account the standards of SP, fire safety, SanPiN. It is necessary to provide access to the sinuses of the workings for workers to carry out construction operations.
Good publicity
Interior arrangement of the cellar
Marking
When marking, it is necessary to take into account the thickness of the walls so that the size of the cellar is correct. Usually its size is 2*3*2 meters, where the larger value is the width
It is important to maintain equality along the diagonal of a rectangular room
Dismantling the screed
The labor costs for dismantling the screed depend on its thickness. If the floor is made of a rather thin layer, then the necessary tools will include a grinder, a hammer drill and a concrete disc.
Along the edges of the rectangle of the future cellar, seams are cut with a grinder, and then the inner perimeter of the form is dismantled using a hammer drill. If the screed is made with reinforcement and a thick layer, then when you reach the rods, they need to be cleaned of dust and cut off with a metal disc.
Pit
You need to dig a hole to the depth of the basement that is planned to be made, adding 30 centimeters for the ceiling and backfill. The walls should be as smooth as possible in order to reduce the amount of concrete during their construction. The bottom is leveled, covered with 10 centimeters of slag, compacted and spilled to compact it.
Next, a reinforced concrete slab or asbestos-cement slabs is laid. The walls and the base need to be covered with waterproofing in two layers, securing the upper layers at the junction with the base of the house with a gas burner.
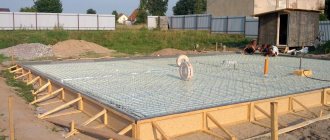
Formwork
The formwork can be either removable or non-removable.
In the case when the formwork is planned to be removed, it is made from boards or panels of the required size. They make a rectangular box, slightly smaller than the size of the cellar, and place it on the bottom of the pit. Square-shaped bars are placed in the corners to add rigidity to the structure.
If the floors are not concrete, you can lay reinforcement bars so that the edges protrude beyond the formwork frame and secure them with screws or nuts. When the formwork is removed, the ends are sawed off with a grinder, and the part inside the concrete serves as reinforcement.
If permanent formwork is being made, then the spacers will be jumpers that are placed between the walls of the formwork. When pouring concrete, you need to tap the frame with a hammer to avoid the formation of voids. In this case, the wall will truly be monolithic.
Overlap
The concrete screed is removed along the entire perimeter of the cellar, and a new floor is poured with I-beams. The beams are attached by welding to the mortgages. The formwork will be USB sheets that are placed under them. Vertical fastening is done with spacers, often sliding ones.
Filling and installation of floors is carried out only after the walls have completely dried. As a rule, this is a period of up to 3 weeks. Concrete should infuse and gain strength within a month. The formwork is removed after 2 weeks.
How to quickly dig a trench for a foundation
Any home starts with a foundation. You can hire specialists who will dig a trench or foundation pit, according to the project, or you can evaluate your strength and cope with the excavation work yourself.
In the article we will describe how to dig a trench under the foundation correctly, what you should pay attention to, to what depth it is necessary to dig holes depending on the type of soil
Preparing a foundation pit with your own hands
Digging a foundation pit for a residential building with your own hands
What shape and size should the pit have? How to organize work correctly and what to pay attention to?
When is the best time to start building a foundation pit?
First of all, you should decide on the start time of excavation work.
Of course, in conditions of extreme necessity, foundation trenches are dug throughout the year, however, in accordance with the basic rules and regulations of construction, it is better to dig a foundation pit in the fall or summer.
What are the benefits of these particular time periods? The answer lies on the surface; during the autumn and summer months the soil is usually very soft and easy to dig.
So, carrying out work in the summer or autumn is a real saving of finances, time and effort.
If work on preparing a pit for the foundation is scheduled for autumn, it is better that it is the first part of autumn, and not the end of October or November - at this time the process of soil freezing may begin, which will undoubtedly affect the progress of work. In addition, the second half of autumn is characterized by large amounts of precipitation, which will also be a negative factor.
Regardless of the weather in which we start digging a pit, we should not forget about safety.
The walls of the trench tend to crumble, so it is necessary to take care in advance of their reliable fastening.
You should work at the bottom of the pit with the utmost care; it would be a good idea to stock up on special clothing and even helmets.
About the development of a foundation pit
The option for developing a trench for the foundation depends on the design and depth of the foundation. In cases where we are talking about shallow foundations, it is quite possible to develop the soil on our own.
If we are talking about a deep foundation (for example, for houses with basements or basements), then we cannot do without the use of special equipment.
How to speed up soil development work?
The fastest result can be obtained if:
- Use earth-moving machines: excavator or tractor.
- Prepare the area for soil storage in advance and organize prompt removal using dump trucks.
- Start work in late spring or early summer, when the earth has warmed up but has not yet dried out. Avoid rainy days.
- Take clear measurements using technical devices.
- Install the formwork immediately, strengthen the walls if necessary.
If the amount of work is modest, it is faster to complete it manually. This way the trenches will be neater and no modifications will be required.
How to dig a trench under a strip foundation
We can confidently call those people who make the difficult decision to build a house on their own heroes heroes. Considering the fact that the vast majority of Russians are people with not very high incomes, building a house with their own hands is almost the only opportunity for them to improve their living conditions. In the primary and secondary real estate markets, the cost of housing is very high, and taking out a mortgage is a serious step, as there is a threat of falling into credit bondage with banks. But if the brave souls have already decided on individual construction, then naturally they need to start with the foundation, which can be completely done on their own, without the involvement of professional builders.
Before starting construction, when you already have a ready-made project for the future house and all the necessary permitting documents, then before proceeding to the primary stage - laying the foundation, you should prepare the site for it. To do this you need:
- Plan the site;
- Make a breakdown for the foundation.
It is important to remember that the foundation of a house is its foundation. Any mistake when laying it will cause a lot of problems in further construction.
Therefore, the breakdown of the foundation perimeter must be approached with special care. It is better to do this with the involvement of a professional surveyor, who, using instruments, will draw the correct angles and lay down the necessary dimensions. Mistakes are unacceptable here, since after the foundation is poured, correcting mistakes will be extremely difficult and expensive...
During subsequent work on digging trenches for the foundation #8211; you can do it on your own. It is not difficult, although it requires significant physical effort. You need to know that surveyors divide the building along center lines. And in order to avoid any mistakes in laying the foundation, it is necessary to correctly calculate the width and depth of the trenches under it.
The trench parameters are calculated based on: The planned thickness of the foundation walls. For a one-story house, the thickness of the load-bearing perimeter of the foundation is sufficient at 40 centimeters. Under the partitions - 30 centimeters. Trench depths. Determined depending on the nature of the soil. If the soil is sandy, then the depth of the trench must be provided up to 0.5 meters. For clay soil, 35–40 centimeters is sufficient. Trench widths. It is calculated based on the thickness of the foundation + the thickness of the formwork + a reserve gap for maneuver of 10 - 12 centimeters.
Don't forget that professional designers indicate building dimensions along center lines. This must be taken into account when laying the trench. The calculated trench width should be divided by 2 and the result obtained should be transferred to the construction site to the right and left of the center line, laid out by the surveyor using a device. When all the dimensions of the foundation are marked with pegs on the ground, you can start digging trenches. As an option, an excavator is involved in this process, but in this case it should be remembered that the excavator removes much more soil from the trenches than is done with manual work. There may be a problem with disposal of excavated soil. And even after an excavator, the trenches have to be brought to condition manually. And no less time is spent on this than on actually digging trenches by hand.
After completing the above work, you can begin installing the formwork under the foundation. But this is a topic for another conversation...
Best answers
k131_Akela:
Start by finding a thick-walled half-inch pipe, at least 2.5 meters long. Weld a glass from a pipe of at least 2 inches to its end, having first made a chamfer at the end of the glass. Dig a trench from the well so that the kitchen is right along the trench. Place the manufactured bolt perpendicular to the wall and use a sledgehammer to drive the glass of the device into the ground. Pull out and knock out the earth from the glass, insert it into the hole and again give several blows with a sledgehammer. Pull out and knock out the earth. You will end up with a round hole. The main thing here is to choose the right direction to the kitchen. In the kitchen you will have to dig a pit where, according to your calculations, the water pipe should come out. If everything matches up, eventually your homemade bolt will end up in a pit in the kitchen. Drive a 1.5-inch pipe into the hole and insert a three-quarter-inch water pipe into it. The task is completed and you can replace the leaky pipe at any time. True, I would put stainless steel. Good luck. Hunting is worse than captivity.
Sakha:
You need to wrap it in glass wool and that’s it. If the foundation of the house is brick, then the pipe with cold water will not freeze to -32 degrees, since under the floor of the house, with the floor height 60 cm from the ground, the temperature ranges from +3 to +9.
Victor:
a directed explosion will help you (if...digging on your knees is very inconvenient)
Sergey Ryabykh:
A puncture is better; now there are companies that do this work at any distance with minimal deviation. Nearby, they made a puncture under an area for a length of about 150 m - a super jewelry deviation of 3-5 cm. The cost was about 10 dollars per meter.
Skilov:
In general, Akela told you that this is how we drilled a pipe under an asphalt road when laying a telephone. I also laid the pipe from the well, the depth of the trenches is 1.7 meters, 10 meters for - I lost 5 kg of live weight (useful). The bottom of the trench was covered with sand about 5 cm and a plastic corrugation was laid. A half-inch piece of metal-plastic fit into it normally. You can wrap the pipe with a special insulation, it is sold in the form of a foam rubber pipe - excellent insulation!