It is quite possible to build wooden floors in a house with your own hands. This design is considered one of the traditional options. Such floors are installed during the construction of residential buildings from almost any materials: brick, foam concrete, expanded clay blocks, and, of course, they will be relevant in a wooden house. How to make them yourself? A detailed answer to this question can be found in this article. Installation, insulation, sound and vapor barrier: we will consider the most important aspects of the work.
Interfloor, as well as attic wooden floors in a house, made of wood, are practically no different in their design features. They consist of wooden beams, as well as inter-beam filling, which is a roll made of panels or wood. Wooden beams are load-bearing structures, usually made from softwood. These could be, for example, hewn logs, boards or beams.
Technical requirements
The ceilings in the house are original structures that divide adjacent rooms by height, forming floors, separating them from the attic and basement. The installation of floors in a wooden private house must meet the following requirements:
They must be durable to cope not only with their weight, but also with payloads (furniture, appliances). The parameters are indicated taking into account the purpose of the room. Attic structures must support a weight of no more than 105 kg/sq. m, interfloor and basement - from 210 kg/sq. m;
- When installing, ensure good insulation. It is important to seal every crack in the structure. This will ensure that heat and sound cannot penetrate into rooms adjacent in height;
- It is important that the structure is rigid. It should not sag due to temporary or regular loads;
- Fire safety should also be taken into account. To do this, impregnations and plaster are applied to the ceiling in a wooden house.
Recommendations for selection
When choosing reinforced concrete beams, you need to focus on the basic properties and characteristics, the required parameters. Among the main ones, the following are usually taken into account: steam/hydro/sound insulation, heat protection, fire resistance
As for the size and dimensions, it is also important to determine the main indicators
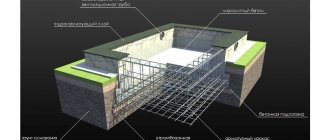
The design of reinforced concrete products must meet the requirements as much as possible in accordance with the design of the element/structure. So, for a wall frame on a columnar foundation, the weight of a solid floor on reinforced concrete beams will be enormous. At the same time, hollow beams in a solid house will not guarantee the required level of building safety.
During the installation process, structures must accurately calculate all compressed and tensile zones that affect the strength of reinforced concrete.
During the construction of the interfloor slab, the reinforcement in the reinforced concrete beams must be located precisely in the tension zones. This will give the required level of reliability.
Beam floors
Typically, the load-bearing components of the structures are beamed interfloor floors located at the same distance from each other. The space between them is filled with fillers.
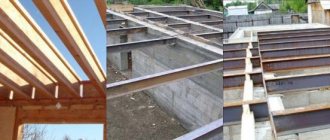
Beams are made of reinforced concrete, wood, and pre-packaged metal. It should be noted that they must have strength in order to cope with all loads. The cost of laying wooden structures is quite low. In this case, complex lifting machines will not be needed, which will also save money.
From wooden beams
Typically, frame or timber residential buildings with a small number of floors use beamed timber structures. They should not be installed on spans whose width is more than 5 m.
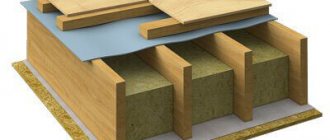
A flooring protruding as a floor is placed on the top of the timber structure. If there is a living space under the structure, it is lined with boards from below, forming a ceiling. The void is filled with sound and heat insulating material.
Advantages of choosing wooden floors in the house:
- Installation is simple and quick, regardless of configuration. It is not necessary to use specialized equipment for wood coating;
- It is possible to obtain a lightweight and durable structure at a fairly low price.
The main disadvantage of a house with wooden floors is its high fire hazard.
If handled incorrectly, this material may over time be subject to rotting and invasion by bark beetles.
Installation technology
Typically, the installation of floors in a house made of timber occurs in the following steps:
Installation of wooden beams. You should first carry out thorough treatment with antiseptics and sunscreens. If the support is a brick, concrete wall, aerated concrete or foam block, then the ends of the beam require wrapping with roofing felt in two layers. At the ends of the beams, the end part is cut at an angle of 60 degrees. After installation, insulation, such as polyurethane foam, should be poured into the space. Lay wooden beams parallel to each other, the distance between the beams should be the same;
Installation of rewind. It is created from shields made from boards. Knurled plates are attached to cranial beams with a cross-section of 4x4 or 5x5 cm. They are first nailed to the side edges of the load-bearing beams. The whole ceiling is fixed to the roll;
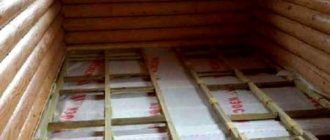
- Laying an insulating gasket. In order for sound and heat insulation to be of high quality when installing a floor in a wooden house, it will be necessary to fill it with insulation. They can be shavings, mineral wool, expanded clay, straw, polystyrene foam. It is better to give preference to “cotton” mats. They weigh less than expanded clay, which reduces the load. With the help of a fibrous structure, air penetrates between rooms more easily. This insulation has high insulating properties.
Before installing the insulating gasket, it is important to spread a vapor barrier film between the beams. It can be roofing felt or glassine. It is important that the ends extend onto the supporting elements to a height of at least 5 cm.
The insulating pad must be more than 10 cm thick. If cold rooms and heated rooms are separated, the recommended thickness is doubled.
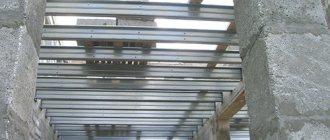
Metal beams
These structures are considered more reliable in comparison with wooden beams. Thanks to the small cross-sectional dimensions, usable space is preserved. However, they are used infrequently. Slabs or lightweight concrete inserts are used for filling, which greatly increases the weight of the structure.
Advantages:
- With the help of metal beams you can cover wide spans;
- Good resistance to insects, rot and mold.
Flaws:
- Risk of corrosion in areas of high humidity;
- Low thermal and sound characteristics.
Metal beams for the ceiling are placed in nests on the walls, prepared before starting work. The gaps are filled with hollow reinforced concrete slabs 90 mm thick. Then a sand-concrete screed is installed. Its thickness should not exceed 100 mm.
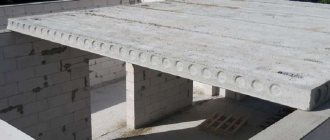
Made from reinforced concrete beams
They are common for spans up to 7.5 m. The main advantage is the ability to create structures with wide spans, which is difficult to do with metal or wooden counterparts.
Reinforced concrete beams usually weigh more than 100 kg. Therefore, you will need to use lifting equipment, for example, a truck crane. This feature is considered by many as a disadvantage.
The crossbars are placed in increments of 600-1000 mm. Blocks or lightweight concrete slabs are installed in the space. The seams are treated with cement-sand mortar. For this interfloor covering, an insulating gasket is required.
Calculation of the required cross-section depending on the span length and loads, laying pitch
The number of beams, their dimensions, and installation pitch depend directly on the area of the room and the expected loads. Most experts believe that the optimal load on floors is 0.4 tons per square meter of area (400 kg/m2) . This load includes the weight of the beam itself, the weight of the rough and finishing floor covering on top and the ceiling below, insulation, communications, as well as furniture and people.
Advice
The best cross-section for rectangular wooden beams is considered to have a height to width ratio of 1.4:1.
The cross-section also depends on what kind of wood the floors are made of. Now we present the average recommended values for a laying step of 60 cm :
- If the span is 2 meters, then the minimum cross-section should be 7.5 by 10 cm.
- With a span length of 2 and a half meters, the beam should have dimensions of 7.5 by 15 cm.
- If the span is three meters, then it is customary to use beams 7.5 by 20 cm.
- With a beam length of 4 and 4.5 m, it is customary to use them with a section of 10 by 20 cm.
- To build a five-meter floor, crossbars with a section of 125 by 200 mm are used.
- The six-meter ceiling is made of beams measuring 15 by 20 cm.
If the step increases, then the size of the beam section should also be increased.
Here is a table of sections of wooden floor beams depending on the span and installation pitch, with a load of 400 kg/m2:
| span (m)/installation pitch (m) | 2,0 | 2,5 | 3,0 | 4,0 | 4,5 | 5,0 | 6,0 |
| 0,6 | 75x100 | 75x150 | 75x200 | 100x200 | 100x200 | 125x200 | 150x225 |
| 1,0 | 75x150 | 100x150 | 100x175 | 125x200 | 150x200 | 150x225 | 175x250 |
If you do not plan to load the floors (in the case of a non-residential attic for storing light items), then lower load values from 150 to 350 kg/m2 are acceptable. Here are the values for an installation pitch of 60 cm:
| Loads, kg/linear m | Section of beams with span length, m | ||||||
| 3,0 | 3,5 | 4,0 | 4,5 | 5,0 | 5,5 | 6,0 | |
| 150 | 50x140 | 50x160 | 60x180 | 80x180 | 80x200 | 100x200 | 100x220 |
| 200 | 50x160 | 50x180 | 70x180 | 70x200 | 100x200 | 120x220 | 140x220 |
| 250 | 60x160 | 60x180 | 70x200 | 100x200 | 120x200 | 140x220 | 160x220 |
| 350 | 70x160 | 70x180 | 80x200 | 100x220 | 120x220 | 160x220 | 200x220 |
On the Internet you can find online calculators for calculating the load-bearing capacity of wooden beams. I will give a link to one of them: https://vladirom.narod.ru/stoves/beamcalc.html
Also, for example, you can replace one beam with a section of 100x200 with two boards 50x200, sewn together with bolts or nails every meter. They do this for various reasons:
- beams with the required cross-section are not available for sale;
- boards with a smaller cross-section weigh lighter, so they can be lifted to the top alone and fastened there.
It is recommended to sew the boards together so that the wood fibers are in different directions. This increases the strength of the structure.
Wall mount
Beams are attached to walls using several methods:
- Sealing into wall grooves. They are usually used in timber and brick buildings. You need to drill deep grooves, lay the ends of the beams, then create waterproofing;
- Use of metal supports. They are attached using screws or self-tapping screws. This option is technologically advanced and does not take much time, but in terms of reliability it is inferior to the previous one.
Installation of longitudinal ceiling beams.
After installing the cross beam of the ceiling, we install the longitudinal beams of the ceiling.
Fig 4. Longitudinal beam of the ceiling
The material for the longitudinal beams is the same board, 50 mm thick and 150 mm wide. At the ends of the longitudinal beams resting on the external walls, we make a 50/50 cut under the top beam (visible in Figure 4). And we simply fasten those ends that lie on the cross beam together using a piece of board and attach them to the cross beam with a metal corner (a little visible in Figure 5).
Fig 5. Extreme ceiling longitudinal beams attached to the beam
The distance between the longitudinal ceiling beams is 1200 mm to match the size of the rolled thermal insulation. We will arrange these beams in such a way that not a single beam stands above the window opening; for this, the step in some places will have to be made a little less, and in some places a little more.
Important: if there is a residential floor above the ceiling, you often walk on the ceiling, store some things in the attic, then with spans like ours at 4 meters and 150 mm thick boards, the step needs to be made smaller - 600 mm or add beams later. The outer longitudinal beams of the ceiling are attracted with self-tapping screws to the side of the block, so that they become in the same plane with the wall
The protrusion of the beams beyond the external wall was provided at 300 mm, visible in Figure 6
The outer longitudinal beams of the ceiling are attracted with self-tapping screws to the side of the beam, so that they become in the same plane with the wall. The protrusion of the beams beyond the external wall was provided at 300 mm, as can be seen in Figure 6.
Fig. 6. Ceiling beams protrude 300 mm beyond the load-bearing wall
My ceiling beams also serve as a support for the rafters, which is why the 300 mm protrusion is made. To install rafters on them, a 50\50 mm block was placed on top of the ends of the beams with a distance of 50 mm from the edge (Figures 7 and 6).
Fig 7. Block for installing rafters
Quantity calculation
Before starting construction, it is important to calculate the length of structures, their number, cross-section, and spacing. This directly affects safety and load bearing capacity.
The length is affected by the width of the span and the method of their fastening. If metal supports are used for this, the length will be the same as the span width. When using grooves, the length is calculated by adding the span and the depth of insertion of the ends of the beam into the grooves.
The distance between the axes is from 0.6 to 1 m. To calculate their number, you need to plan the localization of the outer beams at a distance from the walls of 50 mm. Other parts are placed evenly in the span space, taking into account the selected step. The cross-section is affected by the load, the width of the span along the short side of the room, and the spacing of the elements.
To avoid doing independent calculations, you can use ready-made charts and tables. They record the relationship between size and load and span width.
Glued laminated timber
To increase the strength or size of solid beams, they are fastened together manually during installation of the floors. For the same purposes, laminated veneer lumber manufactured at enterprises is used. It consists of several bars connected to each other. The thickness of an individual element is regulated by the number of products glued together. Glued laminated timber is produced at the factory by pressing, its length reaches 12 m.
Finished products retain the characteristics of solid lumber and can be nailed without loss of strength or cut into pieces of the required size. The only drawback of such structures is their high cost. It is necessary to carefully calculate everything before installing the first floor ceiling on wooden beams.
Note! Glued laminated timber is often used in construction for the installation of arched ceilings.
Beamless floors
This design consists of homogeneous parts located closely. These can be panels, slabs, or a poured monolith. There are prefabricated monolithic, monolithic and prefabricated types. When choosing the first type, good heat and sound insulation will be provided.
Precast concrete
Typically these designs are chosen for brick buildings. Hollow-core or lightweight concrete panels are used. The dimensions of the slabs depend on the span width and their load-bearing capacity.
Unlike metal and wood, concrete does not deteriorate from excessive dampness. It has sufficient strength and can withstand more than 200 kg/sq.m. m.
When laying, lifting equipment is required. Another disadvantage is that the products are sold only in standard sizes, so low-rise buildings of an unusual configuration cannot be made.
The slabs are placed on a sand-concrete “cushion”. The edges do not extend onto the wall, less than 100 mm. The joints are treated with a solution.
Monolithic reinforced concrete
This is an unusual continuous solid slab of different shapes. It is usually poured from M200 concrete. The thickness of the monolithic product is at least 100 mm.
The advantages of this floor slab for a private cottage or house:
- No lifting equipment is needed, you can save money on this;
- High quality surface;
- You can make designs with non-standard configurations.
The disadvantage of monolithic flooring is the long period of its readiness. In addition, installation of formwork is required.
Do-it-yourself installation of monolithic reinforced concrete products proceeds as follows:
- A supporting structure is created using steel beams;
- Suspended formwork is made from uncut boards;
- The reinforcing frame is being welded;
- M200 concrete is poured.
Prefabricated monolithic
It is the most advanced construction technology, surpassing monolithic and prefabricated floors. With this method, reinforced concrete products are installed. There are hollow blocks in the space, then concrete is poured.
Advantages:
- No need to use special equipment;
- Should provide high-quality insulation of the room;
- Possibility to make structures with any configuration. The size of the floor slabs can be selected individually;
- Reducing the period of work.
The disadvantage is that they are not used in the construction of three-story buildings. Doing the work is quite difficult.
The structures are laid in increments of approximately 600 mm for the supporting frame. Then lightweight concrete blocks with polystyrene foam or expanded clay filling are installed for reliable fastening to the walls.
The completed structure is then used as permanent formwork. Before pouring concrete, it is necessary to lay a special steel reinforcing mesh. The cross-section of its cells should be 100x100.
The nuances of laying reinforcement with your own hands
Installation of interfloor ceilings is carried out, if possible, without touching the surface of the formwork. The dimensions of the fittings range from 6 to 12 mm. At the same time, the structure is secured with certain clamps. The formed frame leaves cells of 10*10 cm. Wire is used to tightly bind the frame to the cells. Beams can be used in various types from wood to aluminum. Next, the entire surface of the layer is densely filled with mortar, forming a homogeneous surface. The disadvantage of forming a reinforced floor is the formation of beams along the entire perimeter of the structure at minimal distances.
It is quite difficult to completely fill the ceiling with your own hands. The main nuance is to carry out the filling layer no more than 10-12 hours from the previous one. To create a uniform layer, the solution should not be allowed to dry completely. The technology of interfloor slabs makes it possible to obtain reliable adhesion of the monolith to the surface of the floor and mortar, holding the entire structure together. This method of creating a ceiling with your own hands is the most reliable, safe and easy to install. Complete hardening of the entire layer occurs no earlier than 28 days from the moment of the last pouring. Uneven drying leads to subsequent destruction of the surface, the formation of chips, cracks and additional dust. If it is necessary to eliminate the resulting defects, it is important to simultaneously fill the entire surface with a small amount of water and leave until completely dry.
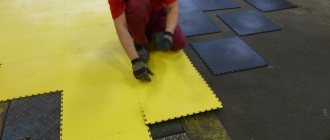
Insulation and finishing
A vapor barrier is placed in front of the insulation in case of danger of steam penetration or condensation. The film must be placed on top of supporting structures. Sound and heat insulators are placed between them on top.
In addition to these layers, waterproofing is required. If the top floor is used for non-residential premises, that is, there are no plans to wash the floors there, you don’t have to use the film. Parquet, linoleum, and carpet are used for covering. There is no need to do cladding in the attic.