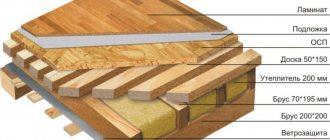
When constructing any building, it is necessary to make floors between floors; for this, lifting mechanisms are used to lay slabs or create homogeneous structures that do not require additional construction equipment. The second option is more popular and can be used in the construction of buildings of any shape, and before starting to pour the floor, formwork is installed.
Types of metal formwork
Metal formwork is available in several versions, the choice is made depending on the project and the planned scope of work. It is necessary to decide on the type of formwork at the design stage. Most often, the following options are used:
- beam-transom;
- large-shield;
- small shield.
Beam-transom
The use of this type of formwork systems is justified for the construction of prefabricated monolithic and monolithic structures. In particular:
- floors;
- foundation;
- columns;
- load-bearing walls.
The use of beam-transom technology makes it possible to create structures of complex shapes with a given bending curvature. Therefore, the equipment is especially in demand during the construction of buildings decorated with various architectural elements. The advantages of this construction method are:
- relatively light weight of the structure;
- fairly simple installation, the ability to combine monolithic and prefabricated elements;
- high speed of dismantling work;
- Possibility of repeated use without additional cleaning between cycles;
- Possibility to use in combination with other formwork structures.
Large-shield
A special feature of this type of formwork is the large size of the panels. The formwork is a prefabricated structure reinforced with vertical and horizontal stiffeners.
The main purpose of use is the formation of massive and high vertical surfaces. Large panel systems are used as formwork for walls, as they can withstand significant loads. Using additional elements, you can form very long and tall structures.
They use adjustable large-panel formwork in professional construction, since installation and dismantling work requires the use of special equipment.
The core of the kit is large-area shields, which are connected to each other using rigid fasteners. During installation, jacks are used to adjust their position.
Small shield
The use of metal panel formwork with small panels is a profitable solution in both professional and private construction. The kit includes:
- formwork panels that are in direct contact with the concrete solution;
- support elements that fix the shields in the desired position;
- fastening devices.
Using small-panel formwork systems, large forms can be cast (up to 15 meters in height). They are often used for pouring foundations. After the concrete has hardened, the systems can be easily dismantled and moved to the next site.
The undoubted advantage of this type is its versatility. Small panel systems are used not only in housing construction, but also in the construction of various technical buildings - wells, fences, etc.
It is worth noting the high economic efficiency of using the kits; they are used repeatedly, which allows not only to recoup the cost, but also to quickly make a profit.
Construction of houses
0 votes
+
Vote for!
—
Vote against!
In houses made of brick, concrete or concrete blocks, the floors are usually made of reinforced concrete. They provide exceptional strength and earthquake resistance to the structure, and are also very durable and do not burn, which is important. There are several ways to construct reinforced concrete floors. The most common and universal is laying factory-made floor slabs. Such slabs are ordered from concrete factories and then installed using a crane and a team of workers. In cases where using a crane on a construction site is difficult, or when the house has a non-standard layout and it is difficult to lay out finished slabs, a monolithic floor slab is installed. In fact, you can fill a monolithic slab not only when there is evidence for it, but also simply because you consider it more appropriate. In this article we will tell you how to lay floor slabs and how to pour a monolithic slab. Not all work can be done independently, but it is still worth familiarizing yourself with the technology, if only to control the process on the construction site.
- DIY monolithic floor slab
- Technology for installing monolithic floor slabs
- Installation of formwork for a monolithic floor slab
- Reinforcement of a monolithic floor slab
- Pouring concrete
- How to lay floor slabs correctly
- Rules for laying floor slabs
- Floor slab laying technology
- Preparatory work before laying floor slabs
- Installation of hollow core slabs using a crane
- Anchoring of floor slabs
- Sealing joints between floor slabs
- Sealing voids at the ends of floor slabs
- Laying floor slabs: video example
DIY monolithic floor slab
Monolithic flooring has a number of advantages compared to flooring made from ready-made reinforced concrete slabs. Firstly, the structure is strong and monolithic without a single seam, which ensures an even load on the walls and foundation. Secondly, monolithic filling allows you to make the layout of the house more free, since it can rest on columns. Also, the layout can involve any number of corners and crannies for which it would be difficult to select floor slabs of standard sizes. Thirdly, it is possible to safely equip a balcony without an additional support plate, since the structure is monolithic.
You can install a monolithic floor slab yourself; you don’t need a crane or a large team of workers. The main thing is to follow the technology and not skimp on materials.
Technology for installing monolithic floor slabs
Like everything related to construction, monolithic flooring begins with a project. It is advisable to order the calculation of a monolithic floor slab from a design office and not save on it. It usually involves calculating the cross-section of the slab for the bending moment at maximum load. As a result, you will receive the optimal dimensions for the floor slab specifically in your home, instructions on what reinforcement to use and what class of concrete. If you want to try to perform the calculations yourself, an example of calculating a monolithic floor slab can be found on the Internet. We will not focus on this. Let's consider the option of building an ordinary country house with a span of no more than 7 m, so we will make a monolithic floor slab of the most popular recommended size: from 180 to 200 mm thick.
Materials for the manufacture of monolithic floor slabs:
- Formwork.
- Supports for supporting the formwork at the rate of 1 support per 1 m2.
- Steel reinforcement with a diameter of 10 mm or 12 mm.
- Concrete grade M 350 or separately cement, sand and crushed stone.
- Bending device for reinforcement.
- Plastic supports for fittings (clamps).
The technology for pouring a monolithic floor slab includes the following steps:
- Calculation of the floor slab if the span is more than 7 m, or the project involves supporting the slab on a column/columns.
- Installation of deck type formwork.
- Reinforcement of the slab with steel rods.
- Pouring concrete.
- Compacting concrete.
So, after the walls have been driven to the required height, and their level is almost perfectly leveled, you can begin to install a monolithic floor slab.
Installation of formwork for a monolithic floor slab
The construction of a monolithic floor slab assumes that concrete will be poured into horizontal formwork. Sometimes horizontal formwork is also called “deck”. There are several options for its arrangement. The first is renting ready-made removable formwork made of metal or plastic. The second is to produce formwork on site using wooden boards or sheets of moisture-resistant plywood. Of course, the first option is simpler and preferable. Firstly, the formwork is collapsible. Secondly, it offers telescopic supports, which are needed to support the formwork at the same level.
If you prefer to make the formwork yourself, then keep in mind that the thickness of the plywood sheets should be 20 mm, and the thickness of the edged boards 25 - 35 mm. If you knock down panels from edged boards, then they need to be tightly adjusted to each other. If gaps are visible between the boards, then the surface of the formwork should be covered with waterproofing film.
Installation of formwork is carried out in this way:
- Vertical support posts are installed. These can be telescopic metal stands, the height of which can be adjusted. But you can also use wooden logs with a diameter of 8 - 15 cm. The step between the racks should be 1 m. The racks closest to the wall should be located at least 20 cm from the wall.
- Crossbars are placed on top of the racks (a longitudinal beam that will hold the formwork, an I-beam, a channel).
- Horizontal formwork is laid on the crossbars. If not ready-made formwork is used, but home-made one, then transverse beams are laid on top of the longitudinal beams, on which sheets of moisture-resistant plywood are placed on top. The dimensions of the horizontal formwork must be adjusted perfectly so that its edges rest against the wall without leaving gaps.
- The height of the pillar supports is adjusted so that the upper edge of the horizontal formwork coincides with the upper edge of the wall masonry.
- Vertical formwork elements are installed. Taking into account the fact that the dimensions of a monolithic floor slab must be such that its edges extend 150 mm onto the walls, it is necessary to construct a vertical fence exactly at this distance from the inner edge of the wall.
- The last time the horizontal and even position of the formwork is checked using a level.
Sometimes, for the convenience of further work, the surface of the formwork is covered with a waterproofing film or, if it is made of metal, lubricated with machine oil. In this case, the formwork can be easily removed, and the surface of the concrete slab will be perfectly flat. The use of telescopic racks for formwork is preferable to wooden supports, since they are reliable, each of them can withstand a weight of up to 2 tons, and microcracks do not form on their surface, as can happen with a wooden log or timber. Renting such racks will cost approximately 2.5 – 3 USD. per 1 m2 of area.
Reinforcement of a monolithic floor slab
After arranging the formwork, a reinforcement frame made of two meshes is installed in it. For the manufacture of the reinforcement frame, steel reinforcement A-500C with a diameter of 10 - 12 mm is used. These rods are used to knit a mesh with a mesh size of 200 mm. To connect the longitudinal and transverse rods, a 1.2 - 1.5 mm knitting wire is used. Most often, the length of one reinforcing rod is not enough to cover the entire span, so the rods will have to be connected to each other lengthwise. To make the structure strong, the rods must be connected with an overlap of 40 cm.
The reinforcing mesh should extend onto the walls by at least 150 mm if the walls are made of brick, and by 250 mm if the walls are made of aerated concrete. The ends of the rods should not reach the vertical formwork along the perimeter by 25 mm.
Reinforcement of a monolithic floor slab is carried out using two reinforcing meshes. One of them - the bottom one - should be located at a height of 20 - 25 mm from the bottom edge of the slab. The second - the top - should be located 20 - 25 mm below the top edge of the slab.
To ensure that the lower mesh is located at the required distance, special plastic clamps . They are installed in increments of 1 - 1.2 m at the intersection of the rods.
The thickness of the monolithic floor slab is taken at the rate of 1:30, where 1 is the thickness of the slab, and 30 is the span length. For example, if the span is 6 m, then the slab thickness will be 200 mm. Considering that the grids should be located at a distance from the edges of the slab, the distance between the grids should be 120 - 125 mm (from a slab thickness of 200 mm, subtract two gaps of 20 mm and subtract 4 thicknesses of reinforcing rods).
special clamps are made from 10 mm reinforcing rod using a special bending tool , as in the photo. The upper and lower flanges of the clamp are 350 mm. The vertical size of the clamp is 120 mm. The installation step of the vertical clamps is 1 m, the rows should be staggered.
The next step is the end clamp . It is installed in increments of 400 mm at the ends of the reinforcement cage. Serves to strengthen the support of the slab on the wall.
Another important element is the connector of the upper and lower mesh . You can see what it looks like in the photo. It is necessary so that the spaced grids perceive the load as one whole. The installation step of this connector is 400 mm, and in the area of support on the wall, within 700 mm from it, in steps of 200 mm.
Pouring concrete
It is better to order concrete directly from the factory. This makes the task much easier. In addition, pouring the mortar from a mixer in an even layer will ensure exceptional strength of the slab. The same cannot be said about the slab, which was poured manually with breaks to prepare a new portion of the solution. So it is better to pour concrete immediately in a layer of 200 mm, without interruptions. Before pouring concrete into the formwork, it is necessary to install a frame or box for technological openings, for example, a chimney or ventilation duct. After pouring, it must be vibrated with a deep vibrator. Then leave to dry and gain strength for 28 days. During the first week, the surface must be moistened with water, only moistened, and not filled with water. After a month, the formwork can be removed. The monolithic floor slab is ready. For installation of floor slabs, the price includes the cost of reinforcement, concrete, rental of formwork and ordering a mixer machine, as well as a concrete pump. In fact, it comes out to about 50 – 55 USD. per m2 of flooring. You can see how the floor slab is poured with concrete in the video demonstrating the installation of floor slabs.
How to lay floor slabs correctly
The use of factory-made monolithic reinforced concrete floor slabs is considered more traditional. The most popular are PC slabs – slabs with round voids. The weight of such slabs starts from 1.5 tons, so laying floor slabs with your own hands is impossible. A crane is required. Despite the apparent simplicity of the task, there are a number of nuances and rules that must be followed when working with floor slabs.
Rules for laying floor slabs
The prefabricated floor slab is already reinforced at the factory and does not require additional reinforcement or formwork. They are simply laid in a span supported on the walls, following some rules:
- The span should not be more than 9 m. This is the length of the slabs that are the largest.
- Unloading and lifting of slabs is carried out using special equipment provided by the project. For this purpose, the slabs have mounting loops to which the mounting slings are hooked.
- Before laying floor slabs, the surface of the walls on which they will be laid must be leveled. Large height differences and distortions are not allowed.
- The slabs should rest on the walls by 90 - 150 mm.
- The slabs must not be laid dry; all cracks and technological seams must be sealed with mortar.
- The location of the slabs must be constantly monitored in relation to the walls and supporting surfaces.
- The slabs are laid only on load-bearing walls, all partitions are installed only after the installation of the floors.
- If you need to cut a hatch in the ceiling, then it must be cut at the junction of two slabs, and not in one slab.
- The plates should be located as close to each other as possible, but with a gap of 2 - 3 cm. This will ensure earthquake resistance.
If there are not enough floor slabs to cover the entire span, and there remains, for example, 500 mm, then there are different ways to lay floor slabs in this case. The first is to lay the slabs end to end, leaving gaps at the edges of the room, then seal the gaps with concrete or cinder blocks. The second is laying slabs with uniform gaps, which are then sealed with concrete mortar. To prevent the solution from falling down, formwork is installed under the gap (a board is tied up).
Floor slab laying technology
During the process of laying floor slabs, there must be clear coordination of actions between the crane operator and the team receiving the slab. To avoid injuries at the construction site, as well as to comply with the entire technological process and rules described in SNiPs, the construction foreman must have a technological map for installing floor slabs. It indicates the sequence of work, the quantity and location of equipment, special equipment and tools.
It is necessary to start laying floor slabs from the flight of stairs. After laying the slabs, their position is checked. The slabs are laid well if:
- The difference between the lower surfaces of the plates does not exceed 2 mm.
- The height difference between the upper surfaces of the slabs does not exceed 4 mm.
- The height difference within the site should not exceed 10 mm.
As the installation diagram for floor slabs demonstrates, after laying the slabs, they must be connected to each other and to the walls using metal connecting parts. Work on connecting embedded parts and connecting parts is carried out by welding.
Scheme for laying floor slabs
Don't forget to follow safety precautions. It is not allowed to carry out work using a crane in an open area with a wind of 15 m/s, as well as during ice, thunderstorms and fog. When moving the slab using a crane, the installation team should be away from the path along which the slab will move, on the opposite side of the feed. Despite the fact that using the services of a professional foreman and a team of installers significantly increases the cost of installing floor slabs, this is still not the case when you can save money. The foreman must provide the project.
Before ordering slabs from the factory, it is necessary to carry out preparatory work. It is better to coordinate the delivery time of the machine with slabs and the crane at the same time, so as not to overpay for downtime of special equipment. In this case, the installation of the slabs can be carried out without unloading, directly from the vehicle.
Preparatory work before laying floor slabs
The first is a flat supporting surface . The horizon must be almost ideal; a height difference of 4–5 cm is unacceptable. First of all, we check the surface of the walls, then, if necessary, level it with concrete mortar. Subsequent work can be carried out only after the concrete has acquired maximum strength.
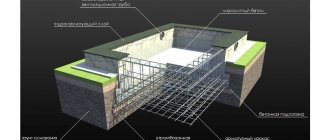
The second is to ensure the strength of the support zone . If the walls are built from brick, concrete or concrete blocks, then no additional measures need to be taken. If the walls are built from foam blocks or gas blocks, then before laying the slabs it is necessary to fill in the reinforced belt. Correct laying of floor slabs requires that the supporting surface must be strong enough to support the weight of the slab and not deform along the abutment line. Neither aerated concrete nor foam concrete have the necessary strength. Therefore, formwork is installed along the entire perimeter of the building, a reinforcement frame made of 8-12 mm rod is installed in it, and then everything is filled with concrete with a layer of 15-20 mm. Further work can be continued only after the concrete has dried.
Third, install mounting towers . Telescopic supports, as described in the section on installing a monolithic floor slab, are installed in increments of 1.5 m. They are designed to take on the weight of the slab if it suddenly slips out of its place. After installation, these towers are removed.
Installation of hollow core slabs using a crane
After the freshly poured concrete has acquired sufficient strength and has dried, the installation of the floor slabs can begin. For this, a crane is used, the lifting capacity of which depends on the size and weight of the slab; cranes of 3 - 7 tons are most often useful.
Stages of work:
- Concrete mortar is applied to the supporting surface in a layer of 2–3 cm. The depth of application of the mortar is equal to the depth of support of the slab, i.e. 150 mm. If the slab rests on two opposite walls, then the solution is applied only to two walls. If the slab rests on three walls, then on the surface of three walls. The actual laying of the slabs can begin when the mortar reaches 50% of its strength.
- While the solution dries, the crane operator can hook the slings to the slab fasteners.
- When the crane operator is given a signal that the slab can be moved, the team of workers must move away from the place where the slab is moving. When the slab is very close, the workers hook it with hooks and turn it around, thereby dampening the oscillatory movements.
- The stove is directed to the right place, one person should stand on one wall, and the other on the opposite. The slab is laid so that its edges rest on the wall at least 120 mm, preferably 150 mm. After installation, the slab will squeeze out excess mortar and evenly distribute the load.
- If there is a need to move the slab, you can use a crowbar. Its position can only be aligned along the laying area; the slab cannot be moved across the walls, otherwise the walls may collapse. The slings are then removed and a signal is given to the crane operator to pick them up.
- The procedure is repeated for all slabs without exception. The rules for installing floor slabs suggest that the slabs should be aligned along the bottom edge, since it is the bottom surface that will be the ceiling in the room. Therefore, the slab is laid with the wider side down and the narrower side up.
You may come across a recommendation that reinforcement must be placed in the area where the slab is supported. Proponents of this method say that it is more convenient and easier to move the stove. In fact, placing anything other than concrete mortar under the slab is prohibited by the technical map. Otherwise, the slab can easily move out of the support area, as it will slide along the reinforcement. In addition, the load will be distributed unevenly.
Laying floor slabs on the foundation is practically no different from laying interfloor slabs. The technology is exactly the same. Only the surface of the foundation must be thoroughly waterproofed before laying the slabs. If the project provides for non-standard support of floor slabs, then special steel elements are used for this. Such work should not be carried out without a specialist.
Anchoring of floor slabs
Anchoring - tying the slabs together - can be done in two ways, depending on the project.
The first is tying the slabs with reinforcement . Reinforcing rods with a diameter of 12 mm are welded to the fastening embedded elements on the slab. For slabs from different manufacturers, the location of these elements may be different: in the longitudinal end of the slab or on its surface. The strongest connection is considered to be a diagonal connection, when the plates are connected to each other with an offset.
The slab must also be connected to the wall. Why is reinforcement built into the wall?
The second method is a ring anchor . In fact, it looks like an armored belt. Formwork is installed around the perimeter of the slab, reinforcement is installed into it and concrete is poured. This method slightly increases the cost of laying floor slabs. But it’s worth it - the slabs end up clamped on all sides.
Sealing joints between floor slabs
After anchoring, you can begin to seal the cracks. The gaps between the floor slabs are called rustications. They are filled with concrete grade M150. If the gaps are large, then a board is tied from below, which serves as formwork. If the gaps are small, then the floor slab will be able to withstand the maximum load the very next day. Otherwise you need to wait a week.
Sealing voids at the ends of floor slabs
All modern slabs with round voids are produced with the ends already filled. If you purchased slabs with open holes, then they need to be filled with something 25 - 30 cm deep. Otherwise the slab will freeze. You can fill the voids with mineral wool, concrete plugs, or simply fill them with concrete mortar. A similar procedure must be performed not only on those ends that face the street, but also on those that rest on the internal walls.
The price for laying floor slabs depends on the amount of work, the area of the house and the cost of materials. For example, the cost of PC floor slabs alone is approximately 27 - 30 USD. per m2. The rest is related materials, renting a crane and hiring workers, as well as the cost of delivering the slabs. Professional teams have very different prices for installation of floor slabs, from 10 to 25 USD. per m2, maybe more depending on the region. As a result, the cost will be the same as for pouring a monolithic floor slab.
Laying floor slabs: video example
Technical requirements
Since formwork for floors is responsible for the further strength of monolithic blocks, it must be erected in accordance with established construction standards, taking into account all technologies and rules. The following requirements apply to this design.
- High safety margin. Each component element of the structure must withstand not only the reinforcement frame, but also the weight of liquid and hardened concrete.
- Safety and reliability. During reinforcement and pouring of mortar, workers move along the base, so it must be rigid and prevent any vibration. Otherwise, monolithic slabs may develop defects, which can lead to emergency situations in the future. Construction tables, which can also be moved during construction work, also help prevent damage to the integrity of the structure.
- Long service life. This primarily concerns collapsible and removable formworks, which are used repeatedly in construction. To create a monolithic floor, it is recommended to install formwork made of durable material that will withstand subsequent use after dismantling.
- Resistance to loads. Since concrete is poured superficially and with a recess, its mass creates increased dynamic loads on the formwork. In order for the structure to reliably withstand them, it is necessary to select the correct material for its manufacture in advance and prepare a plan for the foundation slab, which complements the formwork drawing and slinging diagram.
- Have accelerated installation. Today, there are many supporting parts and ready-made sections on sale that allow for quick assembly of structures.
- Possibility of disassembly. After the solution has hardened, the formwork, consisting of several elements, can be dismantled for further use. This process should be quick and easy.
Advantages of I-beams made of wood
The popularity of using these products in construction is due to a number of serious advantages of I-beams:
- high load-bearing capacity of the element, allowing the creation of formwork for large-area floors;
- profitability - low cost of the beam and the ability to reduce the amount of other materials. Thus, I-beams of wood make it possible to reduce the overall weight of the supporting structure and eliminate many of the mounting and supporting parts of the formwork;
- the ability to avoid such phenomena as cracking, shrinkage, deformation, splitting;
- it is possible to splice beams by filing the lock and using ordinary bolts;
- preservation of the original geometry - the beams do not bend even with sudden changes in humidity;
- environmental friendliness - everyone knows that there is no more environmentally friendly building material than wood;
- resistance to external influences: precipitation, moisture, parasites, etc.;
- lightness of elements, simplification of the process of lifting and installation of the structure. These factors significantly speed up the process, increasing the profitability of building construction;
- durability. Provided the product is of high quality, its service life is measured in decades.
System installation
This type of floor formwork is used for ceilings. The main advantage of this system is that it uses all currently known horizontal formwork technologies, which in turn makes it possible to arrange four different formwork systems.
The combination of these systems makes it possible to minimize the finishing surface for each specific case. The use of racks with removable heads makes it possible, during the accelerated stripping process, to leave only individual intermediate racks, thereby saving time and money.
The wooden laminated beam H20 is widely used, which is designed for manual installation of a structure of main and secondary beams on metal posts with a “falling” head. The result is a universal formwork for floors.
Emerging loads on the frame
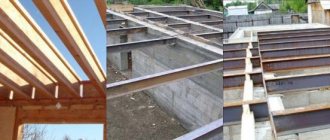
Types of profiled sheets.
This technology has gained the right to exist due to the fact that the load of interfloor floors using profiled sheets does not fall on the wall, but on a completely strong and reliable metal frame.
When using corrugated sheet flooring as a building material for walls, we can recommend foam block or gas block, which are also used for thermal insulation.
Interfloor ceilings made from profiled sheets have another equally significant advantage.
The construction of a large building involves the use of a strip foundation, which requires significant costs for building materials.
But the previously noted transfer of loads to the frame, which entails the possibility of lightening the walls, leads to a decrease in loads on the foundation. As a result, instead of a material-intensive strip foundation, you can choose another type of foundation (for example, a column foundation), which will spend significantly less money and time, and perhaps even less labor costs
It is worth noting that in a column foundation, each individual column will take the load only from one column of metal frames
At the head of such a foundation, it is necessary to cut out a small grillage, the cross-section of which is calculated using data on the thickness of the walls and the expected spacing between the foundation columns.
Tips for creating floor formwork
- To consider the detailed features of construction, let’s take the formwork of monolithic floors. They are popular in construction nowadays.
- Do the work efficiently, this will ensure correct installation. Specialists in this matter usually use various options for its construction.
- The formwork is made as follows. First, the frame is assembled. The components of this frame are vertical posts fastened with crossbars, which are nailed perpendicularly to a beam located transversely. And finally, sheets of plywood are laid on this structure. Since this will be the bottom of the formwork, it is better to choose laminated plywood.
- For work, prepare the following building materials: support posts, two types of beams (transverse, crossbar), diagonal beams (braces), laminated plywood.
- In your work, carry out calculations of the formwork. Determine how many support elements need to be installed. All these are important elements in creating floor formwork.
Installation and dismantling of beams
When assembling beam formwork systems, you need to strictly adhere to the technology and know the basic rules for its installation. The work is carried out in several stages:
- clearing the site;
- installation of special tripods observing a certain interval;
- telescopic racks are installed, vertical holders are mounted on their upper ends, on which the beams are mounted;
- transverse crossbars are fixed on top of longer longitudinal ones, the spacing of the parts should be the same (50-60 cm);
- side vertical panels are fixed to the crossbars, the gaps between the parts are covered with film;
- horizontal panels are laid - the deck, the horizontality of this element is verified.
So, a beam crossbar is an element that is used to assemble a wide variety of shapes. Products made from wooden beams, metal and plastic are used. Each option is designed for a specific load. Exceeding this load can lead to failure of the part - deformation, cracks, or breakage. Load calculations and choice of material options are made at the design stage.
How to save money?
Laying the foundation with your own hands, in most cases, is explained by the desire of the master to save money on hiring a construction team. Therefore, it is advisable to consider additional ways to save.
Filling in layers
The use of removable formwork allows builders to reduce the cost of purchasing materials. The method involves gradually pouring the concrete mixture.
After the solution hardens, the structure is dismantled and reassembled on another section of the tape. During the warm season, approximately 3-4 days pass between filling cycles.
Vertical division
The concreting process can be divided into stages both according to the length of the foundation and its height. When the bottom layer of the mortar has completely hardened, the cement laitance must be removed from its surface and you can begin the next cycle of formwork construction.
To make the building material last longer, the surface of the dampers can be covered with plastic film or treated with an aqueous solution of slaked lime.
Floor formwork: types of structures
A reservation should be made right away - all types of horizontal formwork for floors are determined solely by the type, or rather, the type of supports
As you understand, they relate exclusively to factory products of this type - in general, you need to pay attention to them only when it comes to buying ready-made formwork, and not about making it yourself from scratch. There are four types of formwork for monolithic floors
- Formwork on telescopic construction sites. It is very difficult to overestimate the convenience of its use - leveling horizontal formwork with the help of such supports is done quickly and, most importantly, with high accuracy.
- Formwork on volumetric racks. Unlike the previous option, you will have to tinker a little more with the installation and leveling of formwork of this type, but, nevertheless, it copes well with the tasks assigned to it. In most cases it is used for small volumes of concreting.
- Formwork on wedge scaffolding. It is notable for the fact that wedge-type scaffolding is used as supports.
- Formwork on cup scaffolding. Exactly the same option as the previous one, only unlike it, cup-type scaffolding is used as supports.
The last two types of formwork are often called frame formwork for floors. Their peculiarity lies in their versatility - in fact, scaffolding is used to create this type of formwork. In general, there is no need to purchase special systems in full - the scaffolding is simply supplemented with panels and beams, which you can make yourself. So if you already have scaffolding at your disposal, then you can quite easily upgrade it with minimal costs and use it as supports for horizontal formwork of floors.
And that’s not all, in addition, all existing floor formworks can be divided into collapsible and permanent. To put it simply, prefabricated formwork is a reusable product; in contrast, permanent formwork, or rather only its panels, is used only once. Everything is removed except the panels - this is the easiest way to get a high-quality and smooth ceiling surface in the house. Often, polystyrene is used to make permanent formwork, which is an excellent insulation material.
Types of construction
The working surface, which is located between floors, can be filled in several ways, using removable and permanent formwork. If an apartment building with a large number of floors is being built, then a good estimate is included in such a building and, in most cases, mobile panels are installed using jacks.
If a person builds a house on his own, then a reliable but cheaper construction method is needed. In such cases, most often the installation of floor formwork occurs, which is carried out using more budget-friendly building materials.
The removable structure is made of wooden boards and consists of:
- thrust bar;
- spacers;
- embedded and covering panels;
- wire tie.
The design diagram can be easily found on the Internet. The non-removable design is more complex and includes more materials.
These structures are made from scrap materials:
- profiled sheet;
- waterproof plywood;
- tree.
If a large load is expected on the future floor, then the best material is corrugated board. Formwork made of wood or plywood is suitable for constructing the ceiling of the last floor, on which there is a non-residential attic.
Installation of formwork
Now let's talk about such a moment as the installation of formwork, because the construction of the floor slab assumes that concrete is poured into the formwork structure, laid horizontally. It usually has the name of the deck. There are the following options for arranging this design:
- installation of a ready-made removable solution – plastic or metal;
- creation of formwork on site, using boards or moisture-resistant plywood.
The first option is easier to use, because the formwork is disassembled and has telescopic supports that are needed to maintain it at a certain level. If you create the formwork yourself, you should know that the thickness of the plywood should be 2 centimeters, and the thickness of the edged boards should be 3 centimeters. When knocking down a structure, the elements should be well adjusted. If there are gaps between them, then the formwork surface must be covered with a waterproofing film.
Step-by-step instructions for installing formwork.
- We install vertical rack supports. Typically these are telescopic solutions made of metal with adjustable height. As an alternative, you can use logs, placing them every meter.
- We place the crossbars on the racks.
- Then we install horizontal formwork on top. If not a ready-made option is used, but a hand-made one, then transverse beams are placed on the longitudinal beams, and plywood with moisture-resistant properties is installed on top. The dimensions of such formwork should be adjusted perfectly so that there are no gaps.
- It is necessary to adjust the height of the rack supports so that the upper part of the horizontal formwork converges with the part of the wall masonry on top.
- Next, we install the vertical formwork parts. The dimensions of a monolithic slab should be such that the edges extend 15 centimeters onto the walls. A vertical type fence should be created exactly at this distance from the inside of the wall.
- Using a level, we check the even position of the structure and its horizontal position.
Slab reinforcement
The monolith must undergo a reinforcement procedure.
- First you need to prepare the fittings. The required diameter of the rods should be selected, knowing the design loads. Typically, rods with a diameter of 12-14 millimeters are used for this.
- We lay the first reinforcing mesh at the bottom of the structure - it will become a monolithic slab in the future. This will be a kind of armored belt. First, you should lay the longitudinal rods, then the transverse ones. The best cell size for such a grid is 12-15 centimeters. If the overlap is not very large in area, then the size of the cells can be increased to 20 centimeters.
- The joints of the rods should be tied using steel wire.
- We lay the second reinforcing mesh similarly to the first. We carry out tying the meshes with wire. If there are not enough rods, then you can take an additional rod, which should be tied with an overlap equal to at least 40 times the reinforcing diameter. If rods with a diameter of just over a centimeter are used, then the overlap should be 48 centimeters. The joints of the rods should be placed in a checkerboard pattern. The ends of the reinforcement rods must be on load-bearing type beams.
Installation of homemade formwork
The technology for installing formwork from forest and lumber largely depends on the experience of the master. There is no specific technology here, since the method is considered artisanal. Often, lumber intended for the rafter system or floors of a building is used for table posts and beams.
There are a number of requirements that must be observed when assembling formwork yourself.
The racks must be made of solid wood - timber or boards. Overlay splicing is not allowed. End-to-end extensions on intermediate racks are allowed.
Section and pitch of racks:
- 75x75 mm - 800 mm
- 100x100 - 1000 mm
- 120x120 - 120 mm
- 150x150 - 1600 mm
- 180x180 - 1800 mm
- 200x200 - up to 2000 mm
Thickness and pitch of the crossbar*:
- 75 mm - 600 mm
- 100 mm - 800 mm
- 120 mm - 1000 mm
- 150 mm - 1400 mm
- 200 mm - 1800 mm
Thickness and pitch of formwork beams:
- 40 mm - 400 mm
- 50 mm - 500 mm
- 60 mm - 600 mm
And so on at the rate of 1 to 10.
* A reasonable width of the crossbar board or beam is assumed to be 100–200 mm.
Operating procedure
1. Carefully measure the height from the floor to the top of the wall.
2. Make U-shaped elements (“frames”) from material for racks and crossbars. The racks must be fixed 300 mm from the edge of the crossbar.
3. Install them with a given step (see above), securing them with temporary slopes.
4. Check for correct installation and compliance with the horizon.
5. Install additional posts and secure the structure with permanent slopes.
6. Lay out the formwork beams with a given step (see above).
7. Make the flooring from the selected material (plywood or board). If the flooring is supposed to be plank, lay polyethylene on it.
Note. All other things being equal, the quality of the overlap (marks, plane) made using homemade formwork will always be lower compared to inventory
However, this is not so important, since the ceiling is usually made suspended
Instructions for monolith reinforcement
It is necessary to cover the spans between floors using monolithic platforms. To make them as strong as possible, they need to be reinforced. The technology for carrying out this work includes a certain sequence of actions:
Installation of formwork. The first step is to make a box for which boards and also sheets of plywood can be used. To keep the formwork in place, tripods are installed underneath it.
You need to understand that concrete is a very heavy material, and therefore it is important to provide good support for it. To ensure that the concrete does not stick to the plywood or boards, and the box can then be removed, you should choose materials with a laminated or oil-treated surface.
Frame installation
To do this, steel rods are placed in a box and tied together. The cells should have a length and width of approximately 15-20 centimeters. If suddenly the length of any of the rods is not enough, you need to apply another one, but with more overlap.
Filling the box. At this stage, it is recommended to use factory-produced concrete mortar. Firstly, it clearly complies with all the necessary quality standards, as well as the proportions of the required components. Often the material also includes additional components that improve the strength properties of concrete. When the concrete solution is delivered to the construction site, the formwork is poured using a concrete pump. A special construction vibrator compacts the solution over the entire area of the platform and distributes it evenly, eliminating bubbles from the solution. At the end of this work, the surface is leveled again by hand and then sprinkled with dry cement on top.
It is worth considering that when filling the platform, the air temperature should be at least 5 degrees. Low temperatures can negatively affect the quality of the platform. An example is the appearance of cracks caused by the freezing of moisture in a concrete solution. Any cracks and damage to concrete structures entail a reduction in the service life of the slab, as well as a deterioration in strength characteristics. If conditions are favorable, the concrete platform dries completely within one month.
The feasibility of installing a monolithic floor
Both ready-made floor slabs and slabs poured in place as a single monolith have their own advantages and disadvantages. You need to choose one option or another by comparing their features and projecting them onto your circumstances: construction conditions, technical and financial capabilities.
Monolithic floors really have many advantages.
Possibility of producing non-standard slabs.
In private homes, the use of prefabricated reinforced concrete products is limited to their standard shapes and dimensions. They cannot be used to cover bay windows, external figured balconies, and other rooms whose dimensions do not allow the finished slabs to be laid out and supported on load-bearing walls. But you can fill the ceiling of any configuration with your own hands.
External balcony supported by columnsSource plazma-m.ru
No joints or seams.
A one-piece design means it is impossible for the plates to move relative to each other with the formation of cracks along the joints and the risk of leaks, damage to heat and sound insulation.
Uniform distribution of loads.
The monolithic slab is part of the building frame. All loads placed on it are evenly distributed along the entire perimeter of the walls and are also evenly transferred to the foundation.
High strength and durability.
There are no voids or joint zones in a monolithic slab, so it can withstand heavy loads with equal thickness to prefabricated structures.
The monolith is poured entirely over the entire floor areaSource alacrisstroi.by
As for economic benefits, this point requires individual calculations, otherwise the result may be unexpected. Most private developers believe that the production of a concrete slab will cost less than the installation of prefabricated floors based on the cost of the slabs themselves, their transportation, loading work and the use of special equipment for lifting to the floor and laying.
But the delivery of a huge amount of reinforcement and ready-made concrete mixture also involves transportation costs, and a concrete pump is needed to supply the solution to a height. We add here the costs of manufacturing formwork and supporting structures. And only after this can you compare the costs of the two options and see how significant the difference is.
The most budget option is to do everything yourself, including preparing the concrete. But for this you need to know how to fill the ceiling between floors with your own hands correctly, how to achieve the strength of a homemade mortar, how to save on formwork. And be prepared for the fact that the work will take a lot of time and require remarkable physical effort.
It is impossible to fill a large area of flooring alone; you need helpersSource pobetony.expert
High time and labor costs are not the only disadvantage of monolithic floors. Another serious drawback is related to the fact that after they are poured, it will be possible to continue work on the site no earlier than a month later, when the concrete slab reaches its design strength. During this time, it will require attention and measures to prevent the appearance of shrinkage cracks.
Additional reinforcement of floors - advantages and disadvantages
The need to strengthen concrete floors is related to the characteristics of concrete. The concrete mass is capable of withstanding increased compressive loads, but is susceptible to tensile forces and the influence of bending moments. Concrete is not capable of damping loads on its own and requires additional reinforcement. To compensate for tensile forces and maintain the integrity of reinforced concrete structures, additional reinforcement of floor slabs is performed.
A concrete slab, the strength of which is increased due to additional reinforcement, is a reliable structure with a number of advantages. Main advantages:
- long service life. Thanks to the increased safety margin, the service life of a reinforced concrete structure is calculated in decades;
- absence of butt seams, as well as smooth surface of ceilings and floors. There is no need to perform expensive and labor-intensive finishing work;
- reduced weight of the monolithic floor structure compared to purchased reinforced concrete panels. This significantly reduces the load on the foundation;
- increased strength characteristics. The combination of the properties of steel reinforcement and concrete makes it possible to increase the strength of the base and ensure its integrity under increased loads;
- increased reliability of reinforced concrete structures. Resistance to loads acting in different directions is achieved through reinforcement. Reinforced floors are capable of supporting from 0.5 to 0.8 tons per square meter of surface;
- Fire safety. The use of non-combustible building materials ensures the fire resistance of the structure. The stove is able to maintain its integrity for a long time under the influence of elevated temperatures and open fire;
This design weighs noticeably less compared to ready-made reinforced concrete slabs, however, this factor does not affect its strength
- reduced costs compared to using standard panels to form floors. The costs of constructing a monolithic floor are significantly lower compared to a similar prefabricated structure;
- no need to use special lifting equipment and rigging equipment. A crane is not required to form a monolithic slab;
- uniform transfer of forces from the monolithic slab to the load-bearing walls of the building or support columns. As a result of load equalization, the likelihood of crack formation is reduced.
Among other advantages, it should be noted the possibility of pouring a non-standard configuration of the ceiling. This allows the construction of buildings of varying levels of complexity with non-standard layouts. A serious advantage is the ability to create interfloor openings and communication openings at the concreting stage.
Along with the advantages, there are also weaknesses:
- increased labor intensity of carrying out activities for assembling the reinforcement frame;
- increased duration of the process of cement hydration and, accordingly, the gain of operational strength by concrete.
Dismantling of formwork systems
Many developers are interested in when the formwork can be removed. It should be noted. That the period for dismantling the supporting elements is determined by the period of hardening of the concrete solution.
As a rule, dismantling work is carried out as soon as the poured concrete reaches at least seventy-five percent strength. If the temperature in the room is within fifteen degrees Celsius, and the humidity level is normal, then the formwork can be removed seven to eight days after the end of pouring, then wait four weeks for the concrete to gain its design strength. During this period, construction work is suspended or carried out at another site.
Stripping begins from the top point to the bottom, from the corner areas to the central point. First, all fasteners are removed - bolts, twists, etc. After this, you should move to the corners of the room - here the concrete hardens faster, the load forces are less than in the central part of the floor.
Then you need to lower the racks and dismantle the shields. The main feature when performing such work is the accuracy of its implementation. So that the formwork structure can be reused, it is cleaned of dirt, dried and stacked under a canopy for storage.
It is believed that a prefabricated formwork system manufactured in an industrial environment differs in quality and strength from a home-made structure. To minimize financial costs and reduce work time, floor formwork is rented using.
Installation of beam-type floor formwork
Such a floor system assumes the presence in the structure of monolithic reinforced concrete beams that absorb the main load created by the floor. Therefore, the installation of floor formwork of this type involves, among other things, the installation of formwork for these beams.
The whole process is carried out as follows.
After the pouring of the columns has been completed, you can begin installing the bottom of the formwork of the load-bearing beams. They are attached to special grooves available in the formwork structure of the columns. Then the installation of telescopic racks supporting these elements is carried out; at significant heights, volumetric formwork systems are used. The supports of such systems are installed on special tripods that increase stability and are connected to each other by crossbars.
After this, you can begin installing the side walls of the beam formwork, which are connected to each other and the bottom using special fasteners. The next step is the installation of additional wooden beams on which the deck will be laid. Telescopic supports are also installed under these beams.
The installation of formwork for pouring the floor is completed by installing the side panels and laying the reinforcing frame.
At this stage the following is performed:
- final adjustment of the structure,
- checking the overlap level,
- in addition, it is necessary to ensure that there are no sagging or deflections of the formwork elements.
Installation of floor formwork without monolithic load-bearing beams
The technology for installing formwork in this case is in many ways similar to the work described above. It is even somewhat simplified; there is no need for additional enclosing structures (for pouring monolithic beams).
SNiP normalizes these distances in accordance with the thickness of the ceiling, that is, its weight:
- With a ceiling height of up to 230 mm, the installation step of the racks should not exceed 2 meters.
- When the thickness increases to 280 mm, the distance decreases to 1.7 meters.
- For thicker floors (up to 320 m), the racks are placed one and a half meters apart.
It should be taken into account that this step of the floor formwork posts is the maximum permissible, so the supports should be mounted somewhat more often. A variety of materials are used as panels, also called floor decks, including plywood, plastic, OSB
Please take into account the fact that to obtain a high-quality surface it is advisable to use laminated products; in addition, plywood for floor formwork must be moisture resistant
A variety of materials are used as panels, also called floor decks, including plywood, plastic, and OSB. Please take into account the fact that to obtain a high-quality surface, it is advisable to use laminated products; in addition, plywood for floor formwork must be moisture resistant.
Features of the work
It is worth noting that pouring a monolithic floor is considered not the easiest and cheapest option to implement, but in the end it is possible to obtain a structure that is distinguished by its versatility and durability. This makes monolithic reinforced concrete flooring the most popular among others.
If installation is done by yourself, then moisture-resistant plywood is used for formwork, the thickness of which should not be less than 2 centimeters. As for formwork boards, this parameter should not be less than 2.5 cm.
When constructing a building, in some cases there is a need to install a reinforcing element, which is called a belt. In this case, a reinforced concrete strip runs along the perimeter of the building and acts as a support for the structure.
In order to raise the mesh during the formation of the reinforcing layer, special stands made of plastic are used. The second layer of mesh should be laid out at the same distance from the top plane of the future structure. To attach two layers of mesh at the required distance, it is necessary to prepare special stands, which are made of reinforcing bars. All mesh layers and elements must be connected to each other with wire.
It is important not only to reinforce the monolithic floor to obtain a reliable structure, but also to moisten it after pouring, which is done within a week. Then constant moisturizing will no longer be required
However, it is still necessary to control the drying of the surface.
Monolithic floor slab - self-production
If we compare a monolithic base with a floor made of standard slabs, then the solid version has a number of advantages:
- increased strength due to the absence of joints and seams in the simultaneously poured monolithic structure;
- uniform distribution of forces on the main walls and foundation, associated with the peculiarities of the technology;
- the ability to carry out an original layout, for which it is problematic to select serial elements.
Carrying out pouring activities yourself allows you to form a reliable ceiling without using a crane or hiring hired workers.
The most reliable (but not always appropriate) option for interfloor slabs is a monolithic slab
Approximate cost of floors made of different materials
Of course, prefabricated monolithic floors cannot be called the cheapest (judging by the cost of the material). However, if you take into account the cost of materials, transportation costs, and wages for workers, you can understand that this is more profitable than, for example, pouring monolithic reinforced concrete. Let's try to compare the total costs when installing a floor between the first and second floors with an area of 10.5 × 8 m and a thickness of gas silicate walls of 30 cm. With these parameters, the cost (in rubles, as of the beginning of 2022):
- prefabricated monolithic floor 25 cm thick ≈ 198,000;
- reinforced concrete slab (25 cm + screed 5 cm) ≈ 241,000;
- self-leveling monolith 20 cm thick ≈ 254,000.
Similar installation is allowed, but only if blocks made of lighter materials are used and there is no additional load on top
Care after pouring
If we talk about caring for such a product, it should be said that during its hardening process a lot of heat is emitted, and this causes the rapid evaporation of moisture. Its deficiency leads to deformation of the concrete coating, which is why at first the slab should be moistened with water on a regular basis. You can pour it either in buckets or using a hose with a special sprayer. Before doing this, you can put rags on the concrete and pour water.
When it is hot, the concrete should be covered with polyethylene to prevent the slab from cracking. The formwork can be removed 10 days after the last wetting. Typically, the slab gains strength in approximately 3-4 weeks. When this period has passed, construction work can continue.
In the next video you will see the construction of a monolithic floor slab with your own hands.
How to calculate costs and productivity?
Thanks to the frame structure, the use of coffered floors makes it possible to significantly reduce the cubic capacity of the building, and therefore the cost of its construction. Their arrangement at industrial, civil and administrative facilities is considered the most profitable. With their help, spans up to 6 m long are covered, and the load-bearing capacity of frame systems is up to 500 kg/m2.
The financial costs of the device are minimized due to the economical consumption of concrete. This also affects the labor intensity and speed of construction.
However, when designing such systems, it is important to take into account that in the places where columns and capitals are located, the floor must be continuous - i.e. Caisson formers are not installed in these areas.
Photo 11. The process of concreting a coffered floor
Cost calculations for a monolithic floor of this type are carried out taking into account the consumption of necessary materials and devices:
- Formwork made of metal lathing and support posts, as well as plastic caisson formers, are in most cases rented.
- Concrete - usually a “mixer” is ordered with a concrete pump to automatically supply the mixture to the floor.
- Armature for reinforcement.
However, keep in mind that no one is insured against additional and unexpected expenses.
Floor slabs PK 25-12-8 (Ryazan reinforced concrete plant No. 2) Only new slabs from the factory. PC floor slab for all types of buildings, length 2.5m, width…
From 3567 RUR/pcsMore details
Floor slabs PC 60-12-8 AtV (Ryazan reinforced concrete plant No. 2) Only new slabs from the factory. PC floor slab for all types of buildings 6 m long, wide…
From 7764 RUR/pcsMore details
Floor slabs PK 63-12-8 AtV (Ryazan Concrete Concrete Plant No. 2) Only new slabs from the factory. PC floor slab for all types of buildings, length 6.3 m, width…
From 8157 RUR/pcsRead more
Floor slabs PK 58-12-8 AtV (Ryazan reinforced concrete plant No. 2) Only new slabs from the factory. PC floor slab for all types of buildings, length 5.8 m, width…
From 7699 RUR/pcsRead more
Floor slabs PK 48-12-8 AtV (Ryazan reinforced concrete plant No. 2) Only new slabs from the factory. PC floor slab for all types of buildings, length 4.8 m, width…
From 6929 RUR/pcsRead more
Floor slabs PK 42-12-8 (Ryazan reinforced concrete plant No. 2) Only new slabs from the factory. PC floor slab for all types of buildings, length 4.2 m, width…
From 6227 RUR/pieceMore details
Floor slabs PK 35-12-8 (Ryazan reinforced concrete plant No. 2) Only new slabs from the factory. PC floor slab for all types of buildings 3.5 m long, width...
From 5003 RUR/pcsMore details
Floor slabs PK 30-12-8 (Ryazan reinforced concrete plant No. 2) Only new slabs from the factory. PC floor slab for all types of buildings 3 m long, wide…
From 4349 RUR/pcsRead more
Floor slabs PK 72-12-8 AtVt-1 (Ryazan reinforced concrete plant No. 2) Only new slabs from the factory. PC floor slab for all types of buildings, length 7.2 m, width…
From RUB 11,477/pieceMore details
Floor slabs PB 60-12-8 (Ryazan reinforced concrete plant No. 2) Only new slabs from the factory. PB floor slab for all types of buildings, 6m long,…
From 9196 RUR/pcsRead more
Do-it-yourself formwork for floors
Let's look at how to make formwork with your own hands. To make molds for walls and ceilings, the following materials are used:
- moisture-resistant plywood;
- profile sheet;
- wood.
Types of formwork
Horizontal formwork for floors consists of panels located on strong supports.
Types of supports:
- telescopic ones are easily adjustable in height, it is not difficult to set them to a horizontal level;
- volumetric racks have a low cost and are used for constructing small-area formwork;
- cup or blade scaffolding serves as supports.
The racks are installed in increments of no more than a meter. To learn how to make monolithic concrete floors, watch this video:
Profile sheet as formwork
Profiled sheets of grade N or NS can withstand heavy loads
It is best to use corrugated sheets (grade N or NS) as formwork for large-area floors, since it can withstand significant loads and at the same time serves as a reinforcement frame.
Installation steps:
- we install load-bearing metal beams from a channel or I-beam;
- we attach the profile sheet;
- we lay the fittings;
- pour the concrete solution and compact it using a vibrator. About how to do
Plywood as a form for the ceiling
Moisture-resistant plywood is used for formwork
When exposed to a small load, it is rational to use moisture-resistant plywood for formwork.
You will need:
- support posts;
- load-bearing wooden beams;
- laminated moisture-resistant plywood.
Installation steps:
- wooden beams are installed;
- sheets of plywood for formwork are attached to the beams using self-tapping screws;
- the fittings are mounted using special plastic clamps;
- a polyethylene film is laid as a waterproofing layer;
- concrete slab is poured.
How to make formwork for walls
With the spread of ready-mixed concrete sales centers, formwork for monolithic construction of both large buildings and private houses and household structures is increasingly in demand.
Concrete mixtures can be used to build outbuildings, garages, utility poles, gazebos, pour terraces, stairs, platforms, enclosing walls, and open storm drains.
All these structures require their own rigid form (formwork), which will hold the liquid solution until it reaches the required strength.
- Types of formwork
- With your own hands
With your own hands
The best material for formwork is plywood or chipboard
Solving the problem of how to make formwork for the walls of your own home will not be very difficult. The main points of this stage of work are as follows:
- The main condition will be to ensure the rigidity of the form, since when concrete is poured, strong dynamic variable loads arise, and when it hardens, bursting forces occur.
- Suitable raw materials for this are usually wood and its derivatives (plywood, chipboard, OSB). Steel or aluminum sheets are used by craftsmen engaged in professional construction. If the design is for one-time use, then cheaper materials are chosen that you don’t mind damaging during dismantling. In the case when the formwork is rearranged several times, it is advisable to make the shield from durable materials, with a front surface that does not adhere to concrete (for example, laminated chipboard). To fill non-buried foundations, sheets of flat slate are used as a form.
- Connecting and thrust parts, stiffeners, stakes are made of timber. Self-tapping screws, nails, steel angles, and tie rods with nuts are used as fasteners.
- To facilitate dismantling so that the formwork can be easily separated from the concrete and rearranged without damaging the front surface, you can use water-repellent wood impregnations (drying oil, melamine resin, waste oils) and polyethylene film.
Plastic formwork is lightweight and quickly disassembled - A relatively new type of lightweight formwork is a plastic form. It is lightweight (up to 11 kg), which is convenient for self-construction. Assembly and disassembly is facilitated by special rotary clamps and technological recesses. Easy to clean and store without room humidity conditions. Withstands, according to the manufacturer's data sheet, more than 70 cycles. The design is modular, the required size is achieved using panels of different sizes. The strength limitation is manifested in the fact that the thickness of the concrete wall will not exceed 0.4 m.
- Using formwork for walls with your own hands also involves drawing up preliminary drawings and sketches so that when performing concrete work, a given structural element is obtained. For more information about what you need to know about formwork, watch this video:
An example of how to erect a column from a small panel assembly according to a pre-designed diagram:
In complex cases, such an operation will avoid significant deviations, take into account the need for braces and platforms for work and subsequent control of concrete hardening.
Tolerances
The walls being erected must withstand heavy loads
A critical stage of construction is the construction of walls, which will experience constant and variable loads, vibrations, and changes in temperature and humidity throughout the entire period of operation.
In terms of installation accuracy, wall formwork has its own established standards:
Monolithic construction from reinforced concrete is distinguished not only by short deadlines for the completion of load-bearing structures, but also by increased requirements for the accuracy of all stages of preparatory work.
Installation of formwork systems in accordance with design drawings allows you to obtain strong main walls and horizontal structures, whose load-bearing capacity is 3.5 times higher than that of floor slabs, and also reduce financial costs.
Device
Monolithic flooring is one of the main elements of the structure, which increases the performance characteristics of the building and makes it durable. Its installation begins with the assembly of formwork, which allows the concrete to maintain its shape and immobility until it hardens. Floor formwork is considered a complex building structure, which usually consists of such elements.
Support nodes. These are wooden beams that look like telescopic posts. In order to evenly and correctly distribute the dynamic load on this element, the distance between them must be accurately calculated. With the help of such supports, formwork is assembled for pouring monolithic slabs no higher than 4 m in height. Often, additional or starting posts are used during the construction of structures. They are made of metal profiles and are fixed together with special fasteners (cup or wedge). Thanks to such supports, it is possible to construct formworks up to 18 m high.
Racks, which are usually used when installing formwork in high-rise buildings, consist of three elements: a unifork, a vertical support and a tripod. The unifork is the upper part and serves, as a rule, to fix the working surface. It is often also called the “support fork”. This element is produced from four tubes (square cross-section), which are welded at the corners, and metal plates with a thickness of at least 5 mm. The tripod (skirt) is designed to provide stability to the stand and allow it to be held securely horizontally. In addition, the tripod also takes on part of the main load when pouring concrete.
Types of formwork and their elements
Below is a list of the most common types of formwork systems in modern construction and the elements from which they consist.
Small panel or standardized formwork is used in the construction of monolithic objects of various dimensional categories. Its structural elements are:
- shields of various sizes (from 0.9/0.3 to 1.8/0.6 m) and weighing up to 50 kg;
- prefabricated elements (spacers, racks, etc.);
- fastening elements – locks (wedge, eccentric, spring), clamps, trusses, etc.;
- telescopic crossbars, racks, struts, ladders, etc.
Elements of small panel formwork
Large-panel formwork, which belongs to the prefabricated category and is used in civil and industrial construction, is intended for the construction of large-sized monolithic structures. The functional elements of this type of system are:
- panels used as an independent structural element or assembled into a complex if necessary and combined using fastening systems. The length of the shield is from 2.1 to 5.7 m; there are ordinary and end shields;
- struts with a jack, necessary for vertical alignment of the panels;
- tie bolts (Fig. 5) fastening the formwork panels to each other. In order to make the connection of the shields more precise, wedge locks are used (Fig. 6);
- frames and racks used when pouring massive structures and thick-walled structures of long length;
- contractions and rigid connections used when working with structures whose thickness exceeds 300 mm;
- scaffolding is a platform for placing the pourer and his working accessories.
Large-panel formwork: a - frame, b - frame-panel for massive walls; 1 - brace brace, 2 - deck, 3 - shield frame, 4 - clamp, 5 - screed, 6 - cantilever scaffolding, 7 - strut, 8 - mechanical jack, 9 - stiffening connection, 10 - screed, 11 - spacer, 12 — lighthouse board
Climbing formwork is a type of formwork used when pouring tall objects such as cooling towers, pipes, various towers, etc. This complex, multi-level system consists of:
- a complex of external panels 1.25 * 0.55 m, suspended on supporting rings;
- stiffening ribs mounted at the joints of the shields;
- metal sheets acting as an internal shield, connected with brackets and reinforced with steel strips.
Climbing formwork: 1 - concreted wall; 2 - external formwork panels; 3 - internal formwork panels; 4 - lifting device; 5 — shaft of the support-lifting device; 6 — pendants; 7 - working platform; 8 — support beams; 9, 10 - external and internal suspended scaffolding
Block formwork (block form) is a type of formwork that is used when pouring grillages, elevator shafts, stepped foundations and other things. There are detachable and one-piece block forms. The one-piece version consists of a pillar shape and a step, equipped with mounting loops for the operation of jacks during formwork removal. The detachable type of this system includes:
- step shields;
- fastening elements;
- the shape of the column;
- thrust brackets for jacking;
- squeezing device.
Block formwork of the internal contour is detachable: 1 - external contour panel, 2 - internal circuit panel, 3 - internal corner panel, 4 - lock, 5 - grip, 6 - insert
Block-panel vertical formwork has several modifications that have become widespread when pouring vertical objects located indoors. Depending on the technological features, the elements of the complex may change, but there are universal components present in each of the existing variations of this system. These include:
- lower frame equipped with outriggers and guides interacting with the core;
- spatial core, represented by vertical posts, consoles, brackets and gussets. There are also special technological holes in which shields are attached;
- large-panel panels equipped with a fastening element for hanging on core elements and side posts using brackets. For this type of formwork, two types of panels are used - internal (up to 2.5 m high) and external (up to 2.9 m high). The maximum load adequately absorbed by this system is 50 kN.
1 - common frame, 2 - rigid spatial core, 3 - large-panel panels, corner vertical panels, 4 - corner vertical elements, 5 - outriggers, 6 - consoles, 7 - vertical connecting elements
31.10.2016
Typical formwork for monolithic slabs
To simplify the work with casting floors in low-rise construction, experts recommend dividing the entire floor area into separate sectors or strips, 1.5 m wide, and concreting the ceiling structure of the building in several stages. This approach provides certain advantages:
- The number of racks and support beams used to hold the formwork frame is reduced. Complete concreting of the ceiling can be done with significantly fewer expensive support posts;
- The loss of time associated with the inability to carry out finishing operations in the building due to the supports installed inside the premises that hold the formwork is reduced several times;
- The small dimensions of the slab allow you to freely reach the most remote parts of the concreted floor, while the middle part of the slabs hardens in the formwork, you can prepare the reinforcement for the next slab and begin removing the floor formwork from the first, already hardened section of the floor.
Thus, the sectional method of concreting the floor turns into an “assembly conveyor”, which makes it possible to significantly reduce the loss of time associated with the forced wait for the concrete to gain strength.
It is clear that determining the period after which to remove the floor formwork depends, first of all, on the air temperature. At 20 o C, the side part of the floor formwork can be removed after 3-4 days. It is recommended to disassemble the deck and remove the support posts no earlier than after 10 days. At lower temperatures, the period for removing formwork elements doubles. More accurate recommendations can be obtained from tabular data in construction manuals and SNiPs.
How to sew a deck
The easiest way to assemble the formwork is by filling a regular plank onto installed horizontal floor beams. The greater the distance between the support beams, the thicker the boards should be.
Often, sheet metal or standard laminated boards made of OSB and chipboard are used to arrange the bottom part of the formwork. In theory, in this case a flat and smooth concrete ceiling surface is formed. But in practice, this effect can be achieved by laying ordinary reinforced thick-layer polyethylene on padded boards. There is no “bare” cement surface of the ceiling in a residential area, and the resulting quality is quite sufficient for fine finishing, after a little polishing. There are more labor costs, but unreasonable costs for the purchase of laminate are eliminated.
Important! Removing wooden boards from a concrete floor surface is much easier if there is a separating layer of polyethylene film. Painting or coating significantly contaminates the ceiling part of the slab
Make the correct reinforcement frame for the floor slab and pour concrete
After laying the polyethylene, it is necessary to make and install a reinforcement frame for the floor. According to the standard scheme, at the base of the floor it is necessary to make two layers of reinforcement with an 8 mm rod with a window size of 20 cm. The distance from the film to the bottom layer should be no more than 3 cm, the top layer of reinforcement must be made 10 cm higher. To ensure an even plane of the upper reinforcing mesh, L-shaped supports of the same height are welded to its bars. After laying the rod in the formwork, each thread of the reinforcement is tied in the frame at horizontal and vertical intersections.
Reinforcing bars released from the walls of the building must be welded to the ends of the reinforcing frame of the slab. To do this, it is necessary to bend each rod at an angle of 90° to the level of the upper reinforcing layer. If you simply weld the reinforcement at a right angle, then after a few months the concrete at the joints will begin to crack and crumble.
In addition, when laying communications and wiring inside the frame, plastic channels and hoses cannot be laid in close proximity to the reinforcement threads; it is better to place them at the maximum distance from the rod.
Concreting the formwork is carried out with the utmost care. If you pump the concrete mass with a pump, due to the large weight of the solution, the jet can damage the sides and part of the deck
It is safer, although not easier, to fill the formwork in small portions, 50-100 liters of solution each. After the initial setting of the solution, the concrete surface is smoothed with a wooden plank soaked in water and regularly sprayed with water during the hot season.
Practical recommendations
- If floor formwork is needed for one-time work, its purchase is not justified. It's better to rent.
- The minimum rental period is 15 days. This may be enough for concrete to mature at an air temperature of at least 25 °C, provided it is properly cared for. In winter and autumn, of course, the period may be longer.
- You can save additional money by replacing moisture-resistant plywood with inexpensive chipboard or thinner (8-10mm) plywood. But! In this case, you need to make sure that the deck can withstand the load.
- The joints of the formwork flooring must be sealed or the plywood (chipboard) must be overlapped with a margin of 20 cm.
- Along the perimeter of the ceiling, around staircase openings, chimneys, ventilation ducts, it is necessary to install enclosing vertical formwork (sides). They are usually made from boards 150 mm wide. To prevent the fence from being squeezed out by concrete when supplied by a concrete pump, it must be strengthened by any available method. For example, boards are fixed with binding wire.
- Whatever type of formwork is used, the formwork flooring is in any case covered with waterproofing material: plastic film, glassine or any other material that does not allow moisture to pass through.
Reinforcement of a solid floor slab with reinforcement
Having completed the installation of the formwork, proceed to two-layer reinforcement with the formation of square cells with a side of 15 or 20 cm. When forming the reinforcement frame, follow the sequence of operations:
- Cut the steel rods to the required size, guided by the results of the calculations performed.
- Form a lower tier of reinforcement from the longitudinal and transverse rods, placing supports 30–40 mm high in the areas where the rods intersect.
- Tie the joint areas using a special device and tying wire.
- Lay vertical fixing elements made of steel wire at intervals of 100 cm and attach the second tier of the frame to them.
- Connect both meshes into a single power circuit, installing special clamps in increments of 40 cm.
When performing work, pay attention to the following points:
- placement of rod joints in a checkerboard pattern;
- compliance with the amount of overlap exceeding the diameter of the rod by 40 times;
- rigidity and immobility of the reinforcement frame poured with concrete;
- ensuring a distance between mesh frames of 12–14 cm.
Compliance with these recommendations will allow you to form a strong amplification circuit.
After the formwork has been installed, reinforcement can begin (using metal rods to form the frame of a monolithic floor)
Overlapping technology
The practice of recent years has shown that monolithic flooring using corrugated sheets is most often used in the construction of garages, outbuildings and industrial premises.
In residential premises, corrugated sheeting is rarely used as a finishing for the ceiling.
This fact is explained by purely aesthetic considerations. If such a decision is nevertheless made, when the strength of the structure is taken into account, then when finishing the room, the ceiling is decorated with plasterboard or suspended panels.
Similar solutions are used in the construction of factory buildings.
Preparing to pour concrete
When calculating the strength of a monolithic floor using corrugated sheets, the developer needs to know that structures of this type are used in the construction of houses made of brick and concrete.
In houses made of timber or rounded logs, foam blocks and aerated concrete, such structures are not used.
To assess the strength of load-bearing elements, columns and beams are selected first
Particular attention should be paid to the distance between the beams. Overlapping scheme
Overlapping scheme
To a large extent, this interval determines the type of corrugated sheet. According to current codes and regulations, a sheet of profiled metal must be supported by 3 beams.
This condition must be met without fail, otherwise the corrugated sheet will sag and deform under load. In such a situation, the monolithic floor as a whole is under threat of destruction.
The most important stage of work is the fastening of corrugated sheeting to the beams. The technology for fastening profiled sheets is selected depending on the material from which the beams are made.
The sheet is attached to the metal floor beams with special screws with a reinforced drill. In common parlance, installers call this method of fastening armor-piercing.
The corrugated sheeting is attached to the concrete beams with the same screws, but this is done in the places of the pre-drilled holes.
A plastic dowel is driven into the hole, which ensures the strength of the connection.
The joints of corrugated sheets must be secured. If this is not done, then when pouring concrete there is a possibility that the geometric shape of the sheet will be violated.
Before laying concrete, the sheets of corrugated sheets must be additionally supported with spacers from below.
For temporary fastening, you can use logs and even boards with a thickness of 3 cm. When the concrete stands, these spacers can be easily removed.
Reinforcement and pouring of concrete
The construction of a monolithic floor using corrugated sheets is always carried out with additional reinforcement.
Essentially, reinforcement laid in accordance with building codes constitutes a frame. It is this frame that provides the monolithic floor slab with the necessary bending strength.
The reinforcement mesh is easy to install and fasten with your own hands. Along each wave, along the lower position of the wave, reinforcement is laid.
Video:
When constructing individual housing, the maximum diameter of the rod can be 12 mm. Reinforcement with a diameter of up to 8 mm is laid across the profiled sheet.
After the longitudinal and transverse reinforcement bars are laid, they need to be fastened at the intersection points. Some experts recommend spot welding for this type of fastening.
Practice and accurate calculations show that when using special strapping wire, work is done faster and with good quality. This operation is handled by workers who are just starting their career.
The next step after installing the reinforcement frame is to fill the monolithic floor with concrete. This procedure is responsible and requires careful execution.
When you do the work of installing a monolithic floor using corrugated sheets yourself, the question arises as to whether it is possible to use concrete prepared on site. There is no clear answer to this question.
According to building codes, concrete must be poured into such a structure in one go. If pouring is performed in several stages, the strength of the overlap will be lower.