If such a need arises as concreting the yard of a private house, you do not always need to look for craftsmen and pay large sums for it. After studying the technological process, you can independently fill not only the paths, but also the platform for the car.
The least labor-intensive and cheapest way to bring your yard into excellent condition is to concrete it. If you wish, you can pour the concrete yard yourself.
Scope of work
In order to fill the yard with concrete, you will need to perform the following steps sequentially:
- excavation;
- installation of a drainage system;
- installation of formwork;
- waterproofing;
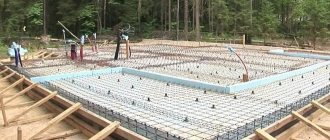
- reinforcement;
- installation of beacons;
- pouring concrete;
- processing during concrete hardening.
Each step is important and cannot be skipped. Since it is possible to fill the yard with concrete only if the work technology is fully followed, which will ensure a high-quality, durable and beautiful coating.
The main stages of concreting a path or yard.
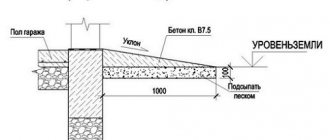
Thickness of concrete cellar walls
An underground vegetable storage facility built from concrete is one of the most budget-friendly options, all other things being equal: durability and functionality.
So, if the construction of a brick cellar may require the services of a qualified mason, you can build a concrete cellar with your own hands and thereby save on expensive hired labor.
At the same time, a very important issue on which the final cost of building a structure depends is the question of the optimal thickness of the walls of the vegetable storage.
The optimal thickness of the walls of an underground cellar built in dry soil with low groundwater is 150 mm with mandatory vertical reinforcement. In this case, the walls do not experience serious mechanical loads, so the value of 150 mm is taken based on design considerations and ease of pouring.
When arranging a structure in moist soils with high groundwater levels, the walls of the cellar in winter experience quite a serious load from soil heaving. In this case, the wall thickness must be at least 250 mm, also with mandatory vertical reinforcement.
The indicated values are confirmed by practical experience in the construction and operation of domestic underground structures with dimensions from 2x2 to 4x4 meters in plan.
Excavation
These works have some specific nuances, since they directly depend on the topography of your site and the type of soil. If the soil in the yard is not fertile and you still have to import black soil, then all excavation work comes down to marking the yard with your own hands, leveling the surface and adding a thin layer of crushed stone.
It is necessary to remove the layer of earth so that the surface of the concrete is at the same level as the surface of the earth, i.e. by 20-25 cm.
And if the base is clay, then you don’t have to add crushed stone. It is best to remove a good fertile layer and transfer it to flower beds and beds, where it will be completely useful.
Three reasons to do concreting
Why should the decision to concrete the yard be considered correct?
Firstly, a concrete-filled area is easier to keep clean. Impassable dirt will not accumulate on such a surface, grass will not grow through it and it will not have to be weeded out. In winter, it will be easier to free the yard from snow debris.
A concrete yard is easier to keep clean.
Secondly, you will get a solid, flat surface that a car of any class, even a truck, can drive onto. At the same time, the yard will not be torn up by wheels and covered with gullies.
Thirdly, it's simply aesthetically pleasing. By concreting the local area, you can simultaneously improve it by allocating space for flower beds, benches, providing a network of alleys, etc.
By concreting the yard you can zone the space
In order for concrete to retain its attractive appearance for a long time, and its surface integrity, it is necessary to strictly follow the technology of the pouring process.
Drainage device
A drainage system is necessary to remove moisture from concrete, since the presence of water in the soil negatively affects its strength properties. It is a simple two-layer bedding made of crushed stone and sand. Sand is poured first and leveled, in a layer of 5-6 cm.
The sand must be compacted well. To do this, it is best to spill it with water, and then walk over it with a tamper. The tamper can be made from a piece of a wide channel by welding a vertical metal handle with a crossbar to it.
The second layer of crushed stone, 6-8 cm thick, is poured onto the sand and is not compacted, but only leveled.
To fill the drainage, it is recommended to use a medium or fine fraction. A large stone will not settle immediately, but may shrink over time. As a result, cracks may appear in the concrete, especially on narrow paths.
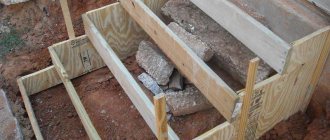
After all the excavation work is completed, you can proceed to the main technological process, which begins with the installation of formwork for pouring concrete. It is needed so that the concrete does not spread to the sides, and the edges of the site and paths are smooth.
Construction of a concrete path.
Composition of concrete for pouring a yard
Different types of concrete are used in construction. For example, the construction of dams and bridges passing through bodies of water requires special hydraulic concrete. There are also acid-resistant, fire-resistant and other varieties. They differ in their composition and characteristics.
But in private construction, the simplest concrete is usually used. It consists of 4 components:
- Binder
- Coarse aggregate
- Fine aggregate
- Shutter
Sometimes various additives and plasticizers are added to the mixture to impart additional properties. But even these four basic components allow you to prepare high-quality concrete.
Binder
Concrete begins to harden due to a chemical reaction that occurs between water and cement. The latter is called astringent. It seems to bind the remaining components into the total mass, creating a strong structure.
For concrete in the yard, it is best to use Portland cement marked CEM I 32.5 N (grade M400) or CEM I 42.5 N (grade M500). The first variety is suitable for non-heaving soils with low groundwater level. It is advisable to take the second one when the site is located in swampy areas or in regions with severe frosts.
The cement must be dry. Each bag must be checked by touch to ensure there are no hard lumps. The fact is that moisture, in contact with cement, starts the setting process in it. If this happens, such material is no longer suitable for concrete.
Many summer residents prefer not to throw away the remaining cement, but to store it for the future. Here you need to understand that the binder has a certain shelf life - only 2 months. After this, the material begins to lose its original properties. Within 90 seconds from the date of production, the cement becomes 25% less quality. And after six months you can only throw it away. By the way, for the same reason you should not buy torn bags: after opening the package, cement must be used within 30 days.
Coarse aggregate
This is a solid bulk material with grains from 5 to 20 millimeters in diameter. It forms the structure of the future concrete and gives it additional strength, as well as frost resistance. The quality of the finished structure depends on the characteristics of the filler.
Crushed stone
The most suitable material in this case is crushed granite stone. It is produced in quarries by crushing dense rock. Since crushed stone has practically not been subjected to weathering processes, it retains high strength and tolerates temperature changes well.
Unfortunately, granite quarries are not located in all regions of our country, and delivery of crushed stone from afar can entail serious financial costs. As an alternative, you can consider crushed stone from amphibolite and serpentinite rocks.
It is highly recommended not to buy marble, limestone and diorite crushed stone, as well as gabbro. The fact is that they do not have high enough frost resistance, and the first two also have low strength. In principle, they are all quite capable of withstanding the loads from passing people. However, in regions with harsh climates, such aggregates can seriously reduce the service life of concrete.
Gravel
Despite the external resemblance to crushed stone, gravel has lower characteristics. This is due to the peculiarities of its origin. If in quarries raw materials are extracted from monolithic rock by explosion, then gravel is formed over hundreds and thousands of years due to the gradual weathering (destruction) of rock masses. Large boulders break off from the parent rock and then break down into smaller grains. The result is a certain mass in which particles of different diameters, different strengths, and so on can be found.
Natural gravel cannot be used as concrete aggregate. Its characteristics are unknown, and some grains are so weathered that they crack even when squeezed in the hand.
But in many regions, other than gravel, there are almost no high-quality bulk materials of suitable size. Therefore, so-called crushed gravel is produced there. For this, river or lake varieties (pebbles) are usually used. The raw material is passed through a crusher to get rid of soft rock grains. The result is a relatively strong material that can be added to concrete. Of course, it cannot be compared with crushed granite stone, but in the absence of other options, it is also quite suitable.
Construction garbage
Broken brick, slate or concrete may remain in garden areas after various works. Sometimes they are even specially purchased at sites where buildings are being demolished. Theoretically, such materials can also be added to the concrete mixture, but only for the most primitive work. If you want a durable deck in your yard, you should use only high-quality aggregates. And broken brick, slate and concrete are not one of them. Essentially, this is waste that can be used, for example, to fill ditches or create temporary driveways to the site.
Fine aggregate
This is a material with grains from 2 to 3 mm, which allows you to reduce cement consumption and declinch larger fractions. Without adding fine aggregate, concrete will quickly crack and become unusable.
Sand
Sand is mined everywhere, so there should be no problems purchasing this material. However, let’s say right away that not all varieties are suitable for concrete. For example, ephelium and quartz sands have grains that are too small, almost dusty. It is very difficult to work with such filler: it constantly precipitates and requires regular stirring. Otherwise, the sand will be unevenly distributed throughout the mixture and the concrete will not be strong enough.
It is best to use quarry (alluvial) or river varieties. During extraction, they are purified with water, which allows them to get rid of foreign impurities.
In general, the cleaner the sand, the better. You can even check this at home. Take a small amount of material and place it in a transparent container, and then fill it with water. Now shake the resulting mass well. If the water becomes cloudy and turns brown, it means there is a lot of clay in the sand. It should not be added to concrete.
Since it is almost impossible to remove foreign impurities from sand on your own, it is better to check with the supplier in advance that you need the material for preparing concrete. Just in case, it makes sense to ask for a product certificate. It indicates which GOST the sand corresponds to, as well as what characteristics it has.
Dropout
This material is produced in quarries along with crushed stone. You could say that this is a by-product. However, screening has a wide range of applications. Including, it is added to concrete instead of sand.
The screenings have rough grains that provide good adhesion to other components of the mixture. In addition, it is more durable and withstands low temperatures better. And, finally, screening may cost you less than sand (although this does not happen in all regions, so you need to compare prices).
PGS and PShchS
Sand-gravel and sand-crushed stone mixtures are two-component materials. On the one hand, they contain large grains of gravel or crushed stone, and on the other, they also contain fine sand. It would seem that this is an ideal aggregate for concrete. Why buy separately crushed stone and sand when you can immediately buy PShchS?
But it's not that simple. Remember when we said that coarse aggregate should have a diameter of 5 to 20 mm, and fine aggregate should have a diameter of 2 to 3 mm? Crushed stone is a fractional material. It is specially sifted at the quarry to obtain grains of the same size. Sand also in most cases has a homogeneous composition. But PGS and PShchS - no. For example, a sand-crushed stone mixture of fraction 0-40 can contain grains up to 40 mm in diameter. And the lower limit is not set at all. That is, these are large and small pebbles mixed with sand and dust. Their specific ratio is unknown in advance.
Having purchased PGS or PShchS, you may encounter two difficulties. First, you will still have to separate the fine aggregate from the coarse aggregate to get the proportions correct. This will require a construction sieve and quite a lot of time. Secondly, it may turn out that sand predominated in the mixture, and, on the contrary, there was not enough crushed stone. As a result, you will need to reorder the material, which will require additional costs.
Shutter
Despite the strange name, this is ordinary water. In addition to starting the concrete setting process, it also increases the plasticity of the mixture, making it easier to lay. The main thing is not to “overdo it”. But we'll talk about this a little later.
The water should be clean, without odors or oily film. It is best to use well or tap water (but never river or waste water).
Installation of formwork
As a material for formwork, it is fashionable to use any good flat material that has one smooth side. Such material, for example, could be:
- boards;
- flat slate;
- chipboard (chipboard);
- plywood.
It is very convenient to use sheet plastic to fill curved paths. If your stock of materials does not contain anything similar, you can rent standard metal formwork from any construction organization. This is practiced quite often today.
What brand of concrete is needed to fill the yard?
Concrete in the courtyard of a private house usually does not experience serious pressure. Mostly people just walk along it. However, you need to calculate in advance the loads that will be exerted on the coating, and in accordance with them, select the correct grade (class) of concrete strength.
What is the grade of concrete?
This parameter is denoted by the letter M, followed by a numerical value - from 50 to 1000. There are 20 such brands in total. The number indicates the maximum load that a concrete cube measuring 10x10x10 cm can withstand. The indicator is measured in kg/cm2.
For example, M150 concrete does not collapse at pressures ranging from 125 to 175 kg/cm2. This is a good indicator, and this brand is often used for simple tasks. M500 concrete has much higher strength (475-525 kg/cm2), and such material is rarely needed in private construction.
What brand is needed to fill the yard? It is believed that the best option would be concrete not lower than M200. This is quite enough to withstand the loads of people moving. If it is expected that heavy objects (for example, concrete benches) will be placed on the site, you should take a higher grade - from M250 to M300. Stronger concrete is not required for such tasks.
You may have noticed that when we mentioned the word “brand” earlier in the article, we added the word “grade” in parentheses. This is not without reason: the fact is that the system of dividing concrete into grades is outdated. It gives only an approximate idea of the actual strength of structures.
What is concrete class?
Imagine that we are pouring concrete into a yard of 40 square meters. To establish the strength grade, it will be enough for us to test only one sample measuring 10x10x10 cm. And by it we will judge the entire structure. But concrete (especially self-mixing) rarely has the same strength throughout its entire volume. Somewhere we could put more cement, somewhere we could pour more water.
Thus, the brand will only give us a rough idea of durability. And in laboratories and in the professional construction environment, strength in classes has long been measured.
The class is designated by the letter B, followed by a numerical value - from 3.5 to 80. The number indicates the minimum pressure (in megapascals) that the concrete sample can withstand in 95% of tests.
In other words, if the brand tells us only about average strength, then the class means guaranteed strength. This means that B22.5 concrete will withstand a pressure of 22.5 MPa in 95% of cases. Most likely, it will withstand more, but it is important for us to know the minimum indicator. With its help, we will correctly calculate the design loads on the coating.
Why is strength still measured in marks?
Despite the fact that this system is outdated and has low accuracy, in private construction concrete is still divided into grades. The reason is simple: you need sophisticated laboratory equipment to determine the class. But it’s easier to establish the brand - you just need to know what components and in what proportions you mix.
Moreover, knowing the brand, you can predict the approximate class of future concrete. You can use the table below for this:
| Concrete grade | Closest strength class |
| M50 | B3.5 |
| M100 | B7.5 |
| M150 | AT 10 |
| M200 | B15 |
| M250 | IN 20 |
| M300 | B22.5 |
| M350 | B27.5 |
| M400 | B30 |
| M450 | B35 |
| M500 | B40 |
| M600 | B45 |
| M700 | B50 |
| M750 | B55 |
| M800 | B60 |
| M850 | B65 |
| M900 | B70 |
| M950 | B75 |
| M1000 | B80 |
As you can see, to fill the yard you will need M200 (B15) concrete. Brands M250 (B20) and M300 (B22.5) are also suitable. Anything lower has too little strength. And, starting with grade M350 (27.5), concrete has improved characteristics, and the cost is much more expensive.
Waterproofing
The waterproofing device is necessary in order to prevent the penetration of moisture from the soil into the concrete, as well as to prevent the premature loss of liquid into the soil from the concrete mixture after it is poured. In addition, in the future, the waterproofing layer will prevent grass from growing through the concrete layer.
As an inexpensive waterproofing layer, you can use ordinary polyethylene film. If you have unnecessary roofing felt or waterproofing material, then use this material.
After this stage of work is completed, reinforcement begins. It needs to be done so that the concrete structure becomes stronger and more durable.
Stages of pouring work
We place beacons
After the area is leveled, you can begin installing beacons.
The leveling of the site of a private house was carried out during the installation of the “cushion” of the structure using a building level. Next, metal profiles are secured for “beacons” throughout the prepared area. And also for orientation they use ropes fixed at the level, which are called “spiders” due to the round configuration of the auxiliary structure.
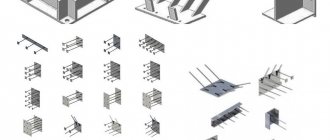
Reinforcement
Next, they begin to create a reinforcing layer. To do this, metal rods or a wire grid with a large cross-section are used; they are placed in the spaces between the “beacons”, while the sharp edges of the elements are bent into the ground. The reinforced frame will protect the structure from deformation and cracking and will preserve the integrity of the structure.
Preparation of the solution
A large volume of material should be prepared using a concrete mixer.
In order to properly concrete the yard, you should take a responsible approach to the selection of the constituent substances of the mixture. These materials must be of high quality and in proper quantities. To mix the monolith, a concrete mixer is used; this work will be difficult to do manually - you need to prepare a large volume of material. Using the necessary ingredients, we achieve a working suspension that is uniform in consistency and color. You can purchase a finished product, but its cost is high.
Pouring concrete
Spread the solution onto the work surface with a shovel into the space between the “beacons”. In this case, you should ensure that the mixture covers the profile guides by 2 mm. The excess mass of the substance is removed with a spatula or a tool with a flat surface. You can use a special strip; it is installed perpendicular to the landmarks and moved through the mixture, leveling the surface of the site.
In hot weather, the concrete jacket should be periodically moistened to prevent temperature deformations.
Final work
The surface becomes more durable after treatment with a special impregnation.
After pouring, finishing activities begin. To do this, polymer-cement impregnations are used, which treat the surface of the structure to give it strength, while not neglecting the edges and corners. The work is carried out immediately after pouring the solution, sprinkling the powder around the perimeter of the object. This can be done after the monolith has hardened, but to do this, remove a 1 cm thick layer in strips and pour in a suspension diluted with water. After hardening, the areas are protected.
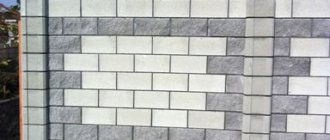
The yard will be decorated with decorative concrete. To do this, the monolith is painted with special paints that have the following characteristics:
- wear resistance;
- durability;
- breathability;
- moisture resistance;
- resistance to solar radiation.
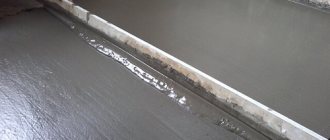
By placing slats in the solution, expansion joints can be formed.
It is also necessary to protect the concrete structure from temperature fluctuations; expansion joints are constructed for these purposes. Under the influence of temperature, the material either contracts (in frost) or expands (in heat). To regulate the condition of the coating, before pouring the solution, wooden slats are placed in the frame, which are removed after hardening. Second option: expansion joints are cut with a grinding machine equipped with a diamond wheel, the gap depth is up to 3 cm.
Reinforcement
To make reinforcing mesh, it is best to use ready-made metal welded mesh. The thickness of the wire in it must be at least 6 mm, and the cell dimensions must be at least 100 mm. It is very convenient to work with such a mesh, laying it in ready-made sheets, overlapping each other.
If you have metal rods with a diameter of more than 8 mm, scraps of old pipes, fittings and similar materials, then you can use them for reinforcement.
All this metal is laid on the surface of crushed stone and tied together with binding wire.
After you finish the reinforcement, you should install the beacons. They will accurately indicate to you the upper level of the site or path when pouring concrete and screeding.
Knitting reinforcement with your own hands.
Curing
The drying process of the monolith takes place quickly, but it is recommended not to start operating the object from the first days of readiness. The material will reach its maximum strength a month after pouring. Caring for the structure involves maintaining an optimal humidity level, especially in the first days after construction. The surface of the site is moistened with water from a sprayer. At high temperatures, the strength of the substance decreases by 2 times. Therefore, concrete will have to be watered in hot weather throughout its entire service life.
Installation of beacons
As beacons, if we concrete the yard with our own hands, it is best to use a metal profile, which is used for installing drywall. Their cost is quite affordable and they can provide the necessary rigidity without breaking under the pressure of the concrete mass.
To prevent rain and melt water from accumulating on the site and paths, their surface should have a slight slope. This should be taken into account when installing beacons. To do this, they are placed not along, but across the site. First, using a level, install two beacons along the edges, securing them in slides made of cement-sand mortar. Plaster solutions cannot be used to secure beacons.
After the solution has set, stretch 2-3 cords between these two beacons, and install the remaining beacons along them. As a result, they will all be on the same level. On paths, given their small width, beacon slats can be installed lengthwise, two at a time.
The nuances of do-it-yourself concreting
When laying concrete, some features must be taken into account:
- To ensure a high-quality solution, you should use sand with a small content of clay impurities and large particles. Check the quality of the sand by pouring it into a bucket filled with water. If the water remains clear after shaking, it can be used. Cloudy water indicates a high content of clay and silt impurities in the sand.
- To strengthen the coating, a small portion of cement is applied to the hardening concrete and rubbed into the surface of the concrete composition.
- To prevent overheating and the negative effects of the sun's rays, the coating is painted white.
- To reduce the moisture content in the solution, it is recommended to use coatings containing salts that have the ability to absorb moisture from the surrounding air.
- To prevent the coating at the joints from cracking, the prepared concrete mixture must be poured evenly and as quickly as possible.
- Concrete should not be splashed with water once it has set if reinforcing mixtures are used. This may cause them to peel off.
- When performing preparatory work, a slope should be provided along which precipitation will be drained. For this purpose, when the concrete hardens, metal pipes are laid on it, pressing them down. After the solution has hardened, the pipes are removed, and the resulting grooves will function as gutters.
A similar technology is used when installing a concrete floor on the ground in a house that does not have a basement, garage, basement or other outbuildings.
Concreting the site and paths
Pouring concrete itself is a fairly simple, but labor-intensive and very responsible process. The appearance of the entire concrete structure and overall quality depend on its precise implementation. Work must be carried out at an outside temperature of 5°C to 25°C.
In order to concrete the yard, you can order the delivery of ready-made concrete, which will significantly reduce the amount of work performed. Or, in order to save money, prepare the concrete mixture yourself.
It should be noted that with a large area of concreting the yard, purchasing ready-made concrete is more preferable and expedient.
If the size of the site is not very large, then the mixture can be prepared independently. To do this you will need:
- concrete mixer;
- shovel;
- buckets and a wheelbarrow for moving sand, crushed stone and ready-mixed concrete.
Concreting process.
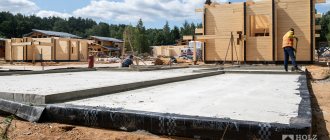
Benefits of concreting a yard
First, concrete is stronger than asphalt. Secondly, it is cheaper than paving slabs, paving stones and stones, which today are increasingly being used to form areas in front of the house. It cannot be said that the concreting process itself is simpler than other options, but many try to carry out this construction process without involving craftsmen. And this is a big mistake, because there are certain nuances that affect the quality of the final result, which home craftsmen may not be aware of.
And other advantages of concreting the yard:
- long service life - up to 20 years;
- high maintainability of the concrete layer:
- possibility of organizing parking;
- concrete withstands all natural loads well: precipitation, wind, sun;
- vegetation will not break through the concrete layer;
- by creating a slope, the problem of puddles and dirt is solved;
- Snow can be easily removed from the concrete surface;
- subsequently, the concrete coating can be used to base the same paving slabs or any other decorative material.
As for the shortcomings, we can note the unpresentable appearance of the concreted area. Although, depending on how you look at it. On the other hand, today manufacturers of paint and varnish products offer special paints for concrete, which have shown themselves to be excellent during operation. So this disadvantage can be translated into an advantage.
Concrete is a high-strength building material Source homebydleni.cz
Concrete mix and pouring process
Before you concrete your yard, you need to purchase cement. The ratio of the components of the mixture will depend on its brand. In the case of using cement of the common M400 grade, for each part it is necessary to add 4.2 parts of crushed stone and 2.5 parts of sand.
As a result of mixing the mixture in such proportions, concrete grade M200 is obtained. If you use M500 cement, then add 4.9 parts of crushed stone and 3.2 parts of sand to it. Initially, all components are mixed dry, and after that, water can be gradually added until the mixture is ready for installation.
The finished concrete is thrown with a shovel inside the formwork so that all the voids are filled. Including those lying inside the profiles. The height of the initial laying of the mixture should be 3-5 cm above the level of the beacons. Leveling is carried out using a plaster rule and a level lath, which is gradually stretched along the beacons. As a result, all excess concrete mixture will be removed and the surface will be leveled.
Each path should be filled completely at one time. You can only stop at expansion joints. If you fill part of the path one day and continue the next day, then cracks will appear at the junction of the concrete laid on different days.
If you understand in advance that the work will not be completed in one day, then you can fill it layer by layer. First, half the thickness is poured, and the next day the top layer is poured.
Video description
This video shows how to correctly form expansion joints:
And lastly. The concrete pad for a car or yard is ready. All that remains is to give it a presentable appearance. To do this, today they use a special concrete grinder, which is popularly called a “helicopter”. It simply levels the surface and makes it perfectly smooth without tool marks, pebbles, protrusions and depressions.
Previously, to strengthen the top layer of concrete, cementation was carried out. This is when the laid mortar was sprinkled on top with cement and the latter was rubbed with trowels. The cement was absorbed into the concrete mortar, increasing the strength of its surface. At the same time, the surface itself became smooth.
So, we can assume that the concrete platform is ready.
Drying and surface treatment
After pouring concrete, you need to wait until the surface dries and sets. This occurs, depending on the temperature and humidity, in approximately 24-48 hours. After this time, you should remove the inserts that were installed to form thermal joints and clean the surface with a wide spatula from remaining deposits and irregularities.
The setting of concrete does not mean that this material has achieved the calculated physical characteristics. The complete hardening time for concrete grade M200 can reach 28 days, but it is believed that concrete structures can begin to be used within one and a half to two weeks.
As a preventative measure, it is recommended to cover the concrete area and paths with plastic film to reduce the rate of water evaporation.
At this time, it is necessary to take measures to ensure that the concrete does not dry out prematurely, and that the water necessary to complete the chemical process of cement hydration remains in it.
In too hot sunny weather, the site needs to be watered periodically. After two weeks, you can remove the film and finally start using the new elements of landscaping your yard
How to care for the surface
Properly dried concrete screed becomes stronger. This process takes a long time. After the water leaves the surface of the concrete, they clean it, removing existing sagging and bumps, and cover the coating with film.
If the weather is hot, it is necessary to water the concreted area, otherwise at a temperature of +30°C, concrete that was mixed with alumina cement loses about 50% of its safety factor.
The hardening process is fast, but it takes more time to gain basic strength. Therefore, you should not park a car or drop heavy objects on a newly concreted area.
Maintaining a moisture reserve is required not only during the formation of the solution, but also during further use.
Concrete pool wall thickness
A monolithic concrete pool is an expensive structure. At the same time, the price of concrete for pouring the bowl of a structure is one of the main items of construction cost. Correct calculation of the required amount of building material makes it possible to order the optimal amount of concrete and reduce the cost of filling the bowl to the lowest possible “minimum”, all other things being equal.
There are no regulatory requirements regarding the optimal thickness of the pool walls, as is the case with the thickness of concrete for the floor screed area. Therefore, we have to use empirical data obtained from experienced developers of such structures.
With mandatory horizontal and vertical reinforcement, the thickness of the pool walls, obtained empirically and tested by practice, must be at least 200-250 mm. Increasing the thickness of the pool wall above 250 mm leads to an unjustified, rather significant increase in construction costs.