Repairing and remodeling apartments and houses has become almost a national hobby for the country's residents. There can be many reasons to modernize your living space. But in most cases they are far-fetched. They are urgently needed only for major repairs of old buildings.
Unauthorized planning is a widespread phenomenon, which entails not only problems in legitimizing such changes and the inability to sell redesigned housing, but also much more serious consequences, leading to the collapse of residential buildings and human casualties.
In order to prevent these consequences, there is a special procedure for making changes to the layout and design of premises, which you can familiarize yourself with in the article presented to your attention, as well as learn about the features of constructing door (window) openings in walls made of various building materials.
Design of redevelopment in the form of an opening in the wall
Before starting to construct a door (window) opening in a place not provided for in the architectural plan, it is necessary to find out whether the wall in which the opening is planned to be made is load-bearing or whether it performs a minor (dividing) function. This can be done by reading the technical plan of the premises or by contacting the management company servicing the house.
Subsequently, a decision is made on the economic feasibility of constructing a doorway and a calculation of non-production costs associated with the preparation of the project by a specialized organization, obtaining permission from the local administration (housing inspection), and legitimizing the changes made to the BTI.
The algorithm of actions is something like this:
- Ordering a redevelopment project from a specialized design and construction organization;
- Coordination of the project with the housing inspectorate of the administration at the location of the facility;
- Application to the administration;
- Documents on ownership of the redeveloped premises;
- Technical passport of the premises;
- Consent of all residents registered in the residential premises for redevelopment;
- Permission from the inspection of historical and cultural heritage sites, if the premises are located in a building of historical value;
- Receipt of a new technical passport indicating the changes made.
If these bureaucratic obstacles do not scare you, you can begin redevelopment.
Technical requirements for the arrangement of doorways in residential buildings
The currently valid SNiP (building codes and regulations) 35-1-2001 regulates the general requirements for the arrangement of residential premises in apartment buildings. In addition to them, there are SP (building rules) 35-102-2001, which regulate the construction of passages, openings, passages and doors for persons with disabilities (wheelchair users).
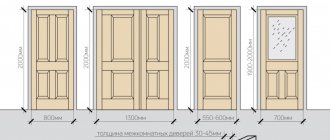
Traditionally, in most residential premises of typical buildings, doorways had a width of 600 to 1200 mm with a height of 1900 to 2100 mm.
The narrowest doors (600-700 mm) were equipped with bathrooms, toilets, storage rooms and exits to the balcony (loggia), the widest were entrance doors and interior doors to living rooms (900-1200 mm).
Based on these generally accepted standards, you should plan to install a new doorway or expand an existing one.
The construction of arched window openings is not provided for in standard projects and can only be done if the wall is not load-bearing. To do this, use a shaped channel with an appropriate bend.
Step-by-step instructions for making a jumper
In order for everything to really work out correctly, the jumper must be made with maximum compliance with the assigned tasks. The developed step-by-step instructions can help with this. You just need to be careful and not skip technological steps:
- First you need to prepare the channels of the required size. For example, if we are talking about an opening of 2.5 m, it is better to take a three-meter steel channel No. 18.
- Then you will need to make holes in the channels for the tightening bolts (the recommended fastener diameter is 20 mm, and the length should be such that it allows them to protrude 50 mm from each side of the wall.
- Next, on the load-bearing wall that goes under the opening, you will need to mark the opening itself, as well as indicate the placement of the steel lintel.
- Then you need to drill through holes to indicate the location of the opening and lintel on the other side of the wall too.
- Then you will need to remove the plaster from the designated areas.
- Using a jackhammer or manually, you need to prepare niches (they are also called grooves) on both sides of the wall - for the subsequent installation of channels. The depth of the gouging should be about 10 cm, and the height - about 18.
- Next you need to prepare (drill) holes for the coupling bolts according to the markings.
- The seats for the channels must be cleaned most thoroughly. And then moisturize.
- Next, cement mortar is applied (cement grade M100, at a minimum, and preferably more).
- And using the pressing method, the channels are “set” - each in its place.
- Next, you will need to insert the mounting bolts through the corresponding holes and tighten them.
- Then each channel must be filled with brick or cellular concrete.
Preparing for work on installing an opening in the wall
To make an opening in a wall, regardless of the material from which it is made, you will need the same type of construction tool:
- Hammer;
- Drills for concrete (brick) with a length exceeding the wall thickness by 100-150 mm;
- Angle grinder (grinder) with a disc diameter of at least 400 mm;
- Cutting discs for stone (concrete) d-400 mm or more;
- Cutting discs for metal (for cutting reinforcement);
- Sledgehammer;
- Chisels;
- Pick;
- Hammer;
- A set of tools for working with electrical wiring;
- Building level;
- Plumb;
- Spatulas and trowels for concrete mortar;
- Mixer for preparing the solution;
- A set of wrenches for fastening metal structures of the lintel and strengthening the opening;
- Welding machine.
In addition, you should prepare a protective suit, respiratory protection against construction dust, construction glasses or a plastic shield to protect your eyes, and covering material for the floor and interior items.
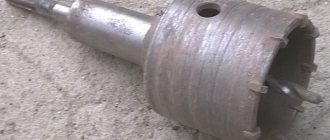
What tools are used to get the job done?
After determining the wall thickness, you need to prepare the following tools:
- hammer drill with a set of drills;
- angle grinder with a diamond disc; hammer and chisel;
- safety glasses, gloves.
In the absence of appropriate equipment, you must resort to renting tools that are currently being assembled.
By using such devices once and returning them, you can significantly save on the purchase of expensive equipment.
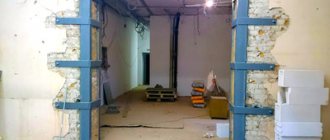
Opening in load-bearing wall
Before constructing the opening, a metal detector and electrical wiring identifier are used to determine the presence of metal structures and electrical wires in the thickness of the wall.
If detected, the electrical wiring is moved to a new location.
The doorway being installed must be located no closer than 300 mm from existing ventilation shafts and chimneys.
Two jumpers are bolted together
Sequence of work on constructing an opening in the wall:
- Installation of supporting floor supports;
- Removing a layer of plaster over the area of the planned doorway;
- Accurate determination of the boundaries of the doorway and drawing its contours on the wall;
- Drilling through holes along the upper edge of the doorway;
- Grooving a niche for laying a lintel to ½ wall thickness;
- Laying the lintel and pouring it with concrete;
- Grooving a niche for laying the second lintel (after the concrete has hardened on the first) (The number of lintels can be more than 2 and equal to the thickness of the wall);
- Tightening metal (steel) channels of jumpers together with bolts;
- Drilling holes along the contour of the doorway at intervals of 20-30 mm;
- Drilling holes to divide the area of the doorway into squares (8-12) depending on the area;
- Cutting the outline of the doorway and squares with a “grinder” on both sides of the wall;
- Knocking out with a sledgehammer;
- In a reinforced concrete wall – cutting of reinforcement;
- Grooving niches for laying wooden blocks for fastening the door frame;
- Installation of vertical support channels along the slopes of the opening;
- Welding (screed with bolts) with a load-bearing lintel;
- Fixing with anchors in the thickness of the wall;
- Leveling and plastering the contour of the doorway.
There is a lot of useful information about the most effective methods of cutting and drilling concrete, as well as about the tools used for this, in a separate article: cutting concrete.
Finishing and acceptance problem
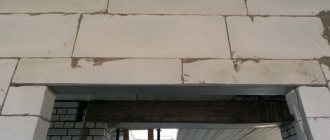
The reinforcing structure is completely hidden under the finishing. This gives rise to the problem of control of the finished opening by supervisory authorities (the same housing inspection). They must first check the quality and integrity of the reinforcing structure, and it cannot be seen under a layer of plaster, putty and drywall. Here is the time to show a document that can be issued by the organization that was involved in strengthening the opening (for this it must have SRO approval). The document is called an act of inspection of hidden work - it describes all stages of the construction of a reinforcing structure and contains its drawing.
Opening in a brick wall
The list of works is similar to the case with an opening in a load-bearing wall with some features.
Doorway in a brick wall
Brickwork is characterized by the presence of a large number of dressings between individual bricks, therefore, after removing the plaster on the freed wall, they try to align the contour of the future opening with the places where the bricks are connected with mortar. Particular attention should be paid to the upper border of the doorway. It must pass through the place where the bricks join. It is strictly forbidden to cut bricks lengthwise in order to adjust the dimensions of the opening to the dimensions of the box. The excess space above the lintel is filled with mortar.
It is advisable to knock out the bricks cut along the contour of the opening using a hand chisel and a heavy hammer, hitting the joint between the bricks. Brickwork is always dismantled from top to bottom. It is not advisable to use an impact hammer or a jackhammer so that vibration does not destroy the bonds between bricks in adjacent sections of the wall.
If it is not possible to completely cut through the side surfaces of the doorway due to the large thickness of the brickwork, the cavities formed after removing the bricks are immediately filled with cement mortar. Before this, the brickwork is abundantly moistened with water.
Change of size
Before changing the size of the window on the wall, which is provided for by the project, you need to determine what type it is: load-bearing or dividing.
This can be understood by studying the house design or technical plan, which the operating organization or BTI must provide to the apartment owner. After this, it will be possible to prepare a set of documents to obtain permission to re-equip window openings.
When and why is it necessary?
In the era of standard construction 60-90. of the last century, most windows were installed in sizes that do not correspond to modern design and building fashion in residential construction.
The place of old square or other standard window blocks is now occupied by rhombic, arched and other modern double-glazed windows.
Along with the need to install large windows, there is a situation when, on the contrary, they need to be installed smaller ones, for example, when old administrative premises are being reconstructed or additional wall area is needed to install furniture.
Reconstruction
Work on the reconstruction of window units is associated with the safety of the process, since it is often carried out at height.
In addition, dangerous work includes dismantling a lintel and part of a brick wall; if done incorrectly, the wall above the window may collapse.
In addition to the usual mason's kit, for dismantling work you will need a sledgehammer, a jackhammer and a hammer drill. Currently, many construction companies, instead of a jackhammer, have begun to use diamond cutting, which works with any type of material, providing the most accurate opening configuration with virtually no noise and dust.
In addition, to carry out the work, the master will need a brick to form a new size, laying mortar and a set of protective clothing:
- headphones,
- gloves,
- overalls,
- mask,
- glasses and shoes.
How to expand and contract?
Expanding the size of window blocks in a brick house is carried out using impact-dynamic cutting or a tool with cutting diamond discs.
The main stages of increasing the window opening:
- Clear the room of objects as much as possible.
- Protecting furniture from possible dust.
- Removing old double glazing.
- Mark the boundaries of the new portal.
- Punch a through hole.
- Install a new jumper, larger in size.
- Bricks are knocked out 30 cm wider than the window frame.
Stages of reducing a window opening:
Take out the old window block and clean the internal surfaces of the opening, including with a vacuum cleaner
Cleaned surfaces are primed to ensure good adhesion to the solution. In order to reduce the cross-section of the window opening in height, holes for the corners are drilled with a hammer drill and secured with dowels or bolts. Lay the 1st brick row. To reduce the width of the opening, masonry is made, which is aligned along the outside. The gaps between the corner and the wall need to be foamed, then carefully cut off the frozen foam with a knife. The laying solution is thick; during the process, the blocks are tapped with a rubber hammer to ensure better adhesion to each other. Allow the masonry to harden overnight. Reinforced mesh is installed. Plastering is being done. The dried plaster is carefully coated with a primer. A new double-glazed window is inserted and the small window is ready.
Construction of an opening in a concrete (reinforced concrete) wall
A characteristic feature of the construction of openings in reinforced concrete walls is the presence of metal reinforcement in the thickness of the wall. To prevent breakage of cutting discs (especially expensive ones with diamond coating), first, using a metal detector, determine the location of the reinforcement bars and mark them with a bright indelible marker. Drilling of holes is carried out at a distance of 20-30 mm away from them. The frequency of drilling holes across the opening area increases by 2-3 times compared to openings in a brick or block wall.
Doorway in a concrete wall
In order to save time on replacing cutting discs, it is more convenient to work with two grinders at the same time: one with a disc for concrete, the other for metal.
After knocking out the top row using a puncher or jackhammer, cut off the reinforcement between the holes. After this, they begin to knock out the next row. The work is done from top to bottom.
In reinforced concrete walls, a transverse lintel is usually not installed, but the broken doorway is reinforced using an all-welded or prefabricated metal frame installed in the broken opening. It is fixed to the wall using expansion anchors or reinforcement rods driven into the wall using welding. To do this, you can use cut reinforcement protruding from the wall.
Useful tips
If the opening is large enough, then its additional reinforcement can be made in the form of supports for the floor, stylized as columns. The easiest way is to use large-section steel pipes. There are enough options for decorating them, and the services of a specialist will not be needed.
Even at the stage of preparation for marking the wall, it is necessary to clarify exactly how the in-house electrical wiring is organized in this area. Moreover, if it was not the owner who was doing it, but someone else. The simplest method is using a cell phone in “FM” mode. By moving it along the surface of the wall, it is easy to determine the wiring layout based on the noise level.
To increase the strength of structural elements (pipes, channels), it is advisable to perform injection. That is, introduce a solution of good fluidity into the cavity. After hardening, it will not only improve the strength of the samples, but also increase the reliability of their bonding to the base material.
In principle, making an opening in the wall is not difficult. The technology is quite simple and can be done by a home craftsman. But only subject to competent calculations and the correct choice of tools and materials. Therefore, it is at the preparation stage that special attention should be paid. Everything else is a matter of time.
Opening in a block wall
Blocks that are especially popular in modern construction, for example, hollow blocks made of expanded clay or slag concrete, are convenient to work with because they can be easily cut with cutting discs for stone (concrete). The number of dressings is significantly less than in brickwork. A block, unlike a brick, can be cut crosswise along the top edge of the opening without losing its strength. The principle of arranging the opening is the same as when working with brickwork. The lintel over the opening should be wider than the doorway by the length of the block on each side.
The technology for strengthening the sides of a doorway is similar to that in brick walls.
Expanding the opening in the wall
Expanding the opening in the wall
A technologically simpler option. Initially, determine the length of the lintel located above the doorway. After this, the possible width of the opening is calculated. The lintel must rest on the masonry by at least 500 mm. If this condition cannot be met, a vertical groove is initially cut along the side of the wall from which it is planned to be expanded. After this, a vertical support (channel) is installed in the groove, which should rest tightly against the lower edge of the lintel. Similarly, fix the vertical support on the other side of the wall. They are pulled together or welded together. Only after this work begins on drilling and cutting out the wall to widen the opening.
Carrying out work on the installation of a doorway is physically difficult and very dusty work. It is recommended to do it yourself only on non-load-bearing (interior) walls made of bricks or blocks.
When constructing an opening in the foundation and basement, the proximity of the ground should be taken into account, so this case has its own characteristics. More details about this in the article: how to make an opening in the foundation.
Types of bricks
Here it would be more appropriate to talk not only about brick, but also about ceramic stones. Their sizes are standardized.
So, the length of both bricks and stones is 250 mm, and the width is 120 mm. The difference between different types of bricks and ceramic stones is in height.
Masonry materials can be either solid or hollow. The former are used for laying particularly loaded areas - for example, pillars, as well as walls with ventilation and smoke ducts. The latter are preferred when laying external walls due to their greater thermal efficiency.
The materials for making bricks are clay and lime. Ceramic bricks are made from the first, and silicate bricks from the second.
Of the important characteristics of this material, two are worth noting. First of all, this is a brand that characterizes the compressive strength, and secondly, frost resistance, or the number of freezing and thawing cycles.