February 20, 2019
There is often a need to replace floors. This procedure is time-consuming and financially expensive and requires a lot of labor. Unfortunately, once the work is done poorly, efforts and money are invested to correct it. Our article will help you avoid mistakes and share tips on how to optimize coating repairs.
Typical reasons for changing floors.
- Old age house;
- Ancient wooden boards;
- Major repairs;
- Installation and installation of “warm floor”;
- Thermal and sound insulation;
- High humidity;
- Deformation and creaking of floorboards or joists.
The most difficult thing to repair and change is in an old house. The boards there are dried and therefore difficult to remove.
Replacing a wooden floor with a concrete one in an apartment or house
If you decide to replace the floor yourself, then first you need to prepare. Save a certain amount of money, purchase the necessary tools and, if possible, find someone to help you. Boards must be purchased at a hardware store or at a trusted wholesale warehouse. The decorative, final coating can be anything: linoleum, parquet, laminate. During repairs, the residents of the room should be moved to another room.
Required tool:
- Shovel;
- hammer;
- nail puller;
- axe;
- screwdriver;
- mount;
- Grinder;
- level.
We also recommend stocking up on work gloves and garbage bags. The work is garbage and requires high-quality cleaning during and upon completion.
How to dismantle
- Removing skirting boards around the perimeter of the room.
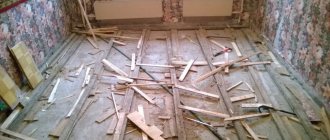
- Raising old flooring. Use a nail puller to remove nails, and a screwdriver to remove screws, respectively. It is advisable not to reuse wooden boards; take them to a landfill or leave them for firewood.
- Dismantling the logs. This step is only available if the space in the room is completely free. The joists must be removed carefully; they are often firmly attached to the rough base. Otherwise, you will waste time repairing the remaining damage.
- Thorough cleaning. Remove all debris and notice any remaining boards or other waste.
These steps will help you prepare to begin your renovation. Now the room is free and clean, you can safely replace the boards in it.
Removing a concrete floor
Concrete floors are rarely cleaned. It is required only if it is categorically worn out and in poor condition. Also in the event that cosmetic repairs are not enough for him. Typically, it can be repaired if the condition is only slightly different from normal. It is necessary to remove it if the house has low ceilings, and the design project provides for thermal insulation. If you decide to remove the screed, then approach this procedure carefully. It is best to spend some money to entrust the work to professionals and avoid damage to the interfloor covering. After removal, cleaning and removal of construction waste is again necessary.
Bringing the surface into the appropriate form.
- Remove dust thoroughly. This way you can notice defects: dents or cracks, if any. Pay attention to whether there is mold or dampness.
- Correct the defects listed above. If you skip this step, there is a risk of reduced sound and thermal insulation. Use polyurethane foam or sealant for such purposes.
- Allow the rough finish to dry. This is an important step, violation of which can affect the quality of the coating.
Creating a Finish Coat
To achieve the most durable concrete floor that has an aesthetic appearance, you need to perform the following steps:
- sand the base with sandpaper;
- apply polymer compositions to it or paint it with paint intended for this type of coating;
- when the concrete has partially hardened, you can iron the screed;
- cover with self-leveling floor, forming a thin layer.
The concrete coating will dry in 2-3 weeks. When choosing materials, it is worth considering that the self-leveling floor helps to increase the overall level by 30 mm. The same is observed when using ceramic tiles, so it is worth thinking in advance about what the finishing coating will be like.
New screed
The screed helps to level out the defects resulting from the work. For example, minor damage. With its help, the floor surface becomes smooth and even. The solution for its manufacture can be purchased at any hardware store. There, the consultant will tell you which manufacturer and which components are best to choose in your case.
Application technique:
- Prepare the mixture according to the instructions on the package.
- Pour the mixture over the surface, level it with a spatula. You can pierce the resulting film with a needle roller in order to remove excess air that has turned into bubbles.
- Leave the poured surface to dry. She must gain strength.
The drying time of the mixture depends on the components included in it. The expiration date is indicated on the package. On average it is 7-30 days.
Advantages of the screed:
- the possibility of laying insulation on a flat surface;
- you can apply sheets of plywood;
- possibility of quick installation of heated floors;
- strong fixation of wooden boards on the joists.
Installation of beacons
Beacons on the floor on the prepared surface are installed simply: special profiles or a corner for decorating corners during plastering are placed on small mounds of gypsum putty. The evenness of the surface formed by the upper points is checked using a long building level.
If the base is poorly prepared and there is a difference in levels in certain areas of the area, the height of the putty mounds varies. The beacons must be placed at a distance of 40-50 cm, directing them along a line from the window to the door. Parts cannot be moved until the putty has completely hardened and the beacons are securely fixed.
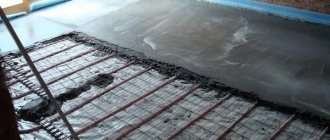
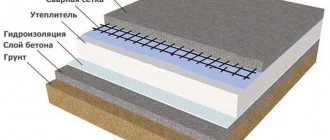
Screed with expanded clay insulation
It is used when replacing coatings in multi-story buildings. However, it is also used in the repair of floors in cottages and private buildings. The reason for this is simple: a screed using expanded clay does not put pressure on the floors between floors. Installed as follows:
- Waterproofing. This procedure is required when pouring on the first or basement floor. It is best to install it using the plaster or cast method. The material should be placed not only on the floor, but also on pre-primed walls.
- Cover the room with thick plastic film. It should extend onto the walls by approximately 17 cm. The pieces of material must be secured with finishing tape.
- Damper tape sticker. It is placed on top of the film. This method helps protect the screed from damage due to temperature changes.
- Arrangement and installation of the same even level of beacons using a level. They are installed and fixed using concrete mortar. The height of the landmarks should correspond to the sum of the thicknesses of the screed and the expanded clay layer.
- Sprinkling expanded clay. It should be placed just below the level of the installed beacons, and then leveled. The concrete solution should be poured on top.
- Pour the mixture in a thin layer. This step must be performed after the screed has dried.
A huge advantage of the work done will be the ability to lay any decorative covering on the floor.
Tools and materials
The best option for the floor base in an apartment on the ground floor is concrete.
It is not at all afraid of moisture and is quite resistant to various types of mechanical damage. In addition, if necessary, such a floor can be insulated without problems. But to get the job done quickly and efficiently, you should take care of the necessary tools. So, you will definitely need:
- a crowbar and a trowel, which will serve as a tool for completely dismantling the old covering of wooden joists;
- slag, high-quality cement, fine crushed stone, expanded clay and dry sand;
- large container for solution and bucket;
- large meter and chalk for marking;
- level;
- large size polyethylene film;
- materials for heat and waterproofing;
- gloves, protective mask and suit;
- rule;
- wooden stick for stirring the solution.
Filling without subsequent insulation
This work is complex and painstaking. It is performed according to the following principle:
- Flooring film for waterproofing. It should be placed directly on the base.
- Putting up damper tape.
- Placing reinforcement on the material to protect it from water.
- Installation of beacons on top of the grid. Beacons are located at the appropriate level of the plane.
- Pour concrete solution. It needs to be positioned 1.5 - 2 cm higher than the landmark on the far wall. This is the distance by which the fill will sag. When laying the mixture, you need to move only along the guidelines.
- After leveling the entire floor surface, the screed must be left to dry. This takes from 3.5 to 4 weeks. It all depends on the substances used to make the screed. Temperature and humidity levels are also important.
- Laying lags.
- Placement of insulation.
- Laying floorboards.
Preparation of the solution
When it is necessary to replace a wooden floor with a concrete one in a private house, but it is undesirable to put excessive pressure on the existing floor, it is recommended to use ready-made mixtures. The most popular brands are KREISEL, which allow you to fill a layer from three and a half to seven centimeters. The dry composition does not need to be stirred - it is completely ready, all you have to do is add a little water.
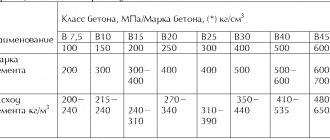
Much more often they use the classic version - cement-sand mortar. To prepare it, the following proportions of ingredients are recommended:
- cement M400 - one part;
- sifted construction sand - 3 parts;
- lime dough required as a plasticizer - 0.1 parts;
- If there is no mesh for reinforcement, fibers are added to the solution, using the amount recommended by the material manufacturer.
Before adding water, the dry mixture must be thoroughly mixed so that it becomes evenly colored. Then gradually add liquid without stopping stirring. The action is continued until the consistency of the solution becomes similar to thick sour cream.
In order to properly fill the floor, you need to prepare the required volume of dry mixture in advance. Then all that remains is to dilute it with liquid without stopping the filling procedure. If you use equal parts of the mixture for kneading, it is easy to understand how much water you need to add - you can get the finished solution much faster.
Laying the screed
You need to start laying the screed from the window or the far wall, moving in the direction of the door. The mixture is spread out in large portions at once, and then leveled according to the marks using a long rule.
There are usually no difficulties in such work; it is only advisable to act quickly, without waiting for the solution to set. It is more convenient to perform such an action together, then everyone has their own familiar part of the event - one does the kneading, the other applies it.
Finish coating
Every apartment owner wants to get the most durable, aesthetically pleasing concrete floor. To do this, the finished screed is processed in the following ways:
- use sandpaper for sanding;
- cover the concrete with a polymer composition or paint it with paint;
- the surface is ironed three days after the solution has partially hardened;
- form a self-leveling floor on top of the screed.
When it is planned to cover the floor with tiles, no additional measures need to be taken to prepare the surface. But before covering the surface with linoleum or laminate, it is advisable to carry out ironing. If you use a self-leveling coating, you can get a perfectly smooth surface with an effective decorative design.
Installation of dry screed
Dry screed is also a well-known method for leveling the surface. It is used mainly in multi-storey buildings. When using this method, you do not need to mix the solution with water. The floor using this technique is also installed in several stages.
- Laying polyethylene film in such a way that it covers up to 10 centimeters of the future coating. It is necessary to mark the board in this opening so that the dry mixture does not fall off.
- Installation of beacons made of wooden beams or metal. It is necessary to align the landmarks using a level.
- Add filler. The level should be slightly higher than the installed beacons.
- Leveling dry material.
- Laying gypsum fiber boards with interlocking joints. The places where they are connected must be treated with an adhesive composition, and it is also necessary to ensure the accuracy of the joining of the plates. Additionally, fasten the blocks with self-tapping screws.
- Installation of decorative covering.
Laying insulation
We use extruded polystyrene foam with a thickness of at least 50 mm as insulation. The sheet sizes are standard 1.2 x 0.6 m.
The sheets have a “locking” device in the form of a “step”, this is clearly visible in the photograph. When laying the sheets, the locks are connected, and the surface is continuous, without cracks.
Since extruded polystyrene foam (extrusion) is completely indifferent to moisture, you can do without waterproofing. We lay the sheets, checking with a level that they lie level. Add sand in the right places and check again.
Replacing a wooden floor with your own hands
Floor structures are installed on a pre-prepared screed. Let's talk about the correct replacement of joists in a residential area. The process takes several stages.
- Marking the room. For such purposes, a stretched strong thread or twine, which is painted with some kind of paint, is used. Most often this is blue. Installation is carried out observing a certain distance between the logs. This distance should be equal to the width of the extension cord.
- Cutting bars of appropriate sizes. Do not forget that the space between the wall and the laid beam should not be more or less than the thickness of the extension. Minvata helps for such purposes. We do not recommend using polystyrene foam. Its use has a negative effect on the body of the occupants of the room. May cause some diseases.
- The logs must be fixed at the base. They need to be fixed to a concrete floor.
- Remember to maintain a distance of half a meter between the joists and their posts. The level is achieved and adjusted by the instrument of the same name.
- Laying insulation. Let us remind you that the procedure is performed in 2 stages. First, between the joists and the wall around the perimeter of the room; after - between the installed bars.
- Covering the structure with vapor barrier film. All this should be fixed using a construction stapler.
- Creating plank flooring. First, the floorboards should be laid at a distance of up to 7 cm from the wall. This way you can create a ventilation and compensation gap. It will be useful in case of subsequent linear extensions. These arise due to inconsistent levels of humidity and temperature.
- Fastening skirting boards over plank floors. It should be fixed to the wall.
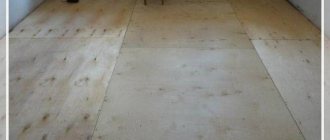
- Watch the location of the joint of the sheets. they need to border approximately in the middle of the block - lag. Sheets of plywood are laid like bricks. This method helps to add additional rigidity to the structure.
- Seal the cracks after installation is complete. To do this, you should use putty. We remove the excess immediately; after complete drying, you can go over the seams with fine-grained sandpaper.
- Installation of absolutely any floor covering. For example, linoleum, parquet or laminate.
Evaluation of the work list
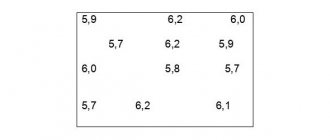
The reinforced concrete slab needs to be inspected and then the level measured. For this, it is better to use a laser; with its help you can quickly determine whether there is a difference in height.
One of the following situations often occurs:
- Several slabs are laid in the room, they form a step;
- a convexity or concavity is visible in the center of the room;
- The slab is placed at an angle.
The scope of work should be assessed. It is necessary to strive to ensure that the screed has a small mass, so the concrete layer is kept to a minimum. It is poured on the backfill or a lightweight solution is used.
If the height difference is large, from 70 mm or more, then the order of work is as follows:
- the concrete screed is made from 40 to 50 mm thick;
- the remaining free space is filled with expanded clay concrete composition.
Adviсe
If your building does not have a freight elevator or does not have one at all, then take care of a person who will help deliver boards to your apartment. Of course, you can hire movers.
If you are not experienced in installing floors and do not have an assistant, entrust the work to professionals. However, remember that here you will not need to spend money on purchasing tools and removing construction waste. It’s up to you to purchase the necessary building materials and control the work. This method will help you if floor repairs need to be completed as soon as possible.
Time it right. An inexperienced person, usually the owner of an apartment, spends a full day's work renovating the floors in one room with an average area of 12 square meters. If the repair cannot last a long time for some objective reasons, think about hiring at least a few workers who can help you.
If you want to save on purchasing floor coverings, choose linoleum. It will serve you for a long time. Linoleum corresponds to the price-quality ratio.
In general, replacing floors is a difficult and expensive job. If you decide to do it yourself, then take your time. Spare no expense in purchasing quality materials. It is better to pay a little more initially than to later contribute huge sums of money to a future major floor renovation. If you decide to hire a team of workers, be sure to pay attention to the portfolio of work completed by the company. Also listen to reviews. Don't overpay for poor quality work. If you have any questions regarding replacing floors, you can consult with specialists in hardware stores when purchasing working material.
If you have any questions, or we have not covered any topic, write to us in the comments and our specialists will prepare the appropriate material.
Tags:
- Home renovation
Rate the material:
A little about very old houses
In houses where there is no reinforced concrete floor slab, there is one way to replace a wooden floor with a concrete screed: build a subfloor from plywood or chipboard. Some people recommend repairing the existing wood floor or adding additional covering.
However, in practice, such work takes a lot of time, money, and requires replacing damaged areas, removing old paint and other coatings to assess the condition of the boards.
Therefore proceed as follows:
- all flooring boards are removed;
- in houses with ceilings on beams or a metal profile, construction waste is poured between the floor and ceiling of the lower floor for sound insulation. All this needs to be removed;
- the state of the lag is assessed. If bad, they are deleted. If good, the logs are cleaned, treated with anti-mold and antibacterial agents and secured in such a way as to ensure the evenness of the plywood or chipboard flooring.
Preparation of the base for the screed begins with filling expanded clay into the interfloor ceiling on beams or I-beams. This layer will have low mass and have good sound insulation. Backfilling is carried out to the upper level of the lag. After this, they lay plywood or chipboard and operate in the same way as in an apartment.
Screed base