According to the standard and SNIP, a hollow-core panel should rest on the walls by 8-10 cm, depending on the wall material.
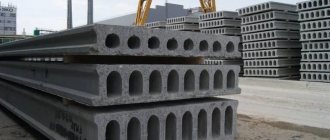
For large blocks of strength grade M-100, such as the Besser sand-cement block, or monolithic concrete, the recommended overlap is 8-10 centimeters. For small-piece but durable products, for example, ordinary building bricks, the support should be about 10-12 centimeters. In the case of using materials of less strength, such as gas silicate or polystyrene concrete, it is better to make the overlap larger (up to 20 centimeters), since there is a danger of destruction of the wall block. For PC floor slabs, the issue of pressure from the overlying wall on the end sides of the panel is important. The more you overlap the slab on the wall, the greater the likelihood of crushing the end of the panel and its further destruction. In order to avoid such a situation, small vertical meshes about 1 meter long are designed in the slabs, which take on the vertical compressive loads. This is why it is not recommended to cut PC brand panels yourself if you have made a mistake with the length size.
In addition, the series provides for the use of concrete liners to fill voids on one side of the slab. If the liners were not made at the factory, it is better to fill them yourself using M-200 concrete. On the other hand, void formers have a special narrowing that reduces the diameter of the hole, and there is no need to fill this side.
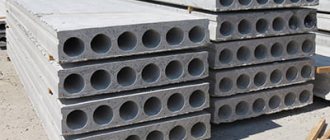
For bench-molded PB floor slabs, this problem does not exist, since they were designed based on sufficient strength of the end sides under any reasonable pressure that the floor slab may experience during operation. This was achieved, first of all, by using high-strength concrete M-400 and higher (as opposed to M-200 for PC panels), as well as due to a larger gap between the voids.
Supporting the sides is not specifically regulated by the standard, but we do not recommend making it very large. We must not forget about the pressure on the side void, which may well crush the product. The best amount of overlap would be up to 100 mm, i.e. until the first emptiness. If you have already purchased panels that exceed the required dimensions in width, we can recommend filling the outer hole with concrete along the entire length, especially if a heavy wall of several floors will press on it from above.
Lightweight slabs are no different in support size from standard panels.
To get acquainted with the dimensions of all panels, the diameter of the holes, the gap between the voids, we recommend that you look at our article Basic dimensions of floor slabs.
Hollow-core floor slabs are used in the construction of buildings and structures to divide them into floors. They are made of reinforced concrete, with different design features. The strength of the house and its durability depend on the correct choice of structures. When designing and installing, it is important to know the minimum and maximum depth of support of floor slabs on walls made of your material.
For different types of buildings, certain types of interfloor ceilings are used. During the installation process, it is necessary to follow the installation technology, which is regulated by regulatory documents (SP 70.13330.2012) .
Types by method of support
The slab used for interfloor separation is a reinforced reinforced concrete structure with voids. The holes in the slabs come in various shapes and sizes to lighten the weight of the structural element.
The choice of interfloor slab and the depth of its support depends on the design features of the building. The following parameters are taken into account :
- purpose of the building (residential, industrial, public);
- the material from which the structure is constructed;
- wall thickness;
- types of loads acting on both the slabs and the building;
- seismic characteristics of the development area.
Based on the type of support, interfloor slabs are divided into three categories . Their selection is carried out at the project planning stage, taking into account calculations of the loads acting on the load-bearing elements of the building.
On both sides
The support for such slabs is two opposite load-bearing walls. They are laid on capital elements, with narrow (transverse) sides. Most often, for this type, interfloor slabs with round voids are used, marked PK, 1PK, 2PK. They can withstand loads of up to 800 kg/m².
On three sides
They have reinforced end reinforcement and are laid on three load-bearing walls. They are mounted in the corners of the building, which have a U-shaped structure of load-bearing walls. They are marked PKT and can withstand loads of up to 1600 kg/m².
On four sides
Such slabs are reinforced with reinforcement at all ends, they are more rigid and have increased load-bearing capacity. They are used only in complex structures where maximum distribution of high loads is required, or in cases where the construction of additional superstructures is planned. They are marked PKK, indicating increased strength. They are practically not used in low-rise construction.
Flat floors
Flat floors are used in private construction.
This type of floor is often used for the construction of civil housing, which is made in the form of a solid slab with longitudinal ribs that work in bending. According to the design scheme, they are divided into non-beam and beam groups.
In the first case, the floor rests on columns with extensions (capitals); in the second case, the beams together with the panels work together as a single unit.
According to their structural characteristics, beam floors are divided into prefabricated beams, monolithic with beams, ribbed monolithic, prefabricated monolithic beams, beamless prefabricated, beamless monolithic, beamless prefabricated monolithic.
Most often, prefabricated beam structures are used in the construction of houses.
Depth of the establishment on the walls
All floors, regardless of installation method, can be laid on a foundation or load-bearing walls made of brick, reinforced concrete panels, aerated concrete or foam blocks.
It is important to know how much you can support a hollow reinforced concrete product. This depth depends on the material from which the supporting structures are constructed :
- brick - from 9 to 12 cm;
- panel - from 5 to 9 cm;
- aerated concrete or foam block - from 12 to 25 cm.
Failure to comply with the recommended laying depth can lead to the destruction of walls due to improperly distributed loads. Insufficient depth leads to coloring of the inner layer of masonry and plaster, or to cracking of the panels. Excessive distance taken for support will lead to the destruction of the outer part of the wall.
Diagram of correct and incorrect support on a brick wall:
Excerpt from SNIP
JV “Large-panel structural systems. Design Rules"
4.3.17 The depth of support of prefabricated solid-section slabs on concrete and reinforced concrete walls, depending on the nature of their support, is taken to be no less than :
- 40 mm - when supported along the contour, as well as two long and one short sides;
- 50 mm - on two sides and a span of 4.2 m or less, as well as on two short and one long sides;
- 70 mm - on both sides and a span of more than 4.2 m.
The support of formless hollow-core slabs on wall panels is carried out on two sides, that is, according to a beam pattern with a support depth of at least 80 mm for slabs with a height of 220 mm or less, and at least 100 mm for slabs with a height of more than 220 mm.
In all cases, the maximum support depth for hollow-core slabs without formwork is taken to be no more than 150 mm.
Supporting hollow-core slabs without formwork on three or more sides (inserting the longitudinal side of the slabs into the walls) is not allowed .
About hollow reinforced concrete products
Errors in laying the floor.
It is difficult to understand the issue if you do not know what floor slabs are. These are structural elements of permanent buildings, made of reinforced concrete, for the installation of floors between floors. Inside along the entire slab there are voids of various shapes, most often round.
Products are manufactured according to standard designs - a series of drawings that indicate design features and dimensions. The length of the elements is 1.5-12 m. Modern production technologies make it possible to cut slabs of the required length in increments of 100 mm. The width of the product is made into 4 types: 1000, 1200, 1500 and 1800 mm.
The standard distributed load for which each element is designed is 800 kg/m2. The slab can have a thickness of 16-33 cm depending on the design and length, the most common size is 22 cm.
Floor slabs are practically irreplaceable products. An alternative is a floor made of wooden beams or monolithic reinforced concrete. Wood is inferior to reinforced concrete in terms of load-bearing capacity, and the construction of a monolithic structure is a complex and expensive process.
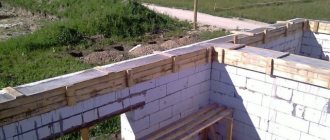
Armopoyas
Before installing the floors on the main structures, a monolithic reinforced belt is installed. It is carried out along the perimeter of the area of the main walls, along their entire width. Formwork is installed along the edge, then a reinforced frame of longitudinal, transverse and vertical reinforcing bars is mounted and filled with concrete.
When constructing an armored belt, the following requirements must be met :
- The height of the armored belt is from 20 to 40 cm (not less than the height of a standard aerated concrete block).
- The width must correspond to the width of the supporting element.
- The thickness of the reinforcement is at least 8 mm. The frame is tightly knitted with wire or fastened by welding.
- The concrete must match the brand of mortar used for masonry. The recommended grade of concrete used is at least class B15.
The armored belt serves to evenly distribute all loads. It also contains reinforcement fasteners, which are designed for reliable installation of interfloor ceilings. Since the armored belt is a cold concrete layer, it is provided with a thermal insulating coating.
Installation technology
When installing prefabricated concrete floor slabs on a construction site, a typical interface is performed according to the following algorithm :
- The laying of load-bearing walls is completed 2 - 3 rows before the design floor height.
- A reinforced monolithic belt is arranged along the support lines of the slabs, allowing the support reactions from the floor to be evenly distributed throughout the entire volume of the masonry. In some cases, the project does not provide for such a structure, and the installation of span structures is carried out over an underlying layer of rigid c/p mixture.
- An underlying layer is applied on top of the belt, smoothed over the entire intended area of support for the slab.
- A sling bracket or chains are attached to the ceiling element through mounting loops.
- The lifting mechanism lifts the slab to the desired level, and the installers carefully bring it to the support area.
- A truck or tower crane slowly lowers the slab onto the support platform under the control of the installers.
- If there is a slight deviation in the position of the structure, workers correct the element with crowbars or a sledgehammer through a wooden block.
- The following floor elements are laid using a similar principle.
- When the installation of prefabricated concrete products is completed, workers caulk the seams with a rigid cement-sand mixture.
- Reinforcing anchors are installed in the mounting loops of the slabs, which are subsequently intersected “crosswise”.
- The anchors are welded together, and the hinges are pressed to a horizontal surface with sledgehammers.
Upon completion of the installation work, the installation of monolithic sections begins, if the layout of the slabs provides for such a design solution.
Support nodes
They are designed for reliable and correct fixation of floor slabs on permanent elements. Laying the slab and fixing it to the wall is done using mortar and rigid reinforcing compounds.
Nodal connections must meet the following requirements:
- the end sides of the slabs should not be closely adjacent to the masonry;
- thermal insulation is performed between the masonry and the ceiling;
- It is recommended to close the hollow holes with special liners to prevent heat loss;
- The connection between the ceiling and the reinforced belt is made by rigidly connecting the reinforcement belt reinforcement with the reinforcing rods of the slab by welding.
The nodes depend on the number and type of capital elements. For support on two sides, they are made on transverse load-bearing walls, and for support on three or four sides - on both transverse and longitudinal walls. The nodes are also performed when the load-bearing elements are columns, trusses and floor beams.
When laying floor slabs, it is necessary to take into account all the parameters necessary for correctly supporting them on the load-bearing elements. The selection of slabs, calculation of nodes, reinforced belt and support depth are made at the building design stage.
After installation, do not forget to seal the seams.
Laying reinforced concrete lintels.
Reinforced concrete lintels are laid over window and door openings to further extend the walls. Jumpers can be load-bearing or non-load-bearing (filler). They differ from each other in their load-bearing capacity.
Load-bearing lintels are laid above the openings of load-bearing walls; such lintels are capable of carrying the load of the load-bearing wall and ceiling laid on them. The depth of support of the lintel on the brick wall is 250 mm.
Non-load-bearing lintels are laid over the openings of partitions and non-load-bearing walls; such lintels serve as filling for the wall or partition and they only carry the load of the brickwork laid on them. The depth of support of reinforced concrete lintels on a brick wall is 250 mm, on the brickwork of a partition, 200 mm.
All reinforced concrete lintels are laid on mortar grade 100, with a seam thickness of 8–12 mm.
I myself watched this video several times to understand what the workers were doing wrong and came to the conclusion that several factors played a role. It was necessary to put less mortar under the slab and the mortar should lie evenly and equally on one side and the other, the crane operator needed to be given more precise commands so that at the very last moment he would lower the slab very slowly and carefully, perhaps the mortar was a little runny. These slabs of strong curvature do not have PC 220. But looking ahead, I will say that I decided to cover the second floor with PNO, they are 160 mm, they are a little cheaper and for delivery it took one long piece, not two. And I regretted it a little because the PNO curves turned out to be tormented with them even more, there will be a video about this too. They sowed sand, but most likely they didn’t remove the concrete mixer or they didn’t clean it well and they weren’t prepared in general.
Should I make an armored belt under the slabs or not?
I’ll first tell you how I did it, and then I’ll explain why. You can’t call it an armored belt, that’s why no, I didn’t do it. I did it differently, we checked the hydraulic level and installed beacons, laid a masonry mesh and made a screed, but not across the entire width of the wall, but only in the places where the slabs rest (my support is no more than 140mm). This helped to avoid the solution from falling into the voids of the block when laying the slabs, thereby making it easier to align them level and relative to each other. Now about why I did this. A little history, at the design stage I also thought about an armored belt, but for a porotherm, unlike an aerated block, according to the manufacturer’s recommendations, there is no need to install an armored belt. On the Internet I found information that some people make armored belts from two or three rows of ordinary working bricks. When we started laying the Porotherm block, I was convinced that the block could bear quite large vertical loads and the difference in strength with the working brick was not significant for the Porotherm M100 and the M150 brick, and some bricks may be inferior to the block in strength. So why create a cold bridge, I thought, because the thermal conductivity of the block and the brick is different, which means there will be a temperature difference, and this causes condensation.
Important!
If you are designing or building a house yourself. Keep in mind that hollow core slabs cannot be laid on lintels; there must be at least 3-4 rows of bricks above the lintel. If this is not possible, for example, you decide to make high windows, there is a way out; then you need to build not a lintel, but a beam. Of course, it should be thicker than the lintel instead of the standard 220mm, make it 308mm, which is equal to 4 rows of bricks, reinforce according to all the rules with reinforcement of a larger diameter, use concrete of a grade not lower than M350.
Useful video
The video clearly explains why it is impossible to lean deeply into the wall. But I would argue with the maximum depth of 30 cm. It should be no more than 15 cm.
The ceiling is a very important component of any capital building. Their use is also closely related to leaning on walls. Let's try to understand this topic in more detail.
Features and purpose
It is appropriate to start the conversation about the use of floor panels with the fact that if the installation technology is violated, problems very quickly arise in them. Periodically it is reported that ceilings are collapsing in different places. Immediately after this, it becomes impossible to use the buildings normally.
Slabs or floor panels can rest either on a column or on an external wall. In any case, they are located horizontally.
The purpose of using slabs is to absorb the load exerted from above, with partial transfer of it to the vertical supporting structures of the house. In most cases these are standard products. The advantage of ready-made slabs is:
- reliability;
- ease of use;
- no special requirements for use;
- retention of vapors, gases and water;
- zero fire hazard.
Application
The use of reinforced concrete products is regulated by various guidelines, mainly GOST 26434-2015 and GOST 9561-2016. It is quite broad: at this time it is impossible to imagine the construction of multi-story buildings without reinforced concrete floor panels.
Such reinforced concrete products are used in the installation of floors, ceilings, foundations and, in rare cases, walls. Due to the fact that they have a standard size, the process of designing buildings is greatly simplified.
Design parameters
In order to avoid getting into unpleasant situations, especially in news releases, you need to pay great attention to calculating the basic parameters. The dimensions of the floor structures are selected specifically for all structures. In this case, the length of the spans located between the walls is taken into account. The spatial diagram of the building allows you to calculate the mass pressing on the supporting structures. Based on this mass, it is possible to determine the loads on an individual slab.
Important: when calculating the total load, the weight of the screed and partitions, insulating materials, furniture and other equipment is taken into account. Let the slab weigh 2900 kg and the load-bearing area be 9 square meters. meters. Accordingly, for 1 sq. meter accounts for 322.2 kg of weight. Next, the calculated figure must be subtracted from the standard figure.
From the resulting difference it is necessary to subtract the approximate load created by furniture, other structures and household appliances. After this there should be a solid margin of safety. Typically, the actual load per unit area is 2–3 times less than the value included in the project. This approach eliminates any surprises during operation.
The largest static load per point should be calculated with a reserve factor of 30%.
The dynamic load is calculated with a reserve factor of 50%. If you need to assess the suitability of old structures, you need to take into account:
- load capacity of walls;
- current state of building blocks;
- safety of fittings.
When placing heavy furniture or large cast-iron bathtubs in an old apartment, you must take into account the load limit. The most accurate results can be obtained by involving specialists. A professionally performed calculation will allow you to avoid many unpleasant situations. As for the width and height of floor slabs, here it is even more necessary to take into account the recommendations of professionals. In some cases, it is possible to resolve the issues of strengthening floor slabs on site by re-supporting them on temporary supports.
Stripping of floors in accordance with established requirements can be done only after concrete has been strengthened to 70% of the design value. In this case, a single tier of racks is installed. Note: if you need 50% stripping, you need to install a couple of tiers of racks. Span lengths up to 8 meters must be constructed with temporary support in the center. If the span is longer, then more supports are needed; but for slabs shorter than 3 meters, support is rarely needed.
Overlap and depth according to SNiP
The requirements of SNiP Russia state that the overlap of the floor slab on the underlying wall is determined by:
- the purpose of using the building;
- width of the walls;
- thickness of overlapping structures;
- their mass;
- seismic hazard level;
- the size of the covered spans.
A larger overlap is simply not provided for in SNiP. Panels of PC and PB types in brick houses are placed on a couple of short sides. If the structure is up to 4 meters long, then the overlap should be 7 cm; for a longer length it should be 9 cm.
The depth to which prefabricated structures rest is:
- when supported along the contour - 4 cm;
- when supported on a pair of long and one short side - 4 cm;
- when supported on two sides and the span of slabs is up to 4.2 m, the depth should be 5 cm;
- when supported on 2 short and 1 long sides - 5 cm;
- when supported on 2 sides with a length exceeding 4.2 m, the depth of support cannot be less than 7 cm.
SNiP 2.03.01–84 prescribes a number of requirements for the anchoring of reinforcement structures placed on supports. Of course, this moment also affects the final depth.
Important: the thickness of all parts of the ceiling located above technical underground rooms and passages (driveways) is calculated together with the insulating layer.
Separate requirements are imposed on the depth of embedding of structures into grooves. If the overlap is made with an incorrectly selected overlap, you can be afraid of the appearance of cracks and even complete destruction of the structure.
What does the concept mean?
Floors always operate in a building within one floor, taking permanent and temporary loads from their own weight, the mass of floors, equipment, furniture and people using the room.
When external forces are applied, internal forces arise in the element , which determine the geometric section and make it possible to calculate the span structure according to 2 groups of limit states.
At the same time, in the floor slab, along with the loads applied to it, support reactions arise, which are concentrated in places where the elements rest on walls or point vertical structures. These reactions are distributed over the support area and the larger its area, the smaller the load on each cm2 of the vertical element.
Thus, the depth of embedding of the floor in the wall is an important parameter that affects both the value of the supporting transverse force Q in the slab and the axial force N arising in the wall or column. Also, the size of the embedment affects the possibility of local crushing or chipping of the reinforced concrete product during load transfer .
Support nodes
When preparing a support unit for aerated concrete blocks, it is necessary to take into account all the loads created by:
- blocks located above;
- reinforcing belts;
- other objects pressing on the jumper.
Part of the window lintels under the ceilings is simply poured into the U-block. In other cases, the concrete lintel is cast inside the wooden formwork.
You can also use factory-ready aerated concrete lintels. The row of blocks that supports the lintel should be reinforced with a pair of rods with a diameter of 8 mm. The reinforcement strip should be 0.9 m on both sides or more.
The row above the aerated concrete lintel, on which part of the ceiling rests, also needs to be strengthened. Otherwise, high point loads can cause severe damage. Attention: the lintels and the walls themselves must have the same thickness. Interfloor aerated concrete floor slabs, as well as wall slabs made from small aerated concrete blocks, must have a support depth of at least 12 cm. Where local loads are transferred to the masonry, it is necessary to spill the solution (no more than 15 cm).
Minimum Maximum Limits
Modern technologies make it possible to implement almost any design solution. Thus, with the help of a monolithic slab floor, you can confidently cover a span of 6x6 m. Additional support points will not be needed. Such a problem can be confidently solved:
- a plate resting on 4 sides (10 cm thick);
- bottom mesh 10 mm;
- upper mesh 6 mm.
In most residential buildings built of brick, the end part of the hollow core slab should extend 9 cm onto the wall. The largest figure is 12 cm. The most accurate information can be obtained through special calculations. When laying a precast slab with voids on a panel wall, the minimum limit is 5 cm and the maximum is 9 cm.
If the wall is made of aerated concrete or foam blocks, these figures are 12 and 25 cm, respectively.
When using a ribbed slab, all the smallest and largest parameters remain the same as for hollow products. In both cases, they start from a single-span beam design. The parameters for supporting slabs for a wooden house deserve special attention. In this case, the walls must have a thickness of at least 250 mm. The smallest support value is 1 cm; the largest, according to various sources, is 16, 22 or 25 cm.
Methods of hanging on walls
Undoubtedly, the classic technique is leaning on 2 sides. In this case, bending occurs under the weight of the load, and the reinforcement picks up the resulting stress. The main condition for success is the correspondence of the created load and the parameters of the slab. Sometimes they try to lean on 3 sides. This technique has an alternative name - support with a valve.
This approach is acceptable if it is impossible to install the slabs in width, and it makes no sense to make a monolithic block. Technically, such a solution is worse than leaning on 2 sides. It is not advisable to install slabs on the long side onto a wall with a depth exceeding the thickness of the product itself. Otherwise, pinching will occur. They are especially dangerous for prefabricated structures.
It is strictly forbidden to:
- support the slab on two long sides;
- install auxiliary support in the span;
- rest the slab on two walls, taking out part as a balcony or console.
Insulation over structural slab
This typical looking construction site is anything but typical. What you see is actually the top layer of two layers of OSB subfloor. Underneath the subfloor is a layer of Type IX EPS insulation that is installed on the core board.
Sometimes ordinary questions can lead to an unusual solution. On a recent project we simply asked, “How do we insulate the slab?” The foundation system for this high performance home needed to be cast-in-place, and we were aiming for R-15 to R-20 slab insulation levels in our area. The homeowner wanted 10" wide plank decking throughout most of the home, so the subfloor needed was to be durable and protected from moisture from below. A plus was that the 2x8 exterior walls supported a wood rafter roof system, meaning the floor area would not be encroached upon by interior load-bearing partitions.