Beton-House.com
Website about concrete: construction, characteristics, design. We combine the experience of professionals and private craftsmen in one place
The process of laying laminate flooring on concrete floors
Laminate is one of the most popular floor coverings today. Relatively inexpensive, easy to install, practical and decorative, it is a good alternative to parquet and parquet boards.
But is it possible and how to properly lay laminate flooring on a concrete floor? This question interests many owners of new homes and those who are renovating their apartment. We will try to answer it in as much detail as possible.
- Self-leveling floor
What will you need for installation?
It takes 3-4 hours to lay laminate flooring in a room with an area of 15–25 m2 on a finished base. This type of coating refers to “floating floors”, which are not rigidly fixed to the base from below, but simply lie on it without fastening. Therefore, you just need to lay out individual laminate lamellas on a screed or flooring made of wood boards, connecting them firmly to each other.
To lay laminate flooring you will need the following tools:
Nothing particularly specialized is needed to install the coating in question. No special skills are required for this. Most home craftsmen can handle this tool without any problems and correctly. Installing interior doors with your own hands can still cause difficulties. With a laminated finish flooring, everything is much simpler.
Laminate in the interior
In addition to the lamellas of the laminate itself, in order to lay it on the floor, you will also need a plastic film for waterproofing. Plus, you will need a backing made of cork, foamed polyethylene or other similar material. The purpose of this lining is to increase sound insulation and distribute the load from individual laminate flooring strips to the base.
It is not recommended to neglect laying the substrate. It is provided with all step-by-step instructions from laminate manufacturers. If you don’t put it in, you can immediately forget about the coverage warranty.
Flooring options
The worst underlay for laminate is a roll of extruded polystyrene
Having written such a title, I feel awkward describing a low-quality substrate. After all, sellers do not have a bad product and you will have to dispute it with numerous commentators.
However, I encounter it quite regularly when laying and I would like to protect readers from such a purchase. Let me explain my position. Each insulation has advantages and disadvantages; this product has no advantages, except for its relatively low price.
Rolled sound insulation for the floor under a laminate made of extruded polystyrene foam is the most uncomfortable underlay I have come across in my work. The complexity of the flooring lies in the constant rolling of the roll and the fragility of the material.
When the canvas is rolled out, the cut end is bent. You have to press down with improvised objects. The curl is so high that it moves the hammer on the wooden handle. The fragility of polystyrene foam guarantees broken edges, which, however, can be glued with tape. But it will look like a collective farm.
The negative qualities of this chemical industry product include its thickness - it is only 2 mm. I've heard reviews that XPS insulation is better than foam insulation and maintains a stable thickness longer. I deeply doubt this. In my work, I have been involved in the dismantling of floor coverings with a laid polystyrene foam underlay. She became thin, like a sheet of paper. But I came across one in good condition. Apparently, the suitability of the old lining depends on the intensity of foot traffic, the amount of furniture in the room, and the evenness of the floor.
Once, while laying such insulation in a hairdressing salon, I asked: “Why did you buy an extruded polystyrene backing?” To which came the following response: “This lining has fire safety certificates.”
There is probably an incorrect interpretation of the facts here. Since any substrate has a certificate of fire compliance with standards. The conclusion is quite vague, would you agree!? The shock absorption of XPS in terms of flammability class - G4 and smoke generation - D3 is the same as polyethylene foam bedding.
Floor preparation
In order for the laminate to last a long time, the base underneath must be perfectly level. Differences in height are permissible only within a couple of millimeters per meter of coverage. If the unevenness on the subfloor is greater, the lamellas will move apart at the joints due to uneven distribution of the load.
The laminate is laid on bases made of:
- floor boards and parquet strips;
- wood boards;
- tiles;
- linoleum;
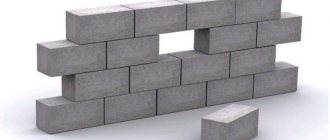
- concrete (screeds or floor slabs).
Styling tools
The main condition is that the base must be level and stable under the feet of a person walking on it. Sagging boards or recesses (bulges) on the concrete surface are unacceptable here. If there are such defects on the rough base, they should be eliminated before starting to lay the laminate.
If the ceiling or floor covering meets the requirements for levelness and resistance to loads, then it can be left. Otherwise, you will have to dismantle this foundation and build a new one.
Laminate in the house
Leveling the floor
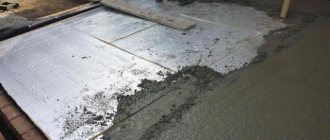
To level the rough base, most often they use a wet or semi-dry floor screed made from DSP. This is the most reliable and durable option. Concrete can withstand heavy loads and is resistant to moisture. However, it will take up to three weeks to set and harden. If you decide to lay laminate flooring on a concrete screed, then repairs to the house may last more than a month.
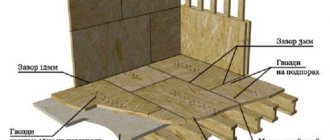
The subfloor is also made from gypsum fiber boards, chipboard, fiberboard or plywood. This option eliminates wet processes and is faster, since there is no need to wait for the cement mortar to set. However, if pipes break, such a base usually has to be completely or partially replaced along with the laminate. Contact with water for wood and gypsum fiber sheets is contraindicated. But in its finished form, such a prefabricated screed weighs much less than a concrete screed.
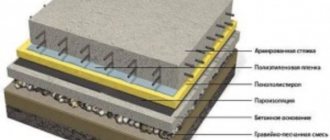
Substrate
Almost all manufacturers prohibit laying laminate flooring without a backing. This underlying layer is needed to redistribute the load on the floor, reduce noise and additionally insulate the laminated slats from moisture from below on the base side.
Most often, a film of foamed polyethylene with a thickness of 2–3 mm is laid as a substrate under the laminate. It is not afraid of moisture and is cheap. But you can also use analogues made from cork, pine needles and polystyrene foam. Cork and coniferous options are natural, eco-friendly materials, but they become unusable when exposed to water. Expanded polystyrene boards have increased noise and heat insulation, but are flammable.
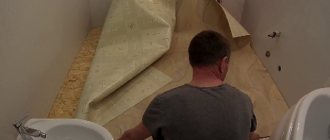
Laying the substrate
Features of concrete pavements
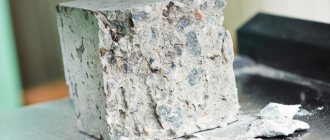
Concrete as a base is found in the form of floor slabs in apartment buildings, in floors on the ground; a special case can be considered cement-sand screeds, which formally cannot be considered concrete, but in terms of properties they are close to them.
Now let's look at the main features of these surfaces.
- Unevenness - the base for the laminate should have differences of no more than 2 mm per 2 m, sometimes no more than 3 mm per 1 m. Many concrete coatings do not meet these requirements, so additional leveling may be required.
- Capillary suction is the property of a building material to raise moisture inside a structure. This problem often occurs upon contact with fresh concrete that contains residual moisture. Water from the mineral base will be absorbed into the slats, causing the laminate to swell.
- Defects - concrete can often have sagging, cracks, and chips. Such flaws complicate installation - they need to be cleaned off.
Methods for laying laminate
Before you go to the store for the coating in question, you need to carefully figure out how to calculate the laminate for a room of a specific size in pieces. Nobody needs extra material, and if there is a shortage of it, it is not always possible to purchase even a couple of planks exactly the same as those taken earlier. And here the method of laying out the slats on the floor plays an important role.
Laminate planks are laid in two ways:
- straight (deck);
- diagonal.
The first one is easier to install and requires less material. In the second case, much more scraps are obtained due to the need to cut the planks at an angle near the walls. But the lamellas laid diagonally in the assembly look more impressive. In both options, the boards are laid with an offset of 10–35 cm to the adjacent row.
Laminate assembly
The connection of laminate planks is made with or without glue. The use of the adhesive method is recommended when it is necessary to increase the moisture resistance of the entire coating. Water then cannot penetrate into the joints between the lamellas and does not harm the substrate and the bottom layer of the laminate.
In this case, the second option is often more preferable. After laying the laminated finish without glue, it can be disassembled if necessary to replace one or more lamellas. It is impossible to separate glued boards without damage.
The laminate is connected using end locks:
- “Lock” (groove-ridge).
- "Click" (simple latch).
- "UniClick" (complex latch).
The first of the locks is the weakest to break, and the third is the most durable and reliable. However, if the laying of the laminate is done professionally, then all of them guarantee a strong connection of the lamellas into a single laminated coating.
The principle of laying laminate
Epilogue about the substrate
The process of writing this article took quite a long time. This was due to the serial publication of stories about each type of isolation separately, in which he combined his observations with the study of the material in theory. Right down to the chemical composition and certificates of conformity.
Most reviews on the Internet about the substrate are completely divorced from reality. It is immediately clear from them that they were simply copied from sites that sell their products and adapted in the form of responses. Various online stores and blogs love such detailed comments; with their help, they rise in search results. But as a result, having surfed the Internet, people receive selective information that does not reveal all the nuances of isolation.
How can a person who is not constantly laying laminate flooring compare one or another underlay to each other, which underlay is better or worse?
How to cut laminate correctly?
You can cut the laminate into the necessary parts with your own hands:
- electric jigsaw;
- small hacksaw for metal;
- a durable construction knife.
When cutting, you must ensure that no cuts or scratches appear on the top decorative layer. Then, on the surface under the sun's rays, they will all be visible to the naked eye. That is why it is not recommended to use a hacksaw on wood with large and medium teeth. It is almost impossible to make a cut without creating unsightly grooves.
Laying laminate flooring near the threshold
To get an even cross-section, it is best to use some kind of metal guide or square. And you should cut out the holes for the pipes slowly with a knife.
Using the tools listed above almost always produces a burr-free cut. If they do form, then such rags can be cut off with a knife or ground off with a flat rasp on wood.
Laying floors around pipes
Installation of skirting boards
The plinth is installed at the final stage of finishing. Before installation, it must be cut at an angle of 90°: this will ensure the strength of the connections. There is no need to adjust all the planks at once: it is better to do this during fastening. When one element is fixed, the next one is joined to it, and only then is it fastened.
You cannot attach the baseboard to the laminate itself. It is fixed to the wall. How exactly to attach the profile depends on what material it is made of. If you chose the laminated MDF option, look at the back side - there should be a groove there. A special clip is attached to the wall, and the profile itself sits on it. The joints are coated with glue. Proceed with caution: if you try to fix the baseboard several times without success, the grooves will become loose.
A miter box is used to work in corners. The profile is inserted with the side closest to the user, and the edge is located at the bottom of the tool. Then the baguette is cut at an angle of 45°. Hold the baseboard firmly while cutting, otherwise the seam will be uneven and a gap will appear during joining that cannot be sealed.
Before attaching the corner, check whether the elements fit tightly. If everything was done correctly, there will be no gaps.
Recommendations
Laminate flooring should be laid in compliance with the following simple rules:
- Before installation, the lamellas must lie in the room in a horizontal position for at least a day to cool down or warm up to room temperature.
- Laying laminate flooring is only permitted on dry substrates. If a concrete screed was originally made, then laying the coating is permissible only after it has completely dried.
- Before starting work, the rough foundation must be thoroughly swept so that there are no pebbles or other debris left on it. If you leave them under the laminate, sooner or later the substrate will tear first, and then the coating itself will be damaged.
- To identify differences in the subfloor, you should use a long rule or level - the slightest deflections will be visible in the gaps that appear.
- It is best to lay the planks away from the window so that the seams along the locks are less visible in daylight.
- Compensation gaps 8–10 mm wide should remain between the walls and the laminate. Without them, the laminated coating, during thermal expansion, will rest against the wall surface and rise like a mound in the middle of the room.
- To prevent the slats from moving during installation and closing the gaps along the walls, spacer wedges should be placed. Then they clean up.
- Compensation gaps must also be made in the middle of the room if the coating is more than 10 meters long. Afterwards, these seams must be closed with decorative thresholds made of plastic or metal.
- The substrate and waterproofing should be glued with tape at the junction of their individual strips. At the same time, you cannot nail this sublayer to the rough base with nails or screw it with self-tapping screws. Gaps are not allowed here.
- The first row is laid against the wall with a tenon, for which it is pre-cut so as not to interfere.
If the walls are uneven, then special attention should be paid to placing spacer wedges and laying the first row. The smoother the first slats are laid out, the more reliable the connection of all the remaining slats will be.
If you strictly follow the given step-by-step instructions and recommendations, the laid laminated coating will last for many years. There is nothing particularly difficult about its installation. In order to figure out how to choose the entrance door to an apartment and then install it, you will have to use your head completely. With the floor finish in question, things are not so scary.
Step-by-step instruction
Appearance
Externally, laminate resembles a thin board, the thickness of which can vary from seven to twelve millimeters, and the width from fifteen to thirty centimeters. In length, the dimensions of the laminate range from one to one and a half meters.
In most cases, the upper part of the laminate is made to look like different types of wood - we have a deep habit of seeing only wooden coverings on the floor. But, there is a laminate, the top covering of which imitates marble, granite and even carpeting.
In a laminate board, just like in a parquet board, there are two grooves - on the short and long sides. As well as two tongues or ridges - located on opposite sides.
Depending on the configuration of the tongues and grooves, the methods of joining the laminate into a solid floor covering are also determined. And there are several of them, but in parquet there is only one.
Laminate composition
Laminate is a kind of multi-layer cake. Moreover, each layer carries its own semantic load. That is, each layer has certain functions: protective, basic (HDF), decorative and stabilizing.
Depending on the production methods, laminate can be divided into:
- High Pressure Laminate (HPL) - or high pressure laminate;
- Direct Pressure Laminate (DPL) - or direct pressure laminate;
With the exception of cases of force majeure in the form of a flood or fire, the service life of the laminate is determined by the protective top film. In high-pressure laminate, this component is multicomponent. In addition, the already expensive melamine or acrylic resins are also supplemented with a layer of aluminum oxide (a layer of corundum). Depending on how high the wear resistance of the film is, laminates are also divided into several types, but we’ll talk about this later. The main role played by the protective film is to protect the material from abrasion. And also from the adverse effects of chemicals, water and ultraviolet radiation.
Behind the transparent protective film is a decorative layer, which is furniture foil (or paper folded in several layers), which is specially processed and a pattern is applied.
The aesthetic value of the laminate will further be determined by the beauty of the pattern of the decorative layer.
Next comes a supporting layer made of high-density fiberboard, in English it sounds like High Density Fiberboard or HDF . Moisture-resistant impregnations are used in its production. This layer is responsible for the rigidity and strength of the product. In addition, the lock, which will participate in fastening the laminate, is also located in the supporting layer.
And some modern developments complement the laminate with a stabilizing layer. The main task of which is to protect the overlying parts from moisture. And also the material from which this layer is made has excellent sound insulation. All layers are connected by strong compression and at high temperatures.
But direct pressure laminate includes only three layers. During its manufacture, the main and supporting layers are combined by compression with a layer of durable film (melamine or acrylic resin).
Quality of laminates
The top layer of the laminated coating is characterized by a sufficiently high quality, thanks to which during the specified service life it is possible to do without additional processing. Sanding, varnishing and polishing will not be necessary for this surface.
Most of all types of laminates do not emit harmful fumes. In 1999, the European Association of Manufacturers of Laminated Surfaces adopted certain standards for all types of laminate. Now this product must meet as many as eighteen points.
First of all, the abrasion, sound insulation and impact resistance of the material are assessed. Moisture resistance is also a very important indicator. That is, for this it is necessary to determine how long the laminate can withstand water procedures. But, even in the case of very high indicators, it is not worth testing laminate in your own apartment in this way. But remember that laminated flooring really needs regular wet cleaning.
And the most significant parameter for evaluating a laminate is its wear resistance. To determine it, a special Taber test was developed. It is used to determine the number of revolutions made by an abrasive wheel pressed closely to the surface of the laminated coating until the protective layer is completely erased.
Accordingly, the more revolutions there were, the better the quality of the material. But everything is not as simple as it seems. There are no specific standards for the tool itself or for the methods of its use. This means that different manufacturers will give different figures for the same materials.
There are also the following indicators:
- presence of the first signs of wear – initial phase – IF;
- wear of the protective layer by ninety-five percent – final phase – FP;
- the sum of the first two digits divided in half - Average Taber - AT;
And only one of the three numbers is indicated by the manufacturer, so we can only guess which indicator it should be attributed to. But despite this, after testing the laminate is divided into classes.
Laminate classification
The class of laminated surfaces can be determined by two numbers. Using the first number, you can assign the material to the corresponding type of premises: 2 are premises for individual use, and 3 are places for public use. And the second number determines the intensity of the load on the surface. Below we present options for using laminate, taking into account its classification.
- twenty-one (21) – laminate for home, low load (children’s room or bedroom);
- twenty-two (22) – laminate for home, medium load (kitchen, dining room);
- twenty-three (23) – laminate flooring for the home, increased traffic intensity (corridor);
- thirty-one (31) – laminate for public places where the intensity is low (manager’s office);
- thirty-two (32) – laminate for public places where the intensity is average (reception);
- thirty-three (33) – laminate for public places where the intensity is high (operating room in a bank, store);