- Step No. 1: Select a design
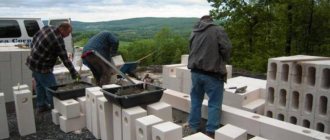
Mauerlat is a structural element of the roof on which the entire roof structure rests. The Mauerlat is made of wooden beams, the size of which usually has a cross-section of 150x150mm or 200x200mm. In residential buildings, the Mauerlat rests on a reinforced concrete belt or, in other words, armored belt . Do you need an armored belt under the Mauerlat for a house made of aerated concrete and how to make it? We'll tell you below.
DIY construction
When the calculations have been carried out, a suitable project has been selected and materials have been prepared, you can proceed directly to assembling the pitched roof.
The work is carried out in the standard sequence:
The first step is to create markings on the site
Particular attention is paid to the location of the supporting elements - they must be strictly on the lines of the rectangle. To avoid inaccuracies, you should use a laser level, rope or other devices for marking.
Next, you need to dig or drill holes for the foundation of the metal posts. The distance between the supports is determined based on the estimated weight of the entire frame and roof: the larger it is, the smaller the step should be between the supports
For a small roof, the optimal value would be 1.5-2 meters. The bottom of each hole must be filled with crushed stone. Then embedded elements are inserted into them - metal soles of rectangular or square shape with holes for bolts, to which the supports will then be attached. Next they are filled with concrete mixture. Further work is carried out only after the concrete has completely set. “Reciprocal” metal soles with the same holes as in the embedded elements are welded to the profile pipes that will be used as supports. Then they are screwed in a vertical position to the embedded parts. The next stage is the assembly of the frame. The profile pipe must be marked and cut into fragments of the required sizes, based on the drawings. Next, rectangular and wedge-shaped trusses are made from pieces of pipes for a pitched roof. Frame elements are attached in a certain sequence. First, horizontal beams are installed, then rectangular trusses, and at the final stage wedge-shaped structures. Installation of a roofing pie begins with the creation of a roof sheathing. It is made from wooden beams or moisture-resistant plywood of the required thickness. A layer of vapor barrier is laid on it, a counter-lattice, heat and waterproofing are mounted on top of it (in the same sequence), and the main roofing covering is laid on top. At the final stage, the metal structures are painted. It is advisable to paint them in two layers or more so that the coating is more reliable and durable.
You can read about the construction of a single-pitched roof for a private house here. And from this article you will learn about the criteria for choosing between a single-pitch and a gable structure.
Insulation
The most important feature of aerated concrete is that it has low thermal conductivity, which will ensure that the built structure does not freeze even at the lowest ambient temperatures. For this reason, when constructing a reinforcing structure, it is important that they do not in any way violate the thermal insulation properties of the house. In winter, as well as during periods when constant sharp changes in temperature are not uncommon, condensation may appear on the brick armored belt. To avoid this, we recommend carrying out insulation work
To avoid this, we recommend carrying out insulation work.
Expanded polystyrene, polystyrene foam and mineral wool (mats) can be used as elements to create thermal insulation. In some cases, you can use aerated concrete blocks that have partitions. When using mineral wool, small ventilation gaps should be left between the facing surface and the insulation.
Calculation of the slope angle of a pitched roof
In order to calculate the parameters of the roof, it is best to refer to SNiP, where all the necessary data, methods and calculation formulas are available. Surprisingly, there is no specialized calculation of the angle of inclination of a pitched roof. It is only indicated that an angle from 2° to 60° is allowed, after which the details and dimensions of the structures are considered. Therefore, the main source of information is the instructions for various roofing coverings, which indicate the optimal installation parameters, including the range of inclination angles.
Minimum roof pitch angleSource kak-sdelat-kryshu.ru
Manufacturers often recommend values that differ from GOST requirements, which is explained by the development of technology and constant changes in manufacturing technology and the chemical composition of materials
Practice makes its own adjustments to the recommended indicators that you should pay attention to
Recommended slope angleSource kak-sdelat-kryshu.ru
When starting to calculate the roof, you should first of all determine the average annual amount of snow in winter. The easiest way to find out is from SNiP tables or other sources:
Weight of snow cover on a horizontal planeSource kak-sdelat-kryshu.ru
It must be taken into account that the minimum angle of inclination of a pitched roof is the most economical in terms of material consumption and, accordingly, money. At the same time, the possibility of snow slipping practically disappears; it accumulates on the roof and creates a significant load on the building structure.
The higher the angle of inclination, the more roofing material will be required. At the same time, the wind load increases sharply, especially dangerous when directed frontally to the high side of the house. The prevailing winds in different regions can also be studied in the SNiP tables:
Wind load map in RFI source kak-sdelat-kryshu.ru
An important factor is the location of the house. If it is located in a lowland, protected from the wind by folds of the relief or other buildings standing nearby, wind loads are significantly reduced. Conversely, if the house is located on a hill and is exposed to the wind, the loads will be maximum.
This will require choosing the minimum slope of the pitched roof, otherwise the risk of losing it becomes too high. It is recommended to take into account all requirements for wind loads when choosing, since, unlike snow loads, they exist throughout the year and can have an impact in both summer and winter.
The final choice of the angle of inclination is made based on a comparison of the properties of the roofing covering and the magnitude of the loads. It is not recommended to choose limit values, since they create too many risky situations when extreme external influences appear. In any region, heavy snowfalls occur from time to time, forming wet and very heavy snowdrifts. Hurricane-force winds are no exception, which do not happen often, but their consequences are quite serious.
Consequences of windSource izvestiy-kamen.ru
In the video you can see the construction of a pitched roof:
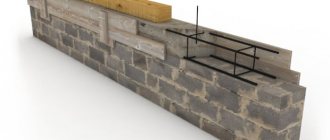
Arm belt construction technology ↑
Installation of formwork
Formwork can be done in various ways using:
- wooden boards (slabs): they are attached to the wall using bars, and also secured on top. When the formwork is dismantled, the top ones are removed. As for the lower bars, they remain in the monolithic filling.
- side supports;
- threaded rods. They are installed in holes pre-drilled in the formwork. Tubes are cut in the following sizes:
opalubka-1 opalubka_2 opalubka_3 opalubka-4
- the ratio of the diameters of the tube and the stud is as follows: the inner one is slightly larger than the outer one of the second,
- the valley and width of the armored belt must be equal.
Next, the pin is placed inside the tube so that its ends come out through the previously prepared holes. The entire structure is tightened with nuts and large washers. In the end, only tubes should remain in monolithic concrete. To do this, after filling the armored belt with concrete, allow it to pre-harden. Next, you need
- unscrew the nuts
- disassemble the formwork,
- knock out the studs;
- U-block method. To ensure the integrity of the belt, they must be trimmed at the corners of the building;
- on the outside of the wall, a row of 10-centimeter blocks is laid, and inside, several rows of bricks are laid on edge, or they are replaced with boards.
Attention! It is necessary to take into account that the wall at the level of the armored belt requires insulation, especially in the case of formwork made of boards, since the concrete can freeze in winter.
The upper edge of the formwork is set strictly in a horizontal plane using a water level.
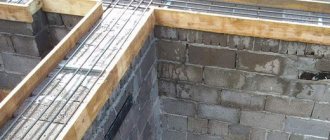
Installation of reinforcement cage
The reinforcement mesh consists of:
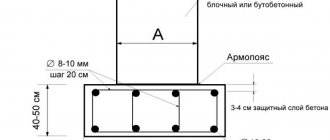
- working longitudinal rods Ø 10–12 in the amount of at least four pieces;
- intermediate jumpers in the form of clamps made of reinforcement with a diameter of six to eight millimeters, placed in increments of 200–400 mm.
Attention! Using an excessively large step when placing clamps is fraught with displacement of the working rods during concreting, and this, in turn, will subsequently disrupt the correct operation of the arm belt.
armatura_dlja_armopojasa-1 armatura_dlja_armopojasa-2 armatura_dlja_armopojasa-3 armatura_dlja_armopojasa-4
knitting wire that holds them together. It should be noted that welding cannot be used for connections, since, on the one hand, it weakens the reinforcement, and on the other, it creates favorable conditions for corrosion in these places.
At the junction points and at the corners of the walls, the mesh is additionally reinforced to add rigidity to these areas. For these purposes, bent reinforcement is used and inserted on each side by 300–400 mm.
We recommend For reinforcement it is recommended to use composite reinforcement. The point is not only that it is cheaper, this material is lighter, it is not subject to rotting, requires greater breaking force, and is much easier to work with.
Embedded studs
Sometimes, in order to secure the Mauerlat, studs with a diameter of 12 mm or more are pre-installed on the armored belt, protruding 3-4 cm above the Mauerlat. The installation step of such studs is 100 cm: they are attached to clamps with knitting wire.
As for the question of the feasibility of making a Mauerlat in the presence of a reinforcing belt, then indeed, theoretically, the rafters can be fixed to the belt. However, in practice this will require a significant number of additional measures. So it’s much easier to go the traditional route of using a reinforced belt under the Mauerlat.
Tilt angle
The larger the angle, the higher the windage. Therefore, the roof slope should always be directed towards the most frequent winds. This reduces the load during a major storm.
It is important to take into account the climate zone when making calculations
A slight slope can cause large amounts of snow to accumulate. If you do not remove it in time and wait for ice to form, the roof under its significant weight will, at best, bend, and at worst, break.
Natural precipitation along the roof is an equally important reason when taking into account the surface and strength of covering materials. Rough types are better suited for arid regions, smooth ones for places famous for heavy rains and snowy winters.
Optimal values for tiles:
- metal, ceramic and cement-sand - at least 6 degrees;
- bitumen - no less than 12.
Limit values for sheet roofing:
- slate, corrugated board, ondulin - at least 6 degrees;
- copper, galvanized sheets (zinc-titanium) – from 17;
- asbestos cement slabs – from 27.
When choosing roofing materials, it is worth double-checking the information. Sometimes the declared slope values for the coating specified by the manufacturer do not coincide with GOST. It is better to entrust the calculation itself to professionals, because there are many nuances, especially for large buildings.
After determining the magnitude of the slope, one of the load-bearing walls is brought to a level that will ensure the implementation of the project.
To ensure water drainage and protect the walls from getting wet, the roof is extended an average of 600 mm. For technical buildings, the minimum for overhang is 20–25, for two-story residential cottages and mansions – up to 1200 mm.
The aesthetics of the entire building are also important. To determine your own preferences, before creating a project, you can use computer programs. This will allow you to see not only the entire roof, but also its harmonious combination with the house.
Purpose of the reinforcing belt
As you know, the roof transfers two types of loads to the building, namely:
- vertical, which is included in the weight of the roof itself, taking into account external influences: seismic activity, wind and snow;
- spacer from the rafters resting on the wall, which tends to push the walls of the building apart. Along with the increase in the load on the roof, the horizontal component – the thrust load – also increases.
Functions of the armored belt
An armored belt is one of the most important components in construction, so let’s look at why it is needed:
- if a building is built from aerated concrete, it should be understood that blocks made from it cannot withstand a point load on its surface even when drilling holes for studs, and simply crack;
- the use of an armored belt makes the structure more rigid;
- all local and point loads are evenly distributed over the surface of the load-bearing walls; in the event of seasonal soil movement, uneven shrinkage of the house or earthquakes, the reinforced belt protects the walls from deformation, preserving the entire geometry of the structure;
- with the help of an armored belt, the entire wall structure is leveled horizontally, while correcting mistakes made during the laying of walls;
- Due to its mechanical strength, all the most important structures can be attached to the armored belt, including the Mauerlat.
How to do it?
The procedure depends on the type of materials and formwork used. In particular, owners can:
- Lay the foundation of the belt from U-shaped aerated concrete blocks with a strength of D500.
This method is valued for its simplicity; after planting the blocks with glue, the owners only need to lay a reinforced frame inside, pour concrete and secure the studs inside under the Mauerlat.Additional insulation measures are not required; the only disadvantage of the method is the high cost of the unit.
- Build external walls (or at least one external one) from partition blocks with the same strength and width from 50 to 100 mm. When choosing this option, the outer side of the belt is, if possible, insulated with a thin sheet of compacted polystyrene foam.
- Completely fill the concrete belt after installing reliable formwork with through fastenings and laying an external insulating layer of extruded polystyrene foam with a thickness of at least 80 mm.
Creating formwork and laying reinforcement
If it is not possible to lay U-blocks, the formwork is assembled from flat boards or panels made of thick moisture-resistant plywood. The panels are assembled on the ground or ceiling and secured with self-tapping screws no less than 50 cm long, side stops, through threaded rods, intermediate jumpers or wooden beams placed on top.
The formwork is installed with strict level control horizontally and vertically, without cracks or distortions, special attention is paid to the corners.
Simultaneously with fastening the formwork, measures are taken to insulate the outer wall of the tape. To do this, a sheet of heat-insulating material is placed inside or the boards are installed with the required offset.
The tape must be reinforced. The reinforced frame of the belt is assembled from solid rods with a length of 6 m, with a minimum overlap of 8 mm at longitudinal joints, and from 30 cm at corners.
To connect the longitudinal and transverse rods, 3 mm knitting wire or clamps are used; welding this structure is not recommended. When laying, the frame is shifted from the future edges of the concrete by 50 mm; in the lower part this gap is ensured using pieces of wood or plastic cups.
Installation of fasteners for the Mauerlat
Maximum reliability is achieved by screwing threaded rods into the top row of blocks or tying them to the top and bottom rows of the frame.
The frequency depends on the number of rafters (ideally, the fasteners are located exactly in the center between the two legs), but does not exceed 1 m. Immediately before pouring the solution, the threaded parts of the fasteners are wrapped in oiled paper or simply lubricated with oil.
Pouring with cement mortar
The preparation of concrete begins after marking and checking the upper level of the formwork and the reliability of its fastening. Concrete with a strength grade of at least M200 and an average size of fractions has the necessary characteristics; pouring is carried out without long interruptions.
After filling the formwork or blocks, air is expelled from the solution with a pin or vibrator, the upper part is carefully leveled and covered with film.
Mauerlat installation
Mauerlat
Wooden beams undergo mandatory treatment with antiseptics and fire retardants and are laid on top of at least 2 layers of rolled or coating waterproofing.
To avoid mistakes, the locations of the fasteners are checked several times (until the beam is completely attached to the belt) and only then holes are drilled in the Mauerlat. For fixation, washers and nuts of large diameter are used, the protruding parts of the studs are cut off with a grinder.
Installation of formwork
Formwork is a structure used to give shape to the mortar of monolithic elements. The installation of formwork is necessary to designate clear boundaries that the product poured inside the boundaries of the formwork will acquire after hardening.
To create formwork for laying gas silicate blocks, you can use two methods. The first method (removable) is an example of the classic installation of formwork, often used for enclosing and forming purposes of a liquid, slowly hardening substance. The second method (non-removable) involves installing formwork after fixing the reinforcement. This formwork is not removable; it is made using the material from which the entire wall is made, in this case it is aerated concrete blocks.
Removable formwork
The standard formwork option for pouring a monolithic belt is the use of thin wooden boards or any metal sheets.
The width varies from 13 cm to 32 cm. The length of the boards is calculated from the width of the wall. If the length of one board is not enough for the width of one wall, it is necessary to connect several boards using connecting pieces. Each segment is attached to the end of one of the sides of two formwork boards at once with self-tapping screws.
Installation
Prepare the required number (depending on the length) of wooden or metal strips. They will be installed on the upper surface of the wall symmetrically, in pairs. The strips are nailed to the aerated concrete blocks with self-tapping screws. To accurately regulate the exactly vertical position in the space of the formwork panels and withstand the strong pressure of the concrete mixture, it is necessary to tie the formwork.
Formwork screed
Drill two parallel holes approximately in the middle of the horizontal line of the boards. Such holes need to be made in increments of 40-50 cm. Take a PVC protective pipe and insert protective cones at its ends. They are fixed on the formwork, covering the holes made.
Insert a pinch screw into the drilled holes, the size of which will exceed the diameter at a distance from one outer edge of the wooden (or metal) strip to the other. The screw is fixed with special formwork ties; the ties are tightened like regular washers along the thread of the coupling screw.
Permanent formwork
Fixed formwork sheets are installed after laying the reinforcement cages. When the reinforcement is fully installed and strengthened, the preparation and fixation of the formwork frames begins. To create a frame on aerated silicate masonry, you need to take an aerated concrete block and make two cuts.
The cuts are made along the horizontal line of the block, departing from its edge a distance equal to the expected diameter of the frame sheet. The cut is made using a circular saw using a carbide blade. Pointing the alligator electric saw at the cut points, you need to evenly cut off one of the future frame panels. There are as many similar boards made as would require entire blocks when building another row of the wall.
Thin strips of blocks are attached to the edge of the outer side of the last layer of masonry of entire blocks of aerated concrete with glue (or other means) that were used to connect the blocks of all walls.
And here is an article about transparent polymer slate.
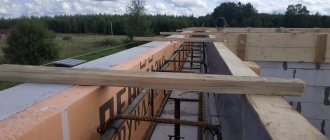
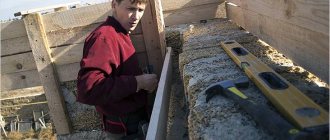
Photo report from the construction site: a pitched roof on a house made of aerated concrete
A house was built in St. Petersburg. There was no project, there was a general idea, which is presented in the photo. The house is made of aerated concrete, the finishing is plaster, the roof is seam, chosen on the basis of low cost, reliability, and ease of installation.
Idea of a house with a pitched roof
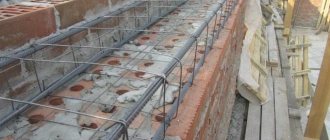
After the walls were removed, an armored belt was poured into them, into which studs (Ø 10 mm) were installed every meter. When the concrete in the armored belt reached the required deterioration, a layer of waterproofing (“Gidroizol”, cut lengthwise into strips of the required width) was laid on the bitumen mastic. A mauerlat - 150-150 mm timber - is laid on top of the waterproofing. All lumber used for roofing is dry and treated with protective impregnations and fire retardants.
Beginning of installation of a pitched roof - laying the Mauerlat
First, they put it in place (lying on the pins, held by assistants), and walk along it, hitting with a hammer on the places where the pins are. The places where the studs stick out are imprinted in the timber. Now they drill holes and simply push it onto the studs.
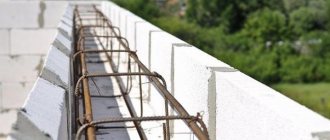
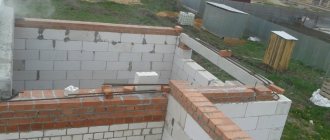
Since the span turns out to be large, supports made of timber (150-150 mm) were placed on which the purlin was laid, which will support the rafter legs.
Installation of racks and purlins
The width of the roof is 12 meters. This takes into account a 1.2 meter offset from the front side. Therefore, the Mauerlat bars and the purlin “stick out” beyond the walls exactly at this distance.
To ensure the removal of the roof, the mauerlat and purlin stick out from the walls
At first there were doubts about such a large offset - the rightmost beam hangs 2.2 meters. If this offset is reduced, it will be bad for the walls, and the appearance will deteriorate. Therefore, it was decided to leave everything as it is.
Laying rafters
Rafters are laid from two spliced boards 200*50 mm, with a pitch of 580 mm. The boards are nailed together in a checkerboard pattern (top-bottom), with a pitch of 200-250 mm. Nail heads are sometimes on the right, sometimes on the left, in pairs: Two on top/bottom on the right, two on top/bottom on the left, etc.). We space the joints of the boards by less than 60 cm. The resulting beam is much more reliable than a similar solid beam.
The rafters are laid. The method of fastening the rafters
Next, the pie of a pitched roof for this case is as follows (from the attic to the street): vapor barrier, 200 mm stone wool, ventilation gap (lathing, counter-lathing), moisture insulation, roofing material. In this case it is dark gray pural.
An example of a roofing pie for a pitched roof (it’s actually standard)
We will carry out insulation from the inside later, but for now we are laying a Tyvek Solid hydro-windproof membrane (vapor-permeable) on top of the rafters.
We lay a waterproofing windproof vapor-permeable membrane
The membrane is laid from bottom to top and secured with staples. The fabric that is rolled out higher overlaps the one already laid by 15-20 cm. The joint is sealed with double-sided tape (bought together with the membrane). Then the planks are placed on top of the membrane, and on them is a sheathing for a standing seam roof.
Lathing made of boards 25*150 mm
First, the sheathing was made from 25*150 mm boards in increments of 150 mm. After installation, walking around the roof, it was decided to strengthen the sheathing. To do this, we fill 100 mm wide boards between the already laid boards. Now there is a gap of 25 mm between the boards.
Sheathing a pitched roof as a result
Next, hooks were placed on the lower gable for installing the drainage system. They are filled unevenly, since due to the large length of the pediment, it was decided to make two receiving funnels at a distance of 2.8 meters from the edge. To ensure drainage in two directions, such a relief was made.
Filled hooks for the drainage system
Next, you need to bring in pieces of metal (pictures) 12 meters long. They are not heavy, but they cannot be bent, so the “sled” disappears. For lifting, a temporary “bridge” was built connecting the ground and the roof. The sheets were lifted along it.
Lifting sheets along the bridge
Next comes roofing work, which differs depending on the type of roofing material. In this case, it was necessary to solve the problem of thermal expansion of the material - galvanized steel (pural) significantly changes its dimensions when heated/cooled. To ensure freedom of expansion, it was decided to fasten the material to the sheathing by the seam using movable clamps with a freedom of movement of 15-20 mm.
Installation of clamps for seam roofingInstallation of seam roofing from pural
After laying the roofing material, what remains is the lining of the overhangs, and they are no different.
The roof needs to be brought to perfection - the overhangs need to be hemmed, but basically it is already ready
Well, the photo below shows what happened after finishing. Very modern, stylish and unusual.
House with a pitched roof - finishing is almost finished
How to do it yourself?
Installation of formwork
You will have to start work by preparing all the tools that will be needed for further manipulations. It is better to spend more time on this and fill the entire structure more efficiently, rather than then rush around chaotically in search of the right things. You definitely need a concrete mixer and a vibration treatment device. Additionally prepare:
- boards;
- special fittings;
- fasteners.
From the very beginning, everything should be properly finished and thought out, immediately at all stages of work forward. The outer part of formwork structures is usually obtained by sawing stones into two halves. The interior is decorated with boards. The slabs are usually mounted on the wall using bars or other fastening structures. A similar method is used when fastening at the top.
You can unscrew the nuts after the time allotted for the mixture to harden has expired. The formwork itself is dismantled, and the studs are knocked out manually, as carefully as possible.
Experts believe that it is better to pour concrete with a regular gasoline pump. Hand pumps can hardly be recommended - the amount of work is too great. But only simultaneous and continuous filling guarantees sufficient operational efficiency and a long service life of the house. But preparing your own concrete mixture is quite possible. For 1 share of cement, take 3 shares of pre-washed sand and an identical amount of crushed stone. Although removing the formwork is possible in a few days, it will take several weeks for the concrete to reach optimal technical conditions.
Laying reinforcement
The correct reinforcement cage is no less important than well-executed formwork. The reinforcement mesh of a special type is used as the basis. In addition to the rods running in the longitudinal plane, intermediate jumpers are provided. Steel tying wire helps tie and hold the pieces together. Clamps should be placed in increments of 200 - 400 mm.
When pouring concrete mixture, various cavities may appear. They are pierced with reinforcement or subjected to vibration treatment in increments of 1 m. Increasing the rigidity of the corner sections is achieved by turning them up by 300 - 400 mm. Therefore, special “bent” fittings are needed. Its composite type is recommended by most experts - it is much more attractive than traditional solutions.
Filling the armored belt
To make the structure as strong as possible, pouring must be done in one step. For this purpose, concrete grade of at least M200 is used. Usually it is necessary to pour a significant amount of solution, so it is best to prepare a concrete pump in advance.
When preparing the solution yourself, take one part of M400 cement, three parts of washed sand and three parts of crushed stone. The formwork can be dismantled 4-5 days after pouring; Full maturation of concrete occurs in 3-4 weeks.
When pouring concrete, you should adhere to the following recommendations:
- It is impossible to do without the formation of internal voids. To remove them, piercing the solution using reinforcement or vibration is used.
- It is important to moisturize concrete. This way it becomes stronger. This procedure is carried out every day while the concrete hardens.
Advantages and disadvantages
A pitched roof has a lot of significant advantages, including:
- Wide possibilities during construction.
The profile pipe has high strength characteristics, thanks to which such a roof can cover large spans of several tens of meters in size. For comparison: wooden rafter systems allow the construction of relatively small structures, since they are not able to withstand significant loads. - Reliability.
Metal treated with high-quality paint and anti-corrosion coating retains its original characteristics for decades. The roof will not have to be repaired and restored annually. The rafters will not rust due to frequent changes in humidity and will not bend under the weight of heavy roofing material. - Safety.
Unlike wood, profile pipe is not subject to combustion. If fires occur (for example, due to a short circuit in the electrical wiring connected to the canopy), such structures will not ignite. In the worst case, they may only be slightly deformed. Safety is also achieved due to the fact that the pitched roof has a certain slope. Heavy snow blocks do not accumulate on it, which could cause the roof to collapse.
However, such roofing structures also have some disadvantages:
- Expensive. Metal structures have a relatively high cost, so during their construction you need to carefully plan every item of monetary expenditure.
- Heavy weight. Heavy profile pipes, the weight of which can reach several centners, cannot be lifted to a height without the use of special equipment. In addition, such a roof will place a significant load on the foundation, so the construction of the foundation will be more expensive and complex.
Let's sum it up
A reinforced base for the Mauerlat is more of a necessity than a luxury. The roofing structure has a fairly large impact on the walls of the house, which, although distributed evenly thanks to the Mauerlat, can negatively affect the strength of the entire building.
The creation of an armored belt is necessary in buildings made of gas and expanded clay concrete due to the fragility of these materials, in areas with high seismic activity. It is also advisable to strengthen the walls under the Mauerlat when creating heavy roofing structures.
Reinforcing the upper part of the walls is not a difficult job requiring the involvement of specialists. If you follow a number of rules and involve assistants, it can be done on your own.
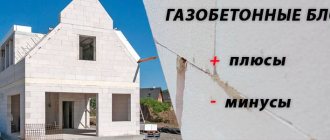
The construction of load-bearing walls of buildings from artificial stone and aerated concrete adds a number of advantages to the object under construction. Aerated concrete blocks vary in size, are fire resistant, and have low thermal conductivity, that is, they do not allow temperature fluctuations that occur in the environment surrounding the blocks to enter the room.
This material is distinguished by thermal insulation properties, thanks to the special texture in the inner part. With the help of a gas generator, the components of the stone take on the shape of foam.
If you have chosen gas silicate blocks for laying the walls of your project, you should know how to make their integrity more durable and prevent the manifestation of negative performance qualities. Cracks can form on aerated concrete walls. They can be small or quite large, long, and in many cases extend vertically across the entire wall.
Gas silicate blocks are a fairly durable material; if the correct manufacturing technology is followed, they are not prone to cracking.
Preparing timber for the mauerlat
Mostly coniferous wood is used for Mauerlat: less moisture accumulates inside it. Before installation, the timber should be treated with antiseptic and pyroprotective chemical compounds.
Requirements for geometric parameters:
To make a Mauerlat, it is preferable to take a beam with a cross-section of 100 x 150 mm. Slightly larger sections are also allowed. The minimum permissible beam height is 100 mm.
When selecting wood for the mauerlat, it is better to use timber whose diameter is equal to twice the cross-section of the rafter legs.
Laying and fastening the Mauerlat to the concrete strapping belt
The surface of the armored belt should be primed after hardening. Before laying the timber, waterproofing is laid along the entire length of the strapping contour. You can apply mastic - this is a fashionable method now; the range of mixtures offered is very wide. But usually it is enough to lay a layer of roofing felt.
The purpose of the operation is to prevent as much as possible the accumulation of moisture between the cement surface and the wood of the rafter base. Due to the differences in structure and large differences in internal temperatures in these materials, water settles between them upon direct contact.
If the timber is fastened with wire loops, there will be no difficulties in working.
- The Mauerlat is wrapped with wire on both sides.
- Then its ends are twisted.
- A lever, even a screwdriver, is inserted into the resulting slack, and by turning it, a tight fit is achieved.
In the case where the beam needs to be placed on studs or anchors embedded in concrete, errors may occur. To ensure that the axes of the holes and pins coincide, they use a number of cunning techniques.
One of them is preliminary installation of the Mauerlat:
- Even at the stage of laying the reinforcement, the beam is drilled in specified places and the pins are screwed into it.
- The resulting assembly is installed on the reinforcement and the lower part of the studs is fixed. If you plan to fix the bases of the pins in the bottom of the block, make markings. Then, after making the half-holes, they are finally fixed. The main thing: the operation is carried out without removing the fasteners from the beam.
- After fixing the studs (anchors), the timber is removed.
In this way, it is possible to achieve the greatest accuracy when aligning the axes of the holes in the Mauerlat and armored belt.
The assembled Mauerlat should ultimately be a single unit with a rafter part, tightly screwed to the armored belt. If the bars are short, they are spliced. The individual parts are connected into a lock. There are different types of joints:
- in the paw,
- half a tree,
- at a quarter.
In any case, the joint point is screwed to the concrete base of the belt during final fastening.
In the corners the Mauerlat is also rigidly fixed. The parts to be joined are twisted with wire, screwed together with studs, self-tapping screws or fastened with staples.
Insulation of armored belt
First of all, a reinforced concrete contour assembled using formwork without thermal insulation needs insulation.
If the belt is installed in the same plane with the covering (floors), the gaps between the ends of the slabs (beams) and the concrete tape are sealed.
For thermal insulation, materials that are resistant to moisture are used. It is advisable to install insulation that does not support combustion.
Wall cladding masking the strapping contour
If the Mauerlat was made on the basis of tray blocks, additional surface decoration should not be carried out. This also applies to the case when face blocks were inserted into the formwork before pouring the mauerlat.
To decorate the surface of a reinforced concrete contour, additional blocks or thin-walled partitions are used. When installing them, it is advisable to leave a centimeter gap in front of the insulation: ventilation inside the wall will facilitate the timely removal of condensate. This rule will be especially useful when mineral wool is used as insulation.
After finishing, the operation of laying an armored belt under the roof of an aerated concrete house can be considered complete. The work, of course, is responsible and requires careful execution. Pouring concrete involves significant labor costs. However, the costs are small compared to the dozens of advantages that arise when building a house from aerated concrete.
Creating a Reinforcement Frame
Reinforcement frames are the basis for creating monolithic belts. They increase the strength and wear resistance of the structure, and take on weight loads.
Made from steel reinforcement bars. At the joints and corners, steel rods are connected by welding. The rods are connected to each other with tying wire for reinforcement. Reinforcing cages are often laid on spacers that act as clamps.
Reinforcing cages are often assembled already in the formwork. Sometimes they are formed before the formwork appears, on the wall, then the already installed reinforcement is covered with formwork. This sequence of actions is only possible when using permanent formwork.
What to consider?
When arranging such a structure, there are no special restrictions in the choice of roofing and thermal insulation materials. Perfect for a garage, veranda attached to the house, summer kitchen, gazebo, canopy. There is an option for residential buildings with a pitched roof.
When calculating roof performance, you should take into account a number of factors that affect the final result. Among them:
- climatic conditions of the region;
- terrain;
- dimensions of the building;
- number of floors;
- type of insulation, roofing material;
- slope angle;
- permanent and temporary loads on the roof.
Before starting calculations, you must familiarize yourself with the current legislative norms SNiP II-26-76 (with Amendment No. 1), compiled by experienced architectural engineers. This will reduce the time spent searching for missing information and help avoid mistakes.
Let us examine in more detail the significance and features of calculating the key parameters of a pitched roof.
Ramp length
The first leg will be the vertical distance from the top of the ridge to the bottom of the eaves overhang, the second leg will be the horizontal distance from the edge of the eaves overhang to the perpendicular line to the ridge. The hypotenuse will be the length of the slope. For the final result, it remains to extract the square root of the resulting number.
Width
The width of the roof directly depends on the distance between the walls and the size of the building:
- With an indicator of 4.5 m, 2 mauerlat bars fixed on the walls will be enough. Plus the rafter legs that rest on the mauerlat.
- With a width of 4.5-6 m, reinforcement with a lying, rafter leg will be required.
- A roof width of more than 6 m implies the installation of a complex rafter system, preferably with an additional load-bearing wall on which the racks will rest.
- If beams over 8 m are involved, it is recommended to splice them. The joints will require reinforcement with mounting plates or pieces of boards.
Height
You can calculate the length of the roof in 3 ways:
- Geometric. It is based on the Pythagorean theorem. The pitched roof is shaped like a right triangle. The hypotenuse is the length of the rafter leg.
- Trigonometric. Here you will need to put ready-made values into the formulas:
- B=A*tgY, where B is the length of the rafters from the wall to the ridge, A is the length of the rafter beams, Y is the angle of inclination of the slope;
- X=A/sinY, where X is the length of the rafter beams, starting from the ridge to the edge of the wall, which is opposite.
- Construction calculators. They work online. Designed in accordance with current standards. It is recommended to use as a supplement to one of the above methods.
When making calculations, do not forget about the overhang. The minimum size is 20 cm. But for the roof to look neat and harmonious, the optimal option is 60 cm.
Tilt angle
For most regions of Russia, 20-30 degrees is considered optimal. In regions with large permanent snow cover, it is recommended to tilt the slope at an angle of 45 degrees.
The higher the slope angle, the greater the consumption of roofing material. The roof slope limit (minimum, maximum) from different materials differs significantly:
- metal tiles - 20-30 degrees;
- corrugated sheeting – 8-20 degrees;
- slate – 20-50 degrees;
- seam roofing – 18-30 degrees;
- roofing material - 5-10 degrees;
- soft roof - 5-20 degrees.
General information
- The construction of walls must be carried out on a reliable foundation.
- During the work process, you should regularly check the evenness of the structure.
- Along the general perimeter of the building, the walls should be reinforced with a reinforced belt made of reinforced concrete.
When carrying out construction work in violation of technological rules, cracking of the blocks may begin due to the high pressure of the roof.
In order to provide a functional armored belt, its structure must meet the following characteristics:
- Be in ring style.
- Be continuous.
- Be closed.
The main components of an armored belt are a concrete mixture, a frame made of reinforcement and blocks (or formwork). The purpose of the design is:
- Protect the walls and base of the building from cracks.
- Distributing the load from the roof and additional floors onto the walls, giving them strength.
- Increasing the rigidity of the building.
Dimensions
The dimensions of the brick armored belt will depend on the design features of the material to which the fastening will be made. Walls can be external and internal.
For certain categories, builders consider certain requirements that relate to the size of the structure.
- The internal structure must be reinforced with an armored belt, which has width values that correspond to the thickness of the wall.
- If we are talking about strengthening the house from the outside, the width of the belt must correspond to the width of the wall without taking into account the formwork and insulation.
- The minimum height of the structure must be 15 cm, and this figure cannot be greater than the width of the wall.
Manufacturing options
It is quite possible to install an armored belt for walls that are built of aerated concrete, and there are several ways to do this:
- When using wooden formwork.
- When using additional blocks.
The unloading belt is not laid if:
- You have a solid reinforced concrete structure.
- You have wooden floors and they rest on blocks.
If you use wooden floors, it will be enough to pour 5 cm thick concrete pads under the beams, which will play a supporting role in order to reliably protect the building blocks from being squeezed. In reinforced concrete structures there is simply no point in providing additional protection, since the existing load will already be evenly distributed.
What is it and what is it for?
The support beam, which is laid along the perimeter of the facade walls at the base of the roof, is called the Mauerlat. In the classic version, it is made of timber and supports the roof truss system.
- allows you to distribute the load from the roof;
- prevents distortions;
- eliminates windage;
- ties the roof structure to the box.
To calculate the thickness of the Mauerlat, climatic conditions are taken into account, compared with the scale and weight of the building, roofing and wall materials
Particular attention is paid to this element of the building in regions where hurricane winds often rage, and in winter the snow load is increased
Necessity
A metal-reinforced belt under pitched roofs must be laid:
- In residential buildings with walls made of porous or slotted materials with relatively low compressive or bending strength. Monolithic piping with reinforced concrete tape is provided for the construction of load-bearing structures made of gas silicate, foam concrete, wood concrete, blocks based on expanded clay or slag, and porous ceramics.
- In brick houses during construction in seismically hazardous areas.
In houses made of timber, the function of an armored belt is performed at the top crown of the frame; laying layers of material with a different heat capacity and moisture absorption is considered a violation. In frame buildings, the upper edge of the load-bearing structures is always made rigid according to the design; additional reinforcement is not required.