The foundation for a gazebo is one of the most important “nodes” of construction, on which the reliability and stability of the entire structure will depend. It is important not only to correctly make the foundation, but also to choose the most practical and suitable option.
Interesting base of an octagonal gazebo made of blocks
It is not always advisable to use an expensive and massive base for an ordinary classic gazebo.
In most cases, you can save a lot of money at this stage.
This article will list the most popular options for constructing a foundation specifically for the construction of a gazebo, and also describe particularly complex and important steps in its installation.
Alcove
The gazebo is the favorite place in the garden of our not so distant ancestors. Gazebos in their classic form came to Russian estates from Versailles and Trianon. But their similarities were built in Russia long before that - however, they were called “attics”.
A gazebo is a light architectural structure, usually located in a garden or park, with benches and a table, designed to protect from rain and direct sunlight and serve for relaxation and conversation - which gave it its name.
Wikipedia
https://ru.wikipedia.org/wiki/%D0%91%D0%B5%D1%81%D0%B5%D0%B4%D0%BA%D0%B0
Types of gazebos by design
The classic gazebo always had a door and glazed windows and made it possible to enjoy nature in the comfortable conditions of a mansion. The gazebos once housed paintings, sofas, and fireplaces.
Another type of gazebo is open. They have no windows and either consist simply of supports and a roof, or a light, low wall is fixed on supports on three sides, and a porch with steps is built on the fourth side. There is a circular bench mounted on the wall, and in the middle, on a fixed support, there is a table.
There is another type of gazebo, which is called a “belvedere” (translated from Italian as “beautiful view”), also known as a green gazebo. Its roof rests on openwork lattice walls - trellises, which are often woven with climbing plants. Belvedere were common in Italian and French gardens and parks, but “our people” also loved them.
Sometimes a gazebo is simply a platform on the grass, protected from rain by a roof and fenced either with trellises or densely planted bushes. This type of gazebo does not need a foundation.
Varieties of gazebos by shape, material and design
The shape of gazebos can be quadrangular, round or multi-faceted. They can be built from forged metal, wood, and stone. Inside you can place a built-in table and benches, or you can place a set of furniture. The gazebo can have a fireplace and barbecue.
Photo gallery: different gazebos on different foundations
The gazebo can act as part of the floristic landscape
A gazebo decorated with flowers on a paved area - stylish and beautiful
The gazebo-canopy requires a point foundation for supports and stands on a paved area
A gazebo in a classic style stands on a columnar foundation
A Chinese style gazebo requires a solid foundation.
Russian-style gazebo stands on a columnar foundation
Gazebo with supports made of discolored rubble stone
A gazebo with a metal fence made of rods is placed on a high foundation
A gazebo-alcove for one person does not require a heavy foundation
The gazebo is surrounded not only by a fence, but also by a hedge on a high foundation
The arch can also be classified as a gazebo - without a foundation or walls
The gazebo can be decorated with climbing plants and stands on a high wooden platform
A boho-style gazebo should, due to its heaviness, be on a strong foundation
A Vietnamese-style gazebo is placed on a monolithic but light foundation
The factory forged gazebo Koncept BS-7 is simply assembled from parts and placed on the ground, it does not need a foundation
A large gazebo with curtains, due to its heaviness, is built on a monolithic foundation.
The type of gazebo, of course, depends on the type of foundation.
Construction company prices
If financial resources allow, then the installation of the foundation and the creation of the entire structure can be ordered from one of the construction companies. Specialists will carry out the work in accordance with the gazebo design, providing a guarantee for their services.
The price range in different cities may vary significantly. So, for 1 m3 of a columnar foundation in Moscow you will have to pay from 25 thousand rubles. And this is provided the ground is level and motionless. If the depth of the pillars is different, then the cost of 1 m3 will immediately double. In Kyiv, pouring this type of base will cost from 3,000 hryvnia per 1 m3.
In addition, at the request of the customer, the foreman goes to the site free of charge, carries out the necessary measurements and calculations, and draws up a cost estimate, thanks to which the consumer can choose the most profitable option for cooperation.
Do you need a foundation for a gazebo?
Of course, a gazebo needs a foundation. Despite the fact that the gazebo is a very light, almost weightless building compared even to a barn, not to mention a house, it also has some weight and is deformed from swelling when groundwater freezes, from heaving and soil shifts, and moisture penetration into the structure itself. Therefore, we need at least the simplest foundation, even from improvised means or such paradoxical building materials as concrete and car tires. The foundation will protect your gazebo from most troubles during its operation.
Foundation (from Latin fundamentum - base) is an underground or underwater part of a building (structure), which receives loads and transfers them to the base. There are strip foundations (including those made from cross strips), columnar, solid, and pile foundations. There are monolithic and prefabricated ones. Material: concrete, reinforced concrete, stone (rubble), wood.
Big Encyclopedic Dictionary
https://slovari.299.ru/enc.php
Functions and foundation depth
In the case of a structure such as a gazebo, the foundation performs the following functions:
- Uniform distribution of the weight of the entire structure through the foundation monolith to the ground;
- Ensuring a stable and permanent position of the gazebo on the site;
- Protection of the material from which the walls or load-bearing elements of the gazebo are made from flooding by groundwater or high water.
The depth of the underground foundation significantly affects its reliability and the completeness of the functions described above. This indicator depends on factors such as:
- Nature of the soil - sandy soils, characterized by large particles, have a greater bearing capacity than looser sandy loams, clays and clayey loams. Accordingly, the foundation depth in the first case will be less than in the second. Very poor soil for laying all types of foundations is silty soil and peat bogs.
Some gazebos and foundations may require full geodetic surveys Source mooc.rii.kz
- Groundwater level - the lowest point of the underground foundation (“base”) should be located above the groundwater level by at least 180-200 cm;
- Depth of soil freezing in a specific area - the foundation should be laid below the depth of soil freezing by 20-25 cm.
- The weight of the structure - the heavier the gazebo, the more powerful the foundation is needed for it.
Criteria for choosing a foundation for a gazebo
The foundation is the fundamental part of any building, even the smallest one. Any foundation is bad and does not fulfill its functions if it is built incorrectly.
There are, in fact, very few types of foundations. They all have a certain depth; lie on a bed of draining crushed stone, pebbles, and sand. There is always waterproofing between the foundation itself and the building built on it. As exceptions, we can note pile foundations, which do without a cushion (although sometimes a buried grillage of the pile foundation lies on the cushion), and non-buried foundations, simply lying on the cushion, used for the lightest buildings.
Types of foundations
Based on the depth of their location, all foundation foundations are divided into buried, shallow and non-buried.
According to their engineering design, they are divided into four main types: slab, strip, pile and column.
Slab
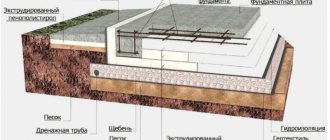
It is used in cases of quicksand, close-lying water, and subsiding soil. Advantages: thoroughness, reliability; in our case, a thin monolithic foundation can be much more convenient than a strip foundation, since a platform is immediately created - the floor of the gazebo. Disadvantages: it requires more labor and more materials than other types; accordingly, it costs more.
The heavy slab foundation shown in the diagram is, of course, redundant for a gazebo
Tape
Typically, a strip foundation is the most popular option, but not for gazebos. Advantages: thoroughness, reliability. Disadvantages: completely redundant for a gazebo. Although if it is very heavy, then a strip foundation is preferable to a monolithic one - it is cheaper and copes better with soil deformations.
A monolithic strip foundation is not the best solution for a gazebo
Pile
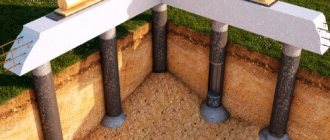
These are supports of small cross-section, deeply buried in the soil and well fixed in it - asbestos-cement or metal pipes. Rarely, but still sometimes such a foundation is made of wooden beams, but special preparation is required. In some cases, factory-made metal screw piles are used, which increases the reliability of the structure and traction with the soil. Advantages: ideal for unstable soil, when building on a slope; a pile foundation made of asbestos-cement pipes does not require large financial investments. Disadvantages: it requires labor and great care when strengthening piles and is often unnecessary in the case of building a gazebo.
Pile foundation with screw piles and concrete grillage is used on slopes
Columnar
The easiest foundation to make and most often used for gazebos. There are recessed, shallowly recessed and non-recessed. For gazebos, the last two types are used. The blocks are placed on a crushed stone or gravel bed, either directly on a cleared area or in pits. Advantages: extreme ease of execution, very cheap, suitable for any soil. There are no disadvantages.
A columnar foundation made of blocks with a wooden grillage is the optimal solution for a gazebo
Video: building a slab foundation for a gazebo
Since your main house has already been built, you already have a professional opinion about your soils made before designing it. Moreover, you already know how your buildings behave: what are the subsidence, soil shifts, and flooding. The choice of the type of foundation for a gazebo or veranda will be based on the opinion of professionals and your existing personal experience. Of course, you must consider site survey indicators. But in the case of a gazebo, everything is much simpler: the requirements are not so stringent; the depth is either insignificant or absent; grillage is the simplest.
Photo gallery: types of foundations for gazebos
A columnar, shallow foundation made of blocks with a wooden grillage is the best solution for a gazebo
A column foundation made of a metal profile pipe with a metal grillage is quite expensive, but for a skilled welder it is very light
The floor frame for the gazebo is built on a slab foundation; it's comfortable
Slab foundation for a gazebo of complex shape
Columnar foundation made of asbestos cement pipes for a large gazebo
Strip foundation with permanent formwork - expensive and impractical for a gazebo
Columnar foundation made of timber - but the timber is packed in metal casings
A columnar foundation followed by cladding creates the floor of the gazebo. A gazebo on screw piles is an excellent, but expensive solution. The foundation can also be installed on tree stumps, if you find suitable ones.
A brick columnar foundation is good in almost all cases, but requires certain skills
Important stages of construction
The construction of a foundation is indeed a complex process in terms of physical activity, but there are usually no problems with leaving the project and the sequence of work (this applies primarily to strip and monolithic foundations, since difficulties may arise with a columnar one due to savings).
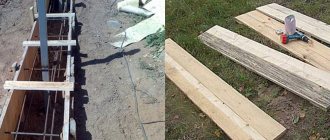
Marking
After selecting the site and type of foundation, it is necessary to mark the site. For a columnar one, you need to mark the holes, and for a strip one, the width of the trench.
It is important to maintain the evenness of the pillars and trench. To do this, pull the cord and hammer the pegs strictly along it. In the future, you will need a level (a water level will be sufficient in most cases).
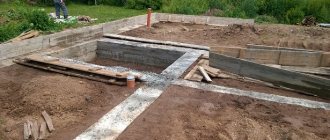
Marking strip foundation
Digging holes, trenches or platforms
Dug trench
Depending on the type of foundation, it is necessary to prepare a flat area for it with a certain depth. I’ll tell you a little experience that I gained in the manufacture of strip foundations.
We share our experience : my friend and I were digging a trench and it was necessary to go down to a certain depth (68 cm from the top edge of the formwork). Since the beginning of the trench was already ready, it was necessary to simply continue digging the soil to the same depth.
After we dealt with the roots of the cherry tree and pulled out all the necessary soil. To the eye everything was quite smooth.
To check the actual height of the foundation in each corner, it was necessary to take a meter ruler and lower it at several points . If the height was the same everywhere, then the trench could be called ready.
It turned out that our height difference is about 15 cm. This is not noticeable to the eye, especially when the soft, fresh soil is easily compacted underfoot. I had to dig up the remaining soil.
Manufacturing of formwork
The process is quite grueling, requiring the installation of formwork strictly to the level. To build it, you need chipboard or OSB sheets, boards, slats, screws, a screwdriver and a level.
Strip base formwork
All the work consists of leveling the walls in all projections, which, in addition, will also have to withstand the concrete solution and not fall apart. To do this, they are fastened with self-tapping screws. Connections should be as tight as possible.
Knitting reinforcement
Metal rods fastened with binding wire make the foundation truly strong and reliable. Without going into technological specifics, I will say: there must be at least some kind of reinforcement; under no circumstances should you refuse it, otherwise your concrete solution may fail.
Metal reinforcement inside the strip foundation
Each foundation uses its own reinforcement; for bored piles and a monolithic foundation it will be fundamentally different. I suggest you watch a video that clearly shows the process of knitting a reinforcement cage.
Preparation of concrete solution
There are three possible options here, each of which has advantages and disadvantages.
- Purchase of ready-made concrete mortar in a “mixer” (from 3,500 rubles per cubic meter plus delivery to the site). In addition to being expensive, you will need to sell the solution quickly, as it hardens quickly. In the case of mixing it yourself, the rush will be noticeably lower.
- Mixing the solution in a concrete mixer . The physical stress associated with manually mixing sand, crushed stone, cement and water is eliminated, and the solution is truly mixed (it is more difficult to achieve this result manually). A serious disadvantage is that the speed of pouring the foundation will not be able to move faster than mixing the solution in a concrete mixer. If we are talking about a large number, then this is very noticeable.
- Mixing the solution in a trough or film . The most labor-intensive method that does not require special equipment. You will need shovels, buckets and a great desire to stir, stir and stir again.
Store-bought concrete in a mixer
Mixing the solution in a concrete mixer
Manual mixing of solution
Brief description of the manufacture of the main types of foundations for gazebos
The choice of foundation depends not only on soil, water and the design of the gazebo. It depends on your preferences, and on the availability of materials that you may already have, and even on the time of year (for example, it is better not to pour concrete varieties in winter, the result will be sad). Therefore, you need to know the basic principles of creating each foundation.
Foundation options for gazebos: strip, monolithic, columnar and pile, the last two with wooden grillages
Columnar foundation for gazebo
Such a foundation is made of blocks (concrete, expanded clay, foam concrete) or brick.
Required Tools
- Construction mixer for mixing concrete (or a trough for mixing by hand).
- Bayonet shovel.
- Shovel
- Hand wheelbarrow.
- Tamping (manual or vibrating).
- Rubber hammer.
- Hydro level (or laser level).
- Roulette.
Step-by-step creation of a columnar foundation from blocks
- We mark the area with string and stakes and select places for the posts. The marked area should be slightly larger than the area of the foundation - 30–50 centimeters on each side.
- We deepen the soil in the marked square (remove the fertile layer) by 30 centimeters (you can remove this layer only under the posts, then less crushed stone will be needed).
- We pour a crushed stone cushion there, spill it with water, and tamp it down.
- In the places marked for the columns, we place two or four (if two, then one on top of the other, if four, then in a checkerboard pattern) blocks on a solution prepared independently (M-400 cement, sand and crushed stone in a ratio of 1: 2: 5). Let the solution set. The same principle applies to bricks, only it will take more of them. There is no point in buying a ready-made solution, since you will only need a little of it.
- We place pieces of roofing felt on the top of the posts on bitumen for waterproofing.
- We install a grillage made of timber using self-tapping screws.
- We connect it with internal stiffeners made of boards (or timber).
Building a foundation for a gazebo on concrete blocks is also very simple.
Video: building a gazebo on a columnar, shallow foundation made of blocks
Strip foundation for gazebo
In some of the cases described above, a strip foundation is required to build a gazebo.
Required Tools
- Construction mixer for mixing concrete (or a trough for mixing by hand).
- Bayonet shovel.
- Shovel
- Hand wheelbarrow.
- Tamping (manual or vibrating).
- Welding machine (if you need to weld reinforcement).
- Hammers of different weights.
- Pliers.
- Grinder for cutting reinforcing bars.
- Nail puller, crowbar.
- Hydro level (or laser level).
- Roulette.
- Circular saw (or hand saw, for cutting lumber for formwork construction).
- Electric drill (for installation of formwork).
- Screwdriver (for installation of formwork).
- Goats (for installation of formwork).
Step-by-step creation of a strip concrete foundation
- We mark trenches on the ground (usually half a meter deep, 40 centimeters wide, plus reserve for formwork), drive in pegs, and pull strings.
- We dig marked trenches.
- We fill it with sand for the drainage cushion - about 30 centimeters, spill it with water, and tamp it down.
- We are building formwork.
- If the veranda is winter, then reinforcement can be applied.
- We pour into the formwork a self-prepared (M-400 cement, sand and crushed stone - 1, 2 and 5 parts by weight, respectively) or ready-made solution.
- Cover the filling with polyethylene and keep it moisturized all the time.
- The formwork can be dismantled in 5–7 days. But the filling will gain strength only after a month.
- We install the frame for the veranda.
Stages of constructing a strip foundation for a gazebo
Strip foundation made of bricks and blocks
Such a foundation is quite difficult to implement. But it’s simpler than a monolithic strip structure, although its reliability is even higher - a “non-monolithic” structure better resists soil deformations. In addition, it is very beautiful - its basement part is made of brick and, in principle, does not require cladding.
Required Tools
- Construction mixer for mixing concrete (or a trough for mixing by hand).
- Bayonet shovel.
- Shovel
- Hand wheelbarrow.
- Tamping (manual or vibrating).
- Hammers of different weights.
- Trowels of different sizes.
- Pliers.
- Grinder for cutting reinforcing bars.
- Nail puller, crowbar.
- Hydro level (or laser level).
- Roulette.
- Circular saw (or hand saw, for cutting lumber for formwork construction).
- Electric drill (for installation of formwork).
- Screwdriver (for installation of formwork).
- Goats (for installation of formwork).
Step-by-step creation of a strip foundation from bricks and blocks
- We mark and dig trenches (usually half a meter deep, 40 centimeters wide, plus allowance for formwork).
- We fill it with sand for the drainage cushion - about 30 centimeters, spill it with water, and tamp it down.
- We place a little mortar prepared independently (M-400 cement and sand - 1 part and 3 parts, respectively) into the trench in an even layer. There is no point in buying a ready-made solution, since you will only need a little of it.
- We place hollow cement blocks on it and wait for the solution to set.
- We put the solution into the voids of the blocks.
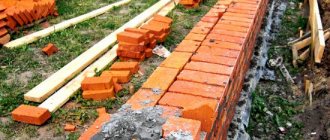
- We lay the bricks on the mortar. You need to be careful in the corners.
- Unstitch the seams; This foundation itself is very beautiful and does not need cladding.
Construction of a foundation for a gazebo made of blocks and bricks
Screw pile foundation
Piles are quite expensive, but infinitely reliable.
Required Tools
- Construction mixer for mixing concrete (or a trough for mixing by hand).
- Bayonet shovel.
- Shovel
- Hand wheelbarrow.
- A mechanism for screwing piles (or a regular crowbar if such a mechanism is not available).
- Welding machine (if you need to cook a grillage).
- Hammers of different weights.
- Pliers.
- Grinder for cutting metal profiles.
- Nail puller, crowbar.
- Hydro level (or laser level).
- Roulette.
- Circular saw (or hand saw, for cutting lumber when building a grillage).
- Electric drill (for installing the grillage).
- Screwdriver (for mounting the grillage).
- Goats (for sawing timber into a grillage).
Step-by-step creation of a pile-screw foundation
- Using twine and stakes, we mark the area and the places of the posts. The marked area should be slightly larger than the area of the foundation - 30–50 centimeters on each side. The marking of piles indicates their load-bearing capacity. Knowing approximately the weight of the gazebo, we calculate the required number of piles.
- We screw screw piles into the marked places - these are hollow cylinders with a drill at the end. There are holes at the upper ends of the piles; a screwing device or a regular crowbar is inserted into them, while the lever is increased by pipes placed on the ends of the crowbar.
- A liquid solution prepared independently (M-400 cement and sand in a ratio of 1:3) is poured into the pile cylinders, fixing the pile in the ground and strengthening the pile cylinder itself. There is no point in buying a ready-made solution, since you will only need a little of it.
- A grillage is mounted: welded metal or wooden, made of timber.
A pile-screw foundation for a gazebo is one of the most reliable solutions
Pile foundation made of poured concrete piles
This is a good compromise between strip and column foundations. And, of course, it is much more reliable than the columnar one.
Required Tools
- Construction mixer for mixing concrete (or a trough for mixing by hand).
- Bayonet shovel.
- Shovel
- Garden drill.
- Hand wheelbarrow.
- Tamping (manual or vibrating).
- Hammers of different weights.
- Pliers.
- Grinder for cutting reinforcing bars.
- Nail puller, crowbar.
- Hydro level (or laser level).
- Roulette.
- Circular saw (or hand saw, for cutting lumber for the construction of formwork and grillage).
- Electric drill (for installation of formwork and grillage).
- Screwdriver (for installation of formwork and grillage).
- Goats (for cutting lumber during the construction of formwork and grillage).
Step-by-step creation of a pile-concrete foundation
- We mark and dig wells, make a cushion of sand 30 centimeters thick, strengthen the formwork above the ground surface (you can put reinforcement inside the pits in the form of several rods of reinforcement the length of the depth of the pit), pour a solution prepared independently (M-400 cement, sand and crushed stone) into the wells in a ratio of 1:2:5), leave for two weeks. You can pre-place squares of bitumen-impregnated boards in the columns to secure the strapping. There is no point in buying a ready-made solution, since you will only need a little of it.
- We assemble the components for the grillage.
- We attach the binding to the squares.
- We strengthen it with a corner.
- We attach supports for the frame of the gazebo or veranda.
Phased construction of a foundation for a gazebo on poured concrete piles
Pile foundation made of timber
This is a very simple and inexpensive option, and for lightweight structures it is as strong as a pile foundation made of metal piles. But it is much less durable than any other foundation, with the exception of a timber frame.
Required Tools
- Construction mixer for mixing concrete (or a trough for mixing by hand).
- Bayonet shovel.
- Shovel
- Garden drill.
- Hand wheelbarrow.
- Tamping (manual or vibrating).
- Hammers of different weights.
- Pliers.
- Nail puller, crowbar.
- Hydro level (or laser level).
- Roulette.
- Circular saw (or hand saw, for cutting lumber).
- Electric drill.
- Screwdriver.
- Goats (for cutting lumber).
Step-by-step creation of a pile foundation from timber
- We mark the site, prepare supports covered with metal profiles.
- We dig pits, make a sand-crushed stone cushion 30 centimeters thick in them, put supports there, and fill them with a solution we prepared ourselves (M-400 cement and sand in a ratio of 1:3). There is no point in buying a ready-made solution, since you will only need a little of it.
- The supports are connected with a grillage.
- The grillage connections are reinforced with metal corners.
- You can add stiffening ribs from boards.
Step-by-step construction of a pile foundation for a gazebo from timber
Foundation frame made of large section timber
This is the simplest foundation possible. Unfortunately, even with high-quality impregnation and careful waterproofing, it is short-lived.
Required Tools
- Bayonet shovel.
- Shovel
- Hand wheelbarrow.
- Tamping (manual or vibrating).
- Hammers of different weights.
- Pliers.
- Nail puller, crowbar.
- Hydro level (or laser level).
- Roulette.
- Circular saw (or hand saw, for cutting lumber).
- Electric drill.
- Screwdriver.
- Goats (for cutting lumber).
Step-by-step creation of a timber frame foundation
- We mark and dig a trench. With its shallow depth, the timber lying on a 30-centimeter-thick sand cushion and roofing felt (for waterproofing) will be slightly above ground level. In principle, you can dig a trench to the depth of the pillow. Sometimes you need the beam to be at ground level. Then the trench should be deeper, and the timber should be wrapped with roofing material.
- We strengthen the connections in the corners with metal corners.
- The timber is additionally secured against horizontal movements by driving rods into the ground through holes.
The foundation for a gazebo in the form of a timber frame is good, but short-lived
Foundation for a gazebo made of pipes (plastic)
It's very simple and effective. But it requires a large number of pipes and, accordingly, meticulous work. Moreover, the pipes can be very different: sewer, asbestos-cement and even plastic.
Required Tools
- Construction mixer for mixing concrete (or a trough for mixing by hand).
- Welding machine (if you need to cook a grillage).
- Bayonet shovel.
- Shovel
- Garden drill.
- Hand wheelbarrow.
- Tamping (manual or vibrating).
- Sledgehammer.
- Hammers of different weights.
- Pliers.
- Nail puller, crowbar.
- Hydro level (or laser level).
- Roulette.
- Circular saw (or hand saw, for cutting lumber when building a grillage).
- Electric drill.
- Screwdriver.
- Goats (for cutting lumber).
Step-by-step creation of a foundation from plastic pipes
- We dig holes-holes slightly wider than the pipes to the calculated depth.
- We place pipes on a cushion of crushed stone 30 centimeters thick. The thinner the pipes, the more often they are installed. The length of the pipe is usually about two meters; it should protrude half a meter above the ground.
- Ideally, we reinforce the pipes inside with metal reinforcing bars (several pieces) along the entire length of the pipe.
- Fill the pipes with a liquid solution prepared independently (cement M-400, sand and crushed stone in a ratio of 1:2:5), leave for two weeks. There is no point in buying a ready-made solution, since you will only need a little of it.
- We install the grillage: it can be wooden, concrete in formwork, or even metal.
A pipe foundation is a simple but labor-intensive structure
Foundation for a gazebo made of car tires
Old tires are used quite widely in many gardening businesses. This use has spread quite recently - since the early 2000s. The patent for manipulating tires for construction purposes is held by inventor Mikhail Semykin. Advantages: it is incredibly economical - you only need a solution and a sand-crushed stone mixture; Tires are eternal, they save you on purchased building materials, they themselves are waterproofing, elastic and perfectly resist soil deformation. Disadvantages: it is not always aesthetically pleasing; it is advisable to decorate the tires later.
Required Tools
- Construction mixer for mixing concrete (or a trough for mixing by hand).
- Welding machine (if you need to weld permanent metal formwork).
- Bayonet shovel.
- Shovel
- Hand wheelbarrow.
- Tamping (manual or vibrating).
- Hammers of different weights.
- Pliers.
- Nail puller, crowbar.
- Hydro level (or laser level).
- Roulette.
- Circular saw (or hand saw, for cutting lumber for formwork).
- Grinder for cutting reinforcement and channels.
- Electric drill.
- Screwdriver.
- Goats (for cutting lumber).
- Scissors for linoleum or roofing felt.
Step-by-step creation of a foundation from car tires
- We “save” the required number of tires of the same size and height.
- We mark the area and places for the posts using twine and stakes. The marked area should be slightly larger than the area of the foundation - 30–50 centimeters on each side; its horizontalness and evenness should be verified using a laser level.
- We pour filler into the laid tires - small crushed stone, pebbles, small fragments of blocks and bricks, and even just earth; then compact it well.
- We place roofing felt on top of the tires: in several layers, overlapping, each next layer perpendicular to the previous one. You can replace it with thick linoleum - it’s even more reliable.
- Then we install formwork no lower than 10 centimeters on top of the tires. You can weld permanent formwork, the frame of the slab is a square of large cross-section channel, for example 100x50x5 millimeters.
- We place metal reinforcement in the formwork. It is advisable not to weld the reinforcement over the entire area, but to use welding to a minimum. We tie the reinforcement with wire.
- Prepare the solution and pour it into the formwork (channel) evenly and quickly. Level the surface and cover with film. We moisten it daily, after a week the board formwork can be removed. But the foundation can be used only after three weeks.
Such a foundation will help to recycle tires, and in case of any deformation it will guarantee peace of mind
There is another way: fill the tires with mortar or cover them tightly with filler, and on this basis, mount a grillage, securing it to the tires with reinforcement.
The most common foundation is made of tires with a wooden grillage.
You can build a “strip” foundation from tires. It does not require formwork.
Method of constructing a “strip” foundation from tires
And what’s more, tires perfectly replace other materials in a columnar foundation. But you need to very carefully pour the filler into them or pour the solution so that your structure does not swing like a cockerel on a spring in a children's park.
Columnar foundation made of tires - very practical and functional
Columnar foundation made of poured concrete barrels
Metal barrels are used, the lid of which is cut off. The bottom is often cut off. This is how we get permanent formwork, which is called a shell. A standard “barrel container” with a volume of 200 liters has a diameter of 60 centimeters and a height of 85. Barrels are placed in the corners of the building, at the intersection of load-bearing walls and in their middle. Advantages: economical, durable, no formwork required. Disadvantages: you need a deep, large pit (a lot of excavation work) and a large amount of sand-crushed stone mixture; You will need a large number of old barrels, which are unlikely to be collected - you will have to buy them.
Required Tools
- Construction mixer for mixing concrete (or a trough for mixing by hand).
- Bayonet shovel.
- Shovel
- Hand wheelbarrow.
- Tamping (manual or vibrating).
- Hydro level (or laser level).
- Roulette.
- Circular saw (or hand saw, for cutting lumber for formwork).
- Grinder for cutting the bottom and lid of barrels and cutting reinforcement.
- Scissors for linoleum or roofing felt.
Step-by-step creation of a foundation from metal barrels
- We “save” the required number of old barrels.
- Using string and stakes, we mark the area and places where the barrels will stand. The marked area should be slightly larger than the area of the foundation - 30–50 centimeters on each side; we check its horizontalness and evenness using a laser level.
- We dig a large pit (or holes for barrels with a diameter slightly larger than the diameter of the barrel).
- Pour sand into a pit or pits to a height of 0.3 meters, lightly fill it with water and tamp it down.
- If the barrels have no bottom, then put roofing material on the sand in one or two layers.
- We place metal shells (barrels) lubricated with waste oil in the designated places.
- Then we fill the pit or pits around the barrels with a sand mixture, which we wet in layers and tamp.
- We place the reinforcement in empty barrels so that it protrudes above the surface of the solution.
- Fill the barrels with solution; It is necessary to fill each individual barrel at a time.
- Let the solution gain strength for a month, moisturizing the surface. Then we make waterproofing with molten bitumen and roofing felt.
- We put up a grillage and attach it to the fittings sticking out of the barrels.
The foundation for a gazebo made of barrels is quite a complicated matter.
The “barrel” foundation should be erected in the spring, and a gazebo should be built on it immediately. If such a foundation is left unloaded for the winter, then the soil may unevenly push out our barrels, and the structure will never be perfectly strong.
Columnar foundation made of roofing felt
You can do without barrels. The execution scheme is exactly the same as in the previous case, only instead of barrels, “pipes” made of rolled up roofing material are placed in the pits. They can be inserted into mesh cases, or you can simply lay them out in a pit. Advantages: the same as in the previous case. There are no disadvantages.
Columnar foundation made of roofing felt - the “optimal” solution
A budget option for creating a foundation with your own hands
The simplest and most affordable solution is to build a columnar foundation. The work order is as follows:
- Along the perimeter of the structure, holes are dug for pillars. Their number and depth depend on the type of soil. For a small gazebo, provided the soil is stable, it will be enough to make 4 holes in the corners, each 50 cm deep.
- 5 cm of sand and crushed stone are poured into the bottom of the holes, compacted, and roofing material is spread.
- The pillars are installed level. 3 reinforcement rods are inserted inside.
- The support cavity is filled with concrete.
If metal pipes are used, there is no need to fill them with solution. You just need to weld two shelves to the ends of the pipes to enhance the strength of the structure, and do not forget about waterproofing the metal parts using bitumen or roofing felt.
Car tire
Increasingly, owners of country houses began to use car tires for foundation construction. This is an inexpensive and easy way to make a good base for a gazebo. This method has several advantages:
- Durability. It's no secret that rubber is a durable material that is not exposed to various external influences. She is not afraid of moisture, frost and heat. You will get a reliable foundation with a long service life.
- Reducing loads. The advantage of rubber is that it can be deformed without losing its integrity and properties. Therefore, under heavy loads, car tires will be able to soften the pressure by evenly distributing the entire weight over the surface.
- Significant savings. Other materials mentioned above (pipes, blocks, concrete, etc.) cost a lot, especially since it is not enough to get by with just the material; you need to purchase a whole complex. But everyone can get tires for practically nothing. Thanks to this, much less effort and expense will be spent on arranging the foundation, which, if desired, is better invested additionally in the building itself and its design.
- Car tires have their own waterproofing.
Solid
Anyone can make such a base from tires. All you need are tires and knowledge, which you can draw from this article. You should know that there are two types of tire foundations:
- Columnar.
- Slab (solid).
If you want the gazebo to stand on such a base for a long time, when installing it you should adhere to the following rules:
- Do not deepen the foundation below the freezing point of the soil. It is better to make a shallow foundation that will perform well in winter.
- When installing the bottom layer of tires, be sure to check with a level that the surface is level. If you miss such an important point at this stage, it will be very difficult to correct something later. Your task is to install the tires so that their top edges are in the same plane.
- When choosing tires, it is better to choose those with a larger diameter, as these tires are much stronger.
- When the foundation is ready, its protruding parts are covered with decorative material.
It is clear that not everyone can immediately decide to build such a structure from tires. But it is worth saying that this technology has been used for a long time and there are examples that prove the success of this method. Moreover, it is appropriate to build a tire base on problematic soil with a high degree of heaving. If you decide to build such a foundation, let's look at the technology for its construction.
Screw piles
This option is universal. It is suitable for all types of gazebos with barbecues, with the exception of stone or brick ones. With a light open structure, screw piles can also be used for brick and stone buildings. This option has its own characteristics and advantages.
The principle of constructing a pile foundation is to screw them into the soil until a solid layer is reached. The advantages of this method include:
They are suitable for complex and mobile soil types, including heaving, clay and all others. Therefore, the type of soil is not decisive
Only the occurrence of the solid layer is important. Based on its depth, you need to purchase piles of the appropriate length; No need to level the area for the gazebo
If there are natural unevennesses, they do not need to be leveled. It is enough to simply use piles of different lengths. Relative to the horizon level, they will create a completely flat base for installing the building frame; Installation of piles is done manually. It will be enough for two people and a gate for which you can use an ordinary metal scrap. To speed up and facilitate the process, you can use technology. But in any case, there will be no need to use bulldozers, tractors and other heavy equipment.
At the same time, the piles are durable and can withstand 70 or more years of operation. They do not rust thanks to a special coating. The products are not exposed to mildly aggressive environments.
Moreover, the pile option will be the best if the gazebo is built in a reservoir.
Columnar base
This option will also be a good solution for lightweight gazebos. This is a great way to create a foundation for an open gazebo made of wood, metal or polycarbonate.
The basis of this foundation is brick columns. They are buried 70 cm into the ground and rise above the soil level by 30 - 40 cm. Using bricks is most convenient. This is an accessible and inexpensive material. Moreover, you can use used brick halves.
Such posts should be placed at a distance of no more than 50 cm from each other. In this case, this distance should be observed not only with the perimeter arrangement of the columns. They should be arranged throughout the entire internal area of the gazebo.
In general, the type of foundation depends on the plans of the site owner. And in each case, you can create a foundation at minimal cost by doing the work yourself. The main thing is not to overestimate your strengths and skills. If the work causes difficulties, you need to contact specialists and not count on luck.
With the help of professionals, it will be possible to create a durable and very strong foundation.
How to make calculations
Calculating material consumption is very important. This will help not only not to make a mistake in the number of tools purchased for the job, but will also provide an opportunity to save money when purchasing everything you need
We recommend using special online calculators. Modern programs have simplified the calculation process to the point of automation.
There are many ways to build a foundation for extensions. The foundations presented in the material gave you the opportunity to familiarize yourself in detail not only with their varieties, specifics, advantages and disadvantages, but also with the methods of constructing each of them.