In order to make a wooden sheathing, you will need lumber with a cross-section of 50x40 mm and above, depending on the height of the ceilings, the unevenness of the floor and/or the need to insulate it. Logs are laid every 40 - 60 cm, it is necessary to take into account that the middle of the beam or slats falls on the edge of the OSB sheet. Fixing joists to a concrete base and OSB boards to timber sheathing is in many ways similar to arranging a plywood floor; you can read in more detail here - “Leveling a floor with plywood.”
In the case of a screed, there are several options for fastening OSB sheets:
- glue fastening;
- fastening OSB to a 6x40 mm dowel.
First of all, you need to pay attention to the cement screed. It should not have serious unevenness or damage to the top layer. The permissible height difference is from 1 to 2 mm per square meter. The surface must be prepared, and for this purpose large dust is collected with a broom, and finer dust can be removed using a construction vacuum cleaner, then it is treated with a primer. OSB3 is used for flooring on a concrete base; it is more wear-resistant and moisture-resistant compared to OSB2 and OSB1, and is also used for outdoor work and is by far the most common type of oriented strand board.
| Thickness, mm. | Width, mm. | Length, mm. |
| 1250 | 2500 | |
| 1250 | 2500 | |
| 1220 | 2440 | |
| 1250 | 2500 | |
| 1220 | 2440 | |
| 1250 | 2500 | |
| 1250 | 2800 | |
| 1250 | 2500 | |
| 1250 | 2500 | |
| 1250 | 2500 |
The above table contains the main dimensions of oriented strand boards produced today. For laying on a concrete base or on an old wooden floor in one layer as a final floor covering, it is better to use OSB sheets with a thickness of 18 and 22 mm and a size of 2500x1250 mm.
How OSB is laid on a concrete floor: technology, how to lay OSB without logs under linoleum
Laying OSB on a concrete floor is a simple and effective method of leveling any surface for further laying various types of finishing materials (linoleum, parquet, laminate, carpet, etc.). OSB is an abbreviation of the English name Oriented Strand Board, translated into Russian, which translates as “oriented strand board” (therefore, it would be more correct not OSB, but OSB, but the first option has long and firmly taken root in the lexicon).
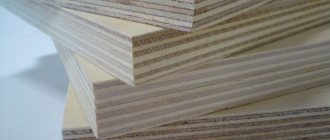
Plates are a fairly popular construction and finishing material. It is used for a variety of work for leveling, insulation, and other tasks. Oriented strand board is a sheet made from 3-4 layers of wood chips (thin chips), which are glued together with resins containing boric acid and synthetic wax. In the layers of the slab, the chips have different orientations: in the inner layers it is transverse, in the outer layers it is longitudinal.
Due to the peculiarities of production, the slabs are quite strong and resistant to various influences, durable and ideal for leveling the floor.
Fastening OSB to joists and boards
To fasten oriented strand board to the joists, use a self-tapping screw or rough nails. And for even greater reliability, fastening joints are sometimes lubricated with universal glue. What is preferable to use for fixation, nails or screws?
- Self-tapping screws are more expensive than nails when compared to the cost per kilogram.
- Fixing (screwing in) one screw using a screwdriver usually takes up to one minute. Fastening slabs with nails is much faster. And when you have a nailer (nail gun), it’s 100 times faster.
- But self-tapping screws withstand pull-out resistance better.
- If the plate was fixed with self-tapping screws, then dismantling it is much easier; removal is possible without damaging the OSB sheet. With nails it is more difficult not to damage the slab during dismantling.
In order for OSB sheets to be fixed as securely and firmly as possible, they are attached not only around the perimeter. For example, draw two diagonal lines to screw self-tapping screws along them with the same pitch. And if the base of the floor surface is covered with whole, large OSB boards, then this is especially important.
Professionals believe that it is safer and more convenient to fix OSB to a wooden floor surface with high-quality self-tapping screws. But this is when there are no restrictions on cost and time.
In the article, we examined the main points of laying OSB boards on logs, concrete screed and wooden flooring. As you can see, this is not such a difficult task and any home owner can cope with it.
In what cases are OSB sheets laid on the floor?
OSB is installed on the floor under any finishing material. A backing made of wood sheets allows you to level the base and extend the life of the floor covering, protecting it from wear due to interaction with the floor. Often this is how the floor is prepared for linoleum, laminate, parquet, and carpeting. It is not always cost-effective and relevant to perform a leveling screed, so leveling with OSB boards becomes the only correct solution.
OSB can be laid on both concrete and wooden floors, on a metal frame, and other types of durable foundations.
Briefly about the main thing
When wondering whether OSB is suitable for flooring, or whether it can be laid on the floor instead of plywood, do not doubt your choice. This material is universal and suitable for roughing and finishing. Unlike analogues, it has no equal and allows you to significantly reduce the cost of floor repairs.
When purchasing OSB sheets, it is important to pay attention to the marking: E1 or E0.5 with the designations “Green” or “ECO”. This material is suitable for residential premises.
OSB boards are attached to the floor only with self-tapping screws, longitudinally-transversely or diagonally. They can also be used as a substrate for a concrete base. In this case, the slabs are laid in one layer.
The material is installed face up, cutting is done using a jigsaw. Laying slabs for an irregularly shaped room starts from the center of the room, and for a standard rectangular room - from the corner.
How to choose an OSB board for the floor
The modern market offers several options for oriented strand boards, which have different thicknesses, technical characteristics, functions, etc. The sheets may contain harmful impurities, and therefore such boards are prohibited from being used in residential premises due to the danger to human health and life.
Composition and characteristics of the slab
OSB (aka OSB, OSB) is oriented strand boards, which are a composite of large wood chips and various polymer binders. Plates are created from several layers, which are placed perpendicular to one another. Thanks to this solution, the sheets successfully resist torsional deformations and are resistant to delamination and tearing.
Usually, OSB-3 is chosen to level the floor under laminate, carpet, linoleum, since these boards can withstand heavy loads (from equipment, furniture, for example), even if installed on joists, they are resistant to temperature/humidity changes, are well processed, easy and quick to install.
It is also important that the slabs always also act as a sound/heat insulating layer. The thickness of the slabs depends on the installation method and the levelness of the floor. The sheets can be attached in one or two layers; a lot also depends on the type of decorative finish, the characteristics of the floor, and the selected slab.
Choosing the thickness of sheets when laying on the floor
The sizes of OSB boards may vary, but when choosing, it is very important to pay attention to the thickness of the sheet. Standard parameters are from 6 to 24 millimeters. And the durability and reliability of the coating depend on the thickness: the thicker the slab, the greater the load it can withstand, but the lower the height of the room and the higher the cost of repairs.
The table below provides more detailed data:
Features of choice
Now there is a large selection of OSB on the market, which differ in their properties and characteristics.
In order to make the right choice, you must follow the following recommendations:
- Products from Canadian and European manufacturers are considered to be of the highest quality; they are produced using modern technologies and meet the E1 standard (environmental safety);
- it is best if OSB-3 is laid (fastened) on the floor;
- for concrete pavement it is necessary to use slabs up to 10 mm thick; for wooden pavement their thickness depends on the distance between the joists.
The size of a standard OSB board is 2440x1220 mm, so the required quantity is calculated based on the location to ensure a minimum of waste. Using a circular saw it is easy to cut to the required size; using a jigsaw for this is not recommended, since it is not always possible to obtain an even cut with its help.
Laying slabs on a concrete surface
Often OSB slabs are mounted on a concrete screed so as not to lose the height of the floors. In this case, the base should be level, preferably new. The floor must be waterproofed to eliminate the possibility of condensation accumulating under the sheets and the appearance of fungus.
After polyethylene or roofing felt is laid on the floor surface, cleared of the remains of the old screed, then beacons are installed and secured with plaster. They need to be leveled using a tape measure, tapping cord, and transverse threads.
What you will need to install slabs on a concrete floor: hammer drill, trowel (notched), screwdriver, dowel nails, parquet glue, hammer. If the base is level, a layer of slabs 10 millimeters thick is sufficient.
Features of OSB surface treatment for different types of floor coverings
Due to the unique characteristics of wear resistance and strength, as well as the hardness of the surface of the front part of the OSB board, it can be used both as a substrate for various decorative finishing options and as a finishing layer.
Installation of slabs on joists
As logs, beams from the most even coniferous wood (spruce, pine, fir, larch) are used. The wood should exhibit a moisture content of no more than 20%. If necessary, you can dry the beams under a canopy.
how to attach a drainpipe to a wall
If the rooms are small, use logs with a diameter of 110x60 millimeters or 150x80 millimeters. For a span of more than 5 meters, beams with a cross section of 220x180 millimeters are used.
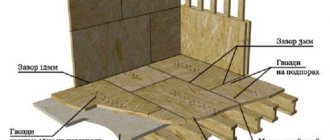
Next, OSB sheets are laid. As a rule, the following rules are followed: 2 layers of slabs are installed, the second layer is laid transversely to the first (to avoid overlap of joints), the gap between the joints is 3 millimeters, between the OSB and the wall is 12 millimeters, the short edges of the slabs are joined on the support beams, the long sides of the joints are placed on supports.
To ensure better contact, the beams and OSB sheets are coated with mounting adhesive, then screwed to the slab joists with self-tapping screws along the short edges in increments of 15 centimeters. The two layers of slabs are also held together with glue and screws.
Creating a subfloor from OSB on joists
This technology for creating a subfloor is most often used on a pile, columnar, pile-screw foundation. The work is done quite quickly and simply. First, logs are mounted on the base with a step corresponding to the thickness of the slabs (the thicker the sheet, the larger the step).
A layer of vapor barrier and thermal insulation material (mineral wool, polystyrene foam, ecowool, etc.) are placed on top of the OSB. Cover the insulation with a second layer of OSB, attaching it to the joists as usual.
Materials for work
In addition to the rules for selecting tools, there are some criteria for choosing the wood itself:
- Curved logs cannot be attached.
- The material does not have to be the most expensive. Reliable and durable options can be chosen from budget raw materials.
- Spruce, pine and fir are considered sufficiently high-quality wood species to solve the problem.
- If you have a small budget, you can get by with wooden products of category B, as well as BC. The only condition is that the maximum humidity level should be 18%.
- Products should be carefully inspected for insect and mold damage. If such traces were found, you should not take such bars.
Operation of OSB floors
The wooden surface created from OSB allows any decorative finishing to be done on top. The cladding not only gives the floor a beautiful appearance and promotes comfortable use, but also protects the OSB sheets from various influences.
It is impossible to install a warm floor under OSB boards, since high temperatures will provoke the evaporation of formaldehydes that adhere to the fibers and this can cause the presence of toxins in the air in the room. On the other hand, the high insulating properties of OSB boards do not allow heat to effectively enter the house and the efficiency of such heating will decrease significantly.
Source
Ceramic tiles: can they be installed on OSB?
Many who want to use tiles for decoration are wondering whether it is possible to lay ceramic tiles on OSB? The answer is clear - no, ceramic tiles are not glued to the surface of such slabs. This is due to the fact that the structure of the slab does not allow the adhesive composition intended for floor and other tiles to stay on the surface for a long time, even when using special meshes and other things. In order to lay tiles on a floor made of OSB, you will have to make an additional layer of DSP or glass magnesite boards. How to lay tiles on such a floor correctly?
The process is as follows:
Based on materials from the site: https://1poplitke.ru
Is it possible to pour floors on a wooden base?
Self-leveling floors are most often laid on a concrete screed, with which they have a high adhesion force. However, cement and polymer coatings are also suitable for other base materials, such as wood.
With a properly prepared base, installation of self-leveling floors is possible, but with a number of restrictions. To pour a high-quality floor, the base must meet the following requirements:
Advice! For pouring onto wood, it is better to use special thin-fill mixtures that do not increase the height of the base too much and are excellent for contact with lumber.
Acclimatization problems
Oriented strand board is divided into four grades. OSB-1 is a general-purpose material, designed for a humidity of no more than 65%, OSB-2 is used at a similar humidity level, but can withstand load-bearing loads, OSB-3 and OSB-4 are used in an environment with a humidity level of no more than 85%.
Acclimatization takes place within two days. The plates are installed in a vertical position, and slats are placed between the sheets to improve air circulation. According to GOST, it is recommended that the absolute humidity of products range from 2 to 12%. At the same time, in an unheated room, the humidity of the material can fluctuate at the level of 16 – 18%.
Particle boards must be protected from water even if OSB-3 and OSB-4 grades are used. Contact with liquid will cause deformation and swelling of the material. After installation, the slabs must be protected from moisture by facing materials (lining, siding, etc.). It is not recommended to treat the chipped surface with products containing a high water content. When using material for external walls, it is covered with a protective film so that the slabs are not saturated with moisture from the ground, and the sheets are laid on wooden pads. Also, using wooden slats, you need to create an air space between the film and the OSB, again this is done for air circulation.
The ends are the most vulnerable areas of OSB; during the acclimatization process, when the environment changes from dry to wet, they can swell; in this case, they must be sanded before installation.
Self-leveling floor on plywood: advantages and features
When a self-leveling floor is made on plywood, the latter often serves as a rough screed. There are, of course, transparent finishing materials through which the wood pattern will look great, but in general, if plywood is used, it will even out the flaws of the existing floor covering.
The installation of such a floor covering is carried out by pouring polymer compounds onto a prepared base. This is a rather complicated technological process, which consists of several stages.
Even minor omissions in the installation of the floor covering are not allowed, which can lead to a deterioration in decorative and performance qualities.
Main stages of the device:
Nuances
1. Waterproofing is a must, otherwise there may be trouble with the tree
2. The thickness of the poured coating should be at least 25-30 mm.
3. It is recommended to use a frame (reinforcement). This is usually a mesh.
Note. The only exception may be floor coverings filled entirely with polymer materials. They do not contain water and cannot damage materials.
Otherwise, installation of self-leveling floors using plywood is no different from conventional installation methods. So, on plywood they can be made of the following types:
Varieties
The following types are offered on the market:
Filling with epoxy Filling with polyurethane White gloss Filling with transparent material
Briefly about the main thing
Self-leveling floors can be laid on any old surface or dry screed. In this case it will be plywood. Before you start pouring, the subfloor should be insulated, leveled and prepared for the finishing coating stage.
It is recommended to adhere to certain requirements when laying on plywood, because it differs from other materials taken as a basis:
The cost of work is significantly reduced when using plywood sheets, because the subfloor material has a minimum cost.
Laying methods
How is OSB installed on the floor in each of the cases described above?
On concrete
An oriented strand board will help level the surface of the screed for the final coating.
- Laying OSB on a concrete floor begins with cleaning: the floor is thoroughly swept and vacuumed. The instructions are due to the fact that the sheets will be placed on glue, and dust will interfere with its adhesion.
- Concrete is primed with any primer. The goal is again to improve the adhesion of the glue by making the surface layer as dense as possible.
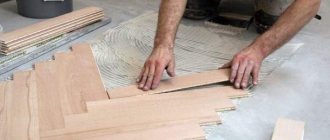
- The material is cut to size. You should leave a gap of 3-5 mm at the wall; the same gaps are usually left between the sheets. OSB is laid out with offset transverse seams, so that the four corners do not converge anywhere at one point.
- How to attach OSB to a concrete floor? The sheets are mounted on parquet rubber adhesive and additionally secured with driven dowels.
In a dry screed
After the bedding is leveled along the beacons, OSB sheets are laid out on it: the first layer, then the second layer, with all seams offset by at least 20 centimeters. Along the seams of the second layer, the sheets are fastened with wood screws 25 mm long. Step – 15-20 cm.
Please note: traditionally, dry screed uses much cheaper plasterboard, which is protected from impact by parquet or laminate. It makes sense to use OSB if the final coating is linoleum.
The photo shows a dry screed using plasterboard.
Since we need to ensure the most even surface possible, the heads of the screws will have to be recessed. To do this, the holes for them are first drilled with a slightly smaller diameter (usually 3 mm), then countersunk with a larger one (8 - 10 mm) .
On the boards
How to level an OSB floor if the boards are noticeably sagging in places?
- On the ledges, the nails are sunk into the board. To do this, you can use a long steel bolt with a diameter approximately equal to the diameter of the nail heads and a hammer.
- Irregularities are removed with a manual or electric planer.
- OSB boards cut to size are laid out on the surface. As with concrete, offset of the transverse joints between courses is necessary.
- The sheets are attached with self-tapping screws with a length of 40 mm. The step is about 30 centimeters. The hats are drowning again.
- The last stage is sanding the joints. Doing this work with your own hands over a large area is quite tedious: it is better to arm yourself with a sander.
Tip: Drywall sanding grids combined with an inexpensive oscillating sander work great on plywood and oriented strand board. At the same time, the resource of one mesh is noticeably greater than that of sandpaper.
Preparing tools
To ensure uninterrupted operation, prepare all the tools and purchase consumables in advance. Depending on the specific conditions, the following devices may be needed:
You also need to purchase a sufficient amount of self-leveling mixture from a trusted manufacturer, which is suitable for pouring onto a wooden base (this is indicated on the packaging). Such mixtures contain fibers that enhance adhesion to wood.
Also for work, you will definitely need paint shoes - soles with spikes that are attached to shoes and are intended for walking on flooded areas for the purpose of leveling and topping them up.
To prepare the base, additional tools and tools are often needed:
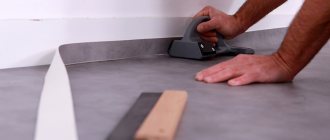
Cutting
Before installation, OSB is cut into sheets of different sizes. A hand or power tool can be used for this. When working, it is important to eliminate vibrations of the slab, so it is securely secured with clamps. To cut along a straight line, use guides made from straight boards. When sawing, it is important to use a corner so that the cut always goes perpendicular to the edge of the sheet.
When marking, you need to take into account the thickness of the cut; all tools have their own thickness. Before starting work, it is recommended to carry out a rough cutting of an unnecessary piece of material. Oriented strand material should be sawed at a moderate speed, the forward movement should be made smoothly. Marking is done using a ruler and a construction marker. Due to the large dimensions of the sheets, they are installed on a wooden stand; cutting in a vertical position is also possible. Let's look at the basic tools that can be used for cutting.
Some manufacturers produce blades specifically for cutting wood panels.
How to choose a self-leveling floor for a wooden floor
Self-leveling mixtures are compositions of cement or gypsum binder, mineral fillers and modifying polymer additives that improve the basic characteristics of the composition (hardening speed, bending strength, compression, etc.).
Manufacturers usually indicate on the label that the mixtures are intended for leveling and repairing mineral-type substrates. These are cement-sand, anhydrite and other types of screeds, concrete slabs, underlying layers of crushed stone, slag, sand, bulk and natural soils (compacted).
How can you find out which compositions can be used on chipboard and OSB boards, wood and plywood? To do this, just look at the instructions. In the description of cement and cement-gypsum self-leveling floors, these categories must be indicated among the bases.
decorating the kindergarten veranda in summer
For wooden and sheet surfaces, the compositions are applied in a layer of 3 to 7 cm. Do not confuse with thin-layer gypsum and gypsum-cement levelers, the layer thickness of which does not exceed 0.2-3 cm.
Since wood and its derivatives (plywood, fiberboard, chipboard, OSB, HDF) have a high coefficient of seasonal changes in linear dimensions, manufacturers strongly recommend the use of separating layers (geotextile, PE film) plus a damper around the perimeter. Simply put, create a “floating” type floor.
How to choose the right multicomponent mixture? See the composition. According to the established rule, in complex formulations the component that is in greater quantity is indicated first. For example, a cement-gypsum self-leveling floor contains more than 50% Portland cement and less than 30% gypsum. Although professionals consider purely cement compositions to be the best option. The fact is that their strength is much higher than that of their analogues; accordingly, it is possible to make a more durable and reliable self-leveling floor on a wooden base.
So, is it possible to level a base made of boards, chipboard, OSB with your own hands using ready-made compounds? The answer is yes, but with some caveats:
Laying tiles on OSB walls
When tiling walls made of OSB panels, you can encounter the same difficulties as when laying ceramic tile flooring. To increase adhesion (adhesion) between OSB and tile adhesive, in addition to the already mentioned plaster mesh, you can use primers and special adhesive mixtures. To learn how to glue tiles in a frame house, watch this video:
Surface primer
Using a primer, you can significantly increase the adhesion of any building materials, and particle board is no exception.
Before applying a layer of primer to the panel, it will need to be thoroughly cleaned using coarse sandpaper or a sanding machine.
After this, the first layer of primer is applied using a roller or paint brush.
For the best effect, use at least two layers - the second is applied after the first layer has completely dried (after about 10 - 12 hours).
Selection of adhesive composition
When installing tiles on OSB, you should not skimp on glue. Since conventional cement-based tile adhesives will not provide sufficient adhesion to the surface, you will need to find a “stronger” option.
PVA construction adhesive has good properties for gluing any materials. It will be able to firmly connect the surface of ceramic tiles and OSB boards.
Small areas can be covered with liquid nails
If the facing area is not so large, for example, a kitchen apron made of ceramic tiles, then you can use “liquid nails” from any manufacturer to glue the tiles.
However, if the wall area is large, this option will be quite expensive, and dismantling the tiles in the future will be very difficult. With the same success, you can use any silicone sealant instead of “liquid nails” for gluing tiles.
Also, when laying tiles on problematic substrates, such adhesive compositions as “Ceresit”-SM, “Soudal”-24A, “Knauf-flex”, which contain special polymer additives, have proven themselves well.
Requirements for a wooden base
Mixtures for wooden bases are produced by almost all well-known manufacturers.
It is worth noting that not every wooden floor is suitable as a base for a self-leveling mixture. A wooden floor must meet the following requirements:
If the floor meets these requirements, you can proceed to the next stage - preparing the base.
Preparing the base
Sanding the boards before pouring
A self-leveling floor is poured onto a wooden base only after careful preparation. The service life of the self-leveling coating largely depends on how well the surface of the boards is leveled.
Floor pouring technology
Priming and filling the floor with a self-leveling compound
The self-leveling floor for wooden floors is poured in almost the same way as mixtures for a concrete base.
If there is not enough water, the mixture will harden in less time, and you may not have time to distribute it.
Be sure to pay attention to the drying time of the composition. If you do not have experience pouring self-leveling floors, it is better to mix the solution in small portions so that you can have time to level it over the floor surface. To speed up the process of distributing the mixture, you can invite an assistant and divide the work being done between you. It is recommended to start pouring from the lowest level. Level the self-leveling floor on the wood using a soft spatula or a roller with needles
When choosing a roller, it is important to consider the thickness of the future coating. The length of the needles should be 2 mm longer
If the needles are short, the roller will plunge deeper into the solution than necessary and create unnecessary fluid movement. Long spikes will not allow the roller to quickly distribute the mixture. To move over a surface already filled with the compound, use special pads for shoes with spikes. After the self-leveling leveler is completed, the beacons are removed and the surface is left until it hardens completely. Manufacturers indicate the minimum time required for the mixture to harden. If you plan to carry out further work on the filled surface, professionals recommend waiting a week.
Self-leveling wood floor leveler can be poured onto both wood planks and plywood
Polymer self-leveling floors do not contain moisture that can cause deformation of the base, but pouring cement mortars must be approached with special attention. Depending on the moisture resistance of the plywood sheets, additional waterproofing may be required.
In general, self-leveling flooring is poured onto plywood in the same way as onto wood. Some experts recommend using reinforcing mesh when applying self-leveling mortar.
We recommend a technology for leveling a wooden floor without tearing off the board.
You can get more detailed answers to the questions: is it possible to lay a self-leveling floor on a wooden floor and how to do it correctly after watching the next video.
Some rules for greater safety
The first time (about six to seven months) after installation, the most intense release of harmful fumes occurs. If you regularly ventilate the room, the negative impact on the body will soon begin to subside. But for greater safety, additional processing of the slabs is carried out.
If the work takes place in a children's room, then compositions with detoxifying properties are chosen as a primer. For common areas, simple water-dispersed paints, varnishes, wax, and penetrating primer are suitable.
Particular attention is paid to the ends. It is through them that the main amount of harmful substances is released
It is enough to saturate them with varnish or primer.
Priming is one of the safety measures that allows you to reduce the amount of harmful substances released
It should be taken into account that the rate of release of toxic elements is affected by temperature. The higher the indicator, the more formaldehyde in the air. The norm is considered to be 30 °C.
In general, there are two main ways that allow, without making excessive efforts, to rid the room of chemical components and saturate it with oxygen. Namely, frequent ventilation and the presence of indoor flowers.
OSB is not recommended for use in rooms where temperatures exceed 30 °C
Any modern building or finishing material that is made using chemical components can emit harmful substances. But manufacturers are constantly trying to keep these figures to a minimum.
Among the advantages of such a building material, there is also a fairly high density - even a large rat will not be able to damage this base. High resistance to moisture allows the material to be used anywhere - you can lay these sheets in bathhouses, as well as in various unheated rooms.
Laying OSB on the floor does not require any special skills - any home craftsman can do it, which is a serious advantage. To arrange a rough foundation, it is enough to be able to use a regular building level, a hacksaw and a hammer.
OSB is a great opportunity to save money, since the price of these boards is low. One element will be enough to cover a large area. You can also highlight the high strength characteristics - even under heavy loads the floor will not deform.
Difficulties in installing floors
Laying a floor on a concrete base is considered quite simple, because the base is strong, stable and relatively level. The surface of timber, boards and other lumber does not fully possess such properties. If the boards are poorly secured, they can even move, “play”, or creak.
Over a long service life, a wooden floor becomes deformed because it is constantly exposed to atmospheric moisture and temperature changes. When overdried, wood often becomes covered with cracks, and when exposed to excess moisture, it begins to rot and mold.
Old wooden floor
These factors greatly influence the installation process of the self-leveling floor, and also determine the quality of the finished coating. Careful preparation of the base helps smooth out the influence of negative factors.
Joint care
No matter how good and high-quality the sealant is, it also has its own service life. On average, protection lasts up to 15 years, but it can last even less - it all depends on the operating conditions.
Open and accessible seams should be periodically inspected and the condition of the sealant checked. Even sip panels should be removed from the vapor barrier layer once every 10 years and their condition checked. At the same time, the cracks will be examined and the protective membrane will be updated.
When conducting an audit, you should perform a number of simple steps:
With proper care of OSB joints, the boards will serve for a long time and reliably. Knowing their most vulnerable places, you can take targeted actions to protect them and significantly improve operating conditions and extend the service life of these wonderful materials.
OSB surfaces with sealed joints are a good basis for finishing. You can learn about various methods of finishing OSB and their features in separate articles:
OSB finishing indoors: walls, ceiling.
Source
Preparing for pouring
Proper preparation of the base is the key to ensuring that the self-leveling floor will be beautiful and last a long time. First of all, it needs to be repaired if the base needs repairing. That is, the old boards are replaced with new ones, all loose elements are fixed. Next, it is important to seal all sorts of cracks to avoid leakage of the potting mixture. A sealant is perfect for these purposes, and you can also use putty
The main thing is not to miss a single crack.
Wooden floors need to be properly prepared
Grease stains, if any, are best removed with a solvent - they can prevent good adhesion of the mixture to the base. All paint is also removed. It can be removed using a special remover or sanding.
whispers on the door of the house
Floors ready for pouring should not creak, wobble or have other defects. In some cases, it is generally recommended to lay a base of plywood sheets on top. The thickness of the sheets must be at least 14 mm. You can also add chalk chips between sheets of plywood to prevent squeaking in the future. By the way, the baseboards must be removed before pouring the mixture, and the nails or screws must be recessed into the floor surface.
In some cases, you can pour a self-leveling floor directly onto a wooden base, but experts strongly recommend not to neglect the creation of a cement screed. This will allow you to achieve the best effect.
Cement screed recommended by experts
Preparing the floor for pouring the self-leveling mixture also includes thoroughly cleaning it of debris and creating waterproofing. You can use plastic film, but liquid mixtures to create a waterproof layer are also a good option. Any waterproofing material should extend approximately 10-12 cm onto the walls.
It is recommended to glue damper tape along the walls, and in the case of preliminary production of the screed, this is mandatory. The thickness of the damper tape or isolon, cut into narrow strips and used for the same purpose, should be 1-2 mm. The damper tape is necessary to protect the screed and bulk mixture from possible cracking and deformation in the event of thermal expansion.
Painting OSB panels
The final stage of finishing the OSB surface will be the application of parquet varnish or painting in several layers with paint for wooden surfaces. The paint coating must be applied following the manufacturer's recommendations, including the use of a primer recommended by the manufacturer of the parquet varnish, in order to avoid incompatibility of components. The plinth is attached last and if it is made of wood, it must be painted in the desired color or varnished in advance. You can secure the plinth in several ways - fastening with glue or self-tapping screws. To prevent the plinth from bursting, a through hole is drilled in the places where it is attached; a recess can also be made with a drill of a smaller diameter for the self-tapping screw and under the head, and upon completion of installation, all holes in the plinth are closed with putty, sanded and repainted. As you know, there are nuances in installing oriented strand boards to a concrete base, but if you follow the sequence of work and recommendations, laying a finished OSB floor with your own hands is quite simple.
Source
Requirements for floor waterproofing
To protect the wood from moisture from the solution, which will lead to swelling and deterioration of the material, waterproofing measures must be taken. It is important to correctly form the separating waterproofing layer and securely fix it.
They use film, roofing felt, coating and other types of waterproofing to choose from. All these materials will prevent rotting of the wood under the self-leveling floor and will prevent it from drawing moisture out of the solution.
Sheet and roll insulation is laid over the entire surface, extending onto the wall by 10-15 cm and with the strips overlapping each other by 8-12 cm. The perimeter over the waterproofing is covered with damper tape or 2 mm thick insulation, cut into strips.
Wallpapering OSB boards: research and recommendations – SOPPKA
- good thermal insulation (due to low thermal conductivity);
- moisture resistance, moisture protection of internal materials;
- high strength, rigidity, elasticity;
- the ability to hold any fastener;
- convenience in further finishing;
- few or no defects;
- environmentally friendly composition;
- economical (made from waste, low price).
Puttying
- stir the product using a mixer to eliminate lumps;
- take a little mixture on a spatula, apply a thin layer to the base, level it;
- Leveling should be done until the surface relief is completely eliminated;
- After the putty has dried, rub the joints with a float or fine sandpaper;
- sweep the wall with a brush to remove any remaining dust;
- to finish the work, apply another layer of primer and wait a day;
- Then you can glue the wallpaper.
Technology of pouring floors onto wood
The process of pouring the floor will be similar to that when working with a concrete base: the only difference is longer and more thorough preparation.
Preparation of bulk solution
Recommendations for preparing any self-leveling mixture are always indicated on the packaging. Usually, to dilute the powder, water at a temperature of +5...+25 degrees is used, into which the required amount of the mixture is poured.
Mix the composition with a construction mixer for 5 minutes at a speed of less than 500 rpm. The finished product should be homogeneous, without lumps.
After 10 minutes, mix it again and begin pouring the floor. Complete production of the mixture should occur in 30-60 minutes, no more, so a small portion of the solution is prepared at a time.
Filling order
Start distributing the solution from the area where there is the lowest level of coverage. If there are serious differences, beacons are installed in advance using a level.
The mixture is poured in portions so that they combine with each other independently. The poured solution is carefully leveled with a spatula until a layer about 5 mm thick is obtained (greater thickness is not allowed for a wooden base). Make sure that the composition evenly fills all corners and joints.
Advice! The ideal option is to work with an assistant who prepares portions of the mixture while the master makes the filling.
Leveling the self-leveling floor They move along the floor using paint shoes. Removal of air bubbles and final leveling is carried out with a rubber needle roller no later than 40 minutes from the moment of pouring.
The joints between different batches of self-leveling mixture are especially good at rolling. The length of the roller needles should be 2 mm greater than the thickness of the filling layer.
At the same time, the beacons are removed while the floor is still wet. 15 minutes after finishing work, cover the surface with film to prevent dust from settling on it. Drying of the coating should be done at a temperature less than +25 degrees.
Windows are protected from sunlight with curtains or foil. After drying, a finishing coating is applied - varnish, transparent polyurethane, polymer for a three-dimensional floor or other materials.
Laying tiles on the wall
Mark the bottom strip from which the laying will begin.
After all the preparatory work is completed, you can proceed directly to laying the tiles.
First of all, using a laser or hydraulic level, we mark the wall.
At the bottom we mark a horizontal strip along which the first row of tiles will be glued. To lay tiles you will need the following tools:
- notched trowel with teeth 5–10 mm long;
- laser or hydraulic level;
- mallet with a rubberized striking surface;
- rubber grout spatula;
- corner braces;
- tile cutter
The lower level is marked with a strip - this will keep the tile from sliding.
Along the line marking the lower horizontal level, we attach a metal profile or a wooden strip to the OSB board using self-tapping screws.
It will act as a support - the first row of tiles will be placed on it. Otherwise, the tiles may slide down the fresh mortar.
Using a notched trowel, apply the adhesive solution to the surface along the entire bottom row. As a result, we get a wavy structure: it is necessary for the convenience of adjusting the tiles in depth. By lightly tapping with a rubber hammer, you can deepen the protruding corners of the tile.
After installing the first row, we insert cross-shaped corner spacers into the upper corners and begin laying the second row. Spacers will allow you to maintain the same joint size between all tiles.
Usually, after laying 4 to 6 rows of tiles, a break is taken to allow the glue to “set.” Otherwise, excess weight will put pressure on the lower rows, under the influence of which they can simply move away from the surface of the OSB panel, fold and crumble.
12 hours after completion of the masonry, you can begin to putty the joints using a special grout solution and a rubber spatula.