For the construction of garages, various types of blocks are used, characterized by reduced weight, porous structure, strength and thermal insulation properties. A significant advantage of block material is the ability to lay walls yourself and the accelerated pace of work. From the expanded range of blocks it is difficult to choose a material for construction. Some car owners build a garage with their own hands from expanded clay concrete blocks. Others use foam blocks, cinder blocks, gas silicate and aerated concrete. Let's consider the properties of concrete blocks. Let's dwell on the nuances of technology.
Brick
What could be more traditional, proven and reliable than brick? If you need a permanent garage that will last forever, with an inspection hole or a cellar, with a workshop or storage area, then it is time to choose brick.
Advantages:
- strength, reliability, durability up to 50 years or more;
- you can build a two-story garage from brick;
- brick does not burn, and for a room where gasoline, diesel fuel and other flammable liquids are stored, this is very important;
- From brick you get a permanent garage into which you can install electricity, water, and even gas. If you plan to organize a bathhouse in the garage, then brick will be one of the most suitable materials;
- good protection from intruders, which is especially important if the garage is located in a garage cooperative;
- environmental friendliness;
- brick is an aesthetic material that can do without additional external finishing.
Flaws:
- brick is far from the cheapest material;
- difficulties during construction. Laying bricks is a troublesome task, and in order to get a truly durable building, it is better to seek help from specialists;
- The construction process will be lengthy. In addition, you will have to spend money on a solid foundation, since brick is a heavy material;
- To make the inside of the garage comfortable both in summer and winter, it is necessary to make fairly thick walls, and you can’t do without insulation.
For construction, you can take both red (ceramic) and white (silicon) bricks. The latter has become more widespread due to its low price and fairly good performance qualities.
Expanded clay concrete blocks
Expanded clay concrete is a highly environmentally friendly material with excellent sound and heat insulation characteristics. In terms of environmental friendliness, it is comparable to ceramic brick.
Expanded clay concrete blocks are made from baked clay (expanded clay), sand, water and cement. By means of vibrocompression, the mixture of starting materials is compacted, formed into blocks and undergoes heat treatment.
The result is a high-strength material that is successfully used not only for the construction of low-rise buildings, but also for the construction of external walls of high-rise buildings.
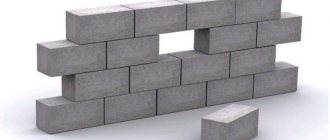
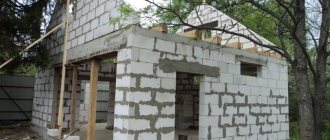
Foam blocks and gas blocks
A considerable number of different blocks are produced based on concrete, but the most popular are blocks made of foam concrete and aerated concrete. They are similar in some characteristics, but radically different in the manufacturing process. Both materials belong to the class of cellular concrete, since there are air bubbles in their structure. In the production of foam concrete, foaming agents are used to produce these very bubbles, which, when interacting with water, form foam. As a result, many air bubbles form inside the solution. The solution prepared in this way is poured into molds, where it hardens, forming ready-made blocks.
The technology for producing aerated concrete is different. Here voids are formed due to a chemical reaction. Lime and aluminum powder are added to the concrete, and under the influence of high temperature and pressure in the autoclave, hydrogen begins to be released, forming bubbles inside the blocks. If foam concrete is immediately poured into molds according to the size of future blocks, then aerated concrete is immediately made large, and then cut into blocks of the required sizes. It turns out that the pores in foam concrete are closed, and those in aerated concrete are open, which is why the latter is more afraid of water and requires careful protection from it.
Advantages:
- excellent thermal insulation qualities, which allows you to save on insulation and heating. Foam block, for example, is 3.5 times warmer than brick, and aerated concrete is even warmer than foam concrete due to its more uniform structure;
- high construction speed, since cellular concrete blocks are several times larger in size than bricks. In addition, they are lighter and quite easy to cut;
- the possibility of constructing a two-story garage and carrying out all the necessary communications;
- relatively low price;
- strength is high, but in this parameter foam blocks are almost two times inferior to gas blocks;
- it is possible to build a lightweight foundation, since the weight of the blocks is small;
- blocks don't light up;
- good vapor permeability, almost like wood, so an optimal microclimate will always be maintained in the garage;
- frost resistance. The material can withstand up to 50 freeze-thaw cycles;
- good sound insulation.
Flaws:
- The gas block is hygroscopic, therefore it is necessary to pay attention to waterproofing the foundation, as well as to perform external finishing of the walls to protect the material from constant exposure to moisture. The foam block is not so afraid of moisture, but it will still have to be finished due to its not very attractive appearance;
- the possibility of cracks appearing, but if the installation of the blocks is carried out correctly, then the likelihood of this defect tending to zero;
- the need to use special fasteners for mounting shelves, racks, cabinets, etc.
In addition, gas blocks also benefit in terms of shrinkage - only 0.5 mm/m versus 2-3 mm/m for foam blocks.
What is aerated concrete
Aerated concrete blocks are white modules in the form of rectangular parallelepipeds. They are made from gas-filled concrete mixture, which, in addition to M400 cement, includes quartz sand, slaked lime, aluminum powder, calcium chloride and water.
Production technology
Autoclave technology is used to produce the material:
- Quartz sand is crushed into smaller fractions.
- All components are dosed according to the technological map.
- Cement, lime and sand are poured into the container.
- Everything is mixed, after which a suspension of aluminum with hot water is introduced.
- The prepared mixture is poured into lithoforms.
Forms are filled out at 65-70% of their total volume. As a result of the chemical reaction of aluminum powder with lime, the release of gas is stimulated, due to which the material acquires its porous structure and the lithoform is filled to 100%.
Next, the hardened block is cut into modules of the required sizes, and the excess is recycled. The resulting modules are loaded into an autoclave and, due to steaming technology, acquire all the required characteristics.
Important! There is also a technology for producing aerated concrete without the use of an autoclave. However, the resulting building models are less durable.
Areas of use
Aerated concrete is in demand due to its density, wide range of applications, and ease of working with the material. According to the construction classification, the following types of material are distinguished:
- thermal insulation;
- structural and thermal insulation;
- structural.
Aerated concrete is used in construction for:
- construction of interior partitions and main walls;
- thermal insulation of brick and reinforced concrete buildings;
- construction of fencing (fences);
- production of monolithic type lintels for different types of openings.
Aerated concrete blocks are reliable and have a long service life. And this is only a small part of their advantages.
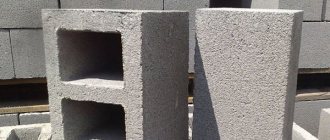
cinder block
The history of the appearance of slag concrete is inextricably linked with the construction of garages. The first cinder blocks were used by Nicholas II specifically for the construction of a garage. Then, waste from coal combustion, the so-called, was used to make this building material. slag, which gave the blocks their name. The appearance of cinder blocks solved two problems at once: the constant shortage of bricks and the need to dispose of previously useless waste from blast furnaces and thermal power plants.
The durability of the first buildings made the material quite popular, although over the century the technology of its production has changed somewhat. A filler of slag, expanded clay, cullet, sawdust, crushed stone, granite screenings, shell rock, etc. is added to the base of cement and sand. Until the 70s, slag concrete was used primarily for the construction of garages, sheds and other utility and utility buildings. Now even residential buildings are being built from it. Cinder blocks have also retained their popularity as a material for constructing garages.
Advantages:
- light weight and large size of the blocks, which facilitates the construction process and allows you to save on the construction of the foundation;
- low price. This is perhaps the most budget-friendly material of all those listed in the article;
- strength and reliability, durability up to 100 years;
- resistance to fire, mold and rodents.
Flaws:
- low thermal insulation qualities when compared with other concrete blocks. But, nevertheless, a cinder block is warmer than a brick, so when building a garage it will be possible to do even without insulation;
- not a very good appearance, so you can’t do without finishing. Manufacturers are working on this problem and are already offering blocks in which one side has a decorative coating;
- hygroscopicity;
- the difficulty of attaching objects to walls and difficulties in laying communications.
If the task is to spend as little money and time as possible on building a garage, but at the same time get a solid, durable structure, then cinder blocks will be perhaps the best choice.
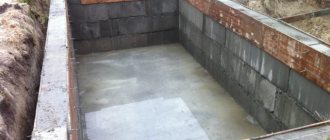
Attention to the base
Whatever modules are chosen for construction, it is best if the base (the first 4-5 rows) is made of solid red brick . Such manipulations will allow you to “kick out zero,” as masons say. If the craftsman’s skills are developed in a different direction, you can set the formwork to the required height and pour concrete.
Additional recommendations:
- a waterproofing layer is laid on top of the base;
- the simplest, time-tested insulation is roofing felt;
- the material is cut into strips and overlapped by 15 cm;
- It is recommended to build a blind area around the foundation, otherwise in five years the garage may crack.
Expanded clay blocks
This material is not as popular in the construction of garages as aerated concrete or cinder blocks, but in harsh climates it has no equal in terms of thermal conductivity. Expanded clay (granules 5-40 mm in size) is added to the traditional base of concrete blocks made of cement, sand and water. Expanded clay is a lightweight but quite durable material, and due to its porous structure it retains heat well, because the more expanded clay in the block, the higher the level of thermal insulation you can ultimately obtain.
pros:
- excellent thermal insulation properties, therefore the material is indispensable in northern regions;
- like other concrete blocks, expanded clay blocks are characterized by light weight and large size, due to which construction will progress quickly, while it will be possible to get by with a lightweight foundation;
- strength, durability up to 100 years;
- vapor permeability and environmental friendliness;
- minimum shrinkage rates;
- resistance to frost, temperature changes, high humidity, rodents, mold;
- relatively low price.
It would seem that this is an ideal material, but it also has drawbacks
- difficulties in processing blocks. If cellular concrete can be cut with a hacksaw, then for expanded clay concrete you will have to use a saw with pobedite teeth;
- difficulties during fastening, but you can use anchor bolts and dowels;
- It’s not a very nice surface, so the walls will have to be covered.
Since any car owner wants to equip his car with a warm and dry shelter, the popularity of expanded clay concrete blocks is only increasing.
Other blocks are also used in the construction of garages, but due to their critical shortcomings, we would not recommend them for use. For example, gas silicate blocks are highly hygroscopic, and polystyrene concrete blocks have low strength, so you may encounter difficulties when installing gates. A good option would be wood concrete , which has excellent thermal insulation qualities, but it is afraid of moisture, frost and is more expensive than aerated concrete.
DIY garage
How to build a garage from blocks - step-by-step instructions:
- Selection of location (high terrain in the northern part of the site in the vicinity of the entrance roads).
- A simplified construction project with the size of a garage made of blocks and proposed additions in the form of an inspection pit, a cellar, and guest parking.
- Purchasing building materials (calculation can be done in an online calculator):
- gas silicate blocks D500 (600x150x250);
- special glue: winter - “Bonolit” , “Prestige” , summer - “Insi” ;
- concrete for foundation (dry mix) M300;
- cement, sand;
- boards for formwork and roof sheathing;
- film waterproofing;
- corrugated metal rod (ᴓ8-10mm) or mesh;
- steel I-beams for floors (100x120m), calculating installation in increments of 80 cm, or laminated timber 150x60;
- roofing and finishing materials.
At the same time, you can dig a cellar or inspection hole (this is unacceptable for heaving soils): dimensional guidelines - wheelbase (80cm) of the car and the owner’s height + 20cm. The length of the pit is determined taking into account freedom of access: vehicle length + 1 meter.
- the prepared trenches are completed with board formwork 15-20 cm above the ground to obtain a base;
- cover the bottom of the trench and the walls of the formwork with a film waterproofing material, lay down reinforcing structures;
- poured with concrete;
- embed up to 4 spacer pins (40cm) for installing metal gates;
- leave for 2 weeks until completely set.
- laying roll sealant along the bottom and walls;
- concreting the bottom (possibly walls);
- lining the pit walls with hardened bricks (1 brick);
- decorating the edges of the pit with a metal corner;
- covering the pit with a shield for the period of construction of walls and ceilings.
Read more about how to choose the size of the inspection hole in the article here.
A cellar, even a small one, will require a depth of 3 meters , the creation of a drainage system and drainage of rainwater. For its installation, the level of groundwater, the quality of waterproofing and floor screed will be of significant importance. The cellar must be equipped with ventilation, electrical wiring, a sealed manhole and a ladder for safe descent. Is there a need for such an expensive structure?
- The first row of blocks is especially carefully checked with a level;
- each block is sprayed with water so that it does not pull it out of the glue, smear the horizontal and vertical edges with a spatula, press tightly, achieving the same thickness of the seam (3-5mm);
- distortions are eliminated with a special plane;
- to strengthen the wall, the finished row of blocks is grooved under 2 parallel rods;
- Reinforcement of walls with a rod or metal mesh is carried out every 2 rows of masonry (to prevent the occurrence of thin cracks in the material); such a system will be redundant if the wall is finished with siding on the outside and plasterboard on the inside, acting as reinforcement.
Important: All wooden structural elements must be treated with fire retardant and antiseptic . For facade and interior wall decoration, it is necessary to choose materials that protect gas silicate from moisture and steam.
Read more about how to make a garage floor with your own hands cheaply here.
What conditions for finishing does gas silicate dictate?
The hygroscopic porous structure of gas silicate blocks requires external protection of the walls from precipitation and internal protection from evaporation. The thermal insulation properties of the blocks eliminate the question of insulating the garage space. Effective exterior finishing materials are:
- mineral, acrylic or silicate facade plaster;
- facade metal profile with polymer coating;
- porcelain stoneware cladding;
- creating a ventilated façade from clapboard or siding;
- facing brick;
- facade thermal panels.
Only moisture-resistant and weather-resistant silicone-based façade paints are suitable for painting
The interior decoration of the garage walls is selected based on the characteristics of the storage facility and associated combustible and flammable materials:
- plaster for painting with silicone enamels;
- ceramic tile;
- PVC lining;
- waterproof or fireproof drywall;
- sheathing with OSB or wood siding.
Building a garage from gas silicate blocks with the recommended finish will take you a month of working time, but it will meet all the nuances of your idea of a comfortable garage, because you will build it with your own hands, according to your own design.
Sandwich panels
If the task is to build a garage in just a week, then you won’t find a better solution than sandwich panels. This is a multilayer material consisting of a layer of insulation, which is covered on both sides with metal, plastic, plasterboard or OSB board. Metal panels are used for the garage. The insulation is polystyrene foam, mineral wool, polyurethane foam. For a garage, it is better to take panels insulated with polyurethane foam, which has a minimum thermal conductivity coefficient, is not afraid of moisture and is capable of self-extinguishing. You can also opt for products with mineral wool - it does not support combustion, but is hygroscopic. Polystyrene foam is not afraid of water, but it burns and can become a haven for rodents.
pros:
- high speed of construction - the garage can be ready in 3-5 days;
- relatively low cost, especially when compared with brick;
- high level of thermal insulation, the ability to do without heating;
- ease of construction, the ability to carry out work even in winter;
- you can build a lightweight foundation, since sandwich panels are quite light;
- if necessary, such a garage can be disassembled and reassembled in a new location;
- excellent appearance, no need for additional finishing.
Minuses:
- some insulation materials do not have sufficient fire safety;
- the need for qualifications for the correct installation of the panels, otherwise gaps may appear into which cold air will constantly be blown;
- low strength: if the region is characterized by frequent hurricane winds, earthquakes and heavy rain with hail, it is better to choose another material;
- with constant exposure to direct sunlight and sudden temperature changes, there is a possibility of deformation, which can lead to depressurization of joints;
- it is impossible to mount cabinets and shelves on the walls - everything will be mounted on the floor.
Yes, there are many disadvantages, but for many car owners they are not significant, which is why sandwich panels are widely used in garage construction.
Foam concrete blocks
Foam concrete is produced by mixing water, cement, foam former, and various fillers. High-density material is used for the construction of floors between floors and foundations. Less dense foam concrete is used for arranging partitions, filling voids, and organizing sound and heat insulation.
Foam concrete blocks are widely used in low-rise construction due to their strength and low cost. Such buildings are practically not subject to wear and tear, do not rot, do not crumble or collapse. High-quality foam concrete is resistant to aggressive chemicals. It will not be damaged by drops of technical oil, acetone or gasoline. This material is also supported by its non-flammability.
Profiled sheet
Another way to quickly build a garage is to use a profiled sheet. These are sheets of steel with a protective layer, and additional strength is determined by the presence of relief, this is the so-called. stiffening rib.
Advantages:
- low price;
- the light weight of the material, which simplifies transportation and construction, allows you to save on arranging the foundation;
- you can build such a garage with your own hands;
- a garage made from corrugated sheets can be disassembled and reassembled in a new location.
cons :
- low level of safety, since the profiled sheet is easy to cut;
- low level of thermal insulation. In an uninsulated garage it will not be much warmer than outside, so insulation must be provided;
- the inability to attach shelves and cabinets to the walls - only to the floor;
- Although the metal is durable, there may be dents on it, which are not easy to fix, and therefore the appearance of the building will gradually deteriorate.
What is foam concrete
Foam concrete blocks are popular in the field of private housing construction. They are made from a mixture of Portland cement, river sand, foaming concentrate, aluminum powder, basalt fiber and warm water.
The total volume of air cavities in foam concrete affects the weight of the blocks, permissible load indicators and areas of application of the material.
Production technology
Foam concrete is produced using classical technology or the porous method.
In the first case, the cement-sand mixture is supplemented with a foaming agent, after which the solution is supplied through pipes to the construction site. The mixture hardens, simultaneously acquiring a characteristic porous structure.
The second method uses a porosizer. This special equipment allows you to conduct dry mixture elements directly into the foam concentrate stream. As a result, particles of the dry mixture settle on the surface of the air cells, and foam material is formed, which, as in the previous method, is supplied to the work site via a pressure line. The porous method is more often used in the field of industrial construction.
We recommend: Choosing a nebulizer – compressor or ultrasonic, which is better?
Classification
Foam concrete blocks compete very successfully with traditional brick, wood and reinforced concrete. Due to their thermal insulation properties, they provide comfortable living conditions in a house or apartment.
The following types of foam concrete are distinguished:
- Thermal insulation. Withstands loads up to 9 kg/cm². Does not crack, maintains integrity.
- Thermal insulation and structural. Maximum permissible load – 800 kg/m³.
- Structural. It has the maximum strength class – B12.
- Structurally porous. Maximum load – 1.6 t/m³.
Important! A high level of porosity increases the level of thermal insulation, while a low content of air cavities makes foam blocks stronger.
The structural type is used for the construction of boxes, internal walls, and interior partitions. Thermal insulation is used in construction:
- floors made of reinforced concrete;
- load-bearing structures in contact with low temperatures;
- under-roof space, due to which the main heat losses often occur.
The porosity concentration of thermal insulating foam concrete can reach 80% of the total volume, which allows it to significantly “reduce” its mass.
Inspection hole
It’s not difficult to build a convenient inspection hole if you prepare before work:
- Prepare a hole of the required depth and width - most often 1.8-2 m long, 80 cm wide and 1.5 meters deep are enough;
- Pour and compact a layer of clay onto the bottom, and make a sand cushion 10-15 cm thick on top of it. Cover the resulting layer with rolled roofing felt and make a concrete screed about 10 cm thick on top of it;
- Lay out the walls of the pit from brick, it is advisable to use a material suitable for arranging damp rooms (make masonry half a brick thick);
- A waterproofing layer is created on the walls of the inspection pit using bitumen mastic. Before work, the material must be heated and the walls treated with a roller or wide brush;
- After creating a waterproofing layer, electrical wiring is carried out along the surface of the walls (if necessary) and plastered;
- If desired, the walls are painted with oil paint;
- Place a frame welded from the corners along the upper edge of the pit. Reinforcement or thick wire is welded to it - it is needed to secure this fence into the concrete floor screed;
- Make and attach a cover to the pit; it will save people from accidental falls. Additionally, it will protect the pit from moisture and prevent the loss of small objects in the pit;
- Build a convenient staircase out of brick or wood.
Use in construction
Cinder blocks are used in construction in different ways. It all depends on what is included. If you need to build strong walls and lay a solid foundation, it is better to use the material that is considered solid. It is more durable and will last longer. To build partitions inside the house, erect sheds, baths, you can also take hollow cinder blocks. It all depends on the method of application.
Important! For small-sized buildings, cinder block is considered the best and most profitable, considering the financial resources spent.
Cinder blocks are used in construction and finishing. The latter is carried out for additional insulation, since the material has proven itself well in this area. When choosing a brand of blocks, pay attention to the composition and qualities that characterize the product.
Blocks can be divided into the following types:
- Thermal insulation. This type is suitable exclusively for the construction of internal partitions, as well as for improving the thermal insulation of already finished walls.
- Structural and thermal insulation. Houses with a minimum number of floors are built from it. They are often used for partitions, depending on the wishes of the master or customer.
- Structural. It is allowed to build multi-storey buildings from it, since this type is characterized by increased strength, durability and other positive performance characteristics.
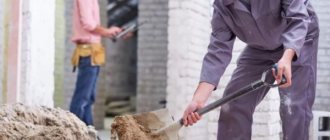
Preparatory activities
Before construction, a number of preparatory activities that are mandatory for any construction should be carried out:
- Develop a project with the appropriate documentation or select a ready-made one in accordance with the soil and topography.
- Make calculations to determine the required amount of building material.
- Prepare or purchase construction tools.
Once you have done all this, you can proceed directly to construction. Good preparation is the key to success, so we will look at each point in more detail.
Design
This is the very first thing you need to do after you have the idea of getting your own garage. You can develop a project yourself if you have the appropriate knowledge or use the resources of the global network by downloading a ready-made one or creating your own using simplified engineering programs.
If the project is too complex, then the best option would be to contact a qualified architect who will help you create exactly what you want in accordance with established standards and technical capabilities. The best solution would be to turn to professionals, since standard garage designs are often created with a number of tolerances that are not always taken into account during construction.
Material calculation
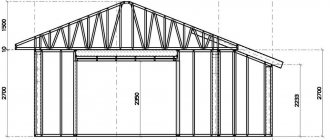
As an example of the calculation, we can give a typical project for a garage made of aerated concrete with an area of 4 by 6 meters and a wall height of 2.4 meters. The standard block size is 0.2x0.3x0.6 m. The calculation uses the formula (L x H - Sp) x 1.05 x B = V, where L is the length of all walls, H is height, Sp is the area of all openings, windows, gates and doors, coefficient 1.05 is an adjustment for the fit and joints of blocks during the construction of a structure (on average 5%), B is the thickness of the block, and V is the entire volume of aerated concrete blocks. You can also calculate blocks based on the area of the walls of the room.
When calculating, it is necessary to round the values to whole numbers plus since it is also necessary to take into account the breakage and defective material. The most optimal wall thickness is 150 mm, but in regions with cold climates it is worth making at least 40 cm (or 30, but with additional insulation).
Preparation of materials and tools
After all the calculations, you need to take an inventory of the tools and if something is missing, then buy it along with the material. To work you will need:
- Hacksaw for aerated concrete.
- Wall chaser.
- Set of brushes.
- Carriage for distributing glue over the block.
- A spatula with a serrated edge.
- Trowel bucket for aerated concrete.
- Plumb.
- Level.
- Rubber mallet.
- Shovels.
- Container for diluting adhesive solution.
In addition to the blocks themselves, you will need the following materials:
- Crushed stone.
- Cement mortar.
- Sand.
- Boards for the construction of formwork.
- Fittings (for strapping).
- Adhesive for laying blocks.
Important: Despite careful preparation, it is the time of construction that can play a major role. You should not start construction in winter or late autumn.
Selecting blocks is not difficult since the quality is approximately the same everywhere. Focus on the average price and do not overpay. The most optimal construction time will be May - June. At this time, the soil has already dried out sufficiently and warmed up, which will ensure both the quality of construction and comfortable working conditions. On average, construction will take from 2 to 3 months.