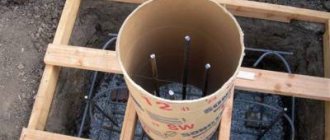
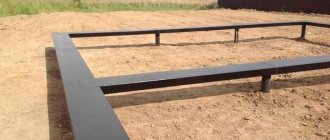
Appearing more than one and a half hundred years ago, screw piles serve as a good foundation in places where traditional structures are not applicable. At first these were industrial and port facilities, but since the mid-20th century they have penetrated into the construction of houses. An important point in laying a pile foundation is the strapping (grillage).
General view of the foundation with a partially installed grillage
How to make a timber frame for a pile foundation
Timber piping for a pile foundation is a common type. Provides the structure with strength sufficient to withstand the weight of a frame, panel building of 1-2 floors. If the building is planned to have 3 floors and weighs a lot (due to the wall material, such as ceramic bricks, aerated concrete blocks), it is better to use a channel, I-beam, or reinforced concrete beams.
Main supporting elements with head part
Types of strapping
There are four types of strapping:
- Reinforced concrete cast tape
- Metal I-beam
- Metal channel
- Wooden beam. Subspecies - grillage with edged boards collected in a package.
Types of bow parts of supporting elements
Features of grillage with timber
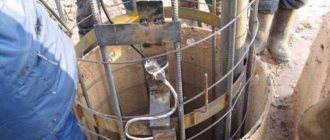
Before installing the grillage, the columns are aligned in length relative to one reference point, and the internal cavity is filled with concrete. After hardening (2-3 days), the ends are welded.
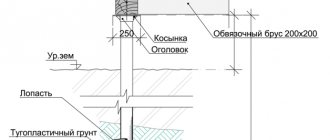
For piles with a screw - a metal structure in the form of a horizontal support 20x20 cm, 25x25 cm with a sleeve welded below, reinforcing slopes - “kerchiefs”.
When using 20x20 timber, the dimensions of the upper platform must be at least 25x25 - this will prevent cracking and emergency failure of the timber.
Section of the parts of the foundation installed in the soil
. Features of timber tying:
- Waterproofing with roofing felt from direct contact with the top of the column. This will prevent moisture (condensation) from accumulating in this place and causing rotting.
- The timber must be pre-treated with fire-fighting compounds and an anti-rotting agent.
- The beam must be attached to the head with plumbing bolts and doubled with staples. The details of the process are clearly visible in the illustrations provided.
- If the length of the beam is not enough, it is spliced with another, there should be another pile under this place
- The maximum distance between piles is 250 cm, the minimum is 50 cm
Support elements of different diameters (for loads of 20-300 tons)
Recommendations from experts
Experts advise following a number of rules that will eliminate common mistakes.
Recommendations:
Before installing a wooden structure, you will need to make sure that all pile heads are located at the same height. Otherwise, you will need to make small grooves in the beams.- The fastening element must be located along the longitudinal axis of the beam, since otherwise the safety margin is reduced and the integrity of the log is compromised.
- Before attaching the wooden frame, embedded elements must be installed.
- The beam should be twice the cross-section of the pile. This will increase the reliability and stability of the structure.
- For waterproofing you will need 2-3 layers of roofing felt. This will improve moisture protection.
- Geometry checks are carried out at every stage of installation and fastening of a wooden structure, including after installation and full fastening. All shortcomings fit into the project.
When forming a grillage for massive buildings, in particular residential ones, it is advisable to first check all calculations with specialists. In some cases, creating a foundation will require special skills and experience.
Performing Load Calculations
To calculate weight and other loads on piles, it is better to contact a specialist. He organizes the necessary geological survey of the soil on the site. Allows you to find out the depth to which you need to screw in the piles.
If the type of soil and the depth of the layer required for screw piles are known, you can make the calculations yourself:
- The approximate weight of the future building is calculated (the weight of the elements and furnishings is summed up with a 20-25% margin)
- The coefficient of snow and wind loads is added to the resulting amount (they differ for regions and are taken from local snips)
- According to the building plan, the number of external corners, internal intersections of load-bearing walls, and ordinary walls is calculated
- The total perimeter of the external and internal walls is calculated - divided by 2.5
- The result from point 3 is added to the result from point 4 - the number of required piles
- The number from point 2 is divided by the total number of piles, and the model of the screw pile suitable in this case is found from the catalog
- Screw piles have weight, they exert pressure on the ground, you need to find the total weight, divide by the maximum for the selected type in pp. 6. The number of additional piles will become known. They are evenly distributed around the perimeter.
Head with screw
Features of the pile foundation
These types of foundations are considered popular for the construction of low-rise structures - objects made of timber or frame buildings that are lightweight.
This is explained by some advantages of pile foundations:
- They can be installed in areas with heaving and complex soils. This condition applies to construction sites that have slopes, when the terrain features do not allow the construction of other foundations;
- long operational period. If you fully comply with the technological features of installation work and use high-quality materials, then with proper operation the pile foundation will serve you for at least a hundred years;
- reasonable cost of materials and work;
- ease of installation. Screw piles can be immersed in the ground within a few hours using special equipment. If there are a sufficient number of workers, this process is performed manually.
By laying a screw pile foundation, you completely eliminate the need for excavation work, which takes a lot of time and effort. It is only necessary to accurately determine the depth of immersion of the piles and the distance between them.
To carry out the calculation, the weight of the proposed object, the characteristics of the soil composition, the groundwater level, and the freezing depth are taken into account.
When installing a pile foundation, you will also have to take into account the fact that the structure will not have continuous support, which will create certain difficulties during the construction of interior partitions. But this problem can be solved by tying the piles. If this procedure is performed in accordance with the requirements, the strength indicator of the finished structure will increase.
How, what to tie?
The process of forming the strapping begins with determining the material, then the installation method is specified, consumables and tools are prepared. When everything is done, they begin to work.
Scheme of grillage arrangement
Material for grillage
The following materials are often used for grillage of screw piles during the construction of low-rise buildings (list in increasing strength):
- Wooden beam (cross section 20x20, 15x20 cm)
- A package of edged boards placed perpendicular to the head (section 5x20 cm, the package can be made of 3 or 4 boards)
- Steel U-shaped channel (sheet thickness 15, 20 mm)
- Steel I-beam (thickness similar to channel)
The choice depends on the structure - the more massive it is, the more durable the material should be used.
Example of a complex foundation
Self-tapping installation
The method of attaching a beam or a package of boards to the head of a pile has become widespread. The reason is manufacturability and availability of consumables. The fastening is based on a plumbing bolt, a self-tapping screw with a hex head.
The general view of the hardware is presented in one of the illustrations given here. The average length is about 8-10 cm. The head is hexagonal for a wrench. You can screw it with a screwdriver or wrench. Using manual keys is impractical. To attach to one head you need 4 plumbing bolts.
Error in assembly - support shift, incorrectly welded profiles (highlighted with a white square)
Using brackets, clamps
The grillage method is combined with the classic self-tapping method. The difference is that pieces of timber 50-60 cm long are attached to the pile heads, and a beam, a package of boards located on the edge, is mounted on them. In corner and cross joints, the fasteners are supplemented with metal staples driven in in the shape of a diamond (at the crosshairs of the harness), inclined to the right (“/”), left (“\”) side of the line.
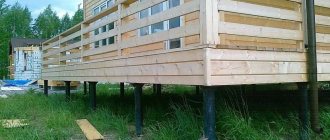
Arrangement of the base of the veranda - connected to the rest of the foundation
Using an I-beam, channel
Channels and I-beams are large-sized metal products common in construction. A channel is a metal blank profiled in cross section like the Russian letter “P”. Wall thickness - 3-8 mm.
An I-beam is an elongated metal part, in cross-section having a profile similar to the Latin letter “I”. Has high longitudinal and transverse strength. Both structural elements are on average about 10 meters long.
Installation of grillage parts in place
On a frame made of a metal I-beam or channel, you can build buildings from aerated concrete blocks and bricks. The following rules must be observed:
- Produce quality welded joints
- For I-beams, the use of caps remains mandatory. Size requirements are the same as for timber.
- The channel does not need heads; it fulfills their role due to its shape
- Corner joints of I-beams and channels are made by preliminary trimming the edges at 45 degrees. It is better to do it on a machine rather than with a hand grinder.
- Upon completion of work, the metal parts of the harness must be cleaned of rust and dirt. Completely coat with a corrosion protective compound.
It is unacceptable to butt weld beams and channels made of alloys that form a galvanic couple. It will lead to the destruction of the seam and loss of strength of the structure.
Error in installation - there is no supporting element at the joint (highlighted by a white square)
If it is impossible to use electric welding, the channel can be secured with bolted connections. You will need heads for screw piles - the channel is bolted to them.
When erecting a frame building, the walls are connected to the channel with bolts (40-50 cm pitch). If brick is used, aerated concrete blocks are inserted into the recess of the channel (pre-installed, in the form of an inverted letter “P”).
Starting to install the floor joists on top of the finished grillage
Board tying
Edged boards with natural moisture can replace timber. There are opinions that packages of boards, properly positioned, give a better effect than solid, laminated timber. The reason is the structure of the wood - in a package they are less likely to crack at the same time in one place. This is a common occurrence for timber.
Composite grillage structure made of metal and wood
Main nuances when tying:
- A 20x5 cm edged board is used. Additional drying and long-term storage before installation are unacceptable - it will lead to serious warping of the material in several planes and will make it unusable.
- Before installation, the boards are marked and trimmed with maximum precision.
- The board is treated on all sides with agents that protect against rotting and fire.
During installation, the package of boards is connected to others - grooves are cut. It is necessary to additionally treat with protective equipment.
- The boards are connected into one package with nails, in increments of 20-25 cm, according to the diagram given here. From 4 standard boards a package is assembled that replaces timber, measuring 20x20 cm
Correct use of the profile for the false base frame
To protect nails from oxidation and make driving easier, completely cover them with machine oil (you can use regular polish).
- The connection method at the corners on piles is shown in the illustration below. It is necessary to use heads whose platform size is 3-5 cm larger than the grooves. It will help to avoid cracking under the weight of the walls.
- Packs of boards placed at the end are attached to the heads with plumbing screws. Externally, it looks like a typical self-tapping screw, but with a hex head for a wrench. They are screwed in with a screwdriver with a bolt attachment or a bolt gun.
Before screwing in the self-tapping screw, you need to drill holes with a wood drill 1.5-2 mm smaller in diameter. No accidental cracking will occur.
Example of a corner bundle of two packages
- At least 4 self-tapping screws are screwed into each pommel
- If there is a need to lengthen the package of boards, they are spliced with another in one of the suitable ways (in a paw, dovetail). But there must always be a pile with a head of the required area under the connection point
- The second crown of the strapping can be made from 3 boards, you will get a package of 15x20 cm. The first one is connected with self-tapping screws (step - 30-35 cm).
Using profile pipes for I-beam piping
Strapping with I-beams made of metal is second in strength characteristics after reinforced concrete. Feature - you will need a small construction crane and a semi-automatic welding machine.
High-quality butt welding of I-beams using a conventional inverter welding machine of an amateur, semi-professional class is unprofitable and produces too low a weld quality. Only a semi-automatic machine in the hands of a sufficiently qualified welder guarantees trouble-free service of the foundation.
Profile pipes are used when tying I-beams as auxiliary elements that strengthen the structure. They are welded in the center of the piles, 30-40 cm below the beam. Placement in the center is important - it increases the strength characteristics. In the case of welding the profile “overlapping” onto the pile, it will not be able to do what is expected, only fastening light base slabs, for example, made of asbestos concrete.
Perpendicular ligament specimen
Why is it needed?
To understand why the foundation is tied with timber, you should clarify the technological features of installing a pile foundation.
Such foundations are often used for lightweight frame buildings with a low specific gravity. The pile foundation significantly benefits in terms of money, is reliable, and is not inferior to its other analogues.
Piles are represented by pillars immersed in the soil, located from each other at a certain distance. But no matter how reliable the supports are, they do not provide a 100% guarantee of strength and the elimination of distortions. In this case, you have to perform a strapping that allows you to ideally solve these problems.
The process of tying a pile foundation with timber with your own hands should involve the formation of strong fasteners, with the help of which the installed supports are connected into a single structure.
With the help of this working stage, a reliable foundation is obtained, which allows you to equally distribute and withstand load impacts. Tying piles with timber is called a grillage and is recognized as the most effective auxiliary element.
Is strapping required during construction?
Sometimes the correct answer to a question may be negative. If a structure is being erected from rounded logs, beams, the first crown will simultaneously be a grillage of piles with a screw. The device is subject to the requirements for grillage using timber or packaged boards.
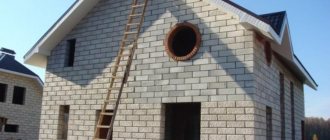
In cases of constructing a frame-type building made of panels, a grillage is required. A similar requirement applies to construction using aerated concrete blocks.
Having completed the piping and begun laying the subfloor, it is wise to leave free access to the subfloor to monitor the condition of the grillage. It is better to identify deficiencies during the construction of walls than after the building is completely built. The fix will cost less money and will not take much time.
Use of plumbing bolts, metal staples
Preparation for the procedure
When preparing for the foundation creation procedure, a number of factors need to be taken into account:
- The arrangement is carried out according to the drawings, taking into account the future features of the house, including the necessary load-bearing capacity and the presence of additional extensions.
- All materials must be checked for defects and any damage before work begins.
- Pre-treatment of wood with antiseptics is carried out.
- The necessary tools and mechanisms, including winches, are prepared.
The choice of wood is made on the basis of calculations and drawings, which include all factors affecting the load-bearing capacity and stability of the entire structure.
Selection of material - quality and size
When choosing a material, take into account that the timber can be glued, that is, glued together from boards, or natural. The first option has already been pre-processed and is ready for use during construction. The second type of timber must be processed independently.
When choosing, the following factors should be taken into account:
- Coniferous trees are more suitable for tying than hardwoods.
- The materials must not be damaged in any way. Purchasing high-quality timber is considered the key to long-term operation.
- Most often, timber with a cross section of 200×150 mm is used to create the strapping. If the weight of the object is increased, including the construction of a house of two or three floors, it is recommended to use 200x200 mm timber.
When creating a foundation for a light structure, 150×150 mm timber can be used. This option requires the use of only high-quality softwood timber, which has increased strength.
The photo below shows a 150x150 mm timber:
In any construction process associated with the creation of a foundation on a pile-screw foundation, it is required not to skimp on the quality of wood . Otherwise, the design will receive deteriorated characteristics.
Possible difficulties
When making a grillage you may have to face some difficulties.
Next we will look at how to overcome them:
- The piles are not screwed level. If it is not possible to bury the pile deeper, then you can not cut the pipe, but make a recess in the beam.
- The foundation turned out to be not square. In this case, the corners are leveled with a grillage.
- A crack appeared on the beam. In this case, the beam should be replaced.
House on a timber grillage
Subtleties and tips
This process has its own little tricks that make the work process and the final result even better. Select larch or other coniferous species as the material for the beams. With the participation of various moisture-proofing compounds, this material will much better resist the negative effects of atmospheric moisture. And larch, moreover, becomes even stronger from its influence.
When you complete all welding work, treat the remaining seams with special anti-rust compounds. When welding, the anti-corrosion compound with which each element was coated at the factory deteriorates. If there is no grillage, the foundation is strengthened with the participation of metal jibs.
Installation procedure
The piping is a supporting structure fixed to the foundation piles, the basis for the installation of a building structure.
In the case of threaded fastening, before installation, steel platforms are welded onto the supports to secure the channel to them with bolts or riveting. A more expensive method is a combined one.
The general algorithm of work is as follows:
- pouring concrete into piles;
- installation of heads;
- marking and making holes for fasteners, cutting corners with a slope of 45 degrees;
- installation of the channel, its fastening with screws (rivets) and welding work;
- anti-corrosion treatment;
- After completing the connections, the metal surfaces are primed and a waterproofing layer is laid between the base and the wall of the future building.
There are also differences in the strapping methods:
- Welding a channel onto piles without heads. The cavity of the screw columns is filled with concrete, and the channel is installed with the wall facing up. Connections in corner areas are made at an angle of 45 degrees.
- Welding with tips. This method allows you to expand the reference plane.
- Strapping by welding two U-shaped profiles placed on an edge, secured to the head plates with a circular seam. This type of strapping resembles a structure made using an I-beam.
- Strapping with a channel installed on an edge, recommended for light building structures.
Is it worth putting roofing felt under the beams?
Roofing felt is laid on pile heads (before installing the timber) in 90% of cases. There is no particular need to use such linings, so decide for yourself whether it is worth doing such waterproofing, or whether its arrangement is a completely useless excess.
Leo060147 FORUMHOUSE user
Do I need to put anything between the heads and the timber while building the frame? There is no point in such waterproofing. Unlike concrete or other porous materials, metal does not have capillaries. Therefore, capillary moisture from its surface cannot get onto the timber or any other material.
For those who want to learn about the technology of tying screw piles from experienced people, we recommend visiting the corresponding topic, open for discussion on our portal. An article about how you can screw piles without the use of special equipment will help you save a lot on labor-intensive construction activities. And a video about how important functions a pile frame is designed to perform will be interesting for anyone who plans to start building a wooden house in the near future.
INSTALLING BEAM ON THE FOUNDATION
After the foundation has been insulated, the installation of the lower piping begins.
The beams installed on the foundation should fit fairly tightly to each other without creating a minimum space between them. This is especially true for the lower part of the frame, where the floor will be created and where significant loads will be placed.
The beams are fastened together with metal dowels, which are achieved using a wooden mallet. In some cases, if necessary, the beams are additionally fastened with staples or nails.
Scheme of fastening the bars to each other
The joining of the lower crown beams to each other occurs by picking at the corners using any of the existing methods:
- “in half a tree” - a variant of laying beams, in which the upper half of the array is removed in corner joints on one beam, and the lower half on the other;
- “into the paw” is the most common way of connecting beams, which is the opposite and does not include the end part of the log protruding beyond the level of the wall.
Nuts and wide washers are used to secure the timber to the surface of the foundation. A wide washer will expand the area of contact of the nut with the surface of the wood. You only need to use a hex nut, and square or round nuts are not suitable for such purposes. If you use narrow nuts to fasten the beams or do not use them at all, then during installation work it will be quite clear that the nut will completely sink into the surface of the beam and the connection of the house frame elements will be unreliable and short-lived.
Laying the first crown
The technology for installing the bottom row of a timber house requires a certain sequence of work. Firstly, antiseptic-impregnated slats 10-15mm thick are laid on the foundation on top of the waterproofing layer in increments of 25-30cm. The gap is subsequently filled with polyurethane foam. Next, the first crown of the timber house is mounted on them. At the last stage, the horizontality of the laid beam is checked using a construction or laser level. If necessary, the spatial position of the crown is adjusted until the required results are obtained.
The first row of timber should be laid taking into account the correct design of the corners. One side must be strictly perpendicular to the other, with the exception of projects involving a complex house shape in plan. After installing the lower crown on the foundation, the correspondence of the dimensions of the diagonals between opposite corners is also checked. If the structure is rectangular, then both lengths should match.
Reinforcement with reinforcement
The base of the building can be tied with steel reinforcement. A welding machine is used for this. The reinforcement is folded into a mesh and firmly secured by welding. This method is rarely used in construction, since after welding the steel loses its high technical strength. The reinforcement may become more flexible and cause deformations.
An alternative to welding is the manual method of steel strapping. The reinforcement is tied with strong wire and fixed with special hooks. Wire is tied around the joints and twisted tightly. Instead of wire, you can use special fasteners that do not twist.
Removal of load-bearing walls beyond the pile foundation
Sometimes private developers try to find solutions that allow them to save on the purchase of building materials and the work of screwing in additional piles. At the same time, they forget about the strength of the building structure, which can be broken very recklessly.
Here is an example of a gross violation of construction technology; the photo shows the removal of the outer wall beyond the boundaries of the pile row.
What can you recommend to people who prioritize questionable savings? The most important thing is to avoid self-indulgence, and then everything will work out for you. If building regulations provide for the installation of piles under each corner or wall of the future room, then so be it. There is no need to make any overhangs or indentations that are not supported in the form of a pile firmly screwed into the ground. This will not lead to a reduction in the cost of construction, but it will provide additional problems for the developer.
If you make an overhang or indentation, then this structure will hang on the logs. In this case, you will have to make a double strapping from the inside and connect it somehow with the external overhang (so that the structure does not completely fall apart). It won’t be cheaper (due to savings on piles), since you will have to spend money on strengthening the lower floor, but this will add problems.
In general, according to the technology of constructing a pile-screw foundation, piles must be placed under all cuts, corners and load-bearing walls. This is the most important rule.
Method of bundling with a profiled pipe
A profiled pipe has a structure similar to a channel, but in terms of strength it is much inferior to it.
This is due to the less durable metal used to make the profile pipe, thinner walls and other features of the material. To achieve maximum strength, corner joints are made overlapping or overlaying.
As an option, the ends are trimmed at 45°, welded, followed by strengthening the joint with an oblique angle for bolted joints.
Procedure:
- Trimming piles, installing caps.
- Laying beams along the outer perimeter, connecting corners.
- Laying internal beams, welding with external elements.
- Tying the remaining supports to obtain maximum rigidity.
- Applying a layer of protective anti-corrosion coating.
IMPORTANT! If possible, all connections are reinforced with metal gussets installed on bolted connections.
Thermal and waterproofing when closing the base
All types of basement finishing require the installation of a heat- and waterproofing layer, which is covered with asbestos-cement slabs, decorative thermal panels mounted on a sheathing of boards or a slate slab, or bricks. All these materials have their pros and cons:
- Asbestos-cement boards do not look very attractive and are characterized by increased fragility, but they are inexpensive.
Asbestos cement slabs - Decorative panels, cement-sand or clinker tiles are resistant to atmospheric influences, and some types of them can even easily withstand high humidity. However, to lay them, a perfectly smooth and even surface is required, so the base around the perimeter will have to be covered with sheet material, for example, asbestos cement. Clinker tiles
- It is advisable to use brick laying or pouring concrete only when the height of the above-ground part of the base is at least 30-40 cm, which allows you to equip a real basement floor.
Decoration of the base with decorative bricks.
Tying and closing screw piles is a very important stage in the construction of a house, which determines how soon it will need major repairs.
INSTALLING BEAM ON THE FOUNDATION
After the foundation has been insulated, the installation of the lower piping begins.
The beams installed on the foundation should fit fairly tightly to each other without creating a minimum space between them. This is especially true for the lower part of the frame, where the floor will be created and where significant loads will be placed.
The beams are fastened together with metal dowels, which are achieved using a wooden mallet. In some cases, if necessary, the beams are additionally fastened with staples or nails.
Scheme of fastening the bars to each other
The joining of the lower crown beams to each other occurs by picking at the corners using any of the existing methods:
- “in half a tree” - a variant of laying beams, in which the upper half of the array is removed in corner joints on one beam, and the lower half on the other;
- “into the paw” is the most common way of connecting beams, which is the opposite and does not include the end part of the log protruding beyond the level of the wall.
Nuts and wide washers are used to secure the timber to the surface of the foundation. A wide washer will expand the area of contact of the nut with the surface of the wood. You only need to use a hex nut, and square or round nuts are not suitable for such purposes. If you use narrow nuts to fasten the beams or do not use them at all, then during installation work it will be quite clear that the nut will completely sink into the surface of the beam and the connection of the house frame elements will be unreliable and short-lived.
What's on top
Foundation for a house made of sip panels
We figured out the structure, insulation and lining (or rather, the lack thereof). It remains to be discussed what the ceiling has on top. So, after completing the installation of insulation, it is necessary to make a vapor barrier, for which we use polyethylene film:
Bottom floor and vapor barrier
In the framework of this note, I would not like to go into details, I will only say that 150 micron film is prescribed in SP 31-105. Polyethylene is the basis of many “branded” PI films, therefore we use it for vapor barrier of walls and ceilings. The film is laid with an overlap, the joints are taped. And plywood is laid on top, this is how it happens:
By the way, the video shows the beginning of construction of a house in Matoksa. The video is of mediocre quality, but there was nothing better and fresher. I'll have to make a new video on this topic.
Moisture-resistant plywood for subfloors
Having made the subfloor from moisture-resistant plywood, you can begin assembling the walls - the floor of the first floor is ready!
Other interesting posts:
- 12/29/2016 Dispute about the lower ceiling
- 03/18/2017 We are building a frame structure on stilts in Nazia
- 08/03/2016 We are building a house with a pitched roof
Eh. Our household appliances measure relative humidity, which refers to the very different amount of moisture in the air at different temperatures. Those. if your home is +20 and the relative humidity is 50%, and outside it is -20 and the relative humidity is also 50%, then the amount of moisture in the air is actually completely different. For example, look at the article, it is quite popular and explains the essence https://belkin-labs.ru/articles/191/
We won’t talk about the basics of science. I'm talking about something else - the humidity in a wooden house is initially low, even very low. By sealing it with films, builders forcefully create increased humidity in the house. This moisture then condenses on these films, demonstrating their supposed effectiveness.
We are talking about frame structures, where the filling is breathable insulation, for which the penetration of warm, moist air is undesirable, as I have already written about
And he will rush inside only if the house is even colder, which is unlikely. Therefore, they are protected from the wind from the outside, and from “steam” from the inside.
Typical construction mistakes
Well, our work was going smoothly:
- Removed excess soil from under the joists.
- The entrance to the steam room has been moved.
- The electrical was redone.
- They installed a sewer system.
- They hid the water pipes.
- The floors were insulated and a base was laid under the screed.
- The water floor pipes were laid.
- The doors were reinstalled.
- We soaked the walls of the washing room twice (so as not to absorb moisture from the screed).
- We cut a window in the steam room.
- A new vapor barrier was installed.
- They poured the screed.
- And we left for a technological break, having repaired the customer’s snowmobile before leaving, which he was very happy about.
A few days later the team returned and continued work.
Washing room:
- They erected a frame wall and covered it with imitation timber.
- The floors were covered with porcelain stoneware.
- Drywall was secured to the walls on guides and the area was lined with washable tiles.
- We came up with and installed a folding shelf (an example of how even in a small room you can create conditions for showering, washing, and massage treatments).
Steam room:
- The floor and side were covered with porcelain tiles.
- They put up a “floating” frame.
- The steam room was lined with natural linden block house.
- We made shelves, a bench, and installed faucets.
- We mounted a decorative shutter on the window, installed lamps, lampshades, and hung decorative branches.
- On the outside, we interestingly decorated the hole from the removed vertical beam at the entrance to the steam room.
And again a break - for technological drying of the block house and its drying out. But they didn’t leave right away - the customer asked to impregnate the entire bathhouse from the inside, having seen how the guys had impregnated the walls of the washing room and the frame wall. While the material was drying, not entirely pleasant news arrived: the hackwork of the furnace installers still made itself felt. During one of the furnace fires, the wall above the furnace firebox began to smolder closer to the rest room. Only the customer's observation saved the fire. And the efficiency with which the Tajik assistant cut out the smoking crown from the side of the rest room.
And so we came for the third time. Everything is almost “native”. The heating works great. The Asian gatekeeper even overdid it - all the rooms of the bathhouse (the rest room, the toilet, and the kitchen) were heated to 45 degrees! Platbands, cladding, etc. It just got twisted in places.
Well, nothing - a couple of hours to eliminate the consequences of the flood, a few hours to caulk. An hour to clean the bathhouse and surrounding area, loading tools into cars. And then 2 hours of steam testing with the permission of the owner of the bathhouse (the stove began to be heated in advance). It turned out beautiful and functional! A real Russian “steam log cabin” - hot, but not harsh, embracing warmth from all sides - from the stove, from the wall, and from the floor.
There is a choice of water here - ice or boiling water, there is also a window for ventilation or breathing (not necessary - lower the shutter and it will be as if it never existed), smooth lines of transition between wood and stone, soft light and wide warm shelves complete the atmosphere of complete relaxation. Need to take water treatments in a cooler place? Please! The shelf can comfortably accommodate an adult lying down or three people sitting. Underneath there are 2 hygienic showers - cold and hot. You can also take a “blow” of water from a sprinkler while sitting.
Or you can fold back the shelves, go into the shower corner and shower while standing. Or just take a shower. Water does not stagnate on the floor - 2 drain ladders are made. The bathroom is equipped with everything necessary - toilet, sink. At the customer’s request, a washing machine was also installed there. The boiler remained in its original place. All pipes are “hidden”.
And, importantly, we managed to get everything done before the end of winter! But the owner of the bathhouse had a cherished dream - this winter to have time to dive from the bathhouse into the snow. It turned out to be heartwarming, just as a bathhouse should be! * the only controversial solution is backrests made from boards on the walls
They were installed at the request of the customer. But it won’t take long to dismantle them if the owner of the bathhouse makes such a decision
* the only controversial solution is backrests made from boards on the walls. They were installed at the request of the customer. But it won’t take long to dismantle them if the owner of the bathhouse makes such a decision.
Kinds
Before starting the process, the strapping technology is carefully selected. Piles can be fixed using:
- threads;
- welding;
- clamps.
It is possible to make a harness with screws attached if wooden poles were used in the construction. They should be quite dense and thick. With this technology, correctly calculate the thread. Fastening screw piles with timber is applicable in the construction of wooden, frame, block and brick houses.
Welding installation of base elements is used if the piles are metal. Tying the foundation using welding will be the best option and will allow all parts of the structure to hold firmly.
The use of clamps is a variant of strapping technology for piles made of dense wood. Clamps can be used when the thickness of the posts is small. The installation method is chosen depending on the characteristics and parameters of the piles.
Objectives of horizontal waterproofing
Installing waterproofing is considered a troublesome undertaking, but not a single house will last long without it, even if it is built on a mountain and the groundwater lies at great depths.
There will always be reasons for condensation and moisture penetration into structural elements. Indeed, in addition to groundwater, there is also rain and melt water, which have an equally destructive effect on the foundation and walls of the building. Horizontal waterproofing is installed between the brickwork and the foundation during the construction stage. Of course, there are ways to do this after the walls have been built, but they are either too labor-intensive or too expensive
A decision to save on materials or simple forgetfulness of the “masters” can lead to significant problems and difficulties in the future, so the importance of a moisture-proof layer should not be ignored
The lower horizontal waterproofing is laid at the level of the base of the foundation, but this article is not about it, but about the upper insulating layer. When constructing it, roll materials are used, such as roofing felt, roofing felt, glass insulation, waterproofing, rubemast, etc. To create a waterproof carpet between the foundation and the brick or block masonry, you must:
- level the upper surface of the foundation with mortar;
- lay the waterproofing material in two layers.
For reliability, roofing felt can be fixed with hot bitumen. In this case, it is recommended to apply the mastic directly onto the prepared canvases, and after laying, press it with a semi-rigid roller. If there are crumbs on the rolls, the surface should be cleaned first, otherwise the joining will be of poor quality.
In the absence of a basement, double horizontal waterproofing of the walls is performed:
- the first layer is between the foundation part and the masonry of the base;
- the second layer is in a brick or block wall, not reaching the lower level of the first floor ceiling or joist about 10-15cm.
Strips of roofing felt or other rolled material are laid flush with the masonry, but they may protrude somewhat beyond the walls. To achieve a neat appearance, it is recommended that the straight edges of the canvases cut lengthwise be oriented outward, and the “torn” side should be oriented toward the inside of the house. In addition, it should be taken into account that the material must be overlapped along its length.
A successful combination of vertical and horizontal waterproofing of a house ensures maximum tightness of structures. And the absence of moisture in them can guarantee a long life of the house and the impossibility of the appearance of dampness and fungus in the interior of the building.