Characteristics and features of aerated concrete blocks
Aerated concrete is an inexpensive and easy-to-work material that has low thermal conductivity. But when choosing aerated concrete blocks for a garage, it is important to take into account some of the features of this building material.
Aerated concrete is produced by foaming concrete, resulting in a porous structure with tiny cells filled with air. This is what determines good heat conservation and high sound insulation in buildings made of aerated concrete blocks.
Depending on the brand of aerated concrete, in addition to cement, sand, water and foaming additives, gypsum and lime may be included in the composition. This is necessary to increase strength and resistance to mold and mildew.
Types of garage blocks
The first thing you will have to decide before starting to build a garage is what material you will use. There are quite a lot of durable materials for construction: brick, concrete, iron, wood, foam blocks. Recently, blocks for garage construction have been used most often. This is due to reasonable cost and practicality. But foam blocks are also different, let's look at their features.
Foam concrete garage
Foam concrete is a mixture of cement and foam, which is made using special equipment. Air bubbles are evenly distributed throughout the entire volume of the block and form small cells. The density of foam concrete is different, it varies from 200 to 1200 kg/m³, which indicates the strength and reliability of the material.
There are three main types of foam concrete blocks, based on density:
- D200-500 - such blocks are often used for thermal insulation; they are not very durable, but have low thermal conductivity;
- D500-900 - blocks are used in the construction of residential high-rise buildings, they are highly durable and do not allow heat to escape;
- D900-1200 – high-strength blocks, used in the construction of high-rise buildings.
Cinder block garage
Cinder block is one of the most inexpensive materials for construction. It is made by vibration pressing from ash, sand, crushed stone, gravel or shell rock. The binder in the production of cinder blocks is cement. In addition, a cinder block may have additives that increase its thermal conductivity (for example, expanded clay). The density of such blocks, as a rule, varies from 500 to 2000 kg/m³. Use the hint when calculating the brick consumption for a cinder block garage.
Cinder blocks are divided into two types:
- hollow (12-14 kg);
- full-bodied (15-28 kg).
Garage made of expanded clay concrete blocks
The technology for manufacturing expanded clay concrete blocks is similar to the production of foam concrete, but the composition necessarily contains expanded clay. Thanks to him, expanded clay concrete blocks are light and very porous. Such blocks have good thermal insulation and are almost eternal.
Expanded clay concrete blocks come in three types:
- thermal insulation;
- structural and thermal insulation;
- constructive.
Garage made of aerated concrete blocks
Aerated concrete blocks are made from gypsum, sand and a special gas generator. Their structure is similar to foam concrete, but with much smaller pores. This provides aerated concrete with the correct even shape, dense structure and low weight. In addition, aerated concrete blocks are easy to cut and can be easily given the desired shape. In addition, they have fire-resistant properties.
Aerated concrete buildings are durable and economical. However, they require mandatory reinforcement in order to prevent cracking during shrinkage.
Garage made of gas silicate blocks
Gas silicate blocks are similar to aerated concrete blocks. However, they also have differences. Firstly, the main binding element in gas silicate blocks is lime. Thanks to lime, such blocks, unlike other foam blocks, are white. Secondly, autoclaving technology is necessarily used in production. The density of gas silicate is from 300 to 900 kg/m³. It retains heat well, has a smooth, even surface and is highly fire resistant.
What to choose?
All of the listed types of foam blocks have no fundamental differences. They differ in the subtleties of production and price. Therefore, the choice is yours based on your financial capabilities and personal preferences.
Cinder block, like foam concrete, requires further external finishing, which will protect the material from moisture and wind. Aerated concrete and gas silicate are more resistant to weather conditions, but as a rule, they are still plastered.
Foundation design and basics
Some people think that there is no need to do a project to build a garage, and then they get upset that they bought too many building materials or, conversely, that something is missing.
Having decided on the construction site, it must have access to the normal exit of the car and ensure the free opening of the garage door leaves, we begin to count the necessary materials.
We offer an approximate calculation of a standard rectangular garage for one car, 4 by 6 meters with a height of 2.4 m.
The accepted size of one block is 200x300x600 mm:
- calculation formula (L x H - Sp) x 1.05 x B = V (L - length of all walls, H - height, Sp - area of all openings, windows, gates and doors), coefficient 1.05 - takes into account trimming and joining during laying at five percent, B is the thickness of the blocks, V is the required volume of aerated concrete blocks for construction).
It is important to round up calculations to whole numbers. This is necessary for unforeseen situations; there are many of them during construction work (combat, defects).
- You can count the blocks individually, focusing on the length and height of each wall.
The optimal thickness of garage walls made of aerated concrete is 20 centimeters, no less. For northern regions - 40 centimeters, or 30 cm, but with additional internal or external insulation.
Basic tips for insulating a garage
When insulating a garage, it is not recommended to skimp on the quality of the material. It is better to buy dense insulation: the higher this indicator, the better the material retains heat.
The most effective heat insulator is high-density polystyrene foam 35 kg/cub.m - PPT-35 and PPT-35N (N - for external use). When choosing insulation, it is important to correctly calculate the costs and take into account additional costs. To work with polystyrene, you only need fastening materials and a standard set of tools. The use of other thermal insulation materials - stone wool, polyurethane foam spraying, foam insulation - will require additional costs for the purchase of waterproofing and vapor barrier films, sprayers, and sometimes payment for the services of third-party organizations.
Foundation structure
The light weight of the material allows you to reduce costs due to a shallow strip or simple columnar foundation. The choice of foundation option depends on the type of soil on the site and temperature fluctuations in the region.
Choosing a foundation type:
- high groundwater level and heaving soils - monolithic or pile foundation;
- To construct an inspection hole on normal soils, it is better to choose a pile-and-tape foundation.
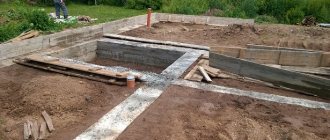
Foundation construction sequence:
- we remove a layer of fertile soil by 70 - 90 cm, the width of the trench depends on the width of the selected blocks;
- We compact the soil with a tamper and periodically moisten it;
- lay out the reinforcement rods (rod diameter 8, A400);
- pour a layer of sand over the reinforcement, about 20 cm, tamp with moisture;
- after compacting, you need to fill in another 20 cm of sand (total thickness 40 cm);
- then a layer of crushed stone of the middle fraction is 10 cm and compacted again;
- Now you can install formwork from old boards.
Evgeniy Filimonov
Ask a Question
To reduce the consumption of concrete mixture, the trench can be covered with a layer of film and reinforcement can be laid on it and concrete can be poured.
- We expose the reinforcement frame and pour the concrete mixture.
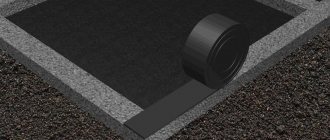
After the concrete has hardened, it is important to waterproof it with a layer of roofing material, which should protrude 2-3 cm at the edges. This will prevent excess moisture from flowing from the foundation to the walls of the garage.
We build walls
When laying aerated concrete, ordinary mortar is not used; a special adhesive mixture is required, which ensures smooth and thin seams - from one millimeter. Ordinary cement mortar is used only when laying the first row of garage walls (the ratio of cement and sifted sand is 1 to 3).
The advantages of the adhesive solution are that it reduces heat loss and guarantees high-quality waterproofing of seams.
Sequence of wall construction:
- we lay out the first row, taking into account that the masonry seam is at least one centimeter;
- We start laying from the highest corner. It is easy to check the height of the corners using a water level;
- We begin to lay out the second row of walls on the second day, after the mortar in the first row has set well;
- first we lay out the corners and determine the level of the next row of masonry with a stretched twine;
- every two rows we reinforce with reinforcing mesh, this will ensure better adhesion and stability of the building;
- do not forget about the ventilation holes, which are important to be located at different heights so that there is unhindered air circulation in the room and the removal of excess moisture in the winter is ensured;
- We close the ventilation passages on the outside with mesh, and on the inside with plastic ventilation grilles;
- strapping belts intended for roofing and ceilings can be installed from wood or reinforced concrete;
- do not forget that metal lintel beams must be installed above the gate opening, which will compensate for the weight of the metal gate and evenly distribute the load on the walls;
- It’s not difficult to make a jumper with your own hands from two profile metal corners (width 100 mm). We install the corners along the edges of the block and fasten them with metal strips, you can also fasten them with reinforcement if you have welding, the fastening step is 50 cm;
- the edges of the metal beam on both sides must be embedded in the pier at least 20 cm (calculation for a standard gate width of 2500 cm).
Window openings can also be strengthened with reinforcement or small metal strips.
Where to insulate - inside or outside
Insulation of garage walls can be done outside and inside. The choice of location for installing insulation depends on several criteria:
- the building material from which the garage is built (metal box, solid brick structure, block, wooden);
- destination (only a parking lot or also a working workshop);
- room area.
A garage for car enthusiasts is not only a place to park a car, but also a room that performs additional functions: a workshop, a storage room, storage for bicycles, skis, spare tires, electrical equipment, and various tools. The multifunctionality of the room places special demands on its insulation. If the garage is used as a workshop and is heated, then it is better to insulate it from the outside. A metal unheated garage, intended only for parking a car and carrying out minor maintenance work, is insulated from the inside.
How to insulate a garage from the inside
The classic way to insulate a metal garage from the inside is to create a sealed loop of foam sheets along the walls and ceiling. All work on insulating a garage can be easily done with your own hands, having purchased materials and tools in advance. The work is carried out in the following sequence:
- A frame made of wooden bars or metal profiles is installed along the walls.
- Sheets of foam plastic (or other insulation) are mounted between the frame elements. Expanded polystyrene, penoplex are attached to mounting foam with adhesive properties, umbrella dowels or liquid nails. Mineral wool slabs are installed between the frame posts.
- Seams and joints are sealed with polyurethane foam.
- Sometimes it may be necessary to lay foil penofol on top to completely eliminate cold bridges.
Some garage owners complete the insulation here, others cover the insulation with plywood, clapboard, OSB boards to improve the aesthetic characteristics of the room and equip the walls for hanging modules, shelves, and tools.
External insulation
Expanded polystyrene for walls is suitable for outdoor use, but it is worth considering that the material is destroyed when exposed to sunlight. Therefore, it is protected with finishing cladding (PVC panels, lining, plywood, OSB boards) or plastering.
The technology of applying plaster to the outside of a building on insulation is called “wet facade”. This is an effective way to insulate both a residential building and a garage. First, a frame is attached to the facade to prevent subsidence of the insulation. Then sheets of foam plastic are fixed to the wall with umbrella dowels, a reinforcing mesh is applied, and a layer of plaster is laid. After the solution dries, a monolithic layer is formed on the outer part of the wall of the garage or house, characterized by high strength and good thermal insulation parameters.
Garage roof insulation technology
To insulate the roof, you can use mineral wool with a density of 90 kg/m3. m, polystyrene foam 25–35 kg/cu.m. m or extruded polystyrene foam. Expanded polystyrene sheets are preferable as they are non-hygroscopic. The structure of expanded polystyrene is formed by closed cells, so the material does not absorb steam, which makes it possible to do without waterproofing. The sheets are simply glued to the surface - this is how a foam ceiling is formed. To ensure increased tightness of the formed layer, you can use samples with a tongue-and-groove lock at the edges or lay them in two layers, provided that the joints on different rows do not coincide.
Construction of an inspection pit
Before installing the gate, but after covering the roof, you will have to perform the following types of work if you decide to make an inspection hole:
- we dig a hole, depth - 1.5 meters, width 0.8 meters, length 1.8, placing it in the center of the room;
- fill the bottom with sand, or better yet, clay and compact it tightly. Then we line it with a layer of roofing felt and fill it with a concrete screed (layer thickness 10 cm);
- in damp regions, it is better to line the pit walls with slag bricks (half a brick width);
- be sure to waterproof the walls and floors with bitumen mastic;
- Next we lay the electrical wiring and plaster the walls;
- outside the pit along the perimeter we place a welded reinforcing frame made of metal corners;
- do not forget to install a metal lid on the pit, or, in extreme cases, a wooden one.
All you have to do is install a removable or stationary ladder and the inspection hole is ready.
Video description
Tips for locating a garage on the site:
SNiP standards
Formally, a garage is an outbuilding, and when placing it, you must adhere to the regulations relating to such buildings. So, for example, a distance of at least 6 meters must be maintained from the garage to the buildings on the neighboring site. This distance can only be reduced if there is written agreement on this issue with the neighbors.
If the garage is planned as a separate structure, there must be a distance of at least 8 meters from it to other stone and concrete buildings. If there is already a wooden building on the site, then the garage should be placed no closer than 10 meters from it. You need to step back at least 3 meters from the house.
If you plan to set up an entrance to the garage directly from the roadway, it should be “sinked” into the depth of the site by 1 meter. This is necessary so that when opening the garage door, passage or driving along the fence is not difficult. These and other standards must be carefully studied. But it is better to consult with specialists involved in drawing up master plans for private households.
Variant of the master plan with a cottage and attached garage Source vyda.kanorecybu.ru.net
Fire safety
Most of the standards included in SNiP are necessary to ensure sufficient fire safety for a garage building. It is worth noting that with strict adherence to all fire safety rules, it is possible to build a garage closer than provided for in the regulations. But this only applies to unheated automobile buildings.
Garage attached to the house
If in a detached garage fire safety is achieved primarily by observing standard distances to neighboring objects, then an extension garage requires the use of additional measures. In addition, the extension must be designed taking into account the layout of the house. Therefore, projects for attached garages are drawn up more carefully.
Insulation of walls and roofing
The roof can be either single-pitch or gable, it all depends on the topography of the site and the characteristics of storm water drainage.
The roof is installed as follows:
- We install a reinforced concrete screed on top of the masonry walls, on which we mount wooden floors and roof rafters;
- Be sure to lay a layer of waterproofing - Mauerlat - before installing the wooden rafters.
Evgeniy Filimonov
Ask a Question
For aerated concrete, lightweight roofing material - corrugated sheeting or roofing felt - is better suited. If there is a monolithic foundation and reliable reinforcement of the walls, then the roof can be covered with both tiles and slate.
Insulation and waterproofing
The disadvantage of aerated concrete blocks is that they are susceptible to the destructive effects of moisture.
Therefore, it is imperative to carry out external wall decoration so that the garage serves you for many years:
- Aerated concrete can be insulated with foam plastic, followed by plastering of the walls, or you can opt for a ventilated façade made of a layer of mineral wool and a protective finish;
- do not choose flammable materials for insulation, and be sure to cover the foam finishing with a layer of plaster over the reinforcing mesh.
If the garage has high-quality ventilation, then internal insulation is not necessary to prevent the appearance of cold bridges. It is enough to simply plaster and paint the walls.
Optimal temperature inside the garage
A garage is a non-residential premises in which it is recommended to maintain the temperature at +5 degrees oC in winter. It is not necessary to increase it: driving a car into the garage from the street should not be accompanied by sudden changes in temperature. Recommendations must be followed to prevent condensation on the metal and avoid the development of corrosion. According to the requirements for the equipment of premises for storing cars, the garage must be:
- Warm. It is difficult to work in the cold; subzero temperatures will lead to liquid freezing. The air temperature in the garage should be positive; while the car owner is working, the room warms up to 16–20 degrees C.
- Dry. Getting water inside will lead to rapid corrosion of the metal, so the walls, floors, and roofing of the building must be waterproofed.
- Ventilated. The presence of ventilation will save the car owner from inhaling harmful exhausts, unpleasant odors and will allow moisture vapors to be removed outside. Forced ventilation is required in the garage.
Properly performed thermal insulation of a garage will create optimal conditions for preserving the car and will make it possible to quickly heat the room for a person to work in it.
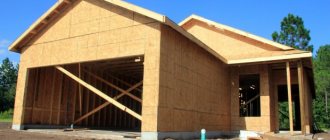
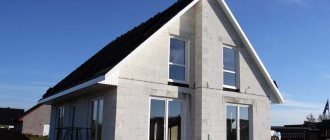
Do-it-yourself aerated concrete garage: the main advantages
Your own garage is a reliable guarantee of car protection, both from the effects of adverse atmospheric conditions and from theft. There are two ways to make your dream come true and get a building.
Buying a ready-made garage does not require much effort, but it significantly affects the family budget.
The second method - building a garage from aerated concrete blocks with your own hands - is the most economical and opens up many advantages for the future owner.
Getting a self-made building while saving money is not the only advantage of a garage made of aerated concrete blocks. The low cost of the material is not a fundamental advantage for most owners.
It is much more important to obtain a material that is easy to process and provides all the necessary conditions for the safety of the car and the comfortable carrying out of current work at any time of the year, at any temperature.
Aerated concrete, thanks to its advantages, meets all the basic requirements of a garage owner:
- Provides good thermal insulation, eliminating additional costs for insulation.
- The porous cells of the material guarantee vapor permeability and frost resistance.
- Aerated concrete walls are highly durable and durable.
- The construction meets all requirements for environmental cleanliness and health safety.
- The outer walls of the garage are built in one layer and do not require additional insulation.
- The correct geometric shape, smooth and even surface of aerated concrete blocks ensures material savings during construction.
- There is no need to use special tools for sawing and trimming.
- Dimensions, weight, as well as the presence of grips and grooves guarantee the speed of building a garage with your own hands.
- Frequent seasonal work related to repair and maintenance of the structure is not required.
The presence of disadvantages similar to the disadvantages of brick (moisture absorption, lowering the temperature in the room due to icing of external walls) should be taken into account during construction. However, the experience of successful owners of garages built from aerated concrete blocks shows that these disadvantages cannot significantly affect the result achieved thanks to the advantages of aerated concrete. Moreover, aerated concrete blocks are not inferior to the material recognized in individual construction - foam concrete blocks.
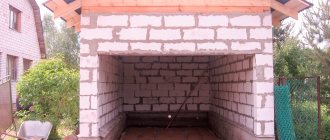
Is it worth building with this material?
Anyone can build a garage from foam blocks if they wish and have the tools. Working with this material is not difficult or expensive. Therefore, if the car owner does not have a lot of money, but a garage needs to be built, this is the optimal solution. During operation, special equipment and a large number of people are not needed.
But if the climate of the area is very humid and rainy, then it is better not to use foam block elements when building a garage. The material has the ability to absorb moisture well. If it rains infrequently, then the blocks will have time to dry out, and if there is prolonged exposure to rain or snow, the moisture will constantly be inside the block and will not dry out. The result is a shrinkage of the garage by 1-3 mm per 1 m of wall.
In other cases, the use of the material has many advantages:
- Light weight. The foam block has a low density, so the constructed garage will not weigh very much compared to other building materials (concrete or brick). Thanks to this, there is no need to lay a heavy and deep foundation. It is enough to get by with a strip foundation with a shallow depth.
- Foam block is a non-toxic material; it does not emit toxic substances during operation. The foam block is made from cement, sand, foaming agent and water, so from the environmental point of view it is safe for health (4th class of environmental friendliness).
- Foam blocks have closed pores, so walls can be laid directly from ground level without filling a high base, since the material will not freeze in winter.
- The characteristics of a foam block product are similar to wood, but unlike it, this material does not burn, is not susceptible to rotting, mold and mildew, is resistant to temperature changes and is much more durable. The material can be exposed to open fire for 4 hours without burning or losing its characteristics.
- The low weight of each element allows you to independently lift and lay out the blocks without resorting to the help of machinery. In addition, foam blocks are easy to transport.
- A garage made of foam blocks has a high level of thermal insulation and sound insulation. The thermal conductivity of the foam block is 3 times less than that of brick. This means that the garage can be easily heated and the heat will not quickly escape through the walls. And the many air cells in the blocks dampen sounds well.
- The elements are easy to process, trim, saw, drill. And this work does not require special tools. An ordinary drill, grinder and emery will easily cope with this.
- Foam blocks have smooth edges, so walls are erected without differences.
- The cost of foam blocks is several times lower than that of other materials.
But for the sake of objectivity, it is worth mentioning a few disadvantages:
fragility and fragility of blocks
Improper transportation, careless handling, and careless actions will easily lead to the material becoming chipped and cracked; the material has low vapor permeability, so good ventilation must be ensured in the garage; ordinary nails or dowels will not hold in foam blocks. To secure shelves or wall cabinets, you need to buy special fastenings for foam concrete; Due to low moisture resistance, it is advisable to decorate the garage walls with an additional layer of plaster or other protective material.
Start of construction work
Building a garage from aerated concrete begins with choosing a project that meets individual requirements. You can find a suitable development in a ready-made form, using information from the network or a specialized magazine, or order your own version by contacting specialists.
The help of professionals is the best option to resolve the issue, since the projects presented on the Internet or in magazines are developed taking into account a number of factors that may not coincide with the characteristics of the site chosen for construction.
First of all, this is:
- soil type;
- groundwater level;
- features of climatic conditions.
After receiving an individual garage project, you need to stock up on a set of tools and materials that will be needed during construction.
The list includes:
1. Tools
- a hacksaw necessary for cutting an aerated concrete block;
- wall chaser;
- brushes;
- a carriage convenient for distributing the adhesive layer;
- notched spatula;
- trowel;
- plumb line;
- shovels;
- rubber mallet;
- building level;
- container for diluting and storing the solution.
2. Materials
- aerated concrete blocks;
- crushed stone;
- cement;
- sand;
- boards for formwork construction;
- reinforcing mesh;
- fittings (intended for strapping);
- glue for laying aerated concrete blocks.
Evgeniy Filimonov
Ask a Question
It is better to start building a structure made of aerated concrete in the warm season. The estimated time frame for completing the work is also taken into account. It all depends on the level of preparedness of the performer. On average, professionals take about two months to build, excluding the time spent on the interior decoration of the garage.
Preparation of materials and tools
When all the calculations are completed, take an inventory of your tools - if you don’t have something, you’ll have to buy more. The following devices will be needed:
- hacksaw;
- device for cutting grooves;
- notched spatula;
- set of brushes;
- ladle;
- carriage for applying glue;
- construction plumb line;
- mallet with a rubber striker;
- long level;
- bayonet shovels;
- reservoir for diluting glue.
In addition to aerated concrete, additional materials are required:
- cement;
- sand with crushed stone;
- formwork;
- reinforcing bars;
- glue.
The period when construction begins is very important. It is better not to start specific work in late autumn. The optimal time is mid-May, when the soil has dried out.
Necessary calculations
The ability to accurately calculate the required amount of materials for building a garage from aerated concrete blocks allows you to save money not only due to the low cost of aerated concrete, but also due to the absence of overpayment for excess material.
The calculation process should begin with:
- Completion of design.
- Determining the dimensions of the garage building (length and height of walls, area of openings (windows, gates)).
- Selecting the size of aerated concrete blocks.
The indicated indicators may be different in each individual case.
In order to understand the calculation algorithm, it is better to use the option with average indicators, according to which the garage structure is assumed to be rectangular in shape, and its dimensions are 4x6 meters (length and width), with a height of 2.4 meters.
As for the parameters of an aerated concrete block, of all the sizes offered by manufacturers, a block with dimensions of 200/300/600 mm is best suited for building a garage.
Calculation of total volume
Those craftsmen who do not want to carry out detailed calculations for one row or for each wall can use the following formula:
(L x H - Sp) x 1.05 x B = V, where L is the total length of the garage walls in meters, H is the average height of the walls in meters, Sp is the calculated total area of the openings in square meters, 1.05 - coefficient (necessary to take into account the five percent margin for trimming, B is the thickness of aerated concrete blocks in meters, V is the desired result of the volume of blocks in cubic meters.
REFERENCE: the result obtained must be rounded up to a whole number. This is true both for calculating the number of pieces and for calculating the total volume of aerated concrete blocks.
The volume of aerated concrete blocks can be calculated using a more simplified scheme:
- determining the volume of one block;
- multiplying the result by the required number of blocks.
The results look like this: 0.2×0.3×0.6= 0.036 cu. m (volume of one block), 0.036 × 232 = 8.352 cubic meters. m (volume of blocks for the entire building is 4x6 meters).
Detailed calculation
Number of blocks for one row. For a garage wall of 6 meters, based on the overall dimensions of the aerated concrete block of 200/300/600 mm, you will need only 10 aerated concrete blocks. For a wall 4 meters long - 7 blocks of aerated concrete (according to the rule, rounding up is done).
The number of rows depends on the required height of the garage and the method of laying the blocks. The blocks can be placed both on the wide side and on the narrow side, achieving adjustment of the wall thickness (the optimal thickness of a garage wall made of aerated concrete is at least 20 cm). For a garage with a wall height of 2.4 meters, you will need to lay 8 rows of aerated concrete blocks.
The final stage in the calculations will be the calculation of the total number of aerated concrete blocks for a 4x6 m garage.
Already obtained data is used:
- quantity for a long wall – 80 pieces;
- quantity for a short wall – 56 pieces;
- a wall with an opening for a gate will take 16 pieces of blocks.
When calculating the total quantity, the figure obtained for the long wall is multiplied by 2. Further calculations are not difficult: 160 + 56 + 16 = 232 pieces. Following the established rule, the resulting figure increases to 235 pcs. aerated concrete blocks. In a similar way, you can make calculations for a 3x6 m garage or the construction of other parameters set individually.
Selection of foam blocks
The photo shows the standard sizes of foam concrete blocks.
Before purchasing blocks for building a garage, you need to decide on its parameters, and based on this, calculate how many foam blocks are needed for the garage.
The optimal size can be considered to be 6x4m. This will allow you to place a car indoors, and still have enough space to move around. But if you expect to use the garage as a workshop for car repairs, or perhaps you will have to park two cars, then it is better to increase the perimeter to 6x6m.
Now you need to select blocks that are more suitable for building walls. There are several parameters for foam concrete briquettes, but the most popular sizes are 100x300x600, 200x300x400 and 200x300x600.
The first type is intended for the construction of interior partitions and is not suitable for the construction of external walls. But the next two sizes are just the most suitable for this. According to the certificate of conformity and installation instructions, their difference is only in length, and they have no differences in height and thickness.
The procedure for calculating the required amount of materials
The photo shows a corner of the garage.
From the above we can conclude that when building a garage from foam blocks and cinder blocks, the size of briquettes 200x300x600 mm is the most optimal and is completely suitable for this construction. In this case, you can make masonry with a thickness of 200 mm or 300 mm, just by changing the position of the blocks, but do not forget that as the thickness of the walls increases, the amount of material will also increase.
For a garage, a thickness of 20 cm is quite enough, so it makes no sense to increase the cost of construction.
In order to calculate how many foam blocks are needed for a 6 by 4 garage, we will perform the following calculations.
- The optimal garage height is 2.4 m, which corresponds to exactly 8 rows of foam blocks stacked on top of each other. In addition, this height is the most optimal for most cars. Now we need to calculate the amount of material in each row.
- Number of stones in one row:
- With a length of 6 m, we will need 10 stones for one row of each long wall.
- The short one is 4 m, which means that for it we use: 4 m: 0.6 m-1 piece = 5.6 stones.
- We round up and find that 6 foam blocks are needed for one row of a short wall.
We take into account engineering elements
Now it remains to determine how much materials will be needed for the part in which the gate is located. As a rule, they are made to the full height, and the total width of both doors should be at least 2.5 m.
- Based on this, we calculate that we will need to lay out only 1.5 m of stone, and for this we need 1.5 m: 0.6 m - 1 piece = 1.5 blocks.
- The total amount of material in one row of walls will be 10+10+6+2=28 blocks. Let's multiply this value by the number of rows in height and find that we will need 196 foam blocks to build a 6x4 m garage.
The photo shows a diagram for calculating the number of foam blocks.
The calculation of how many foam blocks are needed for a 6 by 6 garage is done according to a similar scheme. In a row of each side equal to 6 m we have 10 stones. We reduce the value of the fourth side by one stone due to the thickness of the walls.
The part of the building where the gate is installed will contain 5 stones in each row. Using simple calculations (10+10+9+5)*7, we get a result equal to 238 blocks required to build a garage measuring 6x6 m.
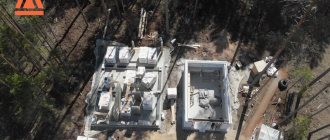
Construction order
Laying out the foundation is the first step in the process of building a do-it-yourself aerated concrete garage.
To determine the type of foundation for an aerated concrete garage, the following parameters must be taken into account:
- Groundwater level. If it is below two meters, the soil is homogeneous and dense, then in this case a lightweight strip foundation with a depth of no more than half a meter is suitable.
- A foundation made of a monolithic slab will be needed if the soil is heaving, since aerated concrete blocks do not tolerate bending loads and there is a high probability of their cracking and destruction.
- A buried strip or combined pile-strip foundation will help solve the problem of arranging an inspection pit and a cellar, since using a monolithic slab as a foundation is not possible.
Work order:
- Marking the location of the future structure on the ground using pegs.
- Digging a hole for the foundation.
- Filling sand at the bottom of the dug trench. Moistening the sand layer and compacting it.
- Laying metal reinforcement (rod has a thickness of 6 to 8 mm).
- Pouring concrete. The solution is prepared at the rate of 1 part cement, 2 parts sea sand (the use of river sand reduces strength), 6 parts fine crushed stone. The dry components are thoroughly mixed in a concrete mixer, and only after that water is added. Filling with mortar should be done after constructing the formwork.
- Laying reinforcing mesh over concrete pouring.
- Moistening the concrete pour and protecting it from precipitation for one and a half months.
- Start of construction of walls.
Strip foundation for a garage
Strip foundations are becoming increasingly popular. It is used in many projects due to its relatively low cost compared to slabs and its good load-bearing qualities. If you need a viewing hole or cellar for a garage, a strip foundation allows you to easily build them.
Before constructing a monolithic strip foundation for a garage, you need to calculate its depth and width.
Shallow strip foundations are very common. It's quite economical. For its construction, a small amount of building materials is required: formwork, reinforcement and reinforced concrete. The minimum depth of a strip foundation is 40 cm. Such a foundation can be erected if the soil underneath is not heaving or loose. Construction on organic soil is not permitted. Most other soils are excellent for strip monolithic foundations.
The strip foundation is laid to a depth of 2-3 m. On heaving soils, the foundation for the garage falls below the maximum freezing depth. On loose soils, it is recommended to install the foundation base as deep as possible. The deeper the foundation, the greater the compression resistance. A deep foundation has less risk of significant settlement.
The width of the foundation should be at least 10 cm greater than the width of the walls.
After marking the location of the strip foundation, you need to dig a pit to the depth of its occurrence with an allowance of 10-20 cm for the sand cushion.
Pouring a strip foundation for a garage can be done in two ways.
The more common method is to install formwork to the full height of all foundation walls, then reinforce it and fill it with reinforced concrete mixture.
Less common is laying a strip foundation in two stages. Several approaches are necessary if a small team of workers is working on the foundation. You may not have time to make the required amount of mixture in a concrete mixer in one day. If there is a problem with lack of time, first pour the main part of the foundation directly into the trench, having previously done the reinforcement. After the reinforced concrete has hardened, the formwork is installed and secured to the required height and the foundation is poured again to the end.
What kind of formwork should be used for the foundation of a garage is determined depending on the budget for the construction of the garage and its overall design.
There is permanent formwork - metal, reinforced concrete and polystyrene foam. Formwork of this type must be sheathed with a material that can be selected in accordance with the overall design of the garage. When using permanent formwork, you do not have to waste time removing it.
Permanent formwork is made of wooden boards or plywood sheets. For installation, the formwork panels are tightly joined together and secured with binding wire.
The foundation needs to be reinforced to strengthen its load-bearing qualities.
The reinforcement frame consists of at least two rows of vertical rods. Horizontal rods are usually located in increments of 30 cm. Their number increases in proportion to the depth of the foundation.
After installing the formwork and reinforcement, the foundation for the garage must be filled with reinforced concrete. You can buy the finished mixture at a hardware store or make it yourself. You need to mix cement, sand, crushed stone in a ratio of 1:3:5. The foundation can be poured in two stages, but a monolithic strip foundation poured in one step will be much more durable.
A monolithic foundation is often chosen by builders. High material costs and a rather complex installation process are justified by good load-bearing qualities, high wear resistance and the possibility of construction on almost any type of soil.
The foundation for the garage is made of cinder block. You will read about this in our next article. And here you will learn how to pour a foundation for a garage with your own hands.
Walls and frame arrangement
Laying of aerated concrete blocks is carried out using a special adhesive composition that replaces the usual mortar for masonry. Thanks to this adhesive composition, the masonry is perfectly smooth, the seam between the blocks does not exceed 1 mm, in contrast to 3 mm when using a cement-based mortar.
To increase strength, a kind of frame is created using a layer of reinforcing material. Control over the location of the reinforcement is carried out thanks to the slight protrusion of the rods beyond the edge of the masonry.
Then the strapping is done:
- Wooden framing is suitable for one-story structures. Before it is completed, the walls are covered with mastic and a waterproofing layer is laid.
- For two-story buildings you will need a monolithic reinforced concrete belt.
Garage in the basement
The ground floor is the technical part of the building, no more than half buried in the ground. The ground floor rises no more than two meters above the ground floor. Building a basement is not cheap. But you can fit all the technical premises in it, including the garage.
Designing a garage in the basement is complicated by the fact that you need to calculate an inclined ramp for entry, as well as a reliable drainage system, without which the garage will flood during precipitation and melting snow. In addition, the car room must be provided with the most reliable ventilation system, and the walls and ceilings must be especially carefully protected from fire.
Sometimes, instead of a ramp, special lifting devices are built, which allow one to avoid an inclined drive, but require the use of rather complex and expensive equipment.
Wall cladding and roof
You can cover garage walls from aerated concrete blocks using thermal panels. This option allows you to avoid additional insulation of the building and improve its appearance, since thermal panels can imitate brick or natural stone. The frame method using a metal profile to which facing materials are attached has also proven itself well.
Evgeniy Filimonov
Ask a Question
After completing the construction of the walls, you can begin making the garage roof. Its type is selected individually, but the best option for a garage is a pitched roof. To equip it, it is necessary to install a reinforced concrete screed on top of the masonry walls.
The mauerlat and rafter system are placed on the screed. The best roofing materials are corrugated sheeting, tiles and slate.
Gates and interior decoration
Gates are selected depending on the size of the garage, as well as the area surrounding the building. If there is enough free space, swing gates are suitable. In other cases, it is better to opt for lift-guillotine, lift-sectional or, as a last resort, roller or roller gates.
The interior finishing of the garage is carried out after plastering work has been completed. What and how to do is decided by the owner himself, based on his individual preferences. Although, the best option would be to paint the garage walls.
Provided you follow all the rules and take into account the nuances characteristic of construction using aerated concrete blocks, you can build a reliable and comfortable garage with your own hands in a short time, where both the car and its owner will feel equally safe.
Based on materials from the site: garazhov.ru, ru-house.net
Garage door insulation scheme
Thermal insulation of gates with polystyrene foam is carried out according to a simple scheme:
- Along the perimeter of the gate, wooden slats are attached to the side metal strips with self-tapping screws. Pre-holes in the steel elements are made using a drill with metal drills. A wooden frame is needed to cover the inside of the doors with clapboard, plywood, OSB boards or plastic panels.
- The polystyrene foam is cut into pieces of the desired shape and glued to the inner surface of the gate with liquid nails.
- The gaps at the joints between the sheets become foamy. After drying, the remaining foam is cut flush with a knife.
- The thermally insulated and hermetically foamed surface is sheathed with clapboard or panels. When attaching wooden or plastic panels, self-tapping screws are screwed into wooden slats, which were mounted at the first stage as a frame.
Our company produces and sells polystyrene foam of any density, which can be used as insulation for floors, walls, ceilings and garage doors. To ask questions and order polystyrene foam of the required density, call TM-StroyPlast by phone +375 (33) 661-98-08 or +375 (44) 78-78-333.