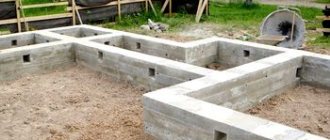
When constructing light low-rise buildings, it is economically beneficial to use a shallow strip foundation (MSLF).
They attract developers due to their simple installation, small amount of consumable building materials, combined with a high level of reliability.
We will discuss in the article what features the construction of this type of foundation has, the pros and cons of the foundation and what are the installation rules.
Advantages and disadvantages
MZLF successfully combines the advantages of buried and non-buried foundations and has the following advantages:
- high strength and reliability subject to installation technology;
- simplified excavation work that can be performed without an excavator;
- reduced amount of building materials;
- reduced labor costs for preparing concrete mortar.
There are also a number of disadvantages:
- significant restrictions on the weight and number of floors of the house.
- the need to install a complex drainage system in a heaving area;
- concrete work can only be carried out under stable temperature conditions of more than +10℃;
- The construction of the MZLF is carried out on a flat area or with a slope that does not exceed 5⁰.
Before proceeding with the construction of a shallow strip foundation, it is necessary to carry out a geological survey of the site to determine the possibility of choosing this type of foundation for a house.
In peat areas, on heterogeneous soils, at the junction of different types of soil, in conditions of high groundwater levels, it is impossible to build a shallow strip foundation.
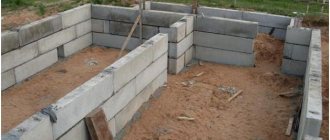
Construction of trenches and cushions
The depth of the trench depends on the depth of the foundation and the thickness of the cushion. The width of the trench is made 10 cm wider than the calculated thickness of the monolithic tape. This is necessary for installing the formwork. When constructing MZLF on loose soils, the trench slopes can be strengthened with boards. Pillowing is necessary to reduce the impact of frost heaving forces on the foundation. The thickness of the cushion, as a rule, is 20-30 cm for slightly heaving and non-heaving soils. For heaving ones - determined according to the table given above.
Correctly backfilling means making 2 layers: the first is coarse sand, which is poured, and then moistened and compacted, the second is fine crushed stone or gravel. Blast furnace or boiler slag can also be used as a second layer. If the groundwater level is high, it is recommended to put a layer of waterproofing under the cushion: roofing felt or geotextile, and fill it on top.
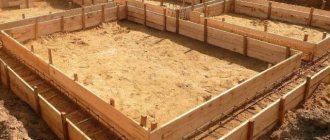
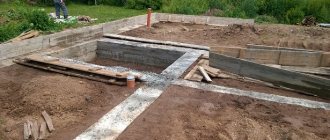
Installation of formwork and reinforcement
The formwork is made from planed boards, the thickness of which is no more than 3 cm. The formwork is mounted in a trench, and its height is 5-10 cm greater than the height of the monolithic tape. A reinforced frame is installed into the finished formwork. Reinforcement of the monolithic tape is carried out in accordance with SNiP 52-01-2003 and SP 52-101-2003. The reinforced frame can contain from 3 to 6 longitudinal reinforcement bars connected to each other by vertical jumpers.
The reinforcement scheme is determined based on the width of the foundation strip. The reinforced frame is assembled from corrugated reinforcement with a cross section of 12 mm, class A3. For a small structure, you can use A500C class reinforcement, the cost of which is much cheaper. The frames are interconnected with an overlap, forming a reinforcement unit. The length of the overlap should not exceed 20 diameters of the rods (20 x 12 = 24 cm). The connections are secured by welding.
For corners where the walls of the future house intersect, it is necessary to strengthen the reinforcement frame by installing additional vertical rods, which are welded to the longitudinal rods. This reinforcement allows the strip foundation to withstand critical loads acting at the intersections of the walls.
You can lay the reinforced frame on a prepared cushion, but it is better to do it on the starting layer of concrete. The thickness of the starting fill should not exceed 20% of the entire height of the tape. Concrete pouring helps create a more even surface on which the reinforced frame is laid. If you decide not to fill the starting layer, then support fungi should be used to raise the reinforced frame above the surface of the pillow by 5-7 cm.
The reinforced frame should be located in space, nowhere in contact with the bedding and formwork.
Pouring concrete
Filling should be done at a temperature of +10 C and above. Before pouring, the formwork must be moistened, then the concrete will lie more evenly. The mixture must be poured in layers, the layer thickness should not exceed 40 cm, optimally 20-30 cm. Each layer is subjected to 5-10 minutes of vibration compaction. This technology does not allow voids to form inside the concrete. To supply the concrete mixture to the formwork, you must use an elastic sleeve or chute.
MZLF device diagram
A reinforced concrete strip must be installed around the perimeter of the base of the house, all load-bearing walls and partitions. Almost half of its height is above ground level and forms a base.
Schematically the device looks like this:
- a pillow made of coarse sand (0.3 - 0.4 m wide and 0.2 m high);
- monolithic reinforced tape (with a recess of up to 0.5 m, the width depends on the thickness of the walls, on average 0.4 m);
- heat and waterproofing along the entire length of the tape and blind area for drainage of melt and rain water;
- decorative cladding (material for cladding at the request of the customer).
Visually, the device diagram looks like this:
One of the important conditions for the possibility of constructing a shallow belt is the absence of a seismic threat above 6 points.
Preservation for the winter
If you do not have time to install the walls in the year the foundation was built, it will remain unloaded for the winter and will not be able to balance the buoyancy forces of heaving with its own mass. Therefore, it needs to be preserved using the following methods:
- cover the entire foundation and the soil around it to a width of 1 meter with a double layer of PVC film;
Preserved foundation strip Source kitavtoprom.ru
- cover in the same way with straw, sawdust, expanded clay or other heat insulator;
- plow the soil around the foundation to reduce its density, and install snow retention shields around the perimeter.
SNiP requirements
SNiP imposes strict requirements on the minimum depth of the foundation cushion:
- 1 m (if the soil freezes from 3 m or more)
- 75 cm (when the soil freezes to a depth of 3 m);
- 50 cm (if the soil freezes less than 2 m).
According to the standards, the reinforcement is laid in the foundation in such a way that at least 6 cm remains to the edge of the concrete pouring. The rods are connected to each other with knitting wire. Special requirements are also imposed on the distance between the reinforcement bars, as well as the spacing of the transverse reinforcement. You can learn more about the basic requirements by following this link.
As practice shows, in the regions of the middle zone the depth of the MZLF will be about 0.5 m . For small outbuildings and country houses, this value can be reduced to 0.3 cm.
Concrete mass calculation
Concrete is the main part of the cost estimate for the construction of a shallow strip foundation. If you have a concrete mixer, you can do it directly on the work site, or order a machine for ready-made concrete.
Expert advice! One-step pouring is more preferable, since the pace of work when using a concrete mixer is low, and if a new portion of concrete is poured onto an already dried layer, the final strength of the monolithic foundation strip will decrease, whereas a large batch of ready-made concrete mixture allows the entire foundation to be poured into the cut.
To fill a shallow strip foundation, according to the current SNiP, it is necessary to use concrete of the M300 standard, since concrete of a lower density will not provide the required load-bearing capacity of the foundation strength.
Rice. 1.3 : Structure of M300 concrete used for pouring foundations
The nominal mass of 1 m3 of M300 concrete is 2389 kilograms. To determine the total weight of the required concrete, we need to multiply the volume of the foundation strip (12.96 m3) by the weight of 1 m3 of concrete:
12.96*2389 = 30,961.44 kg.
Since concrete tends to shrink when hardening, the mixture must be taken with a margin of 3-4% of the required weight:
30961.44 * 0.03 = 928.9 kg;
In total, we need 31.9 tons of M300 concrete.
Foundation installation materials and technology
The technology for installing MZLF depends on the type of building material from which the walls of the building or structure will subsequently be erected.
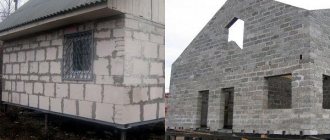
For a house made of expanded clay blocks
The average density of an expanded clay block is 300-900 kg/cubic.
m. This allows the use of a shallow monolithic strip base for a one-story building made of expanded clay block. Due to the high porosity of expanded clay, the foundation needs good waterproofing . All walls of the tape inside and outside along the perimeter are covered with hydrophobic substances: mineral or bitumen mastic, roofing felt or film.
A horizontal waterproofing layer is applied to the sand bed before the concrete strip is poured.
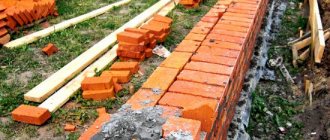
Made of brick
Brick houses have their own characteristics. Brick perfectly resists vertical loads, but it is weak in bending and stretching. In case of uneven shrinkage of the foundation or partial bulging of the soil, the walls will collapse.
Therefore, a shallow strip base is chosen for small buildings and only on dense soils that are not prone to heaving. In other situations, it is better to install a solid concrete slab , which will evenly distribute the load and prevent soil displacement.
Only a powerful solid monolithic foundation can withstand the load from a large brick or stone building.
For frame
A shallow solid reinforced concrete strip can be used as a base for low-weight frame houses on sandy, sandy loam and rocky soil.
If the area is too saturated with moisture, specialists consider the possibility of using this type of foundation.
From logs
For a log house, a reinforced foundation in the form of a shallow strip is built only on sand, stone or gravel soil.
According to construction standards, the foundation depth for regions in the middle zone on non-heaving soil will be at least 0.6-0.8 m, on heaving soil - up to one and a half meters. Therefore, choosing MZLF for heavy log houses is dangerous.
For aerated concrete
Aerated concrete has a high heat-saving ability with low weight.
Walls made of this building material can be twice as thin as brick walls with the same heat-saving effect.
Therefore, for a one-story building that is being built on normal non-heaving and slightly heaving soils, it makes sense to make the base from MZLF in order to save on the foundation.
The width of the base should be at least 0.3 m. When the soil is heaving, under the foundation it is replaced with coarse sand and compacted well.
To achieve high efficiency, the thickness of such a cushion under the tape is made at least 0.2 m, in difficult situations at least 0.8 m.
Read what else you need to know about a strip foundation for a house made of aerated concrete here.
Features of the design of a shallow foundation
A shallow monolithic strip foundation is erected on a flat surface. When building a house on a slope, you will have to combine MZLF with a pile foundation, using supports to level out the height difference. In terms of strength and resistance to deformation, the structure must comply with SNiP 2.03.01-84.
In cross-section, a shallow foundation looks like this:
Features of MZLF that must be taken into account during calculation and construction:
- The depth of the foundation base depends on the depth of soil freezing.
- Be sure to install a cushion made of dry bulk materials: a mixture of coarse sand and gravel.
- When the groundwater level is high, drainage is performed under and around the foundation.
- The base on which the monolithic tape is installed is compacted as much as possible.
- It is necessary to arrange a blind area to drain rainwater and snow.
Sergey Yurievich
Construction of houses, extensions, terraces and verandas.
Ask a Question
Taking these features into account, we can conclude that the backfill and blind area are an integral part of the shallow foundation. Requirements for the blind area are specified in SNiP 2.02.01–83.
How to do it yourself?
To build a shallow reinforced strip foundation, you will need to perform the following steps:
- calculate the width of the foundation, the cross-section of the reinforcement;
- make a reinforcement drawing;
- clear away debris and plan the area;
- dig trenches;
- lay a drainage layer;
- arrange a footing or lay roofing felt;
- install formwork;
- lay and fasten the reinforcement;
- insert sections of pipes for communications and ventilation;
- perform concreting of the tape;
- provide care for concrete during its setting;
- remove the formwork from the tape;
- waterproof the foundation.
Then all that remains is to make a blind area and line the foundation with waterproof material. Each stage of construction of the MZLF has its own nuances.
Necessary calculations
When calculating the foundation , it is taken into account that its laying depth is equal to the freezing depth, minus 25%.
Failure to comply with this requirement results in heaving of the soil and there is a risk of compromising the integrity of the structure.
The height of the base should not exceed the size of the underground part of the base.
To calculate the width of the structure, it is necessary to calculate the ratio of the weight load (t/m) to the calculated soil resistance (t/m2), (based on tabular data SNiP 2.02.01-83). The thickness of the sand-crushed stone platform is determined according to SNiP data.
Detailed information about the calculations in our article at the link.
Preparatory work and marking
The fertile layer is removed and the construction site is graded. At the intersections of the foundation and in the corners, stakes are driven in and a rope is pulled.
Digging a trench and arranging a cushion
The trench is dug to the required depth. Level the walls and corners if heavy equipment was used.
There is no need to plan the bottom of the trench to fanaticism. Pour a layer of clean coarse sand, without plant debris and clay. They tamp down, spilling water. Fine crushed stone is poured in and compacted as well.
A top leveling layer 50 mm thick is installed. The platform is covered with geotextiles, a footing is poured or roofing felt, folded in half and coated with bitumen, is laid.
There is a detailed article about the types of pillows and the features of the device for strip bases here.
Formwork assembly
The formwork is assembled from edged boards 25-40 mm thick. The shields should rise slightly above the tape. Be sure to inspect the cracks.
Builders practice covering formwork with plastic film . The formwork is fixed in place using external stops and internal spacers are installed.
Full information about formwork installation is here.
Reinforcement
The tape is reinforced with a reinforcement cage. Workers are considered to be horizontal rods that accept external loads. Vertical ones play a supporting role. The frame is knitted by twisting it with steel wire . The rods will have mobility and compensate for the resulting loads (when pouring concrete mortar or an earthquake). Welding will not withstand such loads.
The quality of MZLF is greatly influenced by properly executed reinforcement. It is important to correctly calculate the diameter of the reinforcement and the number of rods.
All details of reinforcement of strip bases are here.
Pouring concrete
The concreting process is carried out without interruptions, not exceeding a pause of more than a day.
Otherwise, a monolith will not work. It is advisable to order delivery of the solution or organize its continuous production on site at the required pace.
The pouring process begins from the internal areas with a smooth transition to the external perimeter. You cannot pour concrete at one point and wait for it to spread over the tape. Fill the formwork at once from different points, evenly distributing it along the length.
Next, the surface is covered with polyethylene from hot sunlight. For the first 3 days, the tape is moistened after 4 hours, then another week after 8 hours to extend the setting time of the concrete. This ensures the strength of the monolith. After 10 days, the formwork is removed. After a month, construction can continue.
You cannot shorten the time it takes to complete the concrete strip. In order for the foundation to fulfill its purpose, the tape must not be loaded prematurely.
Formwork removal and waterproofing
Removing the formwork does not mean the end of the construction of the MZLF. It is necessary to perform horizontal waterproofing using two layers of rolled roofing material and coat the side surfaces of the foundation with bitumen.
You can use any impregnating and coating materials that prevent moisture penetration. Reliable waterproofing will protect your home from destruction and mold development.
The sinuses on the outer and inner sides of the foundation are filled with sand and a blind area is created that will protect the foundation from rain and melt water. If everything is done correctly, the water will flow along the concrete strip towards the drainage well.
Insulation of the base and blind area
To insulate the base and blind area, penoplex, penofol, liquid polyurethane foam, etc. are used. Any insulation with moisture-proof properties will be suitable, depending on the developer’s budget. The tape is insulated from the inside over the entire surface, except the horizontal one.
Stages of creating a strip foundation at shallow depths (LFMG).
When working on heaving soils, it is necessary to insulate the soles of the working tape of this foundation. In conditions of sand and sandy loam, it is fashionable to insulate only the blind area.
- Calculation of tape width and reinforcement section, creation of a reinforcement project.
- Creating a trench if a house without a basement is being built.
- A pit is dug if a base is planned.
- Laying drains to remove runoff.
- Warming of the sole.
- Creating a substructure.
- Installation of formwork.
- Laying of reinforcement.
- Pouring concrete. The organization of communications and ventilation ducts is provided.
- Waterproofing of all edges of the tape after dismantling the formwork.
- For a functioning basement, the outer walls are insulated with tape.
Determination of soil composition.
This procedure can be performed without specialists. Just dig holes in different places. Examine the soil visually. Here's how to do the test:
- It easily forms into a dense ball and does not collapse when pressed with your fingers. These are signs of clay.
- If it cracks under pressure, it is loam.
- If it has partially crumbled, it is sandy loam.
- It didn't turn out to be a ball at all - it was sand.
Calculation of tape width.
Here the total load is calculated. It includes the weight values of all structures:
- base;
- floors;
- walls;
- roof;
- facing;
- insulation materials;
- partitions;
- furniture;
- living people;
- loads from wind and snow.
Wind and snow data is obtained from the weather report for your area. Typically, a width of 40-50 cm is sufficient to create a strong tape even on difficult soils.
Calculation of depth.
Here are the rules:
- A depth of 40 cm is suitable if there is protection against heaving.
- 45 cm – subject to sandy soil; groundwater is low.
- 50 cm – when the clay freezes to 100 cm.
- 75 cm – clay freezes to 150 cm.
- 100 cm – freezing at 250 cm.
There are ways to protect against swelling in winter:
- Under the sole the soil is changed to non-metallic material. Minimum layer – 40 cm.
- Drainage is created around the perimeter.
- A blind area and storm drain are installed on the surface.
- The sole and blind areas are insulated.
Shallow strip foundation based on snips in section.
The following numbers will help in the question of how much the tape should be raised above the ground:
- for the base, the tape is buried in place and rises 170 cm above the surface;
- for a modest technical underground, a height of 40 cm above the ground will do;
- to create floors on the ground, the tape is at the same level with the ground or exceeds it by 20 cm.
Advice! Any of these options allows for normal two-layer reinforcement inside the tape. At the same time, you can still arrange a protective layer of 1.5 - 4 cm.
It is advisable to use a calculator when making calculations:
At the building site, you need to tighten the cords. They are located along the outer and inner perimeter. There is no need to remove the axes here, as when working on columnar or pile foundations.
Positional criteria for marks and cords.
- The starting angle of the main facade is positioned 3 m from the site line, 5 m from the axial border of the street.
- To mark the wall of the main facade, two cords are pulled over the cast-offs. A 60-80 cm strip is placed between the pegs. These cords also reflect the edges of the foundation.
- For each wall, a right angle is determined. After which the side walls are calculated. Here the work follows the triangle method. They also require pulling the cords over the cast-offs.
- The rear façade and interior walls are determined using the same method.
Next, pits are marked for the foundations of separate structures of the building: porch, pumping equipment, stairs, stove, etc.
A level is used to align the horizontal lines of all castoffs in a single plane. Correct positions of the cords: 5-7 cm below the top side of the formwork.
Also, the tape trenches must provide for the location of insulation, drainage, and access to the external walls of the tape. To do this, the width of the trench develops 50–80 cm inside the perimeter of the building, 80–120 cm outside.
For excavation work, you can only draw the contours of the trenches. This is done on the soil using lime mortar. If there is a base, a pit is dug out. The cast-offs in the corners should not interfere with the removal of soil, which is carried out by special equipment.
Substrate made of sand or crushed stone.
Typically the substrate is formed from:
- sand, layer 20 cm, it is treated with water or compacted with a vibrating plate;
- crushed stone, the same layer, it is manually bayoneted in layers or similarly compacted.
An example of a sand cushion.
Shallow strip foundation of the house according to SNIPs.
The crushed stone layer covers the sand layer.
Shallow strip foundation of a private house according to SNIPs.
At this stage, drainage is installed along the entire strip perimeter. They should be flush with her sole. The drains are looped into a single circuit. This results in one slope towards the underground compartment where wastewater will accumulate.
With a 40-centimeter immersion of the foundation, it is possible to get rid of heaving. To do this, line the outer side of the tape with polystyrene. Required layer – 5 cm. Width – 60 cm.
When the foundation is 70–100 cm deep, it is necessary to insulate the blind area. Insulation is carried out at a level of 30-40 cm. Heaving impulses are not completely eliminated, but are reduced significantly.
As a rule, the following materials are used to create shields:
- Edged board. The minimum thickness is 5 cm. Its advantages are that it can be reused. Disadvantage: assembly takes a lot of time.
- Plywood with many layers. Its advantages: powerful resistance to moisture, strength. The downside is the huge price.
- OSB. Pros: can be used after the formwork has been dismantled, strong moisture resistance, retains geometry.
For your information! Crossbars are placed at the level of the formwork, and the cast-offs are pulled out. This way the formwork is level, both horizontally and vertically.
It is important to know! In areas of connections in shields, gaps larger than 2 mm are not allowed. The concrete base is poured without formwork. Its functions are performed by the walls of the trench.
Formwork installation options:
- Removable. The top side of the boards exceeds the design mark by 5-7 cm. The walls inside are insulated with extruded polystyrene foam.
- Fixed. Polystyrene blocks are used for assembly. The rigidity of the structure is determined by the jumpers.
The first option is more popular, because after pouring, water protection is installed on the surface. Then insulation is laid on it.
Shallow strip foundation of the cottage according to SNIPs.
An example of placing and strengthening formwork:
Screeds are used for vertical fixation of panels. Required pitch: 50 – 100 cm. Holes are placed inside the ties at different heights. The cartridges will pass through them. And in the underground side, engineering technologies will be introduced through such pipes. Above ground level, the holes will become ventilation ducts. Through them, moisture will leave the underground.
Subtleties of construction
When it is possible to mount support piles below the freezing level of the soil, a shallow strip foundation is built in conjunction with support pillars.
This option is used for damp and marshy areas, on loams, and with close-lying groundwater. This allows you to save on the supporting structure without compromising its reliability.
The following are used as pillars:
- steel pipes protected by a concrete layer;
- reinforced concrete supports;
- asbestos-cement pipes filled with concrete inside.
It is necessary to consider the arrangement of a high-quality drainage system. Otherwise, the costs of arranging the foundation will not be justified and the structure will collapse over time.
Formwork for a monolithic foundation
Installing formwork is creating a form into which concrete will be poured. The formwork can be assembled from boards or panels. It has serious requirements for rigidity and strength.
The concrete solution has a large mass, which is why deformation and expansion of the formwork is possible. Therefore, its walls are rigidly fixed in a strictly vertical position and pulled together. If the formwork is made of boards, then every 50 cm the boards are additionally fastened with transverse bars. All joints are carefully checked for the presence of cracks so that the solution does not leak out.
It is recommended to cover the formwork walls from the inside with film. Then, the boards will remain clean and can be used elsewhere.
In weakly and moderately heaving soils, you can do without filling the foundation cavities with sandy soil. In such soils, it is convenient to fill the wall of a shallow foundation with concrete without formwork, into a trench with vertical walls.
After filling and compacting the sand cushion, the bottom and walls of the trench are covered with a waterproofing film, a reinforcement frame is placed in the trench and concrete is laid. After laying the concrete, the edges of the film are wrapped on a concrete strip, thus creating a horizontal layer of waterproofing between the foundation and the plinth.
Along the walls of the formwork or trench, before pouring concrete, it is recommended to place insulation slabs to insulate the foundation and eliminate the cold bridge through the base of the house.
Vertical insulation boards are laid inside the formwork before concrete is laid and secured to the formwork with nails without heads. The surface of the insulation is treated with a wire brush for better adhesion to concrete. The concrete surface covered with insulation often does not require additional waterproofing. Or waterproofing is installed on top of the insulation.
After laying concrete in the foundation wall, construction of the house can be continued no earlier than 20 days, which is necessary for the concrete to harden and gain sufficient strength.
Features of construction on heaving soils
In an area where the soil is prone to baking, a foundation is built only after measures have been taken against this phenomenon. You need to be prepared for the fact that you will need to carry out expensive and time-consuming activities associated with excavation work.
A radical method is to replace the heaving layer with coarse river sand. To do this, build a pit with a depth well below the freezing level of the ground, cover it with a thick sand layer and compact it thoroughly.
For lightweight structures, the insulation method can be used to combat soil heaving. The width of the insulation is selected individually and depends on the climate in the region. It should not be less than the freezing depth.
Additional information about the features of this type of foundation on heaving soils is here.
Insulation of a shallow foundation
Professional builders recommend be sure to insulate the MZLF. It is recommended to do this immediately at the time of construction of the structure. An insulated foundation will protect the floors of the house from dampness and cold, which is especially important when arranging the floor “on the ground”. In this case, in the absence of thermal insulation, all the heat from the floor will go into the ground.
There are external and internal thermal insulation MZLF. External - when the insulation is attached to the outside of the monolithic tape, internal - from the inside. External insulation is considered mandatory, but internal insulation is usually done if the house has a basement. What insulation should I use? There are a lot of options. The most popular are:
- Penoplex. Dense thermal insulation, excellent heat conservation. Its service life is significantly longer than that of conventional foam. Penoplex is resistant to rodents, mold and practically does not absorb moisture. In terms of price/quality ratio, this is the best material for thermal insulation of a shallow foundation.
- Expanded polystyrene. The extruded material is slightly inferior to penoplex in terms of physical and mechanical properties. However, the price of polystyrene foam boards is 20-30% cheaper. It can be used in dry and dusty soils with minimal moisture.
- Polyurethane foam. Liquid spray thermal insulation is an expensive option, but it has many advantages: no joints between slabs, a service life of at least 50 years, minimal water absorption and resistance to aggressive environments.
The use of insulation based on mineral wool for thermal insulation of the foundation is strictly prohibited! Mineral wool absorbs moisture well, so the insulation will quickly become damp and lose its heat-insulating properties.
The insulation technology depends on the selected material. The heat insulation slabs are attached to the monolithic tape using glue, and then reinforced with a special mesh. A layer of plaster is applied on top. The finishing of the base is carried out together with the installation of the blind area.
Prefabricated base on sandy soils
A strip foundation, buried to 0.4-0.6 m, on coarse sandy stable soils will serve as a reliable foundation for most types of buildings.
The following options for its design can be considered:
- pouring concrete with reinforcement;
- installation of concrete blocks;
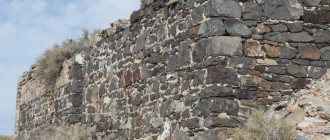
- rubble stone masonry.
Waterproofing the trench will help the concrete gain strength as it matures. Soil with a predominant substrate of silty sand is subject to seasonal deformations and will not act as a reliable foundation base. The MZLF must be strengthened with columnar supports.
Calculation of materials for compacting bedding
To create a compacting bedding, fine crushed stone and sand are used. Soil compaction is necessary in order to reduce the deformation and buoyancy loads that the soil exerts on the foundation.
Rice. 1.2 : Sealing pad diagram
Expert advice! The thickness of the compacting layer, in most cases, is 20 cm: one half of which is crushed stone, the other half is sand.
To calculate the amount of sand and crushed stone, we need to find out the volume of each layer and multiply it by the weight of 1 m3 of material.
- We calculate the volume of the bedding layers (they will be the same, since the thickness of the layers is identical): 56 (length similar to the perimeter of the base) * 0.4 (w) * 0.1 (t) = 2.24 m3.
The weight of 1 m3 of crushed stone and sand is data that can be found in any construction reference book: 1 m3 of sand weighs 1440 kg, crushed stone - 1600 kg. Now we calculate the mass of materials we need:
- Sand mass: 2.24*1440 = 3225.6 kg;
- Mass of crushed stone: 2.24*1600 = 3584 kg.
Types of shallow foundation
The blocks are attached to a cement mixture.
This base has a large number of varieties. Depending on its type, the work to create it differs. There are these types:
- tape monolithic shallow base. It is poured immediately after preparatory work, resulting in a seamless coating;
- strip block foundation. Blocks can be purchased ready-made or made independently; they are only assembled at the construction site. A cement mixture is used for fastening;
- foundation made of FBS blocks. The design of the base and the level of foundation will differ from other types. It has increased strength and quality, but its cost will be higher due to the need to purchase additional materials.
Each variety has its own strengths and weaknesses. But the service life of type 1 is almost 3 times longer than the block type, so the option with a monolithic base is more preferable.
Execution technology
Before correctly pouring a strip foundation, it is necessary to prepare the land plot and lay out the future structure on the ground.
Before correctly pouring the strip foundation, it is necessary to prepare the land plot and carry out the breakdown of the future structure on the ground. To do this, the construction area is cleared of debris and unnecessary green spaces. Next, the axes of the future structure are laid out and linked to the boundaries of the site. After determining the location of one of the corners of the house, a cord is pulled at a right angle to it. From there, the next corners of the building are marked and pegs are driven in. A cord is pulled over the pegs. The width of the foundation is measured from it and the second cord is pulled.
Our step-by-step instructions and video at the end of the article will tell you how to further build a shallow foundation:
- We dig a trench using a shovel or construction equipment. We level the bottom of the trench. At the bottom it is necessary to make a sand cushion 200 mm high. After laying the sand, it is filled with water and compacted.
- Then a layer of insulation is laid. To do this, you can use a dense film, a concrete layer 10 cm high, or roofing felt. It is not worth using geotextiles in this case, since it will only reduce the strength of the base.
- Now we begin the construction of the formwork. To do this, you can use boards, moisture-resistant plywood, OSB or special boards. It is better to cover the inner surface of wooden formwork with film. This will make it easier for you to remove the boards after the concrete has hardened, and they will also become less dirty and can be used in the future.
- Now the reinforcement cage is being constructed. For these purposes, we make a spatial frame from reinforcement with a diameter of 1-1.2 cm. The pitch of the transverse rods is 20 cm. We install the frame in the formwork so that after pouring concrete from the edge of the concrete surface to the reinforcement there is at least 50 mm of the foundation body. This will reliably protect the frame from corrosion.
- Don’t forget to install and tie pipes (sleeves) to the frame through which utilities will be brought into the house. It is also worth laying pipes to ventilate the space under the house. To prevent concrete from getting into them when pouring, sand is poured there.
After preparing or purchasing the concrete mixture, you can start pouring
- 6.After preparing or purchasing the concrete mixture, you can start pouring. As a rule, pouring is done in layers. Air bubbles are removed in each layer using a deep vibrator. This will make the structure stronger. When pouring concrete, you should not pour it from a height of more than 1.5 m, so as not to cause a decrease in the strength of the structure.
- 7.After pouring, the concrete strip is covered with plastic film to ensure uniform evaporation of moisture. In addition, in the summer it is necessary to wet the concrete for the first week to protect it from drying out. After a week, the film can be removed.
- 8.The formwork can be removed when the concrete gains initial strength. This usually happens after two weeks. Complete hardening occurs after 28 days.
- 9.The foundation walls are protected from moisture using bitumen mastic, which is applied in two layers.
- 10. The base is insulated. For this, it is best to use extruded polystyrene foam. It is attached to the outer surface until the ground freezes. Thermal insulation of the foundation in a house with a basement is especially important.
- 11. Now you can backfill the pit or trench. To do this, it is better to use a mixture of sand, clay and gravel, which is carefully compacted.
- 12. To protect the foundation from precipitation, a blind area is performed.
You can find another option for making a strip foundation in the proposed video:
Final stage of work
After pouring the foundation, the reinforced concrete strip is closed from above to prevent it from drying out and left to harden for at least two weeks. During cold weather, special additives are used, since at subzero temperatures water turns into ice, which prevents concrete from hardening even after the temperature rises above zero again. In hot weather, concrete that hardens is watered because when it evaporates excessively, it stops the hardening process and turns into dust.
A strip foundation is poured for a low house, a bathhouse, or a panel house. It is attractive because you can simultaneously cover all four sides of the house with a foundation. Before starting construction work to install the foundation, the ground is cleared and markings are carried out for it. Construction cords mark the location of the future formwork, after which earthworks begin. A trench is dug, the bottom of which is filled with crushed stone drainage and compacted. Then formwork is installed from boards, into which concrete is poured. To make the foundation stronger, concrete is reinforced by installing a lattice of metal rods in the formwork. The poured concrete is kept for at least a month, then the formwork is removed and work is carried out to waterproof the upper part of the foundation.
Stage 1: Preparation of trenches
The first step is to prepare the trenches into which concrete will subsequently be poured.
First, mark the site on which the foundation will be located. Then accurately determine the corners of the future structure - they should be as even as possible. Next, proceed to creating the base - dig trenches around the perimeter of the marked area. The optimal foundation depth is 50 cm. The width of each trench should be at least 60-80 cm.
When the holes are dug, you need to compact the soil - arrange a special cushion on it. If the base of the site is silty fine sand, the soil must first be covered with geotextile - it will prevent siltation of the site and protect the foundation cushion from weeds, which are likely to grow in it due to high humidity.
Preparing the trench
The pillow itself should reach a height of 30-50 cm - this will be enough to give the foundation the necessary strength. First, sand is poured in a layer of 15-20 cm. It must be thoroughly moistened and compacted. Then fill in 15-20 cm of gravel. Wet and compact the base again. Next, waterproofing is carried out - sheets of roofing material are laid.
When the work is completed, check the level of the resulting base surface - it must be strictly horizontal.
Possible mistakes when building a foundation and how to prevent them
Very often, when building a shallow foundation, mistakes can be made and they mistakenly believe that the higher the foundation strip, the better. In fact, this is not the case at all, and there are several reasons for this:
- Increasing the tape will entail the cost of increasing the reinforcement, otherwise the foundation will not be strong and will easily deform.
- When building a frame house on a shallow foundation, it should be taken into account that the structure of the house is quite flexible, and in combination with a flexible foundation they create one single structure that is not afraid of soil heaving. If you make the foundation much higher, then its flexibility is lost and with the pressure of the house on it on the one hand, and the heaving of the soil on the other hand, sooner or later the foundation will not withstand it and will crack.
I would like to note that if you need to raise the foundation higher because its height is not enough, then it is best to do this by laying out the required height with a brick or an additional monolithic tape, which will be separated from the main layer by a layer of waterproofing.
Making a monolithic shallow shallow foundation with your own hands does not require much effort, but it is important to follow all the nuances and rules of construction. Only in this case can the result be a high-quality foundation for any structure
Construction technology
Once everything is calculated, it is time to start laying the foundation. It can be divided into several stages.
Marking
According to the plan, the site for the future building will be designated, and the scope of work will be determined using pegs and tensioned ropes.
Trench
A trench was dug to the required depth. It is necessary to take into account not only the size of the base, but also the size of the pillows underneath it. The width of the trench should be greater than the width of the base of the house so that nothing interferes with the formwork. After the floor has been completely dismantled, the installation of pillows begins.
First of all, it is recommended to lay geotextiles in such a way that the sand does not mix with the soil. Previously moistened sand is laid in layers of 15-20 cm and carefully compacted with vibrating plates. Once the formwork is completed, you can begin installing the formwork.
It consists of plates, but you can buy it from a construction company, made of metal or plastic. When installing formwork, you must carefully monitor the verticality of the walls and maintain a constant distance between them. To enhance the use of the rods, rods are used that are nailed to the rods, which helps to hold the cast mortar in place later.
The formwork walls can be connected by wires. The inner walls of the panels must be smooth. Steel, asbestos-cement or other pipes must be laid in advance to ensure ventilation of the substrate.
They are installed perpendicular to the formwork and filled with sand to prevent concrete from penetrating into the formwork and deforming when installing the foundation.
Reinforcement
Once the formwork is completed, the concrete must be strengthened before concreting. For lightweight buildings, reinforcement can be neglected, otherwise it is strongly recommended to be neglected.
Fittings with a diameter of 10-16 mm are used, which are placed in the longitudinal direction along the entire length of the foundation. As a rule, two reinforcing bars are placed in the lower and upper parts of the future foundation of the house, which are retracted a few centimeters from the edges; they are recommended 5 centimeters. Steel rods with a diameter of 6-8 mm are laid transversely. They are connected to each other by wire.
For reinforcement, two reinforcing strips are sufficient, but the number of strips can be increased for high foundation heights and heavy loads.
In addition to the need to use welding equipment, this joining technology changes the structure of the metal and its mechanical properties by heating. Increased stiffness at a weld can lead to failure during concreting or cause residual stresses in the foundation that inhibit response to temperature fluctuations.
Pouring concrete
M200 concrete is often used in the construction of foundations. The finished mixture is poured in layers of approx. 15-20 cm.
Watch out guys! It is recommended to touch each layer with a vibrator or tamper, or at least a piece of reinforcement, to break the surface and remove air pockets.
The next layer must be filled before the previous one hardens. After concreting, the foundation must be covered with a film and subjected to hardening and moistening with water from time to time.
Pre-curing takes 3-4 days, after which the formwork can be removed. The concrete will be suitable for further processing in 2-3 weeks.