The strip foundation has a non-standard geometry: its length is tens of times greater than its depth and width. Due to this design, almost all loads are distributed along the belt. A concrete stone cannot compensate for these loads on its own: its bending strength is not enough. To give a structure increased strength, not just concrete is used, but reinforced concrete - this is a concrete stone with steel elements located inside - steel reinforcement. The process of laying metal is called strip foundation reinforcement. It’s not difficult to do it with your own hands, the calculations are elementary, the diagrams are known.
The quantity, location, diameters and type of reinforcement - all this must be specified in the project. These parameters depend on many factors: both on the geological situation on the site and on the mass of the building being constructed. If you want to have a guaranteed strong foundation, you need a project. On the other hand, if you are building a small building, you can try, based on general recommendations, to do everything yourself, including designing a reinforcement scheme.
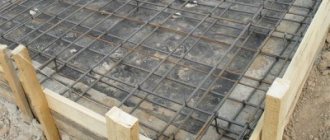
Reinforcement scheme
The location of the reinforcement in the strip foundation in cross section is a rectangle. And there is a simple explanation for this: this scheme works best.
Reinforcement of a strip foundation with a strip height of no more than 60-70 cm
There are two main forces acting on the strip foundation: heaving forces press from below during frost, and the load from the house from above. The middle of the tape is almost not loaded. To compensate for the action of these two forces, two belts of working reinforcement are usually made: above and below. For shallow and medium deep foundations (up to 100 cm deep) this is enough. For deep belts, 3 belts are already required: too high a height requires reinforcement.
You can read about the depth of the foundation here.
For most strip foundations, the reinforcement looks like this
To ensure that the working fittings are in the right place, they are secured in a certain way. And they do this using thinner steel rods. They do not participate in the work, they only hold the working reinforcement in a certain position - they create a structure, which is why this type of reinforcement is called structural.
To speed up work when knitting a reinforcing belt, clamps are used
As can be seen in the strip foundation reinforcement diagram, the longitudinal reinforcement bars (working) are tied with horizontal and vertical supports. They are often made in the form of a closed loop - a clamp. It’s easier and faster to work with them, and the design is more reliable.
What fittings are needed
For strip foundations, two types of rods are used. For longitudinal ones that bear the main load, class AII or AIII is required. Moreover, the profile is necessarily ribbed: it adheres better to concrete and transfers load normally. For structural lintels, cheaper reinforcement is used: smooth first class AI, 6-8 mm thick.
Recently, fiberglass reinforcement has appeared on the market. According to manufacturers, it has better strength characteristics and is more durable. But many designers do not recommend using it in the foundations of residential buildings. According to the standards, it must be reinforced concrete. The characteristics of this material have long been known and calculated; special reinforcement profiles have been developed that ensure that metal and concrete are combined into a single monolithic structure.
Reinforcement classes and their diameters
How concrete will behave when paired with fiberglass, how firmly such reinforcement will adhere to concrete, how successfully this pair will resist loads - all this is unknown and has not been studied. If you want to experiment, please use fiberglass. No - take iron fittings.
Installation of MZLF: step-by-step instructions from A to Z
Preparatory work and marking
The installation of a shallow foundation begins with site preparation, which consists of removing debris and uprooting stumps. The top layer of soil with vegetation is cut off. If necessary, leveling and filling of soil is carried out, followed by compaction.
The marking is carried out as follows: the perimeter of the future foundation is established, beacon pegs are driven into the corners. Ropes are stretched along the future monolithic tape.
The diagonal between the corners must be strictly 45 degrees. You can check the evenness of the markings using a tape measure and a building level.
Do-it-yourself calculation of strip foundation reinforcement
Any construction work is regulated by GOSTs or SNiPs. Reinforcement is no exception. It is regulated by SNiP 52-01-2003 “Concrete and reinforced concrete structures”. This document specifies the minimum amount of reinforcement required: it must be at least 0.1% of the cross-sectional area of the foundation.
Determination of reinforcement thickness
Since the strip foundation in section has the shape of a rectangle, the cross-sectional area is found by multiplying the lengths of its sides. If the tape has a depth of 80 cm and a width of 30 cm, then the area will be 80 cm * 30 cm = 2400 cm2.
Now you need to find the total area of the reinforcement. According to SNiP it should be at least 0.1%. For this example it is 2.8 cm2. Now, using the selection method, we will determine the diameter of the rods and their number.
Quotes from SNiP that relate to reinforcement (to enlarge the picture, right-click on it)
For example, we plan to use reinforcement with a diameter of 12 mm. Its cross-sectional area is 1.13 cm2 (calculated using the formula for the area of a circle). It turns out that in order to provide the recommendations (2.8 cm2), we will need three rods (or they also say “threads”), since two are clearly not enough: 1.13 * 3 = 3.39 cm2, and this is more than 2.8 cm2, which SNiP recommends. But it will not be possible to divide three threads into two belts, and the load on both sides will be significant. Therefore, they stack four, laying a solid margin of safety.
In order not to bury extra money in the ground, you can try to reduce the diameter of the reinforcement: calculate it at 10 mm. The area of this rod is 0.79 cm2. If we multiply by 4 (the minimum number of working reinforcement bars for a strip frame), we get 3.16 cm2, which is also enough with a margin. So for this version of the strip foundation, you can use class II ribbed reinforcement with a diameter of 10 mm.
Reinforcement of a strip foundation for a cottage is carried out using rods with different types of profiles
We have figured out how to calculate the thickness of longitudinal reinforcement for a strip foundation; we need to determine with what step to install vertical and horizontal lintels.
Installation step
There are also methods and formulas for all these parameters. But for small buildings it’s simpler. According to the recommendations of the standard, the distance between horizontal branches should not be more than 40 cm. This parameter is used as a guide.
How to determine at what distance to lay reinforcement? To prevent steel from corroding, it must be embedded in concrete. The minimum distance from the edge is 5 cm. Based on this, the distance between the rods is calculated: both vertically and horizontally it is 10 cm less than the dimensions of the tape. If the width of the foundation is 45 cm, it turns out that between the two threads there will be a distance of 35 cm (45 cm - 10 cm = 35 cm), which corresponds to the standard (less than 40 cm).
The reinforcement step of a strip foundation is the distance between two longitudinal bars
If our tape is 80*30 cm, then the longitudinal reinforcement is located one from the other at a distance of 20 cm (30 cm - 10 cm). Since medium-level foundations (up to 80 cm in height) require two reinforcement belts, one belt from the other is located at a height of 70 cm (80 cm - 10 cm).
Now about how often to install jumpers. This standard is also in SNiP: the installation step of vertical and horizontal dressings should be no more than 300 mm.
All. We calculated the reinforcement of the strip foundation with our own hands. But keep in mind that neither the mass of the house nor the geological conditions were taken into account. We relied on these parameters to determine the size of the tape.
Width of monolithic tape
In order not to make complex calculations, we recommend taking the width of the sole based on the table:
| Wall and ceiling materials | Number of floors | MZLF sole width, m |
| Walls made of lightweight brickwork or aerated concrete with reinforced concrete floors | 1 | 0,6 |
| 2 | 0,8 | |
| 3 | 1,2 | |
| Timber frame walls with timber ceilings | 1 | 0,4 |
| 2 | 0,4 | |
| 3 | 0,6 | |
| Log walls with wooden ceilings | 1 | 0,3 |
| 2 | 0,4 | |
| 3 | 0,6 | |
| Walls made of timber with wooden floors | 1 | 0,2 |
| 2 | 0,3 | |
| 3 | 0,4 |
Height above ground level
The higher the monolithic strip rises above ground level, the better the floors of the house will be protected from dampness and cold. However, the height of the foundation to maintain stability and load-bearing capacity must correlate with its width. The best option: the height of the tape above the zero mark is equal to its width.
Example: The laying depth is 50 cm. The width of the monolithic tape according to the table is 30 cm. This means that the height above ground level will be 30 cm, and the height of the entire monolithic tape will be 80 cm. The height of the ground part of the MZLF should not be lower than the snow level. The snow depth value depends on the region (you can find it on the Internet). For regions of the middle zone, this value does not exceed 8-10 cm.
Corner reinforcement
In the design of a strip foundation, the weakest point is the corners and the junction of the walls. In these places loads from different walls are combined. In order for them to be successfully redistributed, the reinforcement must be properly tied. Simply connect it incorrectly: this method will not ensure load transfer. As a result, after some time, cracks will appear in the strip foundation.
The correct scheme for reinforcing corners: either bends are used - L-shaped clamps, or longitudinal threads are made 60-70 cm longer and bent around the corner
To avoid this situation, when reinforcing corners, special schemes are used: the rod is bent from one side to the other. This “overlap” should be at least 60-70 cm. If the length of the longitudinal rod is not enough to bend, use L-shaped clamps with sides also at least 60-70 cm. Schemes of their location and fastening of the reinforcement are shown in the photo below.
The abutments of piers are reinforced using the same principle. It is also advisable to take the reinforcement with a reserve and bend it. It is also possible to use L-shaped clamps.
Reinforcement diagram for adjacent walls in a strip foundation (to enlarge the picture, right-click on it)
Please note: in both cases, in the corners, the installation step of the transverse jumpers is reduced by half. In these places they already become workers - they participate in the redistribution of the load.
Types of foundation pillows
The foundation pad is a kind of gasket between the soil and the base itself. In order to choose the right material for its manufacture, it is necessary to carefully study the characteristics of the soil at the construction site and know the expected weight of the future structure.
Sand, crushed stone and concrete are most often used as materials for making pillows.
sand cushion
Sand is one of the available building materials, so it is used with a minimum construction budget. It has properties that make it possible to use it in events of this kind.
The sand cushion is used in the following cases:
- The main structure has a small height; a one-story structure is considered the best option.
- A house or other structure is made of lightweight materials.
- Groundwater lies quite deep. If groundwater is located close, then a drainage system can be installed.
Sand foundation cushion
It is possible to construct a foundation cushion only from coarse sand; material with small particles is prohibited for use for such purposes.
When filling the sand cushion, you should pay attention to the following points:
- The surface of the pillow should be as smooth as possible.
- The sand layer should be thoroughly compacted.
- The height of the pillow can be from 20 to 40 cm.
Crushed stone pillow
The need to use a crushed stone cushion arises when a surface that can withstand high loads is required.
Crushed stone for a foundation cushion can be of different fractions from different rocks. The most durable material is considered to be crushed stone of the middle fraction made from granite.
When arranging a crushed stone base, adhere to the following scheme:
- The surface is covered with a small layer of sand so that the crushed stone adheres more tightly to the soil.
- The sand is leveled and compacted.
- Fill in crushed stone, choosing the optimal fraction. The layer thickness should be approximately 0.2 meters.
- Using special equipment, it is necessary to compact the backfill thoroughly.
When creating a foundation cushion from sand or crushed stone, it is important to remember that it should be about 0.3 meters wider than the base itself. This is necessary to build a stable structure that can support the weight of the structure.
Concrete pad
The pillows are made of reinforced concrete at specialized enterprises and have a trapezoid shape. They are considered the most reliable basis for the foundation for heavy stone houses, but the cost of such products is quite high.
Laying foundation pads is done as follows:
Concrete pillow
- The soil is carefully leveled.
- Sand is laid in a layer of up to half a meter, depending on the characteristics of the soil at the construction site.
- Reinforced concrete foundation pads are installed.
Reinforcement of the base of a strip foundation
On soils with not very high bearing capacity, on heaving soils or under heavy houses, strip foundations are often made with a sole. It transfers the load to a larger area, which gives greater stability to the foundation and reduces the amount of subsidence.
To prevent the sole from falling apart under pressure, it also needs to be reinforced. The figure shows two options: one and two belts of longitudinal reinforcement. If the soils are complex, with a strong tendency to winter baking, then two belts can be laid. For normal and medium-heaving soils, one is enough.
Reinforcement rods laid lengthwise are working. They, as for the tape, are taken in second or third class. They are located at a distance of 200-300 mm from each other. They are connected using short pieces of rod.
Two methods of reinforcing the base of a strip foundation: on the left for foundations with normal bearing capacity, on the right for not very reliable soils
If the sole is not wide (rigid design), then the transverse segments are structural and do not participate in load distribution. Then they are made with a diameter of 6-8 mm, bent at the ends so that they cover the outer rods. They are tied to everyone using a binding wire.
If the sole is wide (flexible), the transverse reinforcement in the sole is also working. She resists the soil’s attempts to “collapse” her. Therefore, in this version, the soles use ribbed reinforcement of the same diameter and class as the longitudinal one.
Scope of application, for which soils it is suitable
The load-bearing capacity of the structure is designed for buildings such as a bathhouse, a utility block, a veranda, a summer terrace, a workshop, a garage, a country house or a residential building (one brick, wooden or block two floors plus a roof).
The best soil for a foundation of the MZLF type is considered to be sandy loam or sand with low humidity. Also, the recommendations include a heaving type of soil, but with weak or low seasonal movement. In places with clay, there may be difficulties with the load from the swelling earth during the freezing period.
In the case of MZLF, it is not necessary to contact geologists or surveyors. You can conduct research yourself. To do this, you need to dig several holes at different depths and test the ground with your hands. The table provides a brief description of the main soil types.
| Sample | Signs |
| Clay |
|
| Loam |
|
| Sandy loam |
|
| Sand |
|
How much rod do you need?
Having developed a strip foundation reinforcement scheme, you know how many longitudinal elements you need. They are laid around the entire perimeter and under the walls. The length of the tape will be the length of one reinforcement rod. By multiplying it by the number of threads, you get the required length of the working reinforcement. Then add 20% to the resulting figure - a margin for joints and overlaps. This is how much in meters you will need working reinforcement.
You count how many longitudinal threads according to the diagram, then calculate how many structural rods are needed
Now you need to calculate the amount of structural reinforcement. Calculate how many crossbars there should be: divide the length of the tape by the installation pitch (300 mm or 0.3 m, if you follow the recommendations of SNiP). Then you calculate how much it takes to make one lintel (add the width of the reinforcement cage with the height and double it). Multiply the resulting figure by the number of jumpers. You also add 20% to the result (for connections). This will be the amount of structural reinforcement to reinforce the strip foundation.
Using a similar principle, you calculate the amount needed to reinforce the sole. Putting everything together, you will find out how much reinforcement is needed for the foundation.
You can read about choosing the brand of concrete for the foundation here.
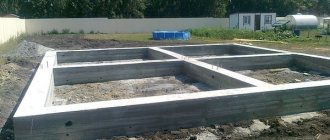
Design features of a shallow foundation
Construction of a shallow strip foundation:
- Priming.
- Sand and gravel backfill.
- Horizontal reinforcement bars.
- Vertical reinforcement frame.
- Concrete tape.
- Roll waterproofing.
- Vertical coating waterproofing.
- Base.
- Blind area
- Insulation
- Wall.
Small foundation diagram
Table No. 1. Advantages and disadvantages of MHFL.
| Advantages | Flaws |
| economical, concrete consumption is 30% lower than when constructing a conventional recessed strip foundation or a foundation with a monolithic floor slab | pouring is carried out at stable temperatures above +10 C |
| ease of construction, you can build it yourself without the involvement of workers and special equipment | limited use due to low load-bearing capacity |
| small amount of excavation work - a narrow trench with a depth of no more than 0.7 m is dug | construction is possible only on a flat surface with a slope of no more than 5 degrees |
| small area of contact between the structure and the ground. | lack of a basement in the house |
Technologies for assembling reinforcement for strip foundations
Reinforcing the strip foundation with your own hands begins after installing the formwork. There are two options:
- The entire frame is assembled directly in a pit or trench. If the tape is narrow and high, it is inconvenient to work. According to one technology, the reinforcement is knitted directly in the formwork
- Frame sections are prepared close to the pit. They are transferred in parts and installed in their designated place, linking them into a single whole. It’s more convenient to work this way, except that it is very inconvenient and difficult to move connected structures made of reinforcement.
Both options are imperfect and everyone decides how it will be easier for him. When working directly in a trench, you need to know the procedure:
- The longitudinal rods of the lower reinforced belt are laid first. They need to be raised 5 cm from the edge of the concrete. It is better to use special legs for this, but pieces of bricks are popular among developers. The reinforcement is also 5 cm away from the formwork walls.
- Using transverse pieces of structural reinforcement or molded contours, they are fixed at the required distance using tying wire and a hook or a tying gun.
- Then there are two options: If contours formed in the form of rectangles were used, the upper belt is immediately tied to them at the top.
- If during installation you use cut pieces for crossbars and vertical posts, then the next step is tying up the vertical posts. After they are all tied, a second belt of longitudinal reinforcement is tied.
There is another technology for reinforcing strip foundations. The frame turns out to be rigid, but there is a large consumption of rods for the vertical posts: they are driven into the ground.
The second technology for reinforcing a strip foundation is to first drive in vertical posts, tie longitudinal threads to them, and then connect everything with transverse ones
- First, vertical posts are driven in at the corners of the tape and at the junction of horizontal rods. The racks should have a large diameter of 16-20 mm. They are placed at a distance of at least 5 cm from the edge of the formwork, checking horizontal and vertical, and driven into the ground 2 meters.
- Then vertical rods of the calculated diameter are driven in. We determined the installation pitch: 300 mm, in the corners and at the junctions of the walls it is half as much - 150 mm.
- The longitudinal threads of the lower reinforcement belt are tied to the posts.
- At the intersection of the racks and longitudinal reinforcements, horizontal jumpers are tied.
- The upper reinforcement belt is tied, which is located 5-7 cm below the upper surface of the concrete.
- Horizontal jumpers are tied.
It is most convenient and quick to make a reinforcing belt using pre-formed contours. The rod is bent to form a rectangle with the specified parameters. The whole problem is that they need to be made identical, with minimal deviations. And a large number of them are required. But then the work in the trench moves faster.
The reinforcing belt can be knitted separately, and then installed in the formwork and tied into a single whole on site
As you can see, reinforcing a strip foundation is a lengthy and not the easiest process. But you can cope even alone, without helpers. It will take a lot of time, though. It’s easier to work with two or three people: both carry the rods and set them out.
Arrangement of insulation and waterproofing
It is recommended to insulate the MZFL foundation at the construction stage. This will protect the floors and ceilings from moisture and low temperatures. Thermal insulation is distinguished as internal and external. This depends on the location of the tape walls relative to the street. If the underground space is planned to be used as a cellar, then insulation is also required here.
The most commonly used materials are waterproof penoplex boards with a long service life. Expanded polystyrene foam costs less, but is thicker and has a shorter service life. Polyurethane foam is more expensive, which pays off with durability, thin layers and high technical performance.
Installation is carried out in 3 steps:
- First, the slabs are glued with additional fixation using parachute dowels.
- Next, the reinforcing mesh is fixed.
- Finally, the walls are covered with plaster.
Another option involves installing sheathing and installing cladding materials.
If the monolith is shallow, it is recommended to insulate the sole if it is a heaving type of soil. On sands and sandy loams, insulating the blind area is sufficient.
What to choose, sand or crushed stone?
The choice of backfill material is determined by the weight of the building. The heavier it is, the larger the backfill fraction should be used. The sand layer has a more noticeable settlement, so it is most often used for frame, wooden houses, buildings made of cellular concrete, etc.
Pure coarse-grained river sand is used, which does not have foreign (especially organic) impurities or clay inclusions.
The crushed stone layer has greater elasticity and load-bearing capacity. It is simpler and easier to compact, the pillow is more rigid and reliable. Backfill made of gravel or crushed stone is used in the construction of higher-rise buildings made of heavy and dense materials.
Crushed stone is not used in its pure form; in practice, a sand-gravel mixture is used in a ratio of 60% crushed stone to 40% sand, although in some situations the volume of sand can be reduced or increased.
IMPORTANT! Before backfilling the crushed stone, in any case, an intermediate sand layer about 15-20 cm thick is made. This is done to level the base and create a compensation layer necessary to absorb heaving loads.
The principle of operation of the reinforcement cage
The quality of the frame affects the properties of the foundation
During construction on an industrial scale, the correct installation of the reinforced frame is monitored quite strictly. In this case, the integrity of reinforcement in foundations with a reinforced concrete frame is checked by special commissions, which are armed with collections of building standards and rules specially developed for this case.
However, when building a private house with your own hands, the developer does not always approach the reinforcement of the reinforced concrete foundation with full responsibility. The result is deformation and premature destruction of the base of the building, which often also entails the destruction of the entire structure.
Properties of concrete structures
To better understand the need for reinforcement of the base, you need to delve a little into such a complex subject as strength of materials. Any foundation of a building is subject to several multidirectional forces, and these forces are not constant, but change their magnitude, direction and place of application over time.
First of all, the mass of the building being erected presses on the concrete foundation, and this pressure force is not the same everywhere. No matter how hard you try to evenly distribute the mass of the house over the entire area of the foundation, you will not be able to do this - in some places the pressure will be stronger.
If the house stands on moisture-saturated soil, the deforming forces of “heaving” press on the concrete foundation from below in winter. Expanding when freezing, the soil begins to bulge onto the surface in the form of mounds, lifting and squeezing up the foundation elements. When the soil thaws in these places, swampy holes can, on the contrary, form, and entire sections of the foundation can simply hang in the air.
Concrete, being a fairly strong material, is not at all elastic - although it copes well with compression, it cannot work in tension and bending. Thus, the resistance of concrete to compression is 50 times greater than to rupture. This is manifested to a greater extent in the design of the strip base: due to its large length, it can have several bending or stretching zones. As a result, the concrete inevitably bursts and cracks, and the foundation of the building collapses.
Technical features of reinforced concrete
Reinforced concrete foundation combines the best qualities of metal and concrete
To avoid these significant disadvantages of concrete structures, a reinforced concrete foundation was invented. Improved technical characteristics were achieved by combining the best qualities of two building materials - concrete and metal. A supporting frame made of steel or fiberglass reinforcement is mounted inside the formwork, which is then filled with concrete.
As a result, reinforcement makes it possible to transfer tensile and bending loads to frame reinforcement, which copes with them much better than concrete.
Useful tips
Before you begin to calculate the amount of materials and the foundation itself, you need to study all the features of the soil. Heaving soil can rise and fall several centimeters throughout the year. If this is not taken into account, then over time the foundation will begin to burst under loads, and cracks will spread throughout the house.
The reinforcement is connected to each other with wire, which makes it movable and because of this, the hardened concrete, under the influence of soil deformations, will also be movable, which will preserve its structure and guarantee the absence of cracks.
Video on the topic: