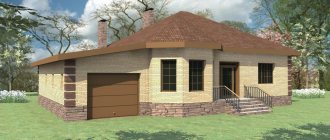
Any building material is suitable for building an extension or veranda: from traditional brick to natural wood.
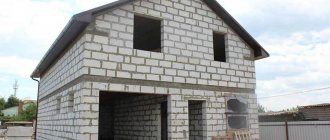
Currently, a modern masonry material - aerated concrete blocks - is very popular.
Due to their technical characteristics, they are excellent for laying external walls and make it possible to complete construction work in an extremely short time.
What kind of houses can a room be attached to?
The construction process of the attached premises itself is not particularly difficult; the main thing is to adequately assess the possibility of carrying out repair and construction work near the existing house. An old building may not be able to withstand the load from a new neighboring building built in close proximity to load-bearing walls and foundations.
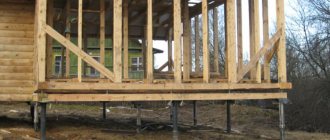
An important point is where the extension is connected to the main walls of the house. In this regard, buildings with wooden walls present great difficulty.
If the “age” of the house is not so critical and there are no visible signs of dilapidation and destruction on the main walls, you can safely begin the construction of a new building.
The main thing is that there is no need to rigidly connect the old building with the new building and ensure that the adjacent walls are protected from atmospheric moisture.
Before construction begins, wooden walls are inspected, rotten elements are replaced and the size of the lower base of the foundation is determined, as well as its outer boundaries.
Knowing the exact characteristics will allow you to correctly calculate the foundation design of the planned extension.
Vestibule heating
Among construction experts, the issue of vestibule heating causes a lot of controversy. Some are ardent opponents of active heating of this room. Others suggest installing a main circuit here, like in any other room, arguing that an unheated room in severe frost can become so cold that it ceases to function as a thermal barrier. Construction rules do not recommend placing heating devices in rooms with external doors. The reason for this is that in critical frosts there is a possibility of the coolant freezing. Not only can a traditional steam circuit freeze, it also wastes energy. Experienced house designers also recommend abandoning the use of steam heating systems here, but are not fundamentally against air heating. After all, the purpose of a vestibule as a building is to be a buffer room for mixing the heat of the house with the flow of cold air from the street.
The following options are possible to solve the heating problem:
The first is laying an electric heated floor into the screed. Such unobtrusive heating will correspond to the functional purpose of the room and provide a sufficient level of heat for storing outerwear and shoes here. At the same time, on very cold days it is an absolutely safe option. An additional advantage is efficiency, autonomy, and the ability to be switched on separately from the main system. The second solution is an active electric heat fan. Such equipment is installed vertically to supply air in a given direction. Working in pairs, the installation is capable of creating a curtain that completely blocks access to cold flows into the living rooms of the house. This option is also safe and economical. InnovaStroy offers high-quality engineering work, including the installation of different options for heating equipment.
What do you need for work?
The construction of any facility begins with the development of a design solution, drawing up a statement of requirements for the necessary materials and calculating the upcoming cash costs.
It is good to seek help from specialist builders; they will make the necessary calculations and draw up design and estimate documentation for construction work. To draw up a project, you need to know the initial data:
- Purpose of the building.
- Linear dimensions of the extension.
- The configuration of the new building and its location to the existing house.
- Type of materials of the main structural elements of the extension.
After collecting the necessary information, a detailed diagram is drawn up with the exact dimensions of the room, the location of window and door openings. In addition to the floor plan, it is necessary to draw up a layout of the walls indicating the height . This will help calculate the required amount of masonry material for the construction of external and internal walls.
It is important to pay attention to the main supporting structure of the extension - the foundation and correctly calculate its depth. It is advisable to include in the project a foundation structure similar to that of the main house.
What blocks are suitable?
For heated extensions made of aerated concrete stones, products of linear dimensions are used:
- Height: from 200 mm to 250 mm.
- Length: from 600 mm to 625 mm.
- Width: from 100 to 400 mm.
The load-bearing external walls are laid from aerated blocks with a width of 200, 240, 300 or 400 mm.
The size of masonry stones for dividing partitions and internal walls depends on the degree of loading of these structures; in standard situations, blocks with a width of 100 to 150 mm are used.
also need to take into account the density of the aerated concrete block, marked with the letter “D” . In a simplified way, this value shows how many air bubbles are contained in a cellular concrete product. Density is measured in kg/m3 and shows the ratio of the weight of the block to its volume.
There is a regularity: the higher the density, the lower the thermal conductivity of the product.
When choosing a masonry material for the external walls of an attached room, you should give preference to a denser D400 gas block, which will better store internal heat.
Internal partitions and walls adjacent to an existing house made of brick or wood are made of aerated concrete stones of grade D500, characterized by greater thermal conductivity. Thanks to this division of masonry material by density, it is possible to significantly save on its purchase and at the same time create a comfortable microclimate in the attached room.
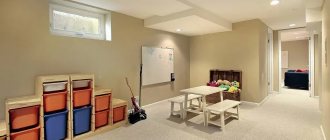
Using the vestibule
Some business owners assign the vestibule the role of a storage room. They keep a bunch of old things here, shoes, gardening and household tools, bags with leftover building materials. All this is very economical, but in the end the already small space is cluttered, it is difficult to clean, and sometimes it is simply impossible to walk through it. Use the area of a small vestibule only for storage systems for unused shoes and outerwear, preferably closed ones. Don’t leave the clothes you wear for the season here. Store it in the hallway or your closet. Hooks for umbrellas, brushes or keys will be useful in the vestibule. A mirror will decorate the free wall. Use the extra space as a “garage” for a sled or baby stroller. If your vestibule is deep enough, don’t skimp on space for a built-in closet. It will become a haven for those items that do not fit well in the house, for example, skis, gymnastics hoop, etc. If you don’t want a closet, make a mezzanine. There, from prying eyes, you can hide boxes of household appliances, which under warranty cannot be thrown away, empty glass containers, and sports equipment.
If the garage is attached to the house, it will be very convenient to make an exit into it from the vestibule. However, this is another source of cold air. But if the door to the garage and the entrance door are not located relative to each other on the same axis, the ventilation of the vestibule is minimal. Especially considering that both doors will not be open at the same time. However, this arrangement also has its drawbacks. If you brought furniture to the garage, it will be difficult to bring it into the house through the corner passage of a small vestibule. The choice of a garage door must also be approached carefully. Let it be less warm, but it must be absolutely airtight. Gas from car exhaust or the smell of fuel should not pass through it into the house.
Requirements for the walls of the extension
In construction, the thickness of walls (external and internal) is selected on the basis of thermal engineering calculations, taking into account the climatic specifics of the development region, soil category, wind load and other important parameters.
It is not always possible to cope with this task on your own, so you have to focus on the technical values of the strength class and energy efficiency of gas-block products:
- Depending on climatic conditions, aerated concrete with a thickness of 300-400 mm of grade D500 is used for laying the external walls of heated buildings.
- For internal walls, it is recommended to use blocks with a thickness of 200-300 mm of grade D400.
- Interior partitions are made from D300 brand blocks, which have the best soundproofing characteristics.
Blocks of these brands are characterized by excellent thermal insulation properties and allow the accumulation of internal heat. If we compare an extension built from classic brick and cellular concrete, in the latter option the savings in energy resources for heating is 40%.
External walls made of aerated concrete have height restrictions due to the low strength of the material. For this reason, the design of the walls of a one-story extension with a height of 2.5-3 meters provides for the installation of a reinforcing reinforcing belt laid along the entire upper perimeter of the external walls.
The greater the number of floors, the higher the requirements for the strength class of masonry blocks.
Disadvantages of foam block construction compared to other materials
Building requirements for the construction of a foam block extension
Despite many advantages, foam blocks also have several disadvantages. They should be taken into account when planning to build an extension from foam blocks to the house.
The main disadvantages of foam blocks:
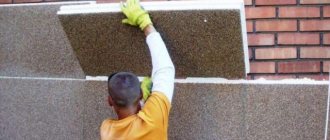
- increased hygroscopicity of foamed concrete associated with the cellular structure of the material. Porous material loses its thermal insulation properties as a result of saturation with moisture. To protect foam blocks from waterlogging as a result of exposure to natural factors, reliable protection is required;
- unesthetic appearance of block products having a grayish color and increased surface roughness. The attractiveness of the foam concrete walls of the extension is achieved through the application of protective and decorative plaster on the facade and interior of the building.
The disadvantages of foam concrete blocks can be easily eliminated using modern finishing materials and plaster mixtures.
Reliable protection is required to protect foam blocks from waterlogging
Consumables and tools
Aerated concrete blocks belong to the class of cellular porous concrete, which is characterized by ease of processing. Products can be sawed and sanded with simple hand tools without much difficulty.
The necessary set of tools for masonry work includes:
Mason's trowel for uniform application of adhesive. The tool ensures a strict dosage of the mixture to create thin masonry joints.- Hacksaw for cutting aerated concrete blocks. The main difference between this tool and a conventional wood saw is the increased thickness of the blade and a slightly different shape of the teeth.
- Rubber mallet. With its help, the laid blocks are settled, the masonry is leveled horizontally and vertically.
- Planer for grinding down irregularities and edges of aerated concrete stones.
- Sanding block or board. The tool smooths out the roughness of the stone surface or rubs its surface after processing with a plane.
- Wall chaser. It is used for cutting grooves in the block for laying cable products.
In addition to the tools listed, you will need a spatula to remove excess mortar, a brush to sweep away dust, a metal square and a marking cord.
The fight for purity
Dirt on shoes can tell you where a person has been during the day. Small pebbles, snow, and dust will eventually come home with your shoes and find their place. It is necessary to make sure that the vestibule is the place where all the dirt remains without getting into the house. Usually the whole struggle ends with laying the rug on a rag or rubber base. They quickly fill with dirt and cease to perform their functions.
Dirt protection systems are the most effective in operation and easy to maintain. They are made from metal, aluminum, and combined with rubber inserts. They perfectly collect coarse dirt and prevent thin heels of women's shoes from getting stuck.
Step-by-step instructions and construction technology
After drawing up the project, you can begin the construction process:
- Marking of the structure. The linear dimensions of the new building are transferred from the drawing and secured to the land plot with wooden pegs. To visualize the outline of the future building, a marking cord is stretched between the support poles.
- Preparatory work. The fertile layer is removed from the plot of land, and the roots of the plants are carefully selected.
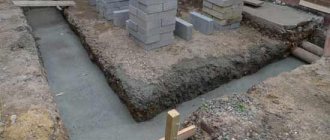
- The soil is being developed for the construction of foundation structures. According to building codes and regulations, the width of the trench must exceed the foundation structure by 150 - 200 mm on each side. This is necessary for installing a support cushion and laying waterproofing.
- Foundation construction. To support load-bearing walls made of cellular concrete, strip foundations made of reinforced monolithic concrete or precast reinforced concrete are ideal. The extension is an independent structure and, compared to the main house, will shrink differently. Therefore, the foundation of the extension should not be in rigid contact with the existing supporting base.
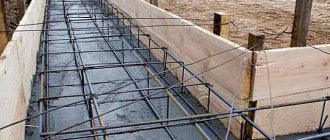
- After installing a 100-150 mm thick sand cushion in the lower part of the supporting foundation structure and laying roll waterproofing, it is necessary to install board or panel formwork for pouring monolithic concrete. A spatial reinforcement frame with working reinforcement 10–12 mm and distribution rods with a diameter of 6–8 mm is installed in the formwork.
To connect with the main house, at the excavation stage, anchors are installed into the body of the existing foundation from reinforcing bars with a length of 400 - 500 mm and diameters of 10 - 12 m. Anchoring will allow two foundations to work as a single whole . But such an event is carried out on strong soils that do not give much subsidence.
After the concrete mixture has hardened, adhesive waterproofing made from rolled roofing materials is laid on top of the foundation surface.
Installation of external walls made of aerated concrete
The laying of external walls begins with the construction of the corners of the building.
To do this, a mooring cord is stretched along the axes of the structure. This will help avoid unwanted masonry defects, which cause undesirable stress concentration in places of distortion, which leads to the formation of sedimentary cracks and damage to the integrity of the wall.
The process of laying aerated concrete blocks is similar to brickwork: in the same way, each horizontal row is shifted by 100-150 mm in relation to the previous one.
Unlike brick, a special adhesive mixture is used to lay aerated concrete stones, rather than a cement-sand mortar. Only the first row of stones is laid on cement.
To prevent cracks from appearing on the surface of the walls during operation, every fourth horizontal row of gas blocks is reinforced with masonry mesh. This increases the mechanical strength of the outer walls of the extension.
It is often necessary to reinforce problem areas of masonry in places where window and door lintels are installed, as well as lay mesh in the corners of the building.
According to the building codes and regulations SP 15.13330.2012 “Stone and reinforced stone structures”, walls made of cellular concrete are necessarily reinforced with a reinforcing frame. Its main purpose is to increase the strength of wall structures and bind them into a single rigid frame, protecting the building from the effects of destructive deformations.
Therefore, after the external walls reach the required height, a monolithic reinforced concrete belt with a height of 200-250 mm is made at their top level:
- Along the top edge of the external walls, panel formwork is installed with a width equal to the blocks used.
- A spatial reinforcement frame made of A2 class reinforcement with longitudinal rods with a diameter of 12 to 10 mm and transverse clamps made of 6-8 mm reinforcement is placed in the formwork.
- The prepared formwork is filled with a concrete mixture of class B22.5 and covered with a protective film until the concrete hardens completely.
Instead of monolithic concrete, it is allowed to use ready-made prefabricated reinforced concrete products that perform the function of a reinforcing belt.
Connection Features
After the construction of the external extension, the gap between the walls is filled:
- expanded polystyrene;
- rigid slabs of basalt fiber or mineral wool.
External cracks are foamed with polyurethane foam, carefully cutting off its excess.
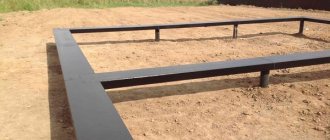
If the house is built of wood, a separating assembly element is laid between the foundations - an expansion joint made of tarred or roofing felt boards.
The gap between the wood and aerated concrete is closed with vertical beams . In this case, even with uneven settlement of the wooden house and block extension, destructive deformations will not develop.
Columnar foundation
This type of foundation can be made from asbestos-cement pipes, screw piles or ready-made blocks. But the principle of building a foundation is the same everywhere. Suitable for unstable swampy, peaty, sandy or waterlogged soils, as well as for regions with deep freezing.
Stages:
- Mark the area where you will dig post holes. If you are building a 6 meter long veranda, make 3 rows of posts along the length. Install 4 pillars in one row. It turns out that each pillar will be 1.5 meters away from the other.
- To install the posts evenly, make formwork.
- To dig holes, you need to find out how thick the soil freezes in your area. The holes should be 25-30 cm deeper than the frost depth. If you are making a foundation on screw piles, use their length as a starting point.
- Pour sand into the holes 10-15 cm deep and compact it.
- Insert pillars. Check that you have placed all the posts at the same height. Take a board, place it on two adjacent posts and place a level on it.
- Bury the piles. Insert reinforced mesh into asbestos-cement pillars and pour concrete inside. It is also advisable to fill the screw pillars with concrete mixture. This will protect the material from corrosion. The foundation will be stronger.
- Insert studs into the posts. They will set with concrete, then you will install timber on them.
- Lubricate the posts with mastic and cover with roofing felt to protect them from moisture.
Errors when building a foundation will occur if you do not take into account the quality of the soil and dig a trench or holes to a depth less than necessary. The trench cannot be left standing for a long time. Let's say you dug it out in the fall, and are planning to build a veranda in the spring.
Pros and cons of using such a stone
The popularity of using aerated concrete blocks in the construction of attached premises is based on the numerous advantages of this material:
- Possibility of independent work.
- Extremely short construction time.
- Environmentally friendly material.
- Durability of block construction.
- Minimum shrinkage of the erected extension.
The big advantage of an extension made from aerated concrete is the special internal microclimate created in the room. The rooms are warm and bright , creating a special atmosphere and making it easy to breathe.
The disadvantages include the high hygroscopicity of the aerated concrete block, which is characteristic of all cellular concrete products. The walls of the external façade must be protected from precipitation and wind loads by textured plaster or other decorative finishing.
Read more about the pros and cons of this material in a separate article.
By cooperating with us you get
Guarantee of meeting deadlines
- Delivery of the project is always on time
- In case of delay, we incur a penalty of 3% per day
Transparent, fixed estimate
- No hidden extra work
- You pay only for what you need, and you choose what you need yourself!
Daily photo and video reports
- Work progress reports via WhatsApp or email
- You will be in the know, even if you cannot be present on site.