Everyone, without exception, wants to have a reliable foundation. And one of the most reliable and predictable is the tape one. But a monolithic strip foundation takes a long time to build: it takes three days to assemble the formwork alone, and you still have to knit reinforcement, then concrete it and wait several days until it gains at least half its strength. This will take at least two to three weeks. It’s good if you have such a reserve of time, but what if you don’t? There is a way out: smart people came up with the idea of transferring part of the work to the enterprise - they make concrete blocks - FBS. From these, a foundation is then assembled, which is called a prefabricated strip foundation. It’s easy to make a FBS foundation with your own hands.
When using this technology, the foundation is assembled from reinforced concrete blocks of different types and sizes. That is why it is often called block or prefabricated. These are all the same type.
Advantages and disadvantages
The most important advantage of a prefabricated strip foundation made of FBS is the short time resource required for its manufacture. It only takes a few days to assemble.
The main disadvantage: it is not monolithic, so it cannot be installed everywhere and not always. Prefabricated strips of blocks stand normally on dry soils that are not prone to heaving. Under other conditions, a calculation is required, preferably a professional one.
Block foundation construction
It should be noted that prefabricated foundations must be thoroughly waterproofed and insulated. It is also necessary to make an insulated blind area. These are necessary conditions for their normal operation.
If we compare monolithic strip and block foundations, the following picture emerges:
- Monolithic construction takes a long time, block construction takes a long time.
- A monolithic tape can be made without renting special equipment (although it is difficult to do without ordering concrete). To assemble a FBS foundation with your own hands, you will need to rent a crane, or at least a winch.
- If you make a monolithic foundation yourself, it costs less than a block one. If hired workers or a company work, then it will most likely cost more: the volume of work is greater, and this is a considerable additional expense.
- A monolith is more durable than a prefabricated one. Strength is approximately 20-30% higher. This allows it to be used as a monolithic tape on loams and clay.
In many respects, monolithic tape wins. But if its strength and reliability are not in demand, then its production is just a waste of time. When work is carried out by contractors, it is also a waste of money. Therefore, if the soils have normal bearing capacity, and groundwater is no closer than 2 meters from the required foundation depth, it makes sense to build a house on a prefabricated foundation.
Looking for energy efficient solutions?
Pay attention to FORUMHOUSE geothermal heat pumps
Ground source heat pump EU (start/stop)
Geothermal heat pump IQ (pseudo-inverter)
IQ ground source heat pump (inverter)
Igor says about himself that he is not new to construction, but he is not a specialist. He tried to do everything with his own hands, without involving construction companies. I just hired a couple of workers from Yaroslavka, so summer residents may find his construction experience useful.
Beginning of work
There was a neglected site for building a house. It is located on a slope, the soil is clay, the water is deep (the neighbor has a well at a depth of 27 meters). My father stocked up on everything he could, so he had 50 FBS blocks, fittings, etc., as well as a great desire to have his own home (used blocks were purchased at construction sites, slowly delivered by dump truck and dumped on the site, In general, we got it inexpensively).
First of all, it was necessary to clear a place for construction, so he hired two Tajiks to sort out the collected rubbish and clean the blocks from mortar. Then he ordered an excavator to dig a pit; it cost 10 thousand rubles per shift and worked for two hours. The Tajiks worked for 5 days and during this time: they removed the garbage, cleared the used blocks of mortar and dug a foundation strip 30 centimeters deep, added 10 centimeters of sand! He paid each person 1 thousand rubles. in a day. They worked well under constant supervision. Total another 10 tr!
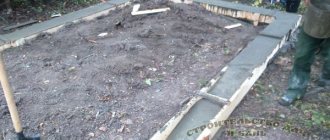
Then, with his own hands, Igor placed the formwork under the tape. Foundation size 6*9. For concreting the tape, I used reinforcement found in my father’s supplies, two rods on each side, and also purchased 10 bags of cement for approximately 3,400 rubles, five cubes of sand for a thousand rubles. and 5 cubes of gravel for 2000 rubles. plus delivery 6000 rub.
To mix concrete, he bought a 160-liter concrete mixer for 10,000 rubles. He mixed everything himself and concreted it, and put hydroglass insulation on the tape and left it all to harden.
Laying blocks
The next stage of construction for Igor was the laying of blocks. To implement it, he, first of all, sketched out a detailed diagram of the laying of blocks for each row, because he considers this very important. The joints of the blocks must overlap the top row! He used pre-saved wedges to level the blocks.
On the evening before laying the blocks, I brought Tajiks. There is a small room on the site, there is a place to sleep, a gas stove and light. I ordered a tap for 8 am the next day. He agreed to pay 7 thousand rubles for the tap.
The crane was late and arrived at 10 o'clock, the crane operator didn't even apologize. While he was preparing the tap for work, the Tajiki mixed the solution. And then it turned out that the crane operator did not have a “spider”. Then Igor refused his services, sent him back and did not pay anything.
The next day Igor ordered another faucet. The driver arrived on time, a normal crane operator, experienced, conscientious. All blocks were installed in one day.
After installing the blocks, the entire team began to seal holes and seams. In general, they were engaged in cosmetic operations.
Waterproofing
At the next stage, Igor began to do waterproofing. To do this, he used 7 rolls of hydroglass insulation, 30 liters of mastic, a can of resin, and he also used a gas torch with a hose. All this cost 3,200 rubles. We coated all the walls with mastic and glued waterproofing. The waterproofing between the tape and the blocks was turned up and also glued.
The work took two days, and the workers were paid 4 thousand rubles. Next, he slowly went through all the seams! I checked everything carefully, glued and greased where necessary. Once again I taped all the seams and coated them with resin.
He laid thermal insulation on top of the waterproofing, this is ordinary polystyrene foam in a film. I made a slope and laid a drainage pipe, wrapped it in geotextiles, covered it with gravel, and sprinkled sand on top. So far he has covered the walls with sand to a depth of 40 centimeters. In the future, he plans to cover the walls with sand to the top so that in cold weather the clay does not press the walls inward. It is important that between the wall and the clay there is no heaving soil (this is sand)!
Laying slabs
Before laying the floor slabs, Igor carefully leveled the upper part of the foundation, for which he built formwork. I connected the formwork boards with threaded pins, laid the reinforcement and poured the whole thing with concrete. It was freezing at the time, so he heated the water and added an anti-frost additive.
When the slabs arrived, there was a thaw, the road was a skating rink, so we had to spread half a car of sand onto the road. The path was filled, the equipment drove through! After throwing three cubes of sand, his arms and legs hurt.
For half a car of sand and a simple car with slabs from Ryazan, he paid 4,500 rubles. The crane operator was not paid extra; he had an 8-hour shift. Six slabs from Ryazan with delivery cost him 44 thousand rubles. plus faucet 8 thousand rubles.
Then we started installation. The slabs were laid with a 10 cm spacing on the wall. He left 10 cm gaps between the slabs for laying communications.
Here is a drawing of what he came up with; he decided to leave the rest until spring.
Estimate for the foundation for December 2007
- Workers (Tajiks worked for 10 days, 2 people) = 20 tr.
- Gravel, sand, cement = 11 t.r.
- Excavator (1 day) = 10 t.r.
- Faucet (2 days) = 15t.r.
- Concrete mixer = 10 tr.
- Drainage + geotextile (20 meters) = 4t.r.
- Mastic, waterproofing = 3.5 t.r.
- Polystyrene foam, film = 3t.r.
- FBS blocks 50 pcs (bought second hand at a construction site inexpensively) = 20t.r.
- PNO floor slabs, 6 pieces with delivery = 44t.r.
- Unforeseen expenses = 10t.r.
Total: 150 thousand rubles.
The expenses turned out to be higher than Igor expected. In addition, he planned to make a gate, fill the sinuses with sand, and fill the floor with concrete in the basement.
Foundation blocks: types, sizes, markings
In private construction, several types of blocks are used. To construct a prefabricated strip foundation, only two types are most often used:
- FBS is a solid foundation block. When they talk about this type of block, they mean a reinforced concrete (with reinforcement) element without voids. These are rectangular blocks of different sizes with mounting steel loops on the top surface. Sometimes vertical channels are formed in the side edges, which are filled with mortar during construction. The foundation strip is made from these blocks.
- FL - pillow blocks. They look like a trapezoid. They are laid on a prepared base and serve to increase the bearing capacity of the foundation.
Types of foundation blocks that will be needed for a prefabricated strip foundation
When constructing a strip foundation, it is necessary to provide routes for laying and supplying engineering systems: water supply, sewerage, electricity, heating. You must not forget about the ventilation system and leave holes for vents to ventilate the underground space or basement. For this purpose, blocks with a channel for laying communications may be useful: FBV.
The sizes and types of blocks are regulated by GOST 13579-78. For a private developer, size and performance characteristics are mainly important. The photo below shows part of the standard, which defines the types and sizes of blocks.
Excerpt from GOST standardizing the dimensions of foundation blocks
Marking according to GOST
To make it easier to navigate the specifications, the names of the blocks, by the same GOST, contain information about their size and type.
First comes the title. Next are numbers describing the geometry in decimeters;
- the first is length (9, 12,24);
- the second (through a dash or dot) - width (3,4,5,6);
- third - height (3.6);
Marking of concrete foundation blocks
If there are any lengths and widths, then the FBS height is usually made 580 mm (marked “6”). Blocks with a height of 280 mm can be made to order.
Next, after the numbers there is a letter designation of the type of concrete used:
- T - heavy (cement-sand mixture with crushed stone). The heaviest high density block. This type is used in the construction of foundations.
- P - porous with expanded clay concrete filler. They have less weight, but also less strength, and are also more hygroscopic.
- C - made of silicate concrete (the main binder is lime). This type of blocks is afraid of getting wet, therefore it is not used in the construction of foundations.
For example, FBS 24.4.6 -T stands for: rectangular block of high-density reinforced concrete. Length 2380 mm, width 400 mm, height 580 mm. By analogy, you can decipher other symbols.
Dimensions of FBS blocks according to GOST
Waterproofing
For high-quality waterproofing of a building, it is necessary to have a proper drainage system around the foundation.
Waterproofing the foundation itself is needed for two purposes: preventing moisture from penetrating into the structure of the house from the foundation (done on the horizontal surface of the foundation) and preventing moisture from penetrating into the foundation from the soil and the environment, so that the concrete does not collapse when this moisture freezes. Let's talk about the second one.
It is done in many ways:
- coating - bitumen, polymer and epoxy mastics are used for this;
- spraying liquid plastic mass (polyurethane) is the most expensive, but also very effective method;
- plastering - special plaster mixtures with plasticizing additives are used for this;
- pasting - films (with polymer glue) and membranes and glass insulation (they are self-adhesive).
Pasting, as a rule, is combined with coating with mastic before and after pasting. If the pasting is multilayer, a mesh is laid between its layers, which is used for conventional plastering.
The placement of layers when pasting should only be vertical; the vertical overlap should not be less than 10 centimeters, the horizontal overlap should not be less than 30, and pasting should be done from below.
Laying FBS blocks
The choice of block width is determined by the thickness of the walls located above. The length of the blocks is selected so that they occupy, if possible, the entire tape. But even experienced builders make mistakes when selecting blocks: some unfilled areas remain, into which even the smallest elements do not fit (they are called additional ones). These areas are usually sealed with cement mortar bricks. If the masonry turns out to be uneven, it is then plastered: this will make it more convenient to apply waterproofing and insulation.
Typically, a prefabricated strip foundation consists of several rows of blocks. Their specific number depends on the required tape height. More often it is laid below the freezing depth of the soil. The required height of the base is also taken into account.
Construction of a block foundation. When laying cushion blocks, some areas remain empty. They are concreted after installation
When installing concrete blocks of any type, the same rule applies as when laying brick: the seams should not match. To do this, they are placed so that the seam of the previous row overlaps the body of the block in the next row. The gaps (vertical joints) between adjacent elements are filled with cement-sand mortar.
To give the structure greater strength and to connect all the blocks into a single system, reinforcement is laid on top of each row. Depending on the type of soil and the weight of the building, class A-I - A-III rods are used. The number of rods is determined by calculations during design; they can be from 2 to 5 pieces. When laying and connecting the rod, all the rules for reinforcing a strip foundation are observed - the connection of corners and partitions occurs according to the same pattern. The only difference is that there is only one reinforcement belt. A layer of mortar is laid on top of the reinforcing belt, and the next row of blocks is placed on it, with the seams offset.
To make the FBS foundation more durable with your own hands, it is reinforced
If these rules are followed, the prefabricated strip foundation will be strong and reliable.
Step-by-step installation instructions
The most important stage in the construction of a FBS foundation is competent design.
Such work should be entrusted to professional builders; saving on the services of specialists can lead to serious consequences, even leading to the premature transition of the building to an emergency condition.
At the preparatory stage the following is performed:
- development of drawings;
- the necessary calculations are carried out;
- a clear work plan is drawn up.
Immediately before starting construction it is necessary:
- prepare the construction site,
- remove debris and excess vegetation,
- provide unimpeded access for special equipment to enter the territory.
Excavation
The blocks can be laid in trenches or a foundation pit (if the building is planned to have a basement). The width of the trenches is calculated not by the dimensions of the FBS, but by the bases of the monolithic pillows, since they are wider.
Before starting earthworks, it is necessary to mark:
- determine the corners of the building,
- mark them with beacons,
- stretch a strong cord between them.
The depth of trenches and pits can be 1000-1400 mm. This depends on the number of rows of FBS blocks, the level of soil freezing and other factors taken into account when developing the project.
Pillow device
To eliminate the possibility of subsidence of the foundation and walls of the building, cushions are installed at the bottom of trenches and pits.
To create them, sand (bottom layer up to 200 mm thick) and crushed stone (filled with the same layer on top of the sand) are used.
The materials must be filled in stages; every 10 cm the layers must be compacted to give them the required density.
It is advisable to perform compaction using a special vibrating plate. To achieve better compaction and speed up the process, the material should be moistened abundantly.
Arrangement of the sole
The sole on which FBS blocks will be subsequently installed can be made in two ways:
- from ready-made FL blocks;
- by creating a monolithic structure.
The first method is simpler and less expensive. FL blocks are more often used on dense, low-moving soils. The products are placed on top of the pillow, after which the seams between them are filled with concrete.
A formwork is created from edged boards on top of the gravel-sand cushion, and a reinforcement frame is placed inside it in two levels (upper and lower). Next, the formwork is filled with concrete mixture, the grade of which is selected individually for each project.
When the concrete reaches the specified strength (1-2 weeks), you can proceed directly to the installation of the FBS.
Laying blocks
To install FBS, a truck crane is used, since manual laying is impossible due to the large weight of the products (1-2 tons, depending on the size).
The blocks are laid on cement mortar, which is also used to fill the vertical joints between the elements.
Installation of FBS begins from the corner areas. A cord is pulled along the first installed blocks, which is used to install the next blocks more evenly.
Creation of an armored belt
When all FBS blocks are installed around the perimeter of the foundation, it is necessary to prepare a reinforcing belt. This structural element serves to strengthen the base and increase its strength characteristics.
The first stage is the creation of formwork. To do this, edged boards are installed on top of the FBS blocks, which must be securely fastened together.
A reinforcement frame made of steel rods with a thickness of at least 12 mm is installed in the formwork. The amount of reinforcement and the dimensions of the cells formed by longitudinal and transverse metal rods are determined during the development of the project. In most cases, from 2 to 4 longitudinal rods are installed.
The final stage is pouring the concrete mixture into the formwork. After it hardens, the wooden frame is dismantled.
Arrangement of waterproofing
FBS reinforced concrete blocks are sensitive to the effects of ground and atmospheric waters, therefore the creation of a waterproofing layer is a mandatory stage in the construction of the foundation.
It is allowed to use any suitable materials - both roll and liquid.
Many projects use bitumen mastics, which are easily applied to the side surfaces of blocks and provide reliable protection from moisture.
Read with this
We build a foundation from FBS with our own hands
The technology for constructing a prefabricated foundation, especially at the preparation stage, is not much different from other types: first we dig a foundation pit. The difference is that it is less labor intensive to manufacture the tape itself and that there is no need to make formwork.
Preparation of the base for a block foundation is standard:
- The fertile layer of soil is removed and removed or stored on the site.
- Next comes the marking. If the house has a basement, the perimeter is marked; if there is no basement, a tape is marked. Markings are made using pegs and cords. The tape is marked on both sides, indicating the width of the wall.
- Next comes the land work. The soil is removed to the planned level.
- The bottom of the pit or trenches is leveled and pre-compacted.
When assembling blocks, do not forget to leave holes for utility systems: breaking the foundation is unacceptable - A layer of sand or crushed stone is poured in and compacted well using a vibrating plate. Hand tamping will not give the required compaction. Therefore, it is better to use a vibrating plate. This is especially important if the bearing capacity of the soil is not very high. Something as simple as a well-compacted sand and gravel bedding can improve it significantly.
- Two layers of waterproofing are laid on the compacted base.
- FL foundation blocks are installed. They are laid out strictly horizontally. Check the correct alignment with a building level or level. The gaps between them are filled with cement-sand mortar.
- The reinforcement is laid, with a layer of mortar of at least 2-3 cm on top of it.
- FBS blocks are installed with offset seams. No joint should match. The minimum offset is equal to 0.4 of the height of the exposed block. If you use FBS with a height of 580 mm, then the offset should be greater than 240 mm.
- If there is another row of blocks, the armored belt is laid again and the mortar is placed on top of it.
- The blocks are also placed with offset seams.
The number of rows depends on the required height of the base and the required depth of the tape. Compliance with the rules for laying blocks with dressing is mandatory. Only by assembling the FBS foundation with your own hands will you receive a reliable foundation for the entire structure.
Preparatory work
The construction of the foundation will be preceded by preparatory work, the algorithm of which is described below:
- Carrying out a preliminary calculation of a block foundation; for this purpose, special software is most often used, with the help of which the main technical characteristics of the structure being built are entered and the blocks are laid out. This will allow us to determine the fastening features of individual structural elements at the initial stage.
- During the calculations, it is necessary to determine the location of communications, since they will require holes to be made in the blocks. Information about this should be indicated when purchasing the material.
- Creation of a paper or electronic project of a construction site, on which the places where equipment, material and other objects will be placed should be marked.
- Primary preparation of the construction site involves removing the top layers of soil. The fastest way to carry out this process is with an excavator; The removed soil should be placed nearby as it may still be needed for backfilling.
- It is necessary to inspect the resulting pit and mark the axes of the future walls of the building. For these purposes, you can use wooden pegs and a fairly strong fishing line.
- At the final stage of preparatory work, internal drainage can be organized using the base, although this is not a prerequisite if high-quality waterproofing of the floor and walls of the building being constructed is ensured during construction.
How to lay FBS
In any row, laying begins from the corners. Then the blocks are placed in the places where the piers are drained. They are called lighthouses, and then all others are compared to them. Their vertical alignment is checked and corrections are made if necessary. Most often, the block must be lifted again, moved and replaced.
After the beacon elements are installed, the moorings are stretched - cords along which they are guided when installing the next blocks. They mark the boundaries of the wall, and so that the FBS stand symmetrically relative to the middle of the FL block (pillow block). The maximum permissible deviation is 12 mm. All subsequent rows of blocks should also be placed exactly above the middle.
When laying blocks, you must ensure that they are stacked one above the other without much displacement
It is more convenient to pull the cords 2-3 mm from the side surfaces of the lighthouse blocks. This will make it easier to display. Intermediate blocks are placed starting from the largest: first they put everything 2.4 meters long, then 1.2 and then 0.9. The correctness of their installation is checked against the marking cords, verticality - with a plumb line.
How to choose the sizes of FBS blocks
You can determine how many blocks you need for your foundation by selection. You can do this yourself on a plan drawn to scale. On the plan, you mark each block to the same scale.
The sizes of blocks for a FBS foundation are selected based on a simple rule: to increase the strength of the structure, you need to use the largest block sizes. Therefore, first you draw the 2.4 meter blocks installed in the corners, then, if they fit, draw them in the places where the partitions adjoin. Between them, you also place the largest blocks that can fit there. Where they no longer stand, place them in a smaller size. If there are any gaps that even the smallest block (0.9 meters) cannot fit into, don’t worry - these gaps are filled with brickwork.
Two types of prefabricated FBS strip foundations - with and without a cushion (shallow strip)
Draw the second row in a similar way, not forgetting about the displacement of the seams. If necessary, draw the third one in the same way. Then count the required number of blocks of each size. Do not throw away the resulting plan: it will be useful to you when installing the prefabricated foundation already on the site.
FBS masonry mortar
For laying foundation blocks, standard cement-sand mortar M-100 is used. It can be obtained using different cement grades and amounts of sand:
- For 1 part of M300 cement take 2.5 parts of sand;
- For 1 part of M400 cement there are already 3 parts of sand;
- when using M500 sand, add 4 parts.
First, mix the dry ingredients until a homogeneous composition and color is obtained. Then gradually add 0.5 parts of water. If the solution turns out to be too thick, add water little by little in small portions. The consistency should be like thick sour cream: not lumpy, but not runny either.
Do not try to increase the amount of cement. This will not only not increase the strength of concrete, as expected, but will significantly reduce it. To gain strength, concrete requires a strictly defined amount of aggregate (in this case sand) and water. If there is a lack of one and/or the other, its strength will be lower. In the worst case, it will crack and crumble.
Installation instructions
The concrete foundation is built with your own hands according to all the instructions in four stages:
- Design and selection of blocks.
- Excavation work with filling a cushion of sand.
- Installation (with or without reinforcement).
- Waterproofing.
It is better to entrust the preparation of the project to a professional. This will allow you to obtain a foundation with the desired characteristics with a minimum cost of materials. FBS are available in different sizes. However, if they are too large, there will be extra expenses and loads on the ground. These concrete products must be selected according to the specific parameters of future walls. But usually for the bottom row they take a width of 400 mm, and for subsequent ones above - 300 mm.
All foundation blocks are divided into four subtypes:
- FBS - solid privates.
- FBP - with voids at the bottom to reduce loads on the soil.
- FBV – with a cutout along the length for communications.
- FL – trapezoidal slabs for the bottom row.
According to GOST, in the marking after these letters there are three numbers (length-width-height in decimeters) and the letters “T”, “P” or “S”, indicating the type of concrete used. In the first case, this is a “heavy” option made of cement, sand and crushed stone. In the second, there is a “porous” analogue, in which expanded clay concrete is used as a filler. And in the third it is a “silicate” product made with the addition of lime. The construction of foundations is always carried out using class “T”. Only they have the necessary load-bearing capabilities and are not afraid of moisture.
The ground stage is standard. It is necessary to dig a trench to a depth below the freezing point of the soil on the site. Then, at its bottom, a cushion compacted from sand 30–40 cm thick is made for the subsequent laying of FL slabs
Here it is important to do everything so that the sand layer is horizontally at the same level throughout the entire length of the pit. Otherwise, the base will most likely end up distorted. It is almost impossible to divide a concrete foundation block into two parts of the required size.
If voids remain in the masonry during installation, they are usually filled with bricks and the opening is plastered. FBS in a row from above are always installed offset; through vertical seams are unacceptable here. For masonry, standard cement mortar with a grade of at least M100 is used.
It is almost impossible to divide a concrete foundation block into two parts of the required size. If voids remain in the masonry during installation, they are usually filled with bricks and the opening is plastered. FBS in a row from above are always installed offset; through vertical seams are unacceptable here. For masonry, standard cement mortar with a grade of at least M100 is used.
If reinforcement is required, then it is necessary to lay 2–5 rods in one layer on top of the already assembled row. In this case, the same technologies are used as when constructing a strip foundation. Only the reinforcing belt turns out to be single-row.
For waterproofing, roofing felt or other rolled equivalent is laid on top of the top rows. Even a soft roof is suitable for these purposes, but it costs more. The sides of the masonry are completely coated with mastic. The waterproofing layer should cover the concrete on all sides to minimize exposure to moisture. This way it will last much longer.
Before you start building a block foundation for a cottage, you need to plan everything carefully. It is necessary to provide a platform for unloading blocks and a place for a crane. This means that special equipment is not required to install supports for a pile foundation or pour a monolithic tape. There is no way to do this without special equipment.
Unloading
We prepare the surface: mark a line of blocks with twine and place waterproofing on the base
We prepare the solution and supply the first one with a tap
Lower the first one along the tensioned level
Place the second one on top of the first one
We adjust the position manually using a crowbar
We arrange all subsequent ones in the same way.
Materials
Support pillars can be made from several types of materials.
Wood
This is an affordable and easy-to-install material, which, however, has the lowest load-bearing capacity and short service life. This option can be used as a foundation for small terraces, temporary buildings, and country houses.
The optimal diameter for wooden posts is 120-200 mm. Before use, the supports should be dried and coated with moisture-repellent and antiseptic impregnations. This will increase the service life of the pillars. Bitumen mastics are used as a waterproofing material.
Brick
Brick pillars have become widespread. Shallow columnar bases of square section with a side width of 40-50 cm are laid out of them.
Concrete
Concrete elements are monolithic or collapsible foundations based on concrete, reinforced with steel rods. The standard cross-section in this case is 400 mm. This option is suitable as a basis for capital construction.
Dependence of the choice of block foundation on the characteristics of the site
Before designing a house, it is necessary to order a geodetic report on the features of the site.
You can, of course, get it from your neighbors, but it won’t be entirely reliable. Sometimes even neighboring areas differ greatly in soil, water, and other characteristics.
Priming
Textbook “Soils. Foundations. Choosing the optimal foundation" classifies soils as follows:
- Rocky soils are, rather, crystalline rock, rock rather than earth, and sedimentary rock (dolomite, compressed sandstone, shale, shell rock, limestone). Any foundation is acceptable except a pile foundation (it is difficult to drill into rock).
- Conglomerates are fragments of varieties of rocky soils; do not erode or change in volume when freezing; Any foundation is acceptable.
- Non-rocky soils:
- bound - clayey and loamy; freeze deeply; capable of “floating” and moving, only heavy types of foundations are suitable;
- unbound - sandy and sandy loam soils; when wet they tend to move and freeze shallowly; Any type of foundation is suitable.
Soil type may vary even in adjacent areas
If your site is a mass of rock, untouched sandstone or sedimentary rocks, then you can easily install a block foundation. It is also good if the soil of the site consists of sand or dense loamy soils.
Table: minimum foundation depth in sand and clay
| The soil | Minimum depth (m) | |
| 1 | Sand | 0,5 |
| 2 | Clay | 0,7 |
To get an approximate understanding of what soils are available on your site, there is an old-fashioned method: drill a hole with a garden drill and examine soil samples from different depths. The sample is moistened with water, and if it can be kneaded like dough, then it is loam. If the earth dissolves in water, it contains a large percentage of loamy component. If sediment falls, there is clay at the bottom and sand above it.
To test the soil, you need to place a sample in a glass of water.
Groundwater
The groundwater level is the most important characteristic of soils. If the level is small, then a shallow strip foundation made of blocks is perfect for us. If it is quite high, then the tape should be buried to a greater depth.
The structure of groundwater in your area has a huge impact on the choice of foundation type
Freezing depth
The freezing depth in our area is on average up to one meter, but deviations are possible. If you are making a deep foundation from blocks, then its lowest point should be below the freezing point of the soil.
Freezing depth is a factor influencing the foundation depth
The most dangerous factor is directly related to the level of soil water and soil classification.
Water "lenses"
Where permeable sand or sandy loam lies on a layer of clay, precipitation penetrates through the upper soil and remains under it in the form of so-called “lenses” that lie on an impermeable base and can severely damage the foundation. You need to be sure that there will be no “lenses” on the way to laying the block foundation.
If there are “lenses” in the soil, only a pile-strip foundation is used
Choosing a foundation
The choice of the shape of the foundation made of blocks depends on all of the above factors - soil, water balance, the presence of lenses, freezing depth, combined into one geodetic conclusion. But it depends on your preferences, and on the blocks that you may already have, and even on the time of year. Therefore, you need to understand the main advantages, milestones and dangers of constructing each block foundation.
As we already know, there are two types of block foundations: columnar and strip.
- Strip foundations made of blocks can be shallow, non- and deeply buried. It is built from expanded clay, foam and cinder blocks, concrete blocks, concrete panels laid on a bed of drainage mixture. Not very suitable for unreliable soils, but the problem is usually solved by deepening and widening the “ribbon”, laying a widened concrete or block base from cushion blocks and creating a permanent reinforced concrete grillage.
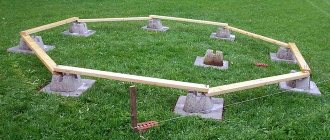
- A columnar block foundation is perhaps the simplest and most inexpensive to construct. It can also be shallow, non- and deeply buried and is also made from expanded clay, foam and cinder blocks, concrete blocks, concrete panels (non-monolithic pillars), laid in pits (if the pillar is buried) or simply on the ground (if not buried) on a bed of drainage mixtures. Suitable for light buildings such as frame houses, gazebos and greenhouses and any soil except swampy ones.
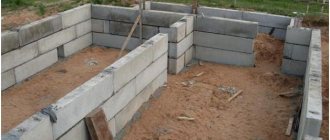
Device
A prefabricated strip foundation is built using the layer-by-layer construction method.
It consists of the following elements:
- A trench dug in the ground to a certain depth.
- A layer of sand cushion providing a smooth horizontal surface.
- A series of trapezoidal blocks (FL) forming a support platform for mounting the tape.
- The main body of the tape is made of FBS.
There are combined types of prefabricated belts, where instead of FL (trapezoidal) blocks, a monolithic concrete screed is used.
This option requires more labor, but forms a more rigid cushion under the tape that is resistant to the effects of soil heaving forces.
Way to save money
There is a little trick that allows you to reduce material costs when building a block foundation for a low-rise building. To do this, wall blocks are laid at small intervals (no more than 70 cm). These gaps are filled with soil and compacted thoroughly. It is necessary to ensure that all vertical seams are located above the blocks. Such structures are called intermittent foundations.
When using this technology, the savings in blocks are 20-25%, thereby reducing the cost of the entire construction. This method is strictly forbidden to be used on soils with weak bearing capacity.
Construction technology
The construction of a strip-type block foundation is carried out in the following order:
- You must first calculate the dimensions and purchase materials in the required quantities.
- Experts advise starting construction by drawing up a building plan.
- Trenches are dug to accommodate the blocks. Their depth should be at the level of freezing of the soil layer.
- The bottom of the pit is prepared for the placement of these blocks.
- It is necessary to increase the support area of this type of foundation through the use of a so-called cushion, which is a special trapezoidal block that promotes the most even distribution of the load over the entire soil area.
- The next step is to lay down the blocks. When constructing the tape, care should be taken to ensure that the thickness of the cement screed is at least two centimeters.
- Waterproofing using roofing felt or some other similar material.
- The sides of the structure, which are in contact with the soil layer, are thoroughly impregnated with bitumen.
- In the end, you need to completely fill all existing sinuses.
Modern technology for constructing a block columnar foundation involves the following steps:
- Before starting work, it is necessary to first prepare the site - thoroughly clean it of various debris, and also level the area.
- If the construction of a building takes place in an area with clay soil, care must be taken to create a gravel backfill.
- The construction site is marked, which consists of marking the places where it is planned to install supports.
- It is necessary to form pillars less than one meter long from blocks and fill each individual structure with concrete mortar.
- Installation of spacers made of wooden blocks is carried out.
- At the bottom of the pit, a so-called cushion of crushed stone and sand should be made in order to provide additional protection for the future building from subsidence for one reason or another.
- A formwork is created, the structure of which is erected using wooden panels. To obtain permanent formwork, you need to use pipes made of metal and asbestos cement.
- It is mandatory to reinforce the supports - reinforcing bars are mounted, and wire for horizontal jumpers is also attached.
- After completing the work of tying the reinforcement, it is necessary to begin pouring the structure with concrete. The solution must be compacted in such a way that it fits as tightly as possible to the walls of the structure and the soil. This eliminates the appearance of voids.
- One of the important stages is to ensure high-quality waterproofing, which is created using a durable roofing material layer applied on top of the blocks.
- Then a grillage-shaped component is created.
- The lintels are connected by thin reinforcing rods, forming a reliable frame.
- The resulting form is poured with concrete mortar and left alone until the substance dries completely.