Despite the strength and durability of concrete floors, even they require regular repairs. Violations of the technology for laying such a floor, the peculiarities of its operation, and improper care can lead to problems in the form of cracks, chips, potholes, swelling and other surface defects. Repairing concrete floors allows you to return the coating to its original appearance and high performance characteristics. In some cases, repairs can be done by yourself, but to eliminate complex defects you will need to hire specialists.
Preparation
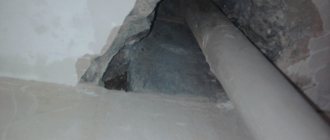
First of all, you should inspect the room and determine if there are other openings through which rodents enter the room.
The fact is that in some old houses the sun lounger, which extends from the riser pipe, is located below floor level. Therefore, there may be several holes that rats use. Typically, access to the basements of such buildings is difficult or there is almost no access to a specific place. Taking this into account, work needs to be done to widen the hole so that it can be sealed from above
It is very important to do this in such a way that a kind of funnel is formed with a narrow neck towards the bottom. This will make it easier to seal holes in the concrete floor without worrying that the created plug will fall out after a certain time
Advice! Since all work will be carried out near pipes, you must be very careful not to damage them. Many homes have long had plastic plumbing systems that do not withstand physical impact very well.
How to fix a hole in linoleum without a patch
What is the best way to seal cracks in a wooden floor and near walls
? You can get rid of dents and small-diameter holes using special adhesives for linoleum:
PVC glue A-type. The consistency of the composition is quite liquid, suitable for sealing deep scratches and holes with a diameter of up to 1.5 mm. To avoid staining the adjacent surface, apply masking tape to the defect site. A neat cut is made in it above the hole in the floor covering. The adhesive composition is pumped in with a syringe. Preferably flush with the surface. After hardening, remove the tape. If the glue sticks out above the surface, then carefully cut it off with a knife. For a better effect, the area is rubbed with wax.
C-type PVC adhesive is suitable for larger holes. It has a thicker composition. The best option is to use it together with a tint that matches the color of the coating. Both compositions are mixed and poured into the hole.
In this way, you can restore small holes: a hole from a drill, deep scratches, etc. For larger sizes, a different technology is used.
Features of filling holes
Restoration of the floor covering has a number of subtleties:
- Location of the defect. If this is the center of the room, you will have to work hard to disguise the repair site. In corners and under furniture, damage to the linoleum will be less noticeable.
- Defect scale. It is more difficult to repair large areas; patches are indispensable.
- Availability of a drawing. With such linoleum, you will have to select several colors for small defects, if there is not a piece left from installing the floor covering.
If you do not immediately repair the hole that appears, it will gradually creep away under mechanical influence. Dirt will accumulate in it, which over time will lead to swelling of the coating and the appearance of unpleasant odors.
Linoleum went in waves
If the defect occurs near the wall, then most likely the technical clearance was not observed during installation. They unscrew the plinth along three walls, trim the fabric, and leave it to rest for several hours or days, depending on the thickness of the material and the surrounding temperature. The floor covering has straightened out, the baseboards are being installed back.
If the linoleum is swollen with a bubble in the middle of the room, then neat cuts are made along the swelling on both sides, air is released, and glued with masking tape so that excess glue does not stain the adjacent area. Glue is driven into the holes formed with a syringe, the edges are joined, secured with masking tape, and left under the load.
Blistering of the coating often occurs due to stretching of the canvas. You will need to not only cut the canvas, but also remove its excess. Gluing is carried out similarly to the previous methods.
Joining seams
When installing in large rooms and on thresholds, linoleum is often connected using cold welding. During use, such seams sometimes come apart. Anyone can seal linoleum on their own. The canvas should be stretched with an overlap of 5 mm. Make a cut in the middle of the resulting mound, grabbing two edges. Perform the operation by applying a flat bar. Remove the cut off excess. Degrease the edges and protect the adjacent surface with masking tape. For this work you will need C-type PVC glue. The edges are processed, glued, and left under pressure. The glue has hardened, the excess is carefully trimmed with a knife, the tape is removed, and the welding area can be treated with wax.
Seal the coal hole
Fixed by installing a patch. The damaged area is cut out on the floor. It is better if the hole is prepared in the form of a regular figure: square, circle, rectangle. If there is any scrap left after installing the floor covering, this is an ideal option, otherwise you will have to go to the store and select a material that matches the color and pattern (if available). After this, a patch is cut out to fit the resulting hole and tried on. The pattern, size (the patch fits into the cut-out space on the floor, fits tightly to the edges), and the direction of the texture must match.
Protect the edges around the hole with masking tape. The floor in the area of the hole is cleared of debris and treated with a primer. Glue is applied to the patch and glued into the prepared hole. PVA and PVC glue are used. At the repair site, oppression is installed for 2 days. You can restore a burnt hole by showing your design skills. For example, make an applique using fabrics of different colors.
Torn holes
It can be solved by using a patch or by gluing the torn surface in place if the edges at the defect site are even.
Even large holes that appear during operation can be repaired thanks to modern adhesives and ingenuity.
Gaps between floor and wall
This problem occurs quite often. Moreover, it can be either a house with a wooden floor or an apartment in a panel house. In any case, the problem must be solved: the sooner the better.
As for flooring made of boards, according to the technology of building construction, a small gap between it and the wall is necessary. This is a mandatory condition, since wood is a “living” material and can expand with high humidity or decrease in volume with dry air. In addition, this is also such important ventilation for wood. The initial width of the gap is in the range of 0.5-1 cm, the permissible increase is up to 2 cm. In the future, you will have to remove the plinth and eliminate the damage. By the way, skirting boards are effective for gaps of 1-2 cm, and their poor installation allows debris to accumulate between the floor covering and the wall, eventually destroying and deforming the joint.
To seal the gap, we dismantle the baseboard, thoroughly clean the gap from dirt and try to reduce its size. The choice of material to eliminate the defect depends on the depth and severity of the latter. Typically used:
- Felt (for caulking), jute, tow.
- Polyurethane foam.
- Plaster, putty.
- Acrylic or silicone sealant.
If the gap:
- Small (less than 3 cm). It is easy to seal it with plaster, polyurethane foam, cement mixture, putty .
- Medium (from 3 to 5-8 cm). Here it is necessary to use additional (preferably natural) materials - tow, moss, jute felt rolled into a “sausage” . They will add strength to the filling, and if processed, for example, in formaldehyde, they will prevent the appearance of insects in the future.
- Large (more than 5-7 cm). To fill the voids, the following are suitable: polystyrene foam, pieces of brick or wood . The main thing is that the filler is not very fine, covers a larger area, but does not make the gap wider.
When the gap is filled with auxiliary material, you can fill it with construction foam, cement mortar, etc.
If, when eliminating the gap, there will be plaster on top, then pieces of wood cannot be placed in the recess. They will absorb moisture from the solution, which can cause rotting, swelling, and mold.
After complete drying, excess material is removed, surfaces are cleaned, finishing work is carried out, and if desired, the baseboard is installed.
Repairing minor damage
What comes first: laminate or doors?
How to repair a small hole in linoleum? - a frequently asked question. The modern market offers a wide range of repair compounds:
- Mastic. Sold as a pencil or paste. A wide range of colors allows you to choose the right option.
- PVC glue for linoleum (cold welding). Allows you to eliminate holes with a diameter of up to 2 mm.
- Wood sealant. Such compositions are available in various colors, so they are often used to repair minor defects in floor coverings.
- Homemade composition. Made from various components. For example, colorless nail polish and shavings from the top layer of linoleum are used.
Before repairs, the surface is prepared: it is cleaned of debris and degreased. After this, the holes are filled with the selected product.
How to remove scuffs?
Minor scratches and surface damage to linoleum can be eliminated using the following means:
Wax for linoleum. This coating renewal is carried out if the damage is shallow. They are rubbed with the edge of a coin, eliminating uneven edges. Treat with wax to obtain a uniform glossy surface. But this procedure will have to be repeated periodically. Mastic
It is important to choose the required color. You can cover shallow damage with mastic. Polish
This product is used to restore the protective layer of the floor covering.
Such materials will allow you to renew the coating and eliminate abrasions that have arisen due to damage to the protective layer of linoleum.
How to seal linoleum is chosen in a specific case. It largely depends on the type, scale of damage, and financial capabilities. Any chosen method requires a patient and careful attitude. Then the repair site will not have to be additionally masked with carpets and furniture.
Useful video: Restoring old linoleum
Gap sealing technology
Most often, cracks are eliminated using sealants or putties, which are available in a large assortment in hardware stores. As a more budget-friendly option, many people prefer sealing with wooden wedges.
Sealing cracks with sealant
The effectiveness of this method directly depends on the type of sealant. In residential areas, silicone or acrylic-based compounds are used for wooden surfaces. The former have greater elasticity, and therefore better withstand deformation of the coating when changing humidity and temperature conditions. But they emit an unpleasant odor during application and are unsuitable for subsequent painting, so to mask treated seams you must initially purchase a composition that matches the color. Acrylic sealants can be puttyed and painted, have no odor, and are applied easily and quickly. Their disadvantage is their tendency to shrink and lower elasticity.
Advice. Acrylic sealant is best suited for heated areas with slight fluctuations in humidity levels. For unheated rooms, or irregularly heated ones, it is worth choosing a silicone-based composition.
Silicone Floor Sealant
In terms of quality, Ceresit, Tytan, Moment and Bostik sealants are considered the best.
In addition to the sealant, you will need a narrow and wide spatula, a clean dry rag and a protective impregnation, such as parquet oil.
Sealant and parquet oil
Step 1. The floor is thoroughly cleaned of dirt, paying special attention to the cracks. If necessary, the surface is degreased or washed with water, after which you should wait until the wood is completely dry.
Step 2. Carefully cut off the tip of the nozzle along the width of the gap between the boards, insert the tip into the gap and squeeze out the sealant in an even, continuous strip.
Applied sealant strip
Step 3. Having filled the cracks in a certain area of the floor, take a narrow spatula and level the composition, running the tool along the cracks. The spatula blade should be held at a slight angle to the surface in order to remove the sealant flush with the boards and not leave protrusions or depressions along the seams.
Leveling the sealant with a spatula
Step 4. Having completed leveling, wipe off excess mixture with a clean, dry cloth.
Step 5. A small amount of parquet oil is poured onto the floor and spread over the work surface with a wide spatula. Movements with a spatula should be arched, across the boards, so that the protective composition effectively fills the slightest recesses.
Pouring parquet oil
Application of parquet oil
Now all that remains is to wait for the surface to dry. If everything is done correctly, cracks in the floor will not bother you for a long time.
Repairing cracks with putty
What you will need for work:
- wood putty;
- wide spatula;
- Sander.
| Step, No. | Procedure |
Floor after renovation
Seal the gap with a wooden lath
During the work you will need:
- thin wooden slats;
- large awl or screwdriver;
- PVA glue;
- hacksaw with fine teeth;
- hammer;
- wood putty;
- sandpaper.
Step 1. The gap between the boards and the floor surface are cleaned of dirt and dust.
Gap between boards
Step 2. The tip of a screwdriver or awl is inserted into the gap and drawn several times with force along the entire length of the board so that the rail fits more tightly into the gap.
An awl is drawn several times with force along the entire length of the board.
Step 3. Next, apply PVA glue to the crack in a continuous strip along the entire length and level it with a finger or the corner of a spatula so that the composition gets inside. Where voids have formed, it is necessary to add more glue.
The glue layer is leveled with your finger
Step 4. Take the rail, insert it edgewise into the slot and tap it with a hammer. For convenience, the lower edge of the lath can be trimmed into a wedge - this way it will fit deeper between the boards and fill the gap more tightly.
The rail is hammered into the slot with a hammer
Advice. If you don’t have a wooden mallet, you can hit the strip with a regular hammer, turning it on its side. You can also use a wooden block as a backing - this way there will be no dents left on the rail from the hammer.
Step 5. When the glue has dried, the protruding part of the slats is cut off with a hacksaw flush with the surface, and then cleaned with a plane.
The excess needs to be cut off with a hacksaw.
Small chips are cut with a knife
Surface treatment with a plane
Step 6. The treated area is covered with putty to eliminate the smallest defects, then sanded with fine-grained sandpaper.
After puttying and sanding, the repair area becomes invisible
After this, all that remains is to clean the dust and treat the boards with any protective compound - oil, varnish, stain or floor paint.
Video - How to seal gaps in the floor between boards
Anton Svistunov chief editor
Author of publication 09.13.2017
Did you like the article? Save so you don't lose!
Reinforcement
Is it necessary to glue linoleum to a concrete floor?
At this stage, you need to lay plywood or glass at the bottom of the resulting funnel. This overlap will serve to hold the mortar in the hole and act as a kind of formwork.
Next you should place the reinforcement. Usually it is used only in cases where the hole in the floor is too large. It strengthens the plug and serves as a connection to the floor slabs. If the floor is made of two panels, then it is installed in the space between them. Some craftsmen prefer to use reinforcing mesh. This is considered an ideal option, but it is not worth purchasing it only for such purposes.
If a water supply or sewerage pipe enters the hole, it must be protected from the loads that will occur when concrete expands as a result of heating from climatic conditions. To do this, use a special damper tape, wrapping it around the pipe at the level of its passage through the ceiling.
Causes
First, let's find out where a hole in the floor can come from.
Agree that the situation when the surface suddenly collapses under your feet is quite unlikely.
- Falling heavy objects . This is a very real situation for weightlifting halls and industrial premises with wooden flooring (which, however, is rather an exception).
Note: platforms in gyms are usually assembled from timber, secured with staples. The platform is laid directly on the screed and covered with a sheet of hard rubber. In general, if a fallen barbell breaks through the floor, this indicates either a gross violation of building codes, or poor discipline of athletes training with heavy weights outside the platform.
- Rotten boards . The picture is typical for houses built more than half a century ago. Harmless antiseptics were not yet available at that time, and creosote and impregnations based on petroleum products were not used in residential premises.
- Dried boards . Actually, in this case, what we have in front of us is not a hole in the floor, but a gap.
How to repair a hole in drywall on a wall
Let's consider two options for solving the problem, when the hole is small and large.
| By reading my blog, you are probably making repairs. Bookmark this page. This is where all the useful home improvement stores are located. |
How to seal a small hole
If the hole in the drywall is small - up to 5 mm in diameter, then plaster or putty is not required for this:
You can seal such a hole with acrylic sealant. The sealant should be acrylic, not silicone. After all, acrylic sealant is easy to paint, but silicone sealant is not. So, we take the gun and begin to carefully fill our hole with acrylic:
Spread the excess that has come out with a spatula:
If the acrylic has rubbed inside, take the gun and push it further into the hole until it comes out. And then carefully spread it with a spatula again.
The hole is sealed. The next day, when the sealant has dried, all that remains is to lightly sand it with zero-grit sandpaper:
How to seal a large hole
If the damage is more extensive:
then sealant is not enough. For these purposes you will need putty. But first you need to remove the chamfer:
and trim off any excess paper that may peel off later. To do this you will need a blade or knife, you can even use a stationery knife. So, the chamfer was removed, the protruding paper was trimmed:
After this you need to prime the hole. We take a brush, a primer and carefully prime it so that the primer gets both inside and outside:
When the primer has dried, take the gypsum adhesive mixture and carefully fill the hole with it:
You need to score properly, don’t rush:
After the mixture has dried:
sand it with sandpaper:
Then we take a knife and in this area we draw a rectangle of about 10 cm by 15 cm with the tip of the knife, cutting only through the paper so that the damage is in the middle of the rectangle:
Next, use the tip of a knife to hook one of the corners of the rectangle:
and remove the paper:
Moreover, the paper must be removed carefully, completely, down to the plaster, so that there are no paper scraps left in the rectangle area.
After removing the paper, we prime our surface:
When the primer has dried, glue a piece of serpyanka (plaster mesh) cut to its size into our rectangle:
After that, we apply putty to this area and begin to putty:
Once the putty dries, all that remains is to lightly sand the area to be repaired with sandpaper.
This is where the article ends. Today we discussed in detail how and with what to repair a hole in the wall and ceiling on a concrete and plasterboard base.
Assessment of screed deformation
Let's figure out whether flaws on the basis are acceptable. Naturally, a high-quality screed should have a perfectly flat and uniform surface, without visible potholes or chips. If damage does appear, you need to correctly assess the scale of the deviation from the norm. We will take three factors into account:
- deformation area,
- the nature of the subsequent finishing,
- economic feasibility of repairs.
For example, if tiles are used in the final finishing, then you don’t even have to worry about how to eliminate surface cracks, but simply ignore them. Tile adhesive can easily replace the base putty and hold them together firmly.
The cost of damaged parquet or laminate flooring is often several times higher than the cost of current screed repairs, so it is extremely financially unprofitable to ignore the defects in the base for these types of finishing. The following types of deformations can be distinguished:
- microcrack (width up to 15 mm, usually occurs on the surface as a result of improper drying),
- visible hole (width from 20 mm, most often from mechanical loads),
- internal ditch (voids hidden in the screed),
- local unevenness (areas up to 5 sq. cm, height/depth up to 15 mm)
After identifying the permissible reasons for the formation of cracks, we determine the dynamics of the mesh. This procedure is especially necessary for floors with low rigidity (for example, in apartment buildings). To check, stick a strip of paper onto the hole in the floor and observe for several days. Movable recesses respond to loads immediately. If possible, leave the beacons for a week.
Next, let's look at the most popular technologies for eliminating cracks on the floor surface with various types of deformation.
Repairing minor defects
So, first, let's look at how to glue linoleum if it has small holes, cracks, or is worn out during use. In the case of the smallest defects, it is enough to use putty (you can either buy it or prepare it yourself) to repair them.
A mixture mixed as follows may also work:
- 0.5 kilograms of powdered rosin should be melted in a porcelain container over boiling water;
- then this substance is cooled to 50 degrees Celsius, after which 150 grams of alcohol and 100 grams of castor oil are mixed into it;
- the mixture must be colored with pigment to obtain an optimal color match with the existing coating. Instructions for using pigmenting substances are usually included with the packaging, which simplifies the process of obtaining the optimal shade.
It is worth saying that after drying the mixture will lose a little in saturation, which means that before applying the composition it should be tested on a similar basis.
The putty should be applied using a spatula (not metal), and as soon as the substance dries, the area should be sanded using glass sandpaper.
How to seal a through hole in the ceiling and loggia
Anything is possible, when making repairs you can drill into the wall, for example, to a through hole or if the house was just built (builders can often leave through holes around pipes).
This can also happen spontaneously - rearranging old furniture, replacing pipes, installing various hanging equipment.
It’s not even a matter of reason, but a quick and less financially expensive way to seal the hole.
It’s easier and much more economical not to call a team of workers (when a lot of money will be spent and the quality will be questionable) to do everything yourself, so you will be completely confident in the quality of the work done and will not be afraid to step on the places of the former holes (if they were on the floor).
How to repair a through hole in the floor
Fixing a through hole is of course more difficult than the same pothole, but it is quite possible. To do this we will need to make formwork and reinforcement.
Sequencing:
It is necessary to chip away at the edges of the hole so that it tapers towards the bottom (cone) (in this case the “plug” will not fall out of the concrete).
Cut out a piece of plywood (necessarily larger than the hole itself), attach it to the bottom and fix it. You can attach it using spacers, you can make a reinforcement and tie plywood to it.
Fill the hole halfway with cement mortar.
Then lay reinforcing mesh on top (or thick wire and tie it together).
Fill the remaining part of the hole with cement mortar.
How to repair a through hole in a concrete wall
Holes in walls can be seen in several sizes:
- Inconspicuous (for example, unsuccessful driving of a nail or drilling);
- Large through hole.
Inconspicuous hole
Before carrying out work, you need to remove debris (remnants of wallpaper, pieces of concrete) and clean the hole from dust (with a regular vacuum cleaner).
Sequence of work:
- Using improvised tools, we slightly widen the hole.
- We remove dust with a vacuum cleaner.
- We take a brush, lower it into the water and moisten the edges of the hole with water (so that the plaster does not absorb moisture from the applied solution).
- Using a spatula, apply the cement mortar, trying to rub it as deep as possible.
- We wait until the solution dries completely.
- Sand the surface with sandpaper.
- After all the work, this place can already be painted or wallpapered.
If the hole is larger, then the sequence is the same, only you need to take a large spatula and you can put the brick deep.
Large through hole
- Ideally, you need to have access from two sides (for example, if this hole is between your rooms).
- But if you do not have access to the other side (it is located on your neighbors’ property), you can still solve this problem.
- Sequencing:
- We take a drill and use it to drive 4 strong dowels deep into the wall (they will serve as a support for bricks or stones).
- We use a brick or a piece of stone (depending on the size of the through hole), making sure that it completely covers the hole.
- We fix the brick or stone inside with cement mortar
- After this, we take putty or gypsum mortar (or you can take the same cement one) and cover up the marks and unevenness.
- Sanding the edges.
If you have a through hole at the junction of the plates, then it is better to use polyurethane foam followed by putty instead of cement mortar (it crumbles).
In general, there is nothing complicated here, even a person who is far from repairing can cope with this (although the size of the hole is directly proportional to the complexity of its repair) everything is absolutely real.
Leveling a wooden floor
Some uneven areas of the floor can be sanded by hand - just like you did after using putty - but where there are depressions in the floorboards or a thick layer of old paint, grease and mastic, the best solution is to borrow a commercial sander and sand it down. the floor again. Start sanding the floor with a coarse sanding belt, then gradually move to a finer abrasive, aiming the machine across the boards. Finish sanding by going along the floorboards with a fine-grit sandpaper.
For hard-to-reach surfaces, also rent a special sander (if you don't have a belt sander), since the sander won't reach areas of the floor directly next to the baseboards.
Mortar and pouring
When deciding how to fill a hole in a concrete floor, many begin to invent their own formulas for creating concrete and use various additives. In fact, everything is quite simple. We take three parts of sand, which we mix with one part of cement. Add a little water to the dry mixture so that the solution has the consistency of thick sour cream.
Then pour the prepared mixture into the bottom of the hole in a one-centimeter layer. Then we begin to lay out a layer of crushed stone, placing the stones tightly together. Next, add more mortar to cover the crushed stone. As a result, the solution should occupy half the depth of the hole.
Advice! It is very important to ensure that the mixture penetrates into all the gaps between the crushed stone. Some craftsmen use a small stick or thick wire to trample down the concrete.
As a result, there should be no empty spaces or air bubbles left.
Some craftsmen, answering the question of how to fill holes in a concrete floor, recommend pouring it in one go. This saves a lot of time and allows you to get a monolithic plug. This solution is considered correct when working with thin floor slabs and shallow holes. If the hole is quite large, then the filling is carried out in two stages so that the solution in its volume does not cause cracks or strong shrinkage.
Given this approach, you need to let the first layer harden. Usually this takes no more than a day. Since there is no need to wait for final hardening.
Advice! If the filling will be carried out in several stages, then you should not immediately prepare a large amount of solution. The remainder will have to be thrown away, which will lead to waste of materials.
The second stage of pouring is carried out according to the principle of primary concreting. In this case, you can also put glass at the bottom of the pit to completely eliminate the possibility of rats entering the room. Then a layer of mortar, crushed stone and more mortar is poured.
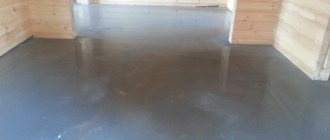
When the hole is filled flush with the floor, the mortar is leveled using a spatula, creating a smooth surface. It is worth noting that if the surface is covered with tiles or other covering, then the leveling is done at the same level as the screed.
At the final stage, you can lay tiles or the coating used in this room on the floor. Usually after repairs there are always small pieces left that should not be thrown into the trash.
Bottom line: answering the question of how to seal a hole in a concrete floor and at the same time block access to the room for rodents, we considered the option of making a concrete plug. At the same time, the solution contains crushed stone, which rats cannot bite through, and the presence of glass lintels completely eliminates this problem. However, it must be remembered that such work should be carried out only after the rodents have left the room. Otherwise, they will remain in the apartment and will not be able to go to the basement on their own.
Repair of floor screed when a weak coating is identified
Connoisseurs of ideal quality in everything will begin to remove the concrete layer to the very base. If such a voluminous scope of work is not at all pleasing, then the necessary repairs to the floor screed can be made by strengthening the weak screed. So, you will need powerful hammer drills designed for professional work. Making holes with a diameter of 20 millimeters, repeated every 25 centimeters using drills with a small angle of inclination of the working groove, will help to carry out repairs using holes drilled to the very base.
You should end up with holes with a widened top and a depth equal to the thickness of the coating. The resulting holes will need to be cleaned to a state corresponding to minimal contamination.
Now you need to stock up on rods from scraps of reinforcement with a diameter of 12 millimeters. We degrease our blanks and make them to a length corresponding to the depth of the hole.
Next, we will need a special epoxy for working with concrete, called Rizopox 3500. This brand is ideal for this type of work. Pour the solution into the holes made, insert a metal rod and fill the upper bowl again. The role of the filler, which brings this composition closer in consistency to concrete, will be played by quartz sand, which must be added to the diluted solution. The result of the work done will be a screed surface reinforced with metal reinforcement, resulting from an epoxy composition consisting of two components.
If the joining seams come apart
You can seal the joints of the coating strips using the “hot” or “cold” method.
The joints are “welded” hot and cold
Step-by-step instructions for cold joining seams:
- we stretch the two strips to create an overlap of 2 mm, put a metal strip under it for ease of cutting. In the middle of the overlap we cut both strips;
- we throw away the cut strips, stick masking tape along the entire length to the joint, and cut it at the joint;
- We fill the seam with PVC glue using a glue gun or a thin tip, after half an hour we peel off the tape and wait until the glue has completely hardened.
Using the hot method, we glue the linoleum joints together using a hair dryer with a special nozzle. To do this, you need to purchase a special cord in advance and expand the joining area to 5 mm.
At the same time, we warm up the cord and quickly (before it cools down) place it inside the seam. The gluing of the ends occurs by vulcanization of the joints, thanks to which the strips form one whole. This method is more reliable, but requires special skills in working with a hair dryer.
Joints sealed using hot method will be properly fastened for a long time. There is no need to neglect repairs, as dirt will get under the covering and moisture will get in, which will lead to the formation of mold and an unpleasant odor in the room.
Filling other types of holes
When installing gaps, cracks and chips, it is important to pay attention to their location. For example, when renovating a bathroom or toilet, you must choose a repair mixture that can withstand high humidity; when renovating a balcony on the street, it must be able to withstand temperature changes; it must also not allow cold air to pass through.
Depending on the location, installation features will be as follows:
- Cracks at the joint. They are removed in the same way as usual, but it is necessary to widen the gap to 1 cm along the entire length.
- Holes when laying pipes. Small holes are sealed with silicone, large ones with polyurethane foam.
- Peeling plaster on the ceiling. It is necessary to apply a special mixture for vertical application, prime and apply several layers of plaster. It is important that each layer dries well - only then can a new one be applied to it.
- In the bathroom, chips can be quickly removed using mastics and polymer-based putties that do not leak.
- Crack in a brick wall. It can be repaired in the same way as concrete.
Separately, it is worth noting the cracks that appear on drywall. There may be several reasons for this:
- The layer of plaster is too thick. The cracks are usually small and form a “web”. Repair consists of carefully removing the plaster and applying new plaster. The layer thickness should be no more than 2 mm.
- There is no reinforcing tape or the metal frame is weakened. Cracks can be horizontal or vertical, they are deeper. You will need to expand them and fill them with plaster, put reinforcing tape on top and plaster them.
It’s not difficult to figure out how to cover up a hole in the wall. The choice depends on the size of the damage, the material of the wall itself and the location. Small cracks are easy to fix on your own; wide and dangerous ones are best left to specialists.
Do-it-yourself repair of cracks in the plaster of internal walls
Repairing large tears in the fabric
Now let's look at how to seal torn linoleum in compliance with the basic parameters of the design. The patch should not stand out in the photo or during visual inspection on top of the main flooring. Naturally, the most reasonable option is to use a piece of linoleum from a previously laid sheet. The restoration of the canvas is carried out in several stages.
First, it is very important to select a patch that perfectly matches the defective area. It is important to take into account the features of the pattern on the existing coating
The pattern is selected with the expectation that the defective hole or crack will be expanded in accordance with the size of the patch. It is necessary to apply it and cut off the area to the very base on which the damaged linoleum is laid, around the patch.
A non-glued sheet is processed as follows:
- the canvas is rolled up and laid so that there is direct access to the damaged area from its reverse side;
- the patch is glued right side to the base of the linoleum sheet, covering the defect;
- when cutting the patch in this area, you can glue two layers with double-sided tape so that they do not get confused and the pattern on the surface is not disturbed;
- masking tape is glued under the joining seams between the patch and the main sheet;
- the patch itself fits into the cutout only after gluing the tape and fits perfectly with the existing pattern;
- strips of adhesive tape are also glued over the coating;
- the prepared seam is heated with a hairdryer to a temperature of 40 degrees Celsius. Then a cold weld strip is laid into the seam;
- After 10 minutes, the welding hardens and the glued tape can be removed.
After repairing the torn linoleum, the seams will be practically invisible.
If we talk about how to patch linoleum glued to the base, the procedure is as follows:
- to begin with, the base is carefully processed: the old adhesive layer, small debris, dust and other foreign materials are removed;
- the base is primed under the patch;
- the cutout for the insert and the patch itself warms up to a temperature of 40 degrees Celsius, but no more;
- Once the primer has dried, you can apply the adhesive layer and lay the patch. The surface is rolled with a roller to remove any swelling that may occur. The adhesive should be marked “For PVC”, since many other compounds can lead to the dissolution of this layer;
- After fixing the torn linoleum onto the patch, it is necessary to lay sheet material with a dense structure (plywood, OSB) and press it down with a weight. Seams that are too noticeable should be puttied with the composition described above.
Cover the burned area
Burnt areas can only be masked with a patch
We repair linoleum with a hole burned through careless handling of fire. To do this, seal the hole using a patch made of the same material.
Repair sequence:
- We design the damaged area in the form of a geometric figure of the correct shape (circle, square).
- We clean the edges, degrease, and remove dust from under the coating with a vacuum cleaner.
- We select a patch so that the pattern matches, apply it to the damaged area, and cut out a piece of the desired shape.
- Spread the patch with adhesive on the bottom and along the edges. We insert it into the hole, press it down, and leave it under pressure for 48 hours.
Using the principle described above, large torn holes can be repaired. If the edges of the tear are even, you can glue them together using the joint-joining method; if they are torn, then you will have to look for a patch made of material with the same structure and pattern.
After completing the repair, there is no need to throw away the remaining materials used; they may be needed to restore damaged areas of the coating.
Cracks in the screed are the most unpleasant type of damage
Uneven loads lead to the appearance of cracks, which have the unfortunate property of increasing. Repairing cracks in floor screeds is carried out as follows:
- we widen the crack and deepen it;
- clean from debris and dust;
- along the crack we make perpendicular grooves 150-200 millimeters wide and 20 millimeters deep;
- fill the crack halfway with a mixture of mortar and quartz sand, install metal brackets in it;
- after the bracket hardens in a vertical position, fill the crack completely with epoxy;
- The hardened surface is polished.
Eliminating the listed screed defects using technologies recommended by professionals in their field will help you reduce costs during repairs and significantly save time. Good luck to you in your endeavors!
Choosing a location for installation
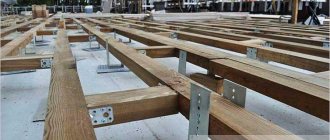
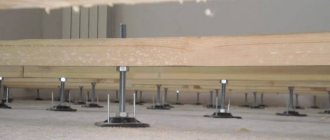
When choosing a location to install a hatch, it is necessary to take into account the structure of the floor and the movement of people. If the floor is made of wood, then the hatch can only be installed between the joists, because damage to even one joist will lead to sagging of the floor, squeaks and vibrations. If the floor is made of hollow core slabs, then the hatch should be located at the junction of two slabs. If the hatch is long, then it must be placed along the slabs. Any other installation will lead to severe weakening of one of the slabs, which may result in its collapse.
In a monolithic reinforced concrete floor, the hatch can be located anywhere, but the closer to the center, the better. The strength of the hatch is much less than the strength of the floor, so it must be installed in those places where people walk least often and do not place furniture. However, the smaller the hatch size, the less susceptible it is to this rule. Hatches measuring up to 80x80 cm (length and width) with a powerful frame and a rebate with a width of at least 25 mm can be installed even in the most accessible places. To do this, the manhole cover will need to be made not from a thin, but from a thick (over 40 mm) board
How to prevent cracks from appearing
It’s not for nothing that they say: “Forewarned is forearmed.” So in this matter: it is better to follow all the rules for laying the floor, regularly carry out inspections and take the necessary measures.
- Laying is carried out taking into account the correct ratio of the thickness of the boards with the gap between the logs.
- There is a gap between the wall and the floor covering along the entire perimeter of the room.
- The joints of wooden surfaces are covered with damping gaskets as a means of shock absorption and preventing squeaks.
- Wood products must be coated with antifungal and water-repellent solutions.
- In order to prevent moisture from appearing under the floor, it is possible to organize natural ventilation.
Material for making hatch
For making a hatch, boards and steel are best suited. A hatch made from boards is easier to manufacture and install, because you don’t have to use a grinder and a welding machine
But the metal hatch is stronger, this is important if there is a chance that your basement is going to be robbed by homeless people. For a basement located inside the house, a wooden hatch is preferable - it is easy to make and no special strength is expected from it
After all, if an attacker breaks into the house, he will find something to profit from besides the basement. Another advantage of a wooden hatch is that it is much easier to finish it so that it does not stand out on the floor.
How to fix cracks in a concrete floor with your own hands
Wooden floors are distinguished by high performance and decorative qualities. This is possible if all work on their installation is completed without serious errors. Otherwise, you need to be prepared for serious repairs and find out in advance how and with what to repair the hole in the floor made of boards.
Causes of holes
All the variety of reasons that lead to floor damage can be combined into two large groups:
- poorly executed foundation;
- defects in floorboards.
The first group includes errors associated with lags (defective material, insufficient cross-section), creation of favorable conditions for the development of mold and mildew, poor quality of the concrete base or supports.
A hole in the floor can form due to the destruction of the floorboards themselves. To reduce the likelihood of such a development of events, it is necessary to avoid the use of low-quality lumber.
Critical defects include:
- long through cracks;
- dead and falling out knots of significant area;
- damage to wood by woodworm.
Coating repair
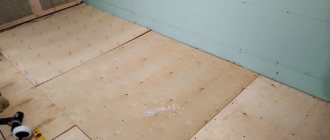
In order to understand how to repair a hole in the floor, you need to assess the extent of the damage. Small areas can be repaired by replacing part of the board between two joists. Sometimes, if the damage is significant, it may be easier to replace the entire floorboard or even several adjacent ones.
Use a jigsaw, saw blade or manually using chisels to select the damaged area. Next, using a crowbar chisel and a hammer, the defective areas of the floor are removed.
The hole in the floor is covered with new, healthy boards. In order for them to fit into their seat as much as possible, the lower part of the groove is cut off. The board is installed in its place and attached to the joists using self-tapping screws.
The fastener caps are masked using putty. The appearance of the floor is finally restored after painting the repaired area.
Base repair
Floors of the first floor made on the ground are very critical to the quality of foundation preparation. The concrete screed on which the floor joists rest is poured over pre-made layers of compacted crushed stone, hydro- and thermal insulation.
Repairing such floors begins with removing the wood covering. The choice of how and with what to seal holes in a concrete floor is made after assessing the nature and extent of damage to the rough screed.
Most often, screed repair comes down to repairing cracks and filling them with concrete mortar. Large gaps are filled with compacted crushed stone, covered with hydro- and thermal insulation and filled with cement mortar level with the level of the subfloor.
We recommend reading:
Why do plank floors squeak in an apartment and how to fix it?
Causes of defects in concrete
Defects on a concrete floor can form for various reasons, which are primarily associated with violations in the process of its arrangement.
Cracks often appear due to the absence, untimely cutting or incorrect calculation of the thickness of joints in concrete floors, designed to prevent stress on the concrete during thermal expansion and shrinkage. A correctly made temperature-shrinkable seam will avoid many problems.
Other reasons for the appearance of cracks include:
- a large amount of water in the solution when pouring a concrete screed or a lack of it;
- poor quality reinforcement;
- lack of waterproofing of the base.
Defects can occur even with quality work done. Any coating is subject to natural wear and tear and is negatively affected by excess moisture. Potholes are caused by physical forces. The influence of external factors on the concrete floor cannot be ruled out. The weak point is the junction of the wall and the floor; cracks often appear there.
It is necessary to determine the type of damage. This will allow you to draw up a work plan and select the right material. The following types are often encountered:
- small depressions, potholes;
- cracks of various sizes;
- the finest cracks and chips.
Repairs should not be delayed for a long time. The size of the defects may gradually increase, the concrete will begin to crumble and come off in pieces, which will complicate the repair of problem areas.
How and how to repair a hole in an iron barrel
The mentality of our compatriots does not allow us to throw away old and unnecessary things. Skilled and zealous owners are able to give a second life to any item. A striking example of this is an old metal barrel, which is used in all areas for watering the garden or as a container for a summer shower.
But the service life of metal in the open air is short: acid rain quickly corrodes the metal. One day you discover that the barrel has leaked: a crack or even a through hole has formed. Our people will not rush to throw away a leaky barrel and buy a new one. Firstly, this requires an investment of money, and secondly, the hole can easily be repaired with your own hands.
Closing the crack
If a crack appears on the bottom or side wall of the barrel, you can repair it in the following ways:
- From the outside, the crack site is coated with molten resin or waterproof glue. Then a layer of rubberized fabric or thick fiberglass is applied. The top of this “patch” is covered with another layer of resin or glue. For reliability, glue or resin is also applied to the inside of the crack (after cleaning the rust).
- The leaky bottom of the barrel is sealed with clay diluted in water. To do this, in the place where the container will stand, dig a small pit, which is filled 3/4 with clay (you can knead it directly in the pit). An empty barrel is immersed in this mixture: to do this, you need to put a couple of bricks or stones on the bottom. After drying, the clay forms a dense layer through which water does not seep. A barrel installed in this way will last for many more years.
Closing the hole
To seal a hole in a barrel, several methods are also used:
- The most common option is to use a bolt with a nut and washers of the appropriate size. Rubber gaskets are placed under the washers on both sides of the hole, after which they are tightened with a bolt and nut.
- If a large hole has formed, you can take a bolt of increased diameter and cut washers of the required size from sheet metal. In this case, it is better to use raw rubber as gaskets, which provides excellent sealing. You need to work with raw rubber in a warm room or warm it up before gluing it to metal.
- For small holes, use cold weld putty. This two-component composition is characterized by high adhesion to any cleaned surface and at the same time has high sealing properties. Cold welding is also suitable for repairing small cracks: for reliability, they are processed on both sides.
In conclusion, we note that using an electric or gas welding machine to apply a metal patch is pointless. The walls of the barrel are very thin, so they will simply burn out, and even more holes will form.
Hatch design
Any hatch consists of the following elements:
- boxes;
- doors;
- awnings;
- pens;
- castle
The box is attached to the floor and bears the entire load, so in wooden hatches it is made of planed boards with a thickness of at least 50 mm and a width of at least 150 mm. To create an iron hatch box, use a steel corner measuring 50–60 mm.
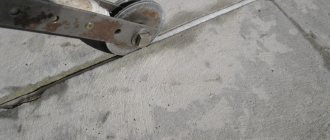
Most often, in wooden hatches, the door is made of planed boards 20–25 mm thick. If the hatch is located in a passageway, then the door is made of planed boards 40–50 mm thick. In an iron hatch, the door is made of a steel sheet 2–3 mm thick and reinforcements made from a corner with a shelf width of 30–40 mm. Any canopies can be used, as long as they are guaranteed to withstand the weight of the door. Handles can be either protruding or hidden or semi-concealed. Any window or door handles are suitable as protruding handles, and use various rings as hidden or semi-hidden ones. As a lock, you can use either bolts, mortise or padlocks.
Methods for repairing linoleum
Large tears are patched
Linoleum can tear due to various reasons, but there is no need to rush to replace the floor covering with a new one. You can carry out repairs yourself without seeking help from specialists. Let's look at ways to seal linoleum with your own hands:
- glue small tears together;
- cuts and joining seams can be sealed with cold welding or mastic;
- Fill small scratches with wax, sealant, mastic;
- We rub away abrasions with wax, selecting a suitable shade;
- To repair large damages, we use a linoleum patch of the same color.
If linoleum is torn, you need to choose the most suitable restoration method for each case. There are many compositions on sale that allow you to repair the coating so that the damaged area is invisible.