I ask for your advice on how to properly and safely make an opening for the stairs in the floor slab. Panel type PC 40-15-8. Option 1 (advised by the person who will make the stairs): as shown in the diagram - cut an opening 80 x 280 cm.
I ask for your advice on how to properly and safely make an opening for the stairs in the floor slab. Panel type PC 40-15-8. Option 1 (advised by the person who will make the stairs): as shown in the diagram - cut an opening 80 x 280 cm.
Option 2. Cut an 80 cm wide opening along the entire length of the panel. Fill the area that will be the platform for the stairs. Thanks for answers.
In practice, I hauled 12 tons of cargo up a 200 meter tower. By the way, why do you need a 24th channel for a span of 4 meters? Did you like the size? Like, is it similar to the size of the void? But there shouldn’t be any problems with the nests. However. There are other ways to secure it. Yes, by the way, GIP BU. Do you have any real experience in actual installation? or is everything just on paper?
For reference. An hour of work by a Chinese a la Liebherr costs about 2500. They charge immediately for 4 hours. In total, putting a couple of channels out the window (if you have no imagination) costs 10 thousand.
GFS GFS Users
GFS GFS Users
Good afternoon Tell me how to secure a monolithic staircase to the floor slab at the junction? Initially, they did not release the fittings for this matter, they screwed it up.
Stolyarov F Stolyarov F Users
Drill holes at the end of the floor slab and hammer F12 reinforcement into it. The pitch is approximately 80-100 mm.
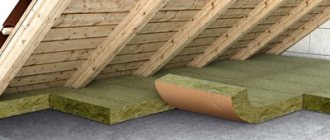
Installation of load-bearing wooden beams in a staircase made of brick or other piece wall materials
Construction of a staircase in a reinforced concrete floor
The opening for the stairs in the interfloor ceiling, consisting of standard reinforced concrete slabs, must be thought out in advance before the manufacture of the floor.
Construction of a staircase opening in a reinforced concrete floor:
- a - in the middle of the ceiling;
- b - near the wall; c - arrangement of formwork for monolithic sections.
The staircase opening in this ceiling is framed with steel profiles (angles, channels, I-beams). Usually, when constructing a building, a gap is left under it, the size of which is equal to the width of a standard reinforced concrete slab. The staircase opening takes up much less space than planned, so the remaining holes on one or both sides are sealed.
It is necessary to place metal beams along the floor slabs, fastening them together by welding. The frame formed from metal profiles should rest on the walls in the same way as the floor slabs. After its installation, you can begin to reinforce monolithic sections.
In order to hide the metal of the structure, you need to raise the frame 2-3 cm relative to the bottom line of the floor slabs. During the manufacturing process of a monolithic section, the concrete solution will flow under the steel profiles and hide the metal. The monolithic fastening will be reliable if short pieces are welded onto the lower shelf of the metal profile and a poppy mesh with a rod thickness of at least 3 mm is attached to them.
When making a metal frame from profiles, it is recommended that their “horns”, that is, the shelves of the profiles lying lengthwise, be placed in the middle of the ceiling. Then it will be easier to produce a monolithic section. For transversely lying profiles, it does not matter where the horns are directed. But if the opening in the ceiling under the stairs is planned to be finished with wood or other material, then it is also better to direct these horns inside the areas being poured with concrete.
The simplest formwork
The budget, most common formwork option is made from boards and timber of at least 2nd grade wood:
- The monolithic layer is poured onto a plank deck with a thickness of at least 25 mm; the width of the boards can be any.
- Beams and purlins are made of 50x100 timber.
- The minimum cross-section of load-bearing posts is 50x65 mm.
Compliance with these requirements will ensure that there is no sagging in the monolithic section of the floor.
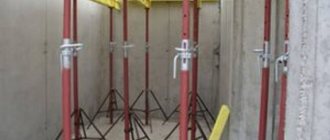
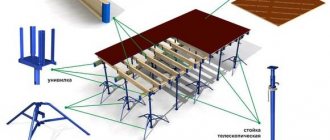
Installation of racks
The side edges of the floor slabs serve as formwork fencing for the monolithic section being constructed. Its deck is placed under the floor slabs and mounted on support posts
Procedure for installing supports:
- Pillars are installed on both sides of the opening.
- Beams rest on them and are laid across the slabs.
- The purlins are mounted on top of the beams along the slabs and are made of 50x100 mm timber.
- Next, the remaining supports are mounted under the purlins in increments of 1 m to ensure the horizontality of the formwork.
- At the base of the supports, a lower frame is made - the posts are sewn together lengthwise and crosswise with a 25 mm board to ensure the stability of the structure when poured with concrete.
- The top trim is done in the same way at a height of approximately 1.5 m, resulting in a rigid spatial structure.
Racks can be made using the extension method. The essence of the method: the supports are made smaller than the required height, but then they are built up at the top in pieces of the required size. This makes it easier to dismantle the formwork after performing monolithic work:
- The lower beams are removed first;
- then the upper parts of the racks with beams are dismantled;
- then the flooring with the purlins attached to it is removed.
Flooring
The deck is mounted on top of the purlins, the edges of the boards run under the installed floor slabs. Any gaps in the flooring are sealed on top with polyurethane foam. The entire surface is covered with plastic film. Covering purposes:
- retaining water in the concrete mixture;
- preventing cracking of the monolithic layer;
- facilitating the dismantling of formwork;
- giving the surface increased smoothness.
Installation of metal beams for the opening in the ceiling under the stairs
Wire loops are placed on the beams, and mounts are inserted between their branches. After this, they begin to twist the wire, thereby attracting and pressing the formwork panel to the adjacent floor slabs. To prevent the possibility of laitance leakage, the shield is covered with plastic film. When the formwork is secured, they begin to reinforce and pour the concrete mixture. The assembly wire twists of the formwork are left inside the concrete monolith.
The criteria for choosing a brand of slabs are the main technical characteristics of the objects being built, including:
Sealing joints between slabs up to 30 cm wide
All of the above is designed for the construction of monolithic sections with a width of 30 cm or more. Regulatory requirements suggest that the slabs are laid almost end-to-end, with a permissible seam of 15 mm.
Important! In the range from 15 to 300 mm, reinforcement of monolithic sections between slabs may not be performed.
Several methods are recommended for filling joints:
- Plywood, boards, a metal sheet of at least 0.8 mm thick, OSB or other durable sheet material are applied to the area below. Spacers are placed under it without any special standards - the result is the simplest formwork. To be on the safe side, you can perform minimal reinforcement of the area at the discretion of the contractor. Next, it is filled with concrete and dismantled after 3-4 weeks.
Features and rules for installing floor slabs
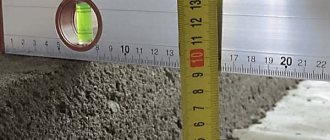
During construction, floor slabs must be laid in compliance with the standards that require the installation of slabs with a supporting surface size in the range from 100 mm to 120 mm. At the same time, depending on the materials used for the construction of walls, the size of the support may vary, amounting to:
- 70 mm – for metal structures;
- from 80 mm to 180 mm in case of support on a wall made of brick;
- from 70 mm to 160 mm for reinforced concrete walls;
- from 100 mm to 150 mm for foam and aerated concrete structures.
The values given are indicative only. The exact amount of support is made at the calculation stage, based on the specifically selected materials and individual conditions.
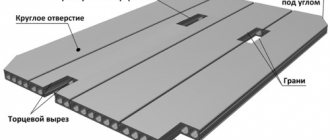
Installation of PC floor slabs is most often carried out by sealing technological voids, which are foamed and plastered to prevent damaging moisture from entering the panels. The embedment depth, as a rule, coincides with the amount of support. Otherwise, open cavities may be exposed to moisture and frost, resulting in cracks appearing in the slab, reducing the service life of the reinforced concrete product. Operation of PC slabs with open technological voids is not allowed.
Storage and transportation rules impose requirements for storing PC floor slabs, which are arranged in stacks with wooden spacers. The location of their installation must coincide with the stiffening ribs, which are located in the locations of the slinging loops. The maximum possible stack height is no more than five products.
Before starting installation work, you need to prepare a drawing of the future structure. It shows all the structural elements with their dimensions. The following requirements apply to the dimensions of individual parts:
Methods for attaching steps to a stringer
There are several ways to attach structural elements to a beam, namely:
- On the sawn tread.
- On Boltsa.
- On a steel support.
- For the filly.
Before starting work, you should decide what material the beam will be made of. You can use wood or metal for this. It is worth remembering that the staircase should fit favorably into the interior of the room.
On a sawn tread
Here the step is attached to a sawn beam. To do this, it is better for the craftsman to use self-tapping screws or wood glue with dowels.
In this video you will learn how to attach steps:
On a filly
A special stop is installed on the stringer beam. It is necessary to provide a base for the step. The filly is fastened using self-tapping screws or screws, based on the features of the staircase structure.
On a steel support
If the support was made of steel, the elements are attached to the part, which in turn is secured to the beam with bolts or self-tapping screws. The support itself can be curved or straight.
On Boltsa
This element looks like a small support leg. It is this that serves as the basis for attaching the steps. Fastening methods should be chosen depending on the situation. Most often these are self-tapping screws or bolts.
Required tools and materials
For a wooden structure, you will need to prepare bars at least 5 cm thick, from which stringers are made. Their length must cover the entire length of the march (two elements cannot be fastened together). You will also need boards for mounting the steps. For the horizontal part their thickness is 4 cm, for the vertical part – 3. It is important to prepare the parts for fasteners. Zinc coated self-tapping screws, anchors and screws are commonly used.
The tools used include a hammer and a chisel for creating grooves, a plane and an electric drill. You should purchase a screwdriver, which is used to fasten the structural elements to each other.
The last point is especially important, since the opening for the stairs in the floor slab somewhat weakens its load-bearing capacity. In this case, everything depends on the location and size of the hole in the slab, as well as the location of its installation on load-bearing walls. When starting calculations, it is advisable to have drawings of the future structure on hand, since only if they are available can you accurately calculate the optimal opening for the stairs and order the appropriate slab at the reinforced concrete structures factory.
Content
- Introduction Wood Grain Direction
- Wall stringers
- Attaching steps to a string - methods
- Methods of fastening balusters
The dimensions of the opening for the stairs must be calculated in advance
Having contracted to deliver a turnkey house to a customer, even professional builders do not try to make money on literally everything, and they usually invite specialists to install the stairs. This must be done before floor slabs are ordered or purchased. In order to subsequently make a comfortable, safe and beautiful staircase, you need to calculate the opening for it in advance. Here many factors must be taken into account that determine the size and location of the hole for the stairs in the floor slab:
- The angle of inclination of the stairs and the height of the room.
- Type of construction: straight march, L-shaped, screw, combined.
- The planned width of the stairs and the presence of protruding safety elements.
- The technical allowance for finishing the walls of the opening depends on the selected material.
- The need to strengthen a slab with a large opening with additional beams.
The last point is especially important, since the opening for the stairs in the floor slab somewhat weakens its load-bearing capacity. In this case, everything depends on the location and size of the hole in the slab, as well as the location of its installation on load-bearing walls. When starting calculations, it is advisable to have drawings of the future structure on hand, since only if they are available can you accurately calculate the optimal opening for the stairs and order the appropriate slab at the reinforced concrete structures factory.
No registered user is viewing this page.
Recently viewed by 0 users
No registered user is viewing this page.
Which countertop to choose for a white kitchen: 4 universal colors and 6 popular materials
Height, width and length of the bar counter for the kitchen: determine the dimensions correctly
Choosing furniture for the kitchen
The best articles on the IVD website
- Construction and repair
- Foundation
- Roof
- Walls
- Window
- Doors and partitions
- Ceiling
- Balconies and loggias
- Internal structures
- Floor
- Water supply and sewerage
- Heating
- Ventilation and air conditioning
- Gas and energy supply
- Lighting
- Plumbing equipment
- Security and home automation
- Baths, saunas, swimming pools
- Construction Materials
- Decoration Materials
- Tools
- Technique
- Laws and finance
- TechnoNIKOL
- Design and decor
- Apartment
- Bedroom
- Kitchen
- Dining room
- Living room
- Bathroom, toilet
- Hallway
- Children's
- Attic
- Small rooms
- Workplace
- Wardrobe
- Library
- Decoration
- Furniture
- Accessories
- Vacation home
- Landscape
- Redevelopment
- Catalog of houses
- Magazine
- News
- Events
- about the project
- Advertising on the website
- Advertising in a magazine
- Terms of use
- Contacts
- about the project
- Advertising on the website
- Advertising in a magazine
- Terms of use
- Advertising on the website
- Advertising in a magazine
- Terms of use
- Contacts
Are you a professional architect or designer?
IVD. Repair and finishing
Are you a professional architect or designer?
The IVD.ru website is a leading Internet project dedicated to the issues of reconstruction and interior design of residential premises. The main content of the site is the archive of the magazine “Ideas for Your Home” - exclusive author’s articles, high-quality illustrations, practical tips and lessons. A team of professionals is working on the project in close collaboration with famous designers, architects and leading publishing experts.
On our website you can choose comprehensive design solutions; view detailed reviews of the market for construction and finishing materials, furniture, machinery and equipment; compare your own ideas with design projects of leading architects; communicate directly with other readers and editors on the forum.
Are you a professional architect or designer?
Are you sure you understood me correctly? Your march length in plan is almost 5 meters. And the “slab” of the stairs is only 5.7cm?? Was she really counted? Yes, she won’t bear herself.
| Page 1 of 2 | 1 | 2 | > |
here, everything is conditional and in paint)
well, not big 5 cm or so, maybe 7 cm there is nothing under the slabs, the distance to the ground is about 80 cm
Are you sure you understood me correctly? Your march length in plan is almost 5 meters. And the “slab” of the stairs is only 5.7cm?? Was she really counted? Yes, she won’t bear herself.
Reconsider the layout of the slabs in the staircase support area. It might make sense to take 1000mm slabs rather than 1200mm (if such are planned). And fill in a normal beam between the slabs, on which you will place the ladder. The beam from below will not interfere with anyone