At first glance, the construction of a floor on a concrete base does not represent anything complicated.
However, for the correct installation technology, it is necessary to take into account many factors that in one way or another can affect its service life.
This is a multi-layered structural element of a house, subject to numerous loads and influences from the external environment, so the design of work must be treated with due attention and responsibility.
Classification
A complete analysis of the element allows us to identify several categories of floors, divided by purpose. These are industrial buildings, residential buildings, public institutions and livestock buildings.
There are several more distinguishing features, first of all, division by type: monolithic, roll and piece. Analysis of the installation site is divided depending on the location: above a heated room, floor construction on the ground, along the interfloor ceiling.
- single-layer, made of material that complies with GOST for heat loss and sound transmission;
- separate structure, made of a separate layer of sound insulation, screed and finishing coating;
- hollow, made along logs (cuts) with heat and sound insulation laid between them.
You can understand how to make a good floor while meeting numerous requirements only after fully familiarizing yourself with the standards.
Floors on concrete slabs
This type of flooring is the most common, since most city residents live in apartments, and all floors of apartment buildings are made exclusively using reinforced concrete slabs. They can be used to make any floor, be it wooden or warm, floating or with the laying of inexpensive linoleum.
Floor slabs are a universal base - they are strong, capable of withstanding enormous loads and can be used for many years in the harshest conditions, without losing their strength properties. But no matter what kind of coating we lay, it is worth remembering the necessary sequence of actions in laying the various layers. In any case, the production of wooden floors on concrete floors is as follows:
- Substrate preparation, cleaning or screeding.
- Marking the installation of logs and applying special glue to the surface.
- Laying the logs strictly horizontally, using a hydraulic level or a regular level.
- Laying a waterproofing layer on top of the lag.
- Laying insulation between joists.
- Placement of the rough layer, be it a board, plywood or chipboard.
- Vapor barrier layer.
- Substrate.
- Finish coating, laminate or parquet, or boards.
Making a concrete base takes much less time than a wooden one, but its properties are completely different. Such floors have extremely high strength compared to any other type of floor and are not subject to destruction and aging. This floor is static, its thermal expansion is so slow and insignificant that any finishing coating on it does not experience any deformation loads and can serve for a very long time. When properly installed, it serves as an excellent barrier to heat loss, and in the event of an emergency, such as a flood, it will not allow water to penetrate to the neighbors.
The disadvantages include the following. Low heat capacity, i.e. poor ability to retain heat - therefore, such a floor without a finishing coating will almost always be cold, unless it is made using heated floor technology. It's very heavy. It puts a serious load on load-bearing structures and foundations, so if this is a private house, and even with floating soil, you should refrain from using such a floor.
Now let's look at the sequence of work. It consists of the following stages:
- Surface preparation.
- Primer with deep penetration compounds.
- Laying roll waterproofing or applying liquid compounds with the same properties.
- Installation of a reinforcing cage, or the use of basalt fiber. In the case of reinforcement with cellular layers, we tie or weld them and lay them on pieces of brick so as to move them away from the surface (so that when pouring the screed, the mesh is in the middle).
- Installation of beacons. They are laid on a solid strip of cement mortar with a small addition of alabaster - this “slide” is laid on top of the reinforcing cage, but so as not to catch it.
- Preparation of a solution using plasticizers or several caps of shampoo.
- Pouring the mortar, pulling the screed.
- Laying vapor barrier, underlayment and finishing coating.
The role of OSB in floor construction
OSB or OSB is used to achieve one or all of 3 objectives:
- To level the floor and hide defects.
- To ensure good sound insulation. The multilayer structure successfully absorbs noise.
- To insulate the floor and make high-quality waterproofing. The natural-based material is characterized by increased moisture resistance and excellent heat retention.
Features of the use of the material
OSB (OSB) is not always attached to the floor. If the concrete base has large differences in height or significant unevenness, the slabs are fixed on wooden beams. The latter successfully act as lags.
OSB (OSB) is laid on a relatively flat surface without using lag. The thickness of one slab is often enough to level the surface. It is fixed with OSB (OSB) using dowels or self-tapping screws.
The material is highly moisture resistant, but still absorbs a small amount of moisture. Because of this, it expands a little. Compression-expansion can be compensated by leaving gaps (up to 3 mm) between the OSB (OSB) boards.
After laying the material, finishing work can begin. Although, it is not necessary to use tiles, laminate or linoleum. OSB (OSB) material itself is considered a representative warm covering for the home. It just needs to be cleaned and covered with several layers of varnish.
Plywood or OSB subfloor
To install a plank floor under tiles or parquet, thick moisture-resistant plywood of the FK brand is used.
Completing of the work:
- Use a building level to check the slope. Its maximum permissible value is 0.2% of the length or width of the room. If the deviation is greater, then you can fill the concrete floor with a self-leveling mixture or lay plywood on the joists on adjustable supports.
On the logs
- Cut the plywood sheets into four pieces. Inspect the workpieces. Elements with delaminated ends are unsuitable for use.
- Cover the area of the floor under the first workpiece with a layer of glue 2 cm thick.
- Glue a piece of plywood.
- Secure the plywood with self-tapping screws, first around the perimeter, then diagonally. The distance between the screws is 20 cm, the distance from the edge of the sheet is 2 cm. The caps must be recessed.
- Sequentially attach all the plywood according to the principle of brickwork. Leave a gap of at least 3 mm between the sheets, and 10 mm between the plywood and the walls.
- Fill the seams between the sheets with putty.
- Use a sander or sandpaper to sand the new floor. After this, you can install finishing materials - tiles, linoleum, laminate.
Plywood floor
Types of ties
If we talk about design features, all screeds are divided into those connected to the base or made on a separating layer. The separating layer is a dense polyethylene film or a heat and sound insulation system.
The installation technology in each case is similar, regardless of the type of structure. The difference lies in the principles of preparing the base and in thickness.
Distinctive characteristics:
- connected - have a connection with the structural part of the object. This is either a concrete floor slab on the ground or a floor slab. Such screeds function in conjunction with the base on which they are laid. Before installation, the concrete slab must be primed, that is, it is necessary to create a layer that ensures high adhesion;
- on the separating layer - performed if the base is: 1. Moist, 2. Contaminated with fats, 3. There is high absorption, 4. Too weak. The structure is poured over the separating layer. Usually this is a polyethylene film 0.2 mm thick. The material is always laid with an overlap (10 cm), overlapping the walls. After completion of the work, the excess is cut off;
- floating - a solution for places where the level of impact noise needs to be reduced or the base is too weak. The substrate (soundproofing layer) is laid using special materials. This can be natural cork, polymer boards, corrugated cardboard sheets, mineral mats, 30-40 mm thick. A polyethylene film is laid over the thermal insulation, and then the solution is poured. If the room is located above an unheated area, you should take care of the issue of thermal insulation.
Plates of insulating material are laid with bandaging, that is, with the seams shifted relative to each other
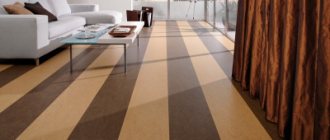
Parquet flooring
Floor arrangement diagram.
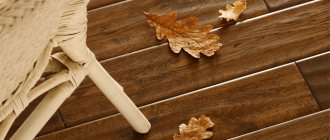
Beautiful appearance, low thermal insulation and soundproofing make parquet (parquet boards, parquet panels, piece parquet) a popular material for the construction of floors. The installation of such a floor is possible on a solid plank base, fiberboard slabs, cement-sand screeds. Block parquet floors made in a herringbone pattern with or without friezes look good.
First, you need to mark the rows of coverage to reduce waste. A layer of glassine is laid on the prepared base, and the lighthouse “Christmas tree” is laid on it. Based on it, the floor covering is installed with careful connection and fastening of each parquet strip with forty nails, two driven into the side groove and one into the end groove. The caps are pressed deeper into the material using a hammer.
The installation of block parquet floors on screeds is made using a hot or cold bitumen solution in a “Christmas tree” pattern without friezes. When laying parquet, if necessary, level it using a special parquet planing machine or a hand plane; After sharpening, baseboards are installed, scraping and sanding of the floor are done. The floor is slightly moistened before scraping. The laid parquet is rubbed with mastic or varnish.
Advantages and disadvantages of the material
Natural wood has always been considered one of the best options for home decoration - it is environmentally friendly, creates comfort and gives warmth, allows air to pass through well, and provides an optimal microclimate in the home.
Wood has certain pros and cons, so before starting work it is advisable to familiarize yourself with all the features.
The main advantages of wood for flooring:
- Wood can easily withstand heavy loads - it does not deform under the weight of furniture and equipment.
- Excellent sound and heat insulation properties.
- Beautiful, stylish and pleasant appearance, compatible with any interior style.
- Easy to work with - you can install a wooden floor on a concrete base yourself.
- Possibility to varnish the floor or paint it in any shade.
- Easy and simple surface care that does not accumulate dirt and dust.
- Safety in operation - the material is completely natural, environmentally friendly.
- Durability, wear resistance, excellent strength.
Among the disadvantages of a wooden floor, it is worth mentioning the rather high cost, the sensitivity of the coating to changes in humidity levels and temperature changes, fire hazard (but when covered with special means, these disadvantages can be eliminated), the need for restoration after a certain time (dents and scratches appear on the floor, and the shine may disappear) .
Characteristics of a concrete base
When faced with the question of which floor is better, many come to the conclusion that a concrete base is one of the most unpretentious.
It is superior to wood for many reasons, the main one of which is its immunity to the formation of decay processes.
In addition, concrete will not creak over time and has a fairly durable surface that is practically resistant to mechanical stress.
Concrete is not susceptible to stress and is durable
Moisture resistance indicators compared to wood are also excellent. However, it should be borne in mind that some of the disadvantages of a wooden floor can be eliminated by using modern technologies.
You should not extol the concrete surface and forget about its disadvantages. You can get rid of a constantly cold floor only after installing an additional source of heating (warm floor). Based on this, the best option would be to lay tiles directly on concrete in the bathroom, toilet or kitchen. For residential premises and living rooms, it is recommended to use other materials with inherent warmth and comfort.
Floors in industrial buildings
If there is a need to manufacture specific flooring with increased durability and improved performance, then you need to inquire about industrial building flooring. This coating is poured in the same way as all screeds. We use waterproofing, damper tape, reinforcement, basalt fiber. But there are a few critical differences. In industrial buildings, depending on the purpose, either a simple screed or a screed with iron reinforcement is made. Depending on the expected load, the layer thickness increases from 5 cm, as in civil buildings, to 20 cm for industrial facilities.
Linoleum flooring on concrete
When choosing linoleum as a covering, flooring systems can be:
- reinforced concrete floor;
- cement-sand screed (about 20 mm thick). The basis of this solution is made up of materials of the M-200, M-150 grades;
- bitumen mastic, applied layer thickness - 0.5 mm;
- bitumen primer 0.3 mm thick;
- linoleum.
If you want to insulate the system, a layer of expanded clay concrete about 60 mm thick is installed between the slabs and the screed. In this case, you can use linoleum on a heat-insulating base, carpet, and also eliminate the screed from the design.
Laying self-leveling floors
To make a self-leveling floor the main coating, you need to start with a base primer. Epoxy or polyurethane primer is applied in two layers (only from one mixture). The front layer is applied exclusively to the decorated coating. Photo printing looks especially impressive on the surface. It is made on a special film, and a transparent self-leveling floor is laid on top.
Laying technology
The process of installing self-leveling floors begins with a standard procedure - cleaning the surface from dust and dirt. Next, a primer is applied. After it dries, along the vertical surfaces that will come into contact with the self-leveling floor, damper tape is glued around the perimeter. It protects the self-leveling base from cracking.
Then it’s time to apply the self-leveling floor solution. It must be done strictly following the instructions, using an electric mixer at low speed.
Laying a self-leveling floor on a concrete base
The finished solution is poured onto the surface and spread with a roller or spatula, and air bubbles are removed with a needle roller. The thickness of the fill should be at least 3 cm. Now you need to wait for the coating to harden.
The time it takes for the surface to completely dry is also affected by its thickness. The curing time is indicated on the packaging of the dry mixture. As a rule, work on laying ceramic tiles begins after three days, and installation of parquet – after a week.
Preparation
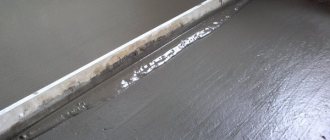
Installing a wooden floor is a common solution for most designers with a concrete base. Natural material guarantees comfort in the room. Although this option requires meticulous preparation of each surface component. Whatever the wood, the base requires pre-treatment. Preparing concrete
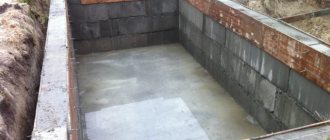
Figure 1. Prepared concrete base
When the floor is to be laid on a newly poured concrete surface built in a private house, it is imperative to wait until it dries completely, which guarantees maximum strength. But if the screed is old enough, it needs to be carefully leveled, any cracks eliminated, cleaned of dust, and then covered with a layer of primer.
It is also advisable to lay a layer of waterproofing on top of the concrete. The film needs to be laid overlapping, carefully gluing the seams, and also moving it slightly onto the wall. The edge of the material should be glued using damper tape.
Preparation
Such floors are a very common design solution. Warm natural material creates comfort and coziness indoors. But such a move requires preparation of both components for the future surface.
No matter what kind of wood you use or what installation method you choose, the concrete base requires treatment.
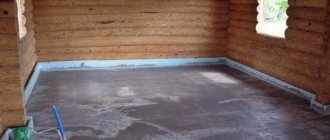
Before laying, the concrete base must be put in order
Putting the concrete base in order
The fresh concrete screed must be completely dry by the time the base is laid. If you are making a wooden decorative covering on an old screed, it is necessary to carry out measures for its ongoing repair.
Concrete base required:
- level;
- get rid of cracks;
- remove dust;
- prime.
The concrete should be primed and dust-free
. At this stage, all technological holes in the concrete for laying communications should also be prepared. As waterproofing, you can lay polyethylene film or penofol.
If a decision is made to use roll waterproofing, then the material should be laid overlapping, carefully gluing the seams. In this case, the film should extend onto the walls to the entire height of the future surface. It would be a good idea to tape the edges of the film with damper tape.
Experienced builders recommend constructing such floors in the spring, after the central heating system is turned off.
Choosing wood
Which floor is better: wood or concrete? The answer to this question is far from obvious. The wrong tree laid on the floor can bring quite a lot of problems in everyday life.
For flooring you should choose the following types of boards:
| Board name | Short description | Photo |
| Regular sexual | Laying is done using a tongue and groove pattern. It has a front side and a back side with vents. Width ranges from 8.5 to 10 cm, thickness from 2.5 to 3 cm. |
|
| Parquet | Consists of 3 perpendicular layers and a varnish (oil) coating. Installed using tongue-and-groove or locking joints. Width from 12 to 20 cm, thickness within 1.8 -2.5 cm. |
|
| Engineering | Three-layer glued. The top layer is made of valuable wood. Width 12 - 45 cm, thickness 1.2 -2 cm. |
|
In addition, a regular board can be planed or unplaned. Unplaned material is used as a rough coating for further finishing. For finishing, planed dry with tongue and groove is used.
Rules when buying a tree:
- The material must be dry. Overdried or wet wood becomes deformed during further processing.
- The board should be flat and smooth.
- The wood must be free of defects.
- For a single coverage area, it is better to purchase material from one batch, with a similar color and texture.
When ordering volume, always buy 10% more material than required by area. The length of the edged tongue-and-groove board should not be less than 2 m. Before starting work, the wood should be treated with antiseptic and fire-retardant impregnation.
The tree should be allowed to rest at room temperature.
Common mistakes
In addition to the correct choice of insulation and calculation of thickness, you need to take into account a number of nuances. The first is preparing the material for installation. It is unpacked at least 1 day before the start of work and stored indoors at room temperature. So it will take on normal linear dimensions, which will not change significantly after installation.
The following factors are also taken into account:
- After installing the heat insulator, I install the upper decorative and protective surface (finished floor) as quickly as possible.
- Pre-treatment of lag with an antiseptic. This will protect them from the appearance of fungus and mold.
- The use of impermeable membranes to protect against water can cause an increase in humidity in one of the layers. It is better to use a vapor barrier.
- Sealing of joints, there should be no “bridges” of cold.
To insulate the floor of an apartment or residential building, you can install polystyrene foam in a continuous layer. It is more difficult to install basalt wool on logs. For the garage they make thermal insulation under the screed. All materials can be used here, including expanded clay. It is important to meet the basic conditions - good thermal insulation, mechanical strength of the surface. In apartments, allowable loads on interfloor floors are taken into account.
Screed
The most common option for leveling a concrete slab is a screed made from a cement-sand mixture. Procedure:
- Clean the surface of the slabs from debris.
- Apply the primer with a roller or brush to collect dust, prevent the formation of air bubbles during pouring, improve the adhesion of the screed to the concrete, and prevent the development of mold and fungi. It is recommended to use a deep penetration primer.
Applying primer
Create a waterproofing layer. To do this, you can use polyethylene film, polymer or profiled membrane, bitumen mastic, roofing felt or other rolled materials.
Waterproofing
Lay a layer of insulation - expanded clay, polystyrene foam, polystyrene foam, mineral wool or polyurethane foam. It is recommended to choose heat-insulating materials with noise-absorbing properties. Polyurethane foam also has waterproofing properties.
Thermal insulation
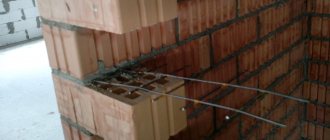
Create a reinforcing layer of metal mesh 4 - 6 mm thick with a cell size of 10 × 10 cm or 15 × 15 cm. The reinforcement is secured with clamps at a height of 2 - 3 cm from the base. The mesh elements are connected to each other with wire.
Reinforcing layer
- If the project includes the installation of a heated floor, then attach the heating system pipes to the reinforcing mesh.
- Using a building level, install metal or wooden beacons over the entire surface of the floor. They are necessary to create a perfectly horizontal surface. Secure the beacons with gypsum or cement mortar.
Lighthouses
- If the floor area is large and it is not possible to pour concrete in one step, then formwork will be needed. To do this, the floor surface will need to be divided into rectangles with a width of 1.5 to 2 m. Formwork can be made from boards or plywood.
- Start pouring the screed from the corner farthest from the door. Pour concrete in batches with a shovel. The layer thickness should be 6 - 8 cm (for warm floors up to 4 - 5 cm). Level the surface using the rule, moving it along the beacons. When working, you need to periodically check the horizontalness of the surface with a level. The deviation from the horizontal plane should be no more than 2 mm per 2 m of floor length. Any air bubbles that appear must be pierced with a shovel.
Filling the screed
Remove the screed, beacons and formwork. Fill the recesses under them with a cement-sand mixture. Cover the surface of the new floor with polyethylene and leave for several days. Complete drying of the screed is achieved in about a month. After this, you can begin laying tiles, parquet, laminate, linoleum or other finishing material.
Self-leveling mixtureFloors with joists
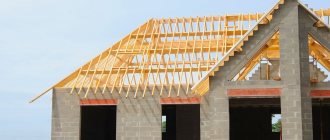
Beam floor, as opposed to a monolithic concrete slab. When creating floors using joists, the base is a “lattice” of longitudinal elements - wooden, metal or reinforced concrete beams.
In one-story and frame private housing construction, wooden beams or logs are more in demand - they can withstand heavy loads, their installation does not require much time or wet processes. The required thickness of the beam is calculated based on the expected loads, the optimal indicator is 1/24 of the length. Coniferous wood is used for beams, as it is more resistant to external influences; humidity should not exceed 14%. Before use, it must be treated with special antiseptic compounds to prevent decay and damage by pests and microorganisms.
Depending on the type of foundation, beams are installed in special grooves (left during pouring or laying, cut into wooden bases) or laid on top. If the beams are in contact with metal, concrete or brick, you need to make additional waterproofing at the joints (resin, roofing felt, film).
A typical beam floor pie consists of the following layers:
Floor beams - the spacing between elements depends on the expected loads and span length, on average - 1 m.
Logs (sheathing) - wooden beams laid perpendicular to the beams; the greater the distance between the beams, the stronger the logs should be. To maintain the level with curved beams, wooden spacers are used; the distance from the wall to the joist is 20 cm. When calculating the step, this nuance is taken into account. When the distance between the beams is less than 80 cm, you can immediately install the subfloor, without logs.
Subfloor - necessary for laying insulation, laid between joists or between beams, with a small pitch. Skull bars (beams with a smaller cross-section) are used as fasteners, attached to beams or joists. Laying boards onto bars is done without the use of fasteners; the boards are placed closely, but lie freely.
Moisture protection - protects the insulation from absorbing moisture from the subfloor, but should not retain steam, so regular film is not suitable. You can refuse waterproofing if the subfloor is dry and the groundwater level is low.
Insulation – most often slab or roll materials are used: stone wool, PSB, EPPS or backfill materials such as ecowool.
Vapor barrier - this can be a special membrane or ordinary polyethylene film.
Ventilation gap - when designing a ceiling, it is recommended to choose logs that will be slightly higher than the insulation layer - a gap for ventilation automatically remains. If this was not done, then after laying the insulation, a beam is filled, which will give the required distance.
Whether to lay another layer of subfloor after insulation depends on the future finishing coating - plank or slab varieties are self-supporting; for linoleum and carpet you will have to spend money on a base layer.
The advantages of such a floor system include the speed of construction, reduced load on the foundation, and the absence of heavy physical stress during production (no need to drag tons of sand and crushed stone, pour cubic meters of concrete).
Among the disadvantages are the need for effective ventilation of the underground, a lower load limit, the fire hazard of wood and less durability compared to concrete. To make underfloor water heating, you will need to spend additional money on screed or use alternative systems, heated floors on wooden joists, etc. But this type of flooring is chosen by many developers, including portal participants, modifying the standard pie to suit their parameters.
colyasegFORUMHOUSE Member
I hemmed an inch board with a width of 15 cm from the bottom at intervals of 7-8 cm, on top of the resulting lattice I placed fiberglass mesh for facade plaster and insulation on it - three overlapping mats, it turned out to be 15 cm. log board 100x50 mm, spaced 24 cm. The boards are already OSB-12 or 15.
Kolyaseg fiberglass mesh replaced the waterproofing film, considering that it would more reliably protect the insulation from destruction, taking into account the gaps in the subfloor.
Mishgun21FORUMHOUSE Member
Log bathhouse/house made of logs 23 cm, 6x6 meters (with an attic floor), the distance between the logs is different - from 1 m to 1.5 meters. The logs are made of logs, the frame stands on screw piles. The floor pie is like this:
- Forty block;
- There is a subfloor on it;
- On top there is a waterproofing membrane, the smooth side towards the subfloor (so that moisture does not pass into the insulation), the rough side towards the insulation so that moisture comes out of it;
- Insulation - 150 mm basalt wool, I will build up the beams with a fifty-fifty block;
- I cover everything with a vapor barrier;
- Counter grille to create a ventilation gap (bar 50×25 mm);
- Batten.
We insulate with our own hands
Before insulating a concrete floor, you need to carefully check the condition of the base. If there are cracks, crevices and potholes on the subfloor, this will reduce the quality of the thermal insulation work, so the defects must be eliminated. In case of height differences (this can be checked using a level), the surface is leveled with leveling mixtures.
Expanded polystyrene
Expanded polystyrene (EPS) is a type of foam material that comes in the form of individual slabs. Such products are characterized by low thermal conductivity and high strength. The service life can reach 20-30 years.
Mineral wool on joists
The advantage of this material is low thermal conductivity and increased sound insulation properties. Such insulation for concrete floors can only be used in the technology of laying on joists, since the material cannot withstand loads.
Fixation to concrete pillars
This method involves fixing beams to concrete pillars, using similar fasteners, but designed specifically for pillars.
- The pillars must be covered in advance with a waterproofing layer (bitumen or mastic is used). Their upper part can be protected from moisture with roofing felt. You need to pre-drill holes in the posts and beams.
- Next, you need to drive dowels or anchor spacers into them.
- Then the beam is attached to the post with self-tapping screws 2-3 times longer than the width of the spacer.
- The timber is attached to the posts using iron plates with screws. They are fixed to the posts with dowels-nails, and to the beams with screws.
Thanks to the study of all these fastening methods, the question of how to install joists on a concrete floor disappears by itself.
Stages of installing a concrete floor
Concrete floors have a number of requirements that they must meet: durability, high chemical resistance, tightness, resistance to stress, and absence of dust.
In order to obtain a concrete coating that meets all these requirements, two conditions must be met: use high-quality materials and strictly adhere to the technology, which includes four main stages:
- preparation of the base;
- laying concrete in a screed;
- surface finishing;
- cutting seams and sealing them.
The floor can be laid either on an existing cement concrete base or on a dirt base.
The installation of a concrete floor on the ground, although an economical, but rather labor-intensive method of arranging a floor. It is advisable to install it in places where it is dry enough. A high-quality ground floor has a layered structure.
A high-quality concrete floor has a layered structure
There are several options, but most often the floor pie on the ground looks like this:
- compacted soil base;
- a layer of river sand bedding;
- a layer of crushed stone or expanded clay;
- waterproofing;
- concrete screed (rough);
- vapor barrier;
- insulation;
- reinforced screed (finish).
If necessary, adjustments are made to this scheme, depending on the tasks and conditions. The technology for constructing concrete floors also depends on this. This type of floor requires careful preparation of the base.
Technological requirements
The correct installation of the floor on a concrete slab is carried out in accordance with construction requirements and standards. They characterize the design features of all elements.
In addition, they must meet standard requirements specific to a given situation: be durable, moisture-resistant, wear-resistant.
When making a floor for a living space, you need to think about heat and sound insulation in advance. If we talk about standard technological requirements, we can identify a number of norms characteristic of this situation.
| Characteristic | Name, technical specification | Short description |
| GOST 31358 - 2007 | Dry cement-based construction floor mixture | Properties and composition of cement mixture. Use for floor |
| GOST 10178 - 85 | Cement | Technical features and requirements for the material used for the screed |
| GOST 25328 - 82 | Cement for mortar | Regulatory data regarding the composition and characteristics of the mixture |
| GOST 24640 - 91 | Additive for cement | Type and method of use of the additive used for filling floors |
| GOST 7473 - 94 | Concrete mix | Compositions, manufacturing technology and use of concrete-based mixtures |
| SNiP 2.03.01-84 | Concrete and reinforced concrete structure | Installation of reinforced concrete structures, floor screeds with reinforcement |
| SNiP 3.02.01-87 | Earthwork base and foundation | Subfloor installation process |
| SP 52 – 101 – 2003 | Concrete and reinforced concrete structures without prestressing reinforcement | Concrete reinforcement process |
| SNiP 2.03.13-88 | Floors | Floor design, installation requirements |
Design, material selection and installation must be carried out based on the requirements presented in these documents. Compliance with the standards will allow you to create a surface that will meet all established parameters.
Among other things, it will have the following characteristics:
- A smooth and durable base will be created, convenient and practical for the safe movement of people.
- It will be of high quality, wear-resistant, durable.
- In accordance with sanitary and epidemiological standards, a foundation will be created that is harmless to humans and provides good living conditions.
- The operational standard characterizes ease of maintenance and possible repair.
All documents were developed by specialists and engineers, so it is not recommended to neglect them.
Preparation
Before laying a wood floor over concrete, it is very important to properly prepare the subfloor. The performance characteristics of the wood layer, service life and quality will directly depend on this stage
Putting the concrete base in order
If the floor is laid on a freshly poured concrete screed, you must wait for it to dry completely and gain strength - work can be carried out 28 days after pouring. When the screed is old, it must be carefully prepared for installation: perfectly leveled, cracks repaired, dust removed, covered with primer.
Here it is important not to forget to complete all the technological holes taken into account in the project for the subsequent laying of communications (if necessary). It is advisable to lay a layer of waterproofing - to achieve this task it is allowed to use penofol or thick polyethylene film
Rolled waterproofing should be laid with an overlap of at least 10-15 centimeters, carefully gluing all the seams and going onto the wall (the distance is equal to the height of the future floor + 10 centimeters). It is advisable to glue the edges of the film with damper tape.
Choosing wood
Before laying a wood floor on a concrete base, you need to select the wood. The performance properties and appearance of the flooring will depend on the quality and type of material. Poor quality or incorrectly selected material will cause many problems and can cause complete deformation of the floor.
Wood for flooring (decorative coating):
- Ordinary floorboard - installation is carried out according to the tongue-and-groove type, the lamellas have a front side, the back side is made with special vents. The width of the boards is 8.5-10 centimeters, the thickness varies from 2.5 to 3 centimeters.
- Parquet board - includes three perpendicular layers and an oil (varnish) coating. The material is placed thanks to the presence of tongue-and-groove locks. The width of the lamellas is 12-20 centimeters, the thickness varies from 1.8 to 2.5 centimeters.
- Engineered board is a three-layer glued board with a top layer made of valuable wood. The width of the lamellas is 12-45 centimeters, thickness – 1.2-2 centimeters.
Ordinary boards can be unplaned or planed. Unplaned ones are used for installing a rough covering for the purpose of further laying decorative finishes. Finishing wooden floors on a concrete base are made from planed dry boards with tongue and groove.
Selecting quality wood:
- Dry material is chosen for flooring, since wet or overdried wood can noticeably deform during further processing, become cracked, and collapse.
- A wooden floor on a concrete base is installed only from smooth and even boards.
- Defects on the wood are not allowed.
- For the area of one room, you need to immediately purchase material from one batch, since wood always differs in texture and shade - if you buy more material later, you can make a big mistake and the floor will be different.
It is better to buy 10% more material than indicated in the calculations. According to the standards, the length of the tongue-and-groove edged board must be at least 2 meters.
Before work begins, the wood is treated with special compounds that protect against fire and biological and other negative factors. Before assembling a wooden floor on a concrete base in a private house (or apartment building), the material must be brought into the room and allowed to lie for several days.
Installation process and features
Properly selected building materials are the key to successful floor installation. Logs are mainly made from wood of various species, with a moisture content of no more than 18%. After purchasing the bars, you need to let them acclimatize to room temperature for several days. The logs bent during this time are rejected. Before laying, they are treated with an antiseptic composition to prevent mold and pests from appearing on them.
- Preparing the concrete base. It is cleared of debris, cracks are sealed and irregularities are removed.
- The tree must be protected from moisture. Therefore, the beams are covered with rolled waterproofing materials, mastics and treated with impregnating compounds.
- It is necessary to prepare all the fasteners and substrates required for installation of the joists on the concrete floor. They must have high rigidity so that they do not sag under loads and gaps do not appear between the joists and the base. Thin boards, plywood and plastic substrates, which are sold in specialized stores, are suitable for this. They are slipped under the joists and securely fixed.
- The logs must be placed across the light coming from the windows. Wood often becomes deformed due to temperature changes, but thanks to this installation it heats up evenly. In rooms without windows, the bars must be placed across the direction of movement.
- The pitch of the beams is selected based on the thickness of the floorboard. In this case, the rule is used: the thicker the board, the larger the step between the lags can be chosen. On average, it varies in the range of 40-50 cm. The logs located near the walls are installed 20-30 mm from the wall, and the rest, taking into account the dimensions of the room.
- After assembling the grating under the floor, it must be accurately installed horizontally. The support for the floor must be perfectly level, so many experts level the floor with a screed if the height of the room is sufficient for this. The underlay for the joists also allows you to level the floor.
- For good shock absorption and increased protection from moisture, logs are placed on roofing felt and other similar materials. These materials should not be soft, because they will sag under the influence of loads, which will lead to the formation of gaps. As a result, the floor will creak while walking.
Safety precautions
Before starting concrete work, workers are given instructions and training in safety rules, principles of correct and safe work with equipment and tools. A log is kept on the site in which each employee signs about the briefing.
The equipment used must be in good working order and must be grounded. When an emergency occurs, the equipment is immediately switched off, and the causes of the accident are eliminated by qualified specialists.
All workers are required to use personal protective equipment - workwear, safety shoes, gloves, mittens, helmets, respirators.
Tools
To install the beams, the following tools are required:
- electric drill or hammer drill;
- screwdrivers or screwdriver;
- electric circular saw or simple hacksaw for wood;
- plane;
- hammer;
- tape measure and level;
- fasteners.
Other tools may be required.
Preparatory work
The soil inside the house needs to be leveled and compacted. If the height of the room decreases significantly after pouring and installing all the layers, you will need to dig a pit over the entire surface of the room for concrete floors in a private house. Its bottom is compacted and leveled.
Prepare the base for the screed:
- Pour 10-30 cm of sand onto the bottom and compact it.
- Fill in about 15 cm of crushed stone, and for thermal insulation you can make an additional pillow of expanded clay (10-15 cm).
- A rough screed that strengthens the bottom layer is prepared from lean concrete, mixing 1 part of cement with 6-7 parts of crushed stone.
Waterproofing works
Before making a concrete floor in a private house, it must be protected from moisture penetration from below (condensation from wet soil, etc.). Rolled materials (roofing felt, thick polyethylene film) are spread over the prepared base with an overlap on the walls (10-15 cm). Adjacent panels should overlap each other by 5-7 cm. At the joints, the seams are filled with bitumen or taped with adhesive tape.
A damper tape made of elastic materials is installed on top of the waterproofing layer extending onto the walls. It will serve to compensate for the expansion of the screed in a warm room or during heating if a heated floor system is installed.
Reinforcement and placement of beacons
To carry out reinforcement, a small layer of concrete (3-5 cm) is poured. A flat welded mesh with a mesh size of 10-15 cm is laid out on it. The thickness of the rod is at least 3 mm.
In order for the floor in the house to have a flat surface, beacons (slats on which the rule will slide) must be installed on the prepared base. The basic requirements for installing beacons are a small step between them and installation of all guides in a single plane. You can check the horizontality of the beacons using a building level, placing it both along and across the planks.
You can change the height of the beacon if necessary and fix it in the desired position using cement or gypsum mortar. A pile of composition is formed under the bar, raising or lowering the lighthouse to the desired level. You can continue working only after the composition has hardened.
Composition of the solution
Concrete for pouring is prepared according to the following recipe:
- 1 part cement;
- 3 parts sand or ASG;
- 4 parts of crushed stone fraction 2-3 cm;
- 0.5 parts water.
The components are most often measured out with a bucket, gradually pouring them into the rotating drum of a concrete mixer. When kneading by hand, dry ingredients are poured in layers and mixed dry. When the ingredients are mixed, add water and begin to knead the solution until the consistency of a thick, creamy dough is obtained. If there is not enough water, you can add it little by little, constantly monitoring the thickness of the solution. Don't pour too much water.
Insulation with expanded clay and sawdust
Insulation with expanded clay
Expanded clay granules as insulation can be used both in screeds and when filling the distances between joists. The sequence of actions is carried out as when insulating the floor with fiber insulation.
This is a cheap method of insulation, which does not have sufficient thermal efficiency for high-quality insulation of a concrete floor in a residential area. To improve these qualities, it is necessary to increase the thickness of the material. Therefore, this method of insulation is suitable only for rooms of sufficient height so that logs can be installed, supporting them on brick posts.
The photo shows a method of insulating a floor using expanded clay.
Insulation with expanded clay
Sawdust is the most accessible and cheapest way to insulate a concrete floor. Sawdust can be used in a screed or separately - in the form of a mixture of sawdust, gypsum water and lime. This mixture is placed in the spaces between the joists on a layer of waterproofing material.
Fibrolite
Schemes for installing a floor on the ground in a house, basement, garage or bathhouse
In houses without basements, the floor of the first floor can be made according to two schemes:
- supported on the ground - with a screed on the ground or on joists;
- supported on walls - like a ceiling over a ventilated underground.
Which of the two options will be better and easier?
In houses without a basement, floors on the ground are a popular solution for all rooms on the first floor.
Floors on the ground are cheap, simple and easy to implement; they are also beneficial to install in the basement, garage, bathhouse and other utility rooms.
A simple design, the use of modern materials, and the placement of a heating circuit in the floor (warm floor) make such floors comfortable and attractive in cost.
In winter, the backfill under the floor always has a positive temperature. For this reason, the soil at the base of the foundation freezes less - the risk of frost heaving of the soil is reduced. In addition, the thickness of the thermal insulation of a floor on the ground may be less than that of a floor above a ventilated underground.
It is better to abandon the floor on the ground if backfilling with soil is required to a too high height, more than 0.6-1 m. The costs of backfilling and compacting the soil in this case may be too high.
A ground floor is not suitable for buildings on a pile or columnar foundation with a grillage located above the ground surface.
Three basic diagrams for installing floors on the ground
In the first version
a concrete monolithic reinforced floor slab rests on load-bearing walls,
Fig. 1
.
| Fig.1. Monolithic flooring on the ground (suspended floor) |
After the concrete hardens, the entire load is transferred to the walls. In this option, a monolithic reinforced concrete floor slab plays the role of a floor slab and must be designed for the standard load of the floors, have the appropriate strength and reinforcement.
The soil is actually used here only as temporary formwork when constructing a reinforced concrete floor slab. This type of floor is often called a “suspended floor on the ground”.
A suspended floor on the ground has to be made if there is a high risk of shrinkage of the soil under the floor. For example, when building a house on peat bogs or when the height of bulk soil is more than 600 mm. The thicker the backfill layer, the higher the risk of significant subsidence of the fill soil over time.
Second option
- this is a floor on a foundation - a slab, when a reinforced concrete monolithic slab, poured onto the ground over the entire area of the building, serves as a support for the walls and a base for the floor,
Fig. 2.
| Fig.2. Floor on a slab foundation |
Third option
involves the installation of a monolithic concrete slab or the laying of wooden logs in the spaces between load-bearing walls supported on bulk soil.
| Fig.3. Floors on the ground |
Here the slab or floor joists are not connected to the walls.
The load of the floor is completely transferred to the bulk soil,
Fig. 3.
It is the latter option that is correctly called a floor on the ground, which is what our story will be about.
Ground floors must provide:
- thermal insulation of premises in order to save energy;
- comfortable hygienic conditions for people;
- protection against penetration of ground moisture and gases - radioactive radon - into premises;
- prevent the accumulation of water vapor condensation inside the floor structure;
- reduce the transmission of impact noise to adjacent rooms along the building structures.
The advantage of a monolithic base
A monolithic slab as a foundation has many advantages, for example, such as:
- The device of a slab base is considered reliable on almost any type of soil. The monolithic slab is laid on a cushion, which consists of several layers, such as: crushed stone and sand;
- The reinforced concrete base structure is installed at a shallow depth. The only preparatory work is to remove the plant layer from the soil using machinery;
- ease of installation;
- due to the high resistance to loads on the slab, walls can be laid using any type of material;
- the strength of the metal reinforcement installed in the frame ensures the same distribution of almost all impacts: deformation in winter under the influence of soil heaving, as well as the pressure of the building on the soil;
- the construction of a monolithic foundation does not take much time and is easier to make than a strip foundation.
The only negative side is that with such a design it is impossible to make a basement, but a solution exists, but it requires high costs. The cost of any home base is determined by the price of building materials, transportation costs, the purchase or rental of specialized tools, as well as workers’ wages.