During the construction of buildings and other masonry and reinforced masonry structures, according to SNiP II-22-81, anchoring of floor slabs is carried out as a mandatory element of strengthening the integrity of the structure. To do this, all concrete slabs installed in the structure in a horizontal position are fastened together and additionally attached to the load-bearing walls using anchors. This measure provides greater stability and safety to the constructed projects during an earthquake or unforeseen subsidence of the foundation.
After installing the slabs on the foundation, the anchoring process is carried out Source narahu.ru
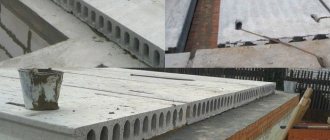
Correct anchoring scheme for hollow core slabs
Anchoring of floor slabs is carried out during the construction of buildings made of brick, aerated concrete or reinforced concrete. Such ceilings are installed between floors, above basements, under attics. Anchoring is carried out after installing the floors on each floor, while the anchors are placed at a distance of up to three meters from each other, and they, in turn, act as fasteners for the mounted slabs between each other and on each of the walls.
Floor slab anchor
An anchor is a metal fastener made of galvanized or stainless steel, brass or other metal alloy. It is integrated into the base and secures a load-bearing element of the building, such as a floor slab. Such fasteners are used during the construction of objects for various purposes. These can be single or multi-storey buildings, industrial buildings, garage structures, etc. Anchors significantly improve strength and stability, and also extend the service life of buildings. For seismically active regions, the slinging scheme is not only advisable, but also simply necessary, because during underground tremors with high amplitude, reinforced interfloor ceilings will fail more slowly, which will help save more than one human life.
Types of fasteners
Depending on the type of construction, place of use and load-bearing element, 5 types of anchors can be distinguished:
- Wedge bolts are bolts with a spacer type sleeve and a cone-shaped head. They are installed in dense structures such as concrete or solid brick. Anchoring is carried out due to the friction of the sleeve against the hole in the load-bearing wall. The advantages of such an element include the speed and accessibility of installation, but the disadvantage is that it cannot be reused.
- Bushings are similar in principle to wedge elements. They are also used to connect solid structures to each other. Their advantages are expressed in simple installation, including through installation, but the disadvantage can be considered that the holes for connection are too large.
- Driven -in bushings are notched at one end. When there is a mechanical impact (impact) on their surface, the bushing expands with a wedge integrated into the part itself. This anchor is suitable for slinging solid, non-elastic building materials such as stone or concrete. The connection is achieved through friction and internal stop. The positive thing is that there is also quick installation and resistance to mechanical stress, but the difficulty is that in this case high demands are placed on the accuracy of the gaps for the connection.
- Chemical - glue structures together by pumping glue into the fastener channel. They are equally suitable for all materials. The advantages include ease of installation, but the obvious disadvantage is their high cost.
- Anchors for special applications are a separate category of fastening elements, which, in turn, are divided into three subtypes: frame (for window and door profiles), ceiling (for suspended structures), foundation, and Molly, intended for hollow inside or weak-bearing foundations.
Types of anchors
- Wedge anchors are bolts with a conical head and a wedge-shaped expansion sleeve, used for concrete and brick. Anchoring is accomplished by friction of the sleeve against the gaps in the walls. Disadvantage: one-time use.
- Bushings - used in the same way as wedges, and for fastening solid elements to each other. Pros: easy installation. Cons: The connecting holes are large in diameter.
- Driven in - these bushings are notched at one end. During a strong impact, the wedge bursts. The anchor is designed for slinging parts that do not have elasticity, such as stone and concrete. It is excellent to use such an anchor with materials of great strength. Pros: Greater reliability and ease of installation. Disadvantages – inflated demands on the accuracy of gap sizes.
- Chemical - parts are attached by gluing. Pros: ease of use. Cons: very expensive.
Anchors for special applications:
- frame (for parts of windows and doors) ceiling,
- foundation and
- Molly – for empty and weak foundations.
Slinging process
An interfloor connection is the anchoring of hollow reinforced concrete panels, which is performed after each floor, taking into account the attic and basement. In this case, the slabs are connected to each other and to the load-bearing wall. The fixation scheme depends on the presence or absence of special mounting loops on the ceilings and the base itself. If the building is built from high-density elements, L-shaped fasteners are used for slinging, the bend length of which is 30–40 cm, and they are installed at a distance of 3 m from each other. Adjacent panels are fixed with transverse fastenings, and the outer ones with diagonal fastenings.
The anchoring procedure looks like this:
- the edge of the fastening element is bent in the shape of a loop, to which the panel eye clings;
- adjacent anchors should be pulled together as much as possible, and then welded to each other and to the mounting loops;
- the seams between the panels and hinges are sealed with a mortar mixture.
In buildings built from hollow building materials, the scheme for slinging the foundations is carried out in the same way as in the previous case, but here it is necessary to lay a concrete belt around the perimeter of the building. This is a so-called ring anchor, which lies in the same plane with the floors, and it also fastens them to each other and to the walls. Such fasteners consist of a reinforced frame poured into concrete.
Using an anchor, the load-bearing panels, which are not equipped with eyes, are also tied, and then a square steel plate (50x50mm or 100x100mm) is attached to the plates, and a metal pin is welded to it. Its second end is placed in the belt. The ceiling is further strengthened by creating a connecting ligament on the inner wall. If it is necessary to strengthen the anchoring of reinforced concrete products, metal pins, reinforcement bars and hooks are used.
Foundation reinforcement
The frame of a monolithic foundation slab consists of 1-3 belts, horizontally located one above the other. A belt is a network (row) of longitudinal and transverse rods intersected at right angles. The bases of the lightest non-residential structures are approximately 15 cm thick; one row is sufficient for them. When constructing houses, commercial and industrial buildings, 2 belts are most often installed with a pitch of about 15 cm; in special cases when increased strength or a thickness of more than 40 cm is required, a third is installed.
Diagram of the device and fixation of the plates
Before installation, each panel is examined for defects and if found, they are removed. In high-quality panels, holes are sealed, for which a brick is placed in the gap and filled with concrete, protecting the slab from freezing. Next, the preparation of the supporting structures is controlled. In a brick house, the upper edge of the masonry should be bonded. In block buildings, for slinging it is necessary to provide a reinforced concrete belt, which will evenly distribute the load and prevent deformation of the building.
Correct anchoring diagram
The beginning of laying the slabs is done on a layer of concrete mortar, the thickness of which does not exceed 2 cm. The panel is placed on two short sides. A technological gap is left between the wall and the slab for insulation material. To make sure that the floors lie in the same plane with a difference of no more than 20 mm, use a level. All irregularities are leveled out by laying insulation. The slinging process is carried out after laying all the slabs.
Plates equipped with hinges are fastened with metal rods, and after slinging, the eyes are filled with mortar to prevent the penetration of water, which will cause the metal elements to rust.
Example of a project with anchorage
If there are no eyelets, the slinging scheme is performed using a solid concrete belt around the entire perimeter of the house. The external wall fasteners are additionally reinforced with metal pins.
Useful tips
In the process of bonding slabs, it is necessary to take into account the recommendations described below.
The slabs are laid in one plane. When laying blocks, leave space up to the outer edge for mandatory insulation. Proceed to anchoring upon completion of laying the milestone slabs. The panels should be connected by welding or tying together the reinforcement protruding from them, as well as using an armored belt. (option for slabs without lugs).
Avoid damaging the reinforcement when drilling holes in the slabs. Do not use defective materials. Suspend work during precipitation.
You can start anchoring immediately after installing all the parts. It is advisable to prepare a plan or diagram before starting work. The anchor must be bent into a loop and hooked into the loop of the slab. After maximum tension, the anchors can be welded to the hinges of the slab. Next, all the seams between the slabs should be immediately filled with cement mortar to avoid the ingress of debris, water and snow. If water does get in, you will have to drill holes from the bottom of the slabs and thus allow the water to drain.
What can cause fastening failure:
- Pulling out a bolt - from the attached material.
- Shearing of the bolt—with an increase in the permissible load.
- Complete destruction of the product occurs at the moment the bolt breaks.
- Severing the base of the fastener means the anchor is completely unusable.
- Corrosion.
How are floor panels anchored?
An anchor is a fastener made of a metal alloy: galvanized or stainless steel, brass and the like. It is installed in a load-bearing base and holds a building structure, for example, a floor slab. Anchors are used in the construction of any objects: single- and multi-story buildings, industrial buildings, garages. They increase the strength, stability and durability of buildings. In seismically active areas, anchoring floor slabs is a direct necessity: during an earthquake, reinforced floors collapse more slowly, which gives people a chance to escape.
Depending on the design, place of application and base, there are 5 types of anchors:
1. A wedge bolt is a bolt with a cone-shaped head and a spacer sleeve. It is used for dense materials (solid brick, concrete). Anchoring occurs due to the friction of the sleeve against the inside of the hole in the wall. The advantages of fastening are low cost and quick installation, including end-to-end installation. The disadvantage is that it cannot be reused.
2. Sleeve fasteners work in the same way as wedge fasteners. It is used for solid materials - reinforced concrete, natural stone. A sleeve runs along the length of the part, which is pushed apart by a bolt or nut. The advantages of the anchor are simple installation (including through). The downside is the large connection holes.
3. A drive-in fastener is a sleeve with slots on one end. When hit, they burst apart with a wedge that is inside the part. The anchor is used for strong, non-elastic foundations. The connection occurs as a result of friction and internal stop. Pros: quick installation and vibration resistance. Disadvantages: high requirements for the accuracy of connecting holes.
4. Chemical fasteners hold structures together using glue that is pumped into the channel of the part. It is used for any materials. Advantages: ease of installation, minimal requirements for hole accuracy. The disadvantage is the high cost.
A separate type is special-purpose anchors. Among them:
- Frame. Used for fastening window profiles and door frames.
- Ceiling. For suspended ceilings.
- Fundamental.
- Bolt Molly. For materials with a cavity inside or low load-bearing capacity (plasterboard, hollow brick, chipboard).
Connecting floor panels
The standard interfloor structure is a reinforced concrete structure with internal voids. Anchoring is done after each floor, including the basement and attic. Interfloor slabs are fastened to each other and to the walls. The connection method depends on the base and the presence of mounting loops (eyes) on the floor panels. In a building made of dense materials (brick, natural stone, solid concrete), the anchoring of slabs to the walls is done with steel L-shaped fasteners, with a bend length of 30–40 cm. They are installed every 3 m. Adjacent slabs are connected with transverse fasteners, and the outer ones with diagonal fasteners.
Procedure for anchoring:
- the edge of the fastening is bent with a loop that clings to the eye of the ceiling;
- adjacent anchors are tightened if possible;
- weld them to each other and to the mounting loops;
- seal the seams between the slabs and the eyelets with mortar.
In buildings made of hollow materials (foam and aerated concrete blocks, effective brick, limestone), the anchoring of floor panels to each other is carried out in the same way as with dense foundations. But in addition, a concrete belt is laid around the perimeter of the house. This is a ring anchor that lies in the same plane with the floor slabs and fastens them to the walls and to each other. It consists of a reinforcement cage embedded in concrete.
An anchor can also be used to tie floor slabs without eyelets. A steel plate 50x50 or 100x100 mm is attached to the panels. A metal rod is welded to it. Its second end is placed in the belt and thus anchored. The floor disc is further strengthened by creating connections on the internal walls. If it is necessary to strengthen the anchorage of reinforced concrete products, use pins, reinforcing bars and hooks.
Construction and fastening of the ceiling
While the reinforced concrete panels are still on the ground, they are inspected and defective ones are removed. In the remaining ones, the holes are sealed: one and a half bricks are placed in the gap and covered with mortar, protecting the slabs from freezing. Then they check the readiness of the load-bearing walls. The top edge of the brickwork should be bonded. If the panels rest on block walls, a concrete reinforced belt is made, which evenly distributes the load and protects the building from deformation.
The slabs begin to be laid on a layer of mortar no more than 2 cm thick. The panel is supported on 2 short sides. A gap is left between the edge of the slabs and the walls for insulation. Using a level, make sure that the slabs are in the same plane, and the difference in their heights does not exceed 20 mm. Irregularities are smoothed out by laying strips of insulating material. Anchoring begins when all the slabs are laid.
Panels with mounting loops are connected to each other and to the walls with metal rods. After anchoring is completed, the eyes are sealed to prevent water from getting inside. The fasteners are covered with cement, protecting them from rust. Slabs without mounting loops are connected using a monolithic concrete belt around the perimeter of the building. Fastenings on external walls are additionally reinforced with reinforcing bars and pins.
Construction of houses
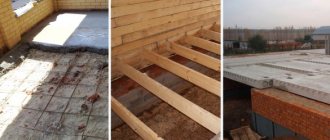
In multi-storey and private construction it is impossible to do without floor slabs, which come in several types: precast reinforced concrete, monolithic and beam. In private and low-rise construction, the procedure of self-reinforcement of floor slabs is often practiced, which, thanks to the tandem of “concrete and reinforcement,” have increased strength. In addition, stair steps, reinforced and arched lintels are made in a similar way.
Content:
Features of reinforced floor slabs
The production of a monolith is not complete without the use of reinforcement, which acts as a binding material in reinforced concrete structures - reinforced slabs, stair steps, reinforced and arched lintels. The process of reinforcing monolithic floor slabs is carried out using reinforcement, which has a cross-section of 8 - 14 millimeters, with the condition that the slab is up to 150 millimeters thick. However, the thickness of the reinforcement may vary depending on the type of product.
Reinforced floor slabs make it possible to solve the concept of building truly warm houses. They are used in residential, commercial and industrial construction to organize roofing and interfloor horizontal floors. Coating and floor slabs make it possible to obtain warm interfloor floors as a final result, as well as provide reliable protection from the cold of attic spaces and used attics and the absence of cold bridges.
Concrete reinforced floor slabs, like ordinary concrete, have specialized markings, and it is recommended to pay attention to them when choosing slabs. Reinforced concrete is marked with marks that consist of letters and numbers. The meaning of the letters indicates the type of slab. For example, PC - floor slabs, PNO - lightweight flooring slabs, or NV - internal flooring. By the numbers that come after the letters (placed with a hyphen), you can recognize the dimensions of the slab: width and length in decimeters.
The most insidious decoding is the last number, which means the permissible load on the floor slab in kilopascals. It is important to remember that any unit contained in the last digit means 100 kilograms per 1 square meter of slab. For example, the number 7 warns you that the maximum load on the product is 700 kilograms per square meter.
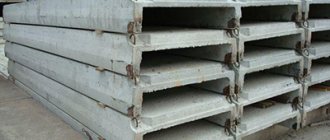
When choosing a concrete slab, you need to pay attention that these structures can differ not only in size and markings, but they also vary in structure. Depending on the cross-section, reinforced concrete slabs are divided into 3 types: solid, ribbed and hollow. The most sold and popular in the construction market are hollow core slabs, which have many worthy advantages.
Such floor slabs are, first of all, relatively light in weight, which simplifies the procedure for their transportation and installation. Also, such slabs withstand deformation tests better and have excellent heat and sound insulating properties. You should know that voids in reinforced slabs come in various shapes: oval, vertical or round.
Thanks to such differences, reinforced slabs can be selected for specific situations, depending on the natural features and climate of the area in which you plan to build a house. Useful information when purchasing reinforced concrete will also be the fact that in the case of using floor slabs as only a ceiling or floor, it is worth practicing reinforcement of ribbed floor slabs; the ribs should go only on one side.
Advantages of reinforced floor slabs
All reinforced floor slabs are recommended for use in coverings and floors of residential and public buildings and structures with walls made of aerated concrete blocks, bricks and large blocks. Floor slabs are suitable for buildings with air humidity inside the building up to 60% and for buildings with a vapor barrier on the inner surface of the walls with indoor air humidity up to 75%. The depth of support of floor slabs on load-bearing walls should be at least 80 millimeters.
Reinforced slabs allow not only to achieve high-quality insulation of a building, but also to speed up the construction process itself, as well as increase sound insulation. The insignificant weight of reinforced slabs and concrete lintels reduces the load on the walls and foundation, allowing for additional economic benefits when building a house. The procedure for reinforcing hollow-core floor slabs does not require huge construction equipment such as a crane.
Anchoring of floor slabs
Content
The final stage of construction of the horizontal load-bearing and enclosing frame of the structure is the anchoring of reinforced concrete slabs.
Anchoring of reinforced concrete slabs is done to connect reinforced concrete elements to each other and to external walls, with further sealing with concrete. The most important element of carrying out such work is knowledge and compliance with the main rules; these rules will help prevent damage to the connecting elements of the structure. Here we will look at the basic rules of operation.
What are anchor ties needed for?
When the floor is erected, the slabs, after embedding, form a strong structure that creates the spatial frame of the building. The provisions of SNiP II-22-81 require taking into account anchor connections in the support units of reinforced concrete products, as well as when assembling the structure frame.
In most options, builders are faced with the question of whether it is necessary to connect the prefabricated slab to each other and to the wall. The answer to this question is obvious, since the main task of anchor ties is to prevent the possibility of shifting the frame of the structure and its floors. Which, as a rule, occurs when the structure is exposed to design loads, subsidence and distortion of the structure’s foundation, as a result of seismic activity and other phenomena.
When the construction of floors takes place in structures consisting of several floors, as well as during the construction of structures located in areas with increased tectonic movement, reinforced concrete concrete must be anchored. It is permissible not to use anchor ties during the construction of attic space in structures with one floor, in areas with favorable seismic conditions.
Anchoring methods
Anchoring reinforced concrete slabs to each other and to external walls involves two options:
- With the help of reinforcement, it is attached to the mounting loops of reinforced concrete products. Thus, a connection is made between the walls using L-shaped rods. If there are no mounting loops, then the reinforcing bars are attached to the plate by welding, the plate is located in the seams between adjacent reinforced concrete slabs, the seams are then filled with concrete.
By making a ring anchor, reinforced concrete slabs are clamped along their entire length with a reinforced concrete belt, reminiscent of an armored belt. In particular, a formwork with a width of 100-150 mm along the length of the laid slabs is erected, a reinforcing frame is placed in the formwork, then it is filled with concrete mortar. To construct the frame, the connection of the reinforcement with each other along the length should be overlapped by 400-500 mm using tying wire.
What elements are used for hollow slabs?
Anchoring of floor slabs, the structures of which have mounting loops, is carried out using materials such as:
- Knitting wire with a cross-sectional area of 4-6 mm.
- Reinforcement class A-III, fastened using a welded connection. The diameter of the rods should be from 10 mm.
- The connection to the load-bearing wall is carried out using L-shaped elements from reinforcement of class A-III, the edge is taken and attached to the mounting loop of reinforced concrete products, the second edge is located in the seam of the concrete solution, which is applied when the side sections are sealed along the entire length and width of the frame.
Anchoring of reinforced concrete slabs, where mounting loops are not provided, is made from reinforcement of class A-III, plates are attached to the ends of the reinforcement by welding, the composition of the plate is metal, the thickness of which is 5 mm. These structures are located in the seams of reinforced concrete products above the internal walls.
Formula for calculating reinforcement
There is a stove with dimensions of 6x10 meters. Reinforcement with a diameter of 10 millimeters is used, the grid spacing is 20 centimeters. Let's calculate the amount of reinforcement that needs to be laid: (6/0.2+1) + (10/0.2+1)= 31 (6-meter bars) + 51 (10-meter bars) = 82 bars. It is necessary to use two reinforcement belts, so the amount of reinforcement doubles. The result is 82 * 2 = 164 rods, including 62 rods of 6 meters and 102 rods of 10 meters. Total 62*6+102*10= 1392 meters of reinforcement for reinforcing the slab.
SNiP requirements
In accordance with the requirements of SNiP II-22-81, anchoring of reinforced concrete products, which is carried out with various parts of structures, must be carried out in the following form:
- The monolithic wall frame and support pillars are connected to the floors and coverings with anchors, the diameter is not less than 0.5 cm 2.
- The largest possible space between floor anchors made of reinforced concrete slabs that rest on the walls is no more than 6 m.
- Calculation of elements is done in individual cases when there is an asymmetrical size of the wall where the slab is subsequently installed, as well as if the gap between the anchors is more than 6 m.
Typically, anchor connections are created from reinforcement, where the cross-sectional area is from 10 mm, and the anchorage length is from 500 mm.
Price
The work of knitting a frame from reinforcement for pouring monolithic foundation and floor slabs is assessed separately from the general work of arranging formwork or pouring and maintaining concrete.
The price greatly depends on the design of the frame and its complexity, so professional installers will be able to provide detailed prices only after visiting the site and reading the design documentation.
Do-it-yourself reinforcement tying includes the cost of tying wire and tools. An important factor is the time spent on work.
So, if you use a gun, you can handle it in one shift or several, but the cost of even renting a tool will not be cheap. It will take about two to three times more wire. But the result will be of the highest quality.
The main stages of covering a building with slabs
Laying of reinforced concrete slabs is carried out in the following order:
- Precast concrete products are slung and transported by a crane operator to the assembly point.
- The elements are placed on a layer of cement mortar 20-30 mm wide, supported on 2 short sides. The depth of support on the walls is 120 mm; the plan may have a new value, calculated taking into account the composition of the load-bearing wall frame and the presence of a seismic belt.
- The laid slabs are checked - the difference in distances between the slabs should not exceed 20 mm. Inconsistencies are removed with a screed.
Anchoring begins as soon as all reinforced concrete slabs are installed.
Features of anchoring in different ways
An anchoring diagram for reinforced concrete slabs can always be found in a building construction project. If suddenly a building is erected without a design, then it is necessary to use a universal plan for the location of anchor ties:
- Nearby reinforced concrete slabs are anchored to each other using U-shaped jumpers.
- In addition, all adjacent reinforced concrete elements are fixed using cross braces.
- The last two elements are fixed to each other using a diagonal strap.
- The slab is attached to the wall with L-shaped anchors with a bend in the range from 400 to 500 mm.
When using class A-III reinforcement, anchors are made by bending the ends, threading them separately into the mounting loops of the slabs and welding them. When connecting rods to each other using a weld, there must be a strong tension.
Anchored using a knitting wire, the cross-sectional area of which is 4-6 mm. There are no significant differences in the location of connections. In particular, in this case, welding is replaced by twisting using double wire.
Also, another effective anchoring method is the installation of a concrete ring anchor. Its structure is the same as a traditional monolithic seismic belt, its only difference is that it is made in the same plane with reinforced concrete slabs, and not under them, like a traditional armored belt. This method is labor-intensive and should be used in areas with increased technogenic conditions, as well as in cases of fastening elements where the device does not have mounting loops.
Nuances in reinforcing nodes for supporting monolithic slabs on the wall
Here Evgeniy gives several options for support units and asks for help in figuring out which one is better.
- Is this connection between the floor slab and the monolithic wall correct?
This solution is used with P-shkami, I don’t really like it in terms of reliability, I’ll explain why later.
What is the U-shaped rod for? The fact is that the upper reinforcement of the slab in a rigid assembly needs to be anchored. There is a clear solution for this in the design manual, shown in Figure 105 (there the slab is rigidly connected to the beam, but there may well be a wall in place of the beam).
How to avoid fastener failure?
The anchoring option, which uses welding, is worthy of special interest. In this option, it is worth paying attention to the quality of welding: the weld should not be destroyed under the influence of any loads during the operation of the building.
Making anchor ties by welding rods requires adhering to the following rules:
- To obtain a high-quality connection, it is necessary to use electrodes of the E46 type (such as ANO-4, ANO-21, OZS-6), the cross-sectional area of which is 3-4 mm.
- The length of the welded joint should be in the range of 80-100 mm.
Using anchoring using one of the above methods does not leave the task of hiding the reinforcement well in the depths of the mortar; as a rule, a screed is applied on top of the floor slabs; it is necessary to protect the reinforcement from external damage, which can lead to corrosion of the anchor ties.
In order to prevent moisture and debris from getting into the cracks of the mounting loops and the gaps between the slabs, it is necessary to timely seal them with cement-sand mortar or concrete.
If you need to order reinforced concrete products, you should contact IS GROUP. We are ready to provide various designs to any region of the country. Here you can find various road slabs, airfield slabs, FBS blocks, PILES, floor slabs and many other reinforced concrete slabs. Delivery is carried out by rail. If there is no company in your city that can provide you with building materials, then be sure to contact us by phone.
Questions about diagrams from the Reinforced Concrete Design Manual
The first group of questions in the figure below:
- Is L₀/10 suitable for fig. 104v?
At one time I asked myself a question, and came to a clear conclusion - there is an error in the drawing. There is a clear rule: when pinched, the upper reinforcement should fill 1/4 of the span, and when hinged, 1/10. This is explained by the fact that when pinched into the support zone at the top it is stretched (this is how the bending moment acts), and the stretched zone needs to be reinforced. And with hinged support, the moment is zero, there is no stretching, but the design rule comes into force, and we still reinforce a small area near the support. The fact is that we cannot create an ideal hinge that completely allows unhindered rotation in structures - the slab is pinched a little, and in its upper support zone, minor, but still stresses arise, cracks can arise, and therefore we reinforce the slab , but only at a length of 1/10 of the span.
- Is it necessary to bend the reinforcement into the lower zone?
No, not necessarily. This solution is associated with savings; it is described in paragraph 3.135 with reference to Fig. 104 (in general, I highly recommend that all figures in the manual be considered together with the text that refers to them). Lower reinforcement is required in the span, but it is not necessary to bring all of it to the support - part of it is bent into the upper support zone.
- What if the height of the floor slab is greater than the thickness of the wall?
In general, the condition for a hinge is that there should be a square b = h on the support, then the plate rests securely (does not slip) and rotates without pinching.
What height are the main slabs? From 60 to 250 mm, right? That is, the depth of support should also be from 60 to 250 mm. But here the rule for anchoring the reinforcement also intervenes - we cannot place it on the support by less than 100 mm, that is, in fact, in the case without welding, our support is from 100 to 250 mm (there are exceptions, but it is better to avoid them).
If the slab rests on the masonry, then I very much doubt that the masonry will be less than 250 mm - then it is no longer a load-bearing wall. If it is reinforced concrete, then it is possible to move on to pinching the slab, and the issue will be resolved.
- Why in Fig. 103 L/4, and in Fig. 104 L/10?
There is an error in Figure 104: either there should be L/4, or it needs to be shown that the slab is hinged on the beam. In general, if there are doubtful aspects and there is no way to figure it out, it is better to take the worst option (this applies to the use of current standards).
How to install floor slabs
The question of how to install floor slabs becomes relevant during the construction of any room. At first glance, it may seem that installation is quite simple, but there are some nuances that need to be taken into account when constructing and constructing a building.
Floor slabs are reinforced concrete products intended for arranging interfloor floors.
To understand how to lay slabs, you need to know the technology and rules for laying floor slabs. Reinforced concrete structures can be divided as follows:
- round-hollow ceilings;
- tent (ribbed);
- long ribbed.
Some prefer to use monolithic reinforced concrete slabs in construction, but this option is more expensive. The most common types used for floors are reinforced concrete round-hollow ones. They have good thermal conductivity and sound insulation.
Floor slab installation technology
For installation you need:
Construction of the floor slab.
- round hollow-core reinforced concrete slabs;
- truck crane;
- cement mortar (cement, water, sand);
- Master OK;
- grinder or autogen;
- sledgehammers;
- level;
- scrap;
- steel brush;
- tow;
- gypsum mortar;
- lime-gypsum mortar;
- thermal insulation material;
- welding machine.
This is not to say that installing floor slabs is an easy process; on the contrary, it is considered quite labor-intensive and risky.
Any foundation is not level and smooth, therefore, before installing reinforced concrete floor slabs, it would be correct and advisable to make the foundation level, for example, lay a brick row on a concrete base. You can check how smooth the surface is using a level. Floor slabs can only be laid on the most flat surface possible; the future service life of the entire building depends on this.
It is necessary to take care of the strength of the foundation, because due to heaving of the soil, its deformation can occur, and regardless of how responsibly the builders approach the installation and how they lay the floor slabs, the building will sag over time.
Calculation of floor slabs.
The foundation can be secured with a regular reinforced mesh, onto which concrete mortar is subsequently applied and floor slabs are installed. The cement must be at least grade 100. The height of the cement layer must be at least 20 cm.
Before installing reinforced concrete floor slabs, you need to prepare them.
If there are flaws, protrusions or chips on the surface, they must be eliminated.
To understand how to lay slabs, before installing and assembling reinforced concrete floor structures, you need to calculate the width so that they occupy the entire perimeter and there are no uncovered parts left. The calculation scheme is quite simple.
Before the installation process, a concrete mixture base is laid out. Laying floor slabs is only possible with the help of a truck crane, since their weight is quite large. Having hooked the reinforced concrete slabs onto the hinges, they are lifted and placed in the right place. Moreover, it will not be possible to carry out installation alone; this process requires a team of 3-5 people. When installing, you need to ensure that each slab lies flat, all elements should be as close to each other as possible. Due to the fact that the cement footing does not harden immediately, the slabs will still be mobile for some time, and installation inaccuracies can be corrected by straightening them with a crowbar.
Scheme of laying floor slabs.
Floor slabs should only be laid on the main walls of the future premises. Installation of internal partitions and walls is carried out after installing the floor slabs, and they should rest 12 cm on the wall. Adjacent slabs must be secured to each other with mounting loops. For installation, it is better to use a cement-sand mortar; it must be liquid, the sand must be thoroughly sifted, otherwise even if small debris gets in, it can lead to deformation of the floor and ceiling.
After the floor slabs have been installed, there are seams between them that must be sealed. All seams must be cleaned using a steel brush. The gaps between the elements of the reinforced concrete structure are filled with tow, previously soaked in gypsum mortar. The tow layer must be compacted. When the gypsum mixture dries, its volume increases, thus, the tow will be pressed against the walls as much as possible. After this, the cracks are covered with lime-gypsum mortar.
The existing ends also need to be sealed so that the slabs do not freeze during the cold season.
Floor slab formwork.
To do this, you can use mineral wool, concrete mortar or backfill brick.
In any construction process, force majeure situations may arise, for example, slabs may burst if unloading rules are violated or they were stored incorrectly.
But it is not advisable to throw away such expensive building material. They can be installed on 3 main walls. Or use them to install the attic space, in this place the load is minimal.
Sealing the ceiling seam from the bottom side
Inter-tile seams - rustications are filled with concrete during installation, then the ceiling is primed, puttyed and painted, unless other finishing is provided.
Sequence of sealing rusts
Before concreting, the seams are thoroughly cleaned of dust and mortar residues with a wire brush ; for better adhesion of the mortar to the slab, the side surfaces can be primed.
- The prepared fresh concrete solution is unloaded into a container and delivered to the work site;
- If the width of the rustication is small, the filling is carried out at one time, if the width of the area is large - in several layers, but no more than after 2...3 hours;
- A concreting area of small width is bayoneted; for a large one, it is compacted with a vibrator;
- For the first week, the surface of the monolith is moistened with water daily;
- After 28 days, the formwork is removed.
Uneven shrinkage of the house
It's unpleasant when cracks appear on the ceiling. This often happens due to::
- Uneven settlement of the building;
- Incorrectly selected brand of concrete;
- Poor quality concrete.
Let us dwell on the causes of uneven precipitation. It may occur in the following cases:
- Structural defects - incorrectly designed foundation;
- Foundation construction without taking into account geology, soil freezing depth and groundwater depth;
- Poorly performed work on the construction of the foundation and masonry of walls;
- Poor quality building materials.
To understand the reason for the appearance of cracks, it is sometimes necessary to order a construction examination.
Decorative ceilings
A protective layer of concrete 30-50 mm thick should ensure that there are no rust stains on the ceiling from the reinforcement, but sometimes this layer is ineffective. The best remedy for seeing stains on the ceiling, traces of leaks and rust cracks is to install a suspended, suspended or suspended ceiling.
A decorative ceiling is the best solution when it is necessary to level the ceiling surface. It will cover all construction flaws and give completeness to the interior. If you want to reduce the height of the room, multi-level or suspended ceilings made of plasterboard, acoustic boards, or combinations of various materials are arranged.
In rooms of low height, false or suspended ceilings are used. The champion here is the suspended ceiling, which “eats” only 3-5 cm of the room’s height.
Every problem finds its solution. Sealing joints between slabs in an aerated concrete house, even with a large width, does not pose a major structural or technical problem. From the proposed options it is easy to choose the one that suits your specific case.
Laying floor slabs: important points
To ensure the accuracy of the design, you need to draw a diagram with all dimensions, this way you will be able to avoid gaps and shortages of slabs. If there are still large gaps, they can be filled with cinder blocks, and small gaps and cracks can be filled with concrete mortar.
When installing hollow core slabs, you need to ensure that they are laid with the smooth side down. They should be located as close to each other as possible - even the smallest gaps should be avoided. They need to be laid, adjusting to each other along the bottom edge.
When installing floor slabs on a foundation, it is very important to know that they should be installed only on 2 walls, and with the short sides and not the long sides. This installation method is needed in order to prevent possible deformation and displacement if the foundation “sags.”
Scheme of steps for reinforcing the floor slab.
The point is that in such cases the entire weight of the structure moves to the third, long side, and cracks or gaps may appear on the short sides, and this cannot be allowed. Also, we should not forget that the short sides of reinforced concrete blanks should not be installed completely on the walls - by 11-15 cm. This will help reduce heat loss in the further operation of any room.
You should immediately think about where the communications will go in order to leave gaps for them between the floor slabs.
After installing reinforced concrete structures, it is imperative to tie them together with reinforcing bars for the strength and strength of the future room. Rods with a diameter of 9-12 mm are suitable for this; you can use wire rod of class A1 (when loads arise, it will stretch and not break). The rods are welded at one end to the loop, and at the other end to the loop of the adjacent floor blank. It is impossible to connect several reinforced concrete slabs at once - only two slabs are connected to each other. The slabs are secured with anchors on the outside.
It is imperative to pay attention to the rules for transporting, unloading and storing reinforced concrete structures and materials so that they do not undergo deformation. Wooden beams must be placed between reinforced concrete slabs at the same distance and in the same places, otherwise they may burst under load.
In some cases, when reinforced concrete slabs are exposed to the cold for a long time, they may freeze, then due to the moisture that will be in the reinforced concrete structures, fungus may form and mold may appear. To avoid this, you need to make small holes in each workpiece at a distance of 25 cm from each other and blow foam into them. Thus, reinforced concrete structures will not absorb moisture.
Anchoring of floor slabs
Correct and incorrect support of floor slabs.
Anchors are metal fastening connections that are laid in any type of foundation. Anchoring of floor slabs must be done after laying out each floor. Anchoring is a method of securing slabs to each other and to the walls of a room. Installation of anchors is carried out at a distance of about 3 meters. To fasten reinforced concrete floor slabs, staples, rods or metal plates are used. Anchoring is carried out only after all structural elements have been assembled and installed. The anchors are attached to the mounting loops. The ends must be connected to the wall with an L-shaped anchor. After this, the anchors should be covered and treated with cement mortar so that they are protected from corrosive processes. Overlapping reinforced concrete elements that rest on the surface of the walls indoors are secured using composite anchors.
Common errors
Correct installation of floor slabs is the key to the reliability of the building. Common installation errors include:
- Use of damaged slabs. Thin shallow cracks can be repaired with mortar and the slab can be used on a lightly loaded area of the floor. If the crack is through, such a product is used for the production of short sections or rejected. Most often, slabs are damaged when transportation rules are violated.
- The support depth is below the established minimum. In such a situation, the load from the slab falls on the edge of the brickwork or reinforced belt, which provokes its slow destruction.
- Extremely large support depth. In such a situation, the slab becomes pinched inside the wall and cannot function properly under loads. As a result, it begins to destroy the masonry. In addition, the end of the slab ends up close to the outside of the wall, which increases the heat loss of the building.
- Incorrect or lack of anchorage. If the slabs that make up the prefabricated floor are not connected to each other and to the walls, or the anchoring is not done correctly, the rigidity of the structure is insufficient and there is a risk of movement of the slabs and walls, especially under seismic conditions. This threatens the stability and integrity of the structure.
How to divide reinforced concrete floors
In some cases it may be necessary to make the structure shorter. To cut reinforced concrete material, you will need a powerful grinder. But it is not necessary to completely cut the reinforced concrete structure.
It is enough to make a superficial cut and hit it with a sledgehammer; as soon as the reinforcing bars are visible, cut them with a grinder. In the case when it is necessary to separate not the transverse, but the longitudinal part, it will be necessary to cut the surface layer and the metal mesh, which acts as a reinforcing frame.