Construction of the cellar ceiling. Stage one
After the walls in the cellar are built and secured, and the floor is securely concreted and insulated from groundwater, you can begin to build the ceiling.
The first step is to build the reinforcement base of the future floor. For these purposes, it is necessary to use only those materials whose strength is sufficient to withstand the weight of a heavy concrete slab. A reliable reinforcement base can be made, for example, from metal water pipes or long metal rods. If the cellar is quite voluminous and its length or width is more than 3 meters, for the strength of the structure you should use an additional element - a beam, which is laid on top of the walls of the cellar.
The reinforcement base should be made in the form of a mesh. To do this, you need to lay pipes or rods crosswise, so that the mesh cells are no more than 10-15 centimeters on one side. The reinforcing material must be fastened together with wire or welding work must be carried out. If an additional beam was used to strengthen the structure, then the reinforcement should be attached or welded to it.
How to make a ceiling in a cellar: technology and materials for installing a concrete ceiling
Concrete ceilings are, without a doubt, the most popular today. Therefore, it is logical to consider in more detail the list of materials and tools necessary for them.
To build a monolithic concrete ceiling, the builder will need the following materials:
- concrete mixture or everything you need to prepare it;
- construction fittings;
- knitting wire;
- wooden beams for formwork;
- moisture-resistant plywood with a thickness of 1.5 cm;
- support beams.
The list of necessary tools looks like this:
- hacksaw or hand circular saw;
- pencil;
- roulette;
- concrete mixer;
- buckets;
- protective glasses;
- shovel;
- building level.
Attention! During construction work, a concrete mixer can be rented.
As you can clearly see, the list of necessary tools and materials is small. The most expensive items are the purchase of concrete mix and the rental of a concrete mixer. It is important not to skimp on the quality of concrete, since the durability of the structure will depend on this. The ceiling in the cellar must be strong enough to withstand all loads.
Stage two. Formwork and concrete pouring
After a reliable reinforcement base for the future floor has been erected, formwork should be made that will hold the liquid concrete until it dries completely.
The best formwork for this type of work is strong plywood sheets attached to the bottom of the reinforcement around the entire perimeter of the basement. It is best to fasten plywood to the reinforcement base with thick wire, which is inserted into pre-drilled holes. Before pouring concrete, the plywood formwork sheets must be supported from below with wooden blocks.
Concrete for pouring the basement floor can be mixed using standard technology: for 100 kg of M300 or M400 cement you need 300 kg of sand and 400 kg of crushed stone or gravel. To make a concrete mixture, a small concrete mixer is sufficient.
The formwork can be removed within two days after pouring the concrete. After the concrete slab has completely dried (3-4 weeks), a layer of earth or sand can be poured on top of it.
A cellar is an indispensable building for owners of private houses, ensuring the preservation of food for a long time. It is a room located below the zero level and does not take up additional space on the site. The ceiling of the cellar, made in accordance with building codes, will ensure the strength of the structure, maintain a stable temperature throughout the year and will not allow the formation of dampness.
Storage for food, canned goods, and vegetables, despite its apparent simplicity, will serve its purpose if you approach the work responsibly and properly seal the cellar.
Work on covering the basement and cellar with your own hands can be done on your own
Composition of building materials
The thickness of the concrete walls in the cellar is selected based on the load on them. If the building is an independent room, then the voltage is minimal. Accordingly, the thickness of the concrete will be less. The concrete mixture includes the following components:
It is better when crushed stone of different fractions is added during mixing of the solution.
- Cement. The grade of material is chosen depending on the marking of the concrete. Cement has a figure less than 2 times.
- Sand. It is selected without clay impurities, since this substance disrupts the adhesion of cement to sand.
- Crushed stone. For a minimum number of pores, it is recommended to use a mixture of building materials of different fractions.
- Water. The liquid must be clean, without impurities, with minimal hardness. To improve the characteristics of concrete, various additives and waterproofing additives are added to the water. The quality of raw materials is regulated by GOST 23732–2011.
This article will describe the stages of concrete cellar construction technology implemented in practice. At this point in time, this building “celebrated” its 25th anniversary and for a quarter of a century has not required any maintenance or repairs, except for regular painting of the lid and cleaning of the ventilation ducts. So, let's figure it out in order, what is needed to fill a cellar with concrete?
Required materials and designs
- Cement M400, furnace slag, construction waste, granot sieving and water;
- Edged board 25x150 or any edged board with a thickness of 25 millimeters or more for formwork;
- Wooden beam 45x45 or 50x50 mm;
- Reinforcement with a diameter of 10-12 mm;
- Knitting wire with a diameter of 2.5-3 mm;
- A finished hatch with a cover, can be made from steel channel No. 20, welded with the shelves facing outwards;
- Nails L=70-100 mm;
- Channel No. 10 for ceiling;
- Red, well-burnt brick, can be used;
- Plastic sewer pipes with a diameter of 150-200 mm for supply and exhaust ventilation and 4 sets of canopies corresponding to the diameter of the pipe;
- Polyethylene film.
Required Tools
- Concrete mixer or sheet of iron 1.5x2 meters with two shovels;
- Galvanized buckets, hammer, wood saw;
- Building level;
- Tape measure, pliers, hatchet, electric drill, drills.
Stages of work
We are considering filling a cellar with dimensions of 2x2 meters in plan and 2 meters in depth. This is the most optimal construction option that allows you to store a supply of country canned potatoes, carrots, beets, Jerusalem artichoke and cabbage from autumn to late spring.
- 4 formwork panels with dimensions of 2x0.8 meters are manufactured. Important! The boards of the shield are arranged vertically and connected into a single whole by 2 horizontal wooden blocks, departing from the upper and lower edges of the boards by 50-100 mm;
- Red brick is laid around the perimeter of a 2x2 meter pit for strength;
- Installation of formwork. The thickness of the poured wall is assumed to be within 200-250 mm. To ensure stability of the wall thickness, wooden “separation bars” 200-250 mm long are cut, which are placed between the pit wall and the formwork at the top and bottom of the formwork panels. In turn, the formwork panels are wedged together by boards, “separation bars” and the walls of the pit. In this case, the wedging boards rest their ends under the bars connecting the formwork panels into a single whole;
- A concrete solution is prepared in the following proportions: 5 buckets of granite sieves, construction waste and furnace slag (if unavailable, it can be replaced with granite crushed stone, but it will cost more), 1 bucket of Portland cement M400, water;
- Filling around the perimeter of the walls. Compacting with bayonet until water comes out, installing reinforcing bars in increments of 250-300 mm;
- After the poured “portion” of walls has been left to stand for 72 hours, the formwork is reinstalled and poured. In this case, the edges of the shields rest on pieces of reinforcement driven into the ground and are also wedged with boards, as in the previous case;
- After the filling level of the walls reaches the ground surface and is allowed to stand for 72 hours, they begin pouring the floor.
Preparatory activities
To ensure that the room fully performs its assigned functions, before you start building a cellar with your own hands, pay attention to the following points:
- Excavation work is preceded by the development of a room layout, which should be thought through to the smallest detail. This will help avoid unforeseen situations in the future.
- Assess the groundwater level at the construction site. Ideal if they are located low. When the storage floor is located below a water-saturated layer, take care that water does not penetrate the floor and walls.
Digging a pit
Digging a pit has two cases: there is already a concrete screed on the floor or there is nothing in the new house yet. If the screed is thin, then removing it is not difficult: a grinder with a diamond wheel for concrete will solve this problem. First, the square is cut, and then the concrete layer is removed using a hammer drill and chisel. In the case where the concrete layer is thick, you will have to use a jackhammer.
There is one caveat: reinforcing bars in thick concrete are cut with a grinder and a metal disc, but it is advisable to leave about thirty centimeters of reinforcement at the edges.
These pieces can later be used to tie the cellar ceiling to the floor plane. And one more thing, which is important. When working with an angle grinder, hammer drill or jackhammer, try to secure windows, doors and other interior parts of the room by protecting them in any way.
Since the cellar will be located indoors, there is no need to talk about any equipment for digging a pit.
All work is carried out using a shovel, buckets for removing soil and a wheelbarrow, with the help of which the excavated soil will be transported to some place. By the way, this place will need to be prepared in advance.
When digging a cellar, you need to pay attention not to weaken the walls of the house. Why was it recommended to retreat one meter from the imaginary line of the walls when marking. And lastly: the walls of the pit should have a slight slope to avoid soil collapse.
Moisture protection
Reliable waterproofing in the cellar makes it difficult for moisture to penetrate and is carried out as follows:
- Apply a layer of plaster with the addition of liquid glass to the side surfaces of the basement structure;
- stick 2-3 layers of roofing felt onto the wet cement mortar;
- build brickwork, with the help of which you press the waterproofing to the walls.
Before pouring concrete to create a basement, you need to install reinforcement and formwork
Floor protection is carried out in a similar way, involving the preparation of a “cushion” 20 cm thick from a mixture of crushed stone and sand.
Selecting a location and marking
Before deciding on the location for digging a pit for a cellar, you need to remember that the pit itself should not be located in the center of the room. It will be correct if one wall of the underground is closer to one of the walls or corner. This is done to make it more efficient to install the ventilation inlet and outlet. But placing the walls of the cellar very close to the imaginary line of the building wall is extremely dangerous.
Therefore, the first mark of the pit is obtained by retreating one meter from the corner, transferring the perpendicular from both walls to the floor and we get the starting point for marking. For example, you are planning to build a basement 3.0 x 3.0 m and 2.4 m high. At the same time, you are going to make the thickness of the concrete walls 0.2 m. Now we calculate: 1.0 m retreated from the wall, 0.2 m thickness of the concrete cellar walls, 3.0 m wall length and plus another 0.2 m thickness of the concrete wall. In total, in order to find the second marking point, you need to retreat from the corner 4.4 m (1.0 + 0.2 + 3.0 + 0.2). By analogy, we find the remaining points of the square for digging a pit.
Next, using two long slats (or something else) and a square, draw a square 3.0 x 3.0 m on the floor. It is very important that all angles of the square are equal to 90º. How to check? Roughly using a square, but precisely by measuring the diagonals from corner to corner, which should be equal.
General recommendations
When the box is prepared (the walls and floor are concreted and waterproofed), a ceiling for the basement is constructed. It is necessary to determine what is best to make the ceiling from? After answering this serious question, you can calculate the need for materials and begin work.
It is convenient when the basement is located in the room where the vehicle is stored. By doing all the work in the garage yourself, you can save financial resources, since you will not involve professional builders. To reduce costs, determine the necessary materials in advance and find out the prices at which they can be purchased. This will allow you to assess the overall level of expenses.
What types of ceilings can be installed in a cellar?
How can I cover the cellar?
Owners of country houses often have to build a partially or completely buried cellar. Such storage facilities, located below the soil surface, can significantly save space on the site when only the entrance to the storage facility is equipped.
Structures underground do not freeze even when there is severe frost, which is why it is so important to properly seal the room so that there is an optimal temperature and humidity inside, ensuring the safety of products and workpieces.
When starting to build a cellar, you should decide in advance how to cover the cellar, so as not to go over budget and do the work efficiently and quickly.
When arranging the ceiling in the cellar, what to make the ceiling from should be decided while construction is still underway. Let's consider the main types of possible arrangement. Some of them are also applicable to basements in private homes.
Features of installing a monolithic block
If you are thinking about how to make a cellar ceiling so that it is practical and reliable, then we recommend a common option - a monolithic reinforced concrete block, which is a reinforcement frame filled with concrete.
The process of creating a solid reinforced base requires following the recommendations:
- It is necessary to determine the dimensions of the monolithic block and prepare the formwork.
- Install strong supports to support the formwork, which will ensure the integrity of the mass when pouring the mortar and during hardening.
- Check the tightness of the formwork boards.
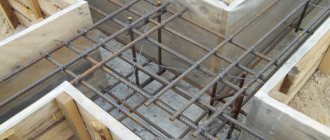
- Carry out mesh reinforcement and knitting of the frame after the installation of the formwork is completed. Build a reinforcement mesh, ensure the interval between the rods is 20 cm and the steel frame protrudes beyond the edges of the slab by 4 cm.
Cellar diagram with insulation and water drainage
Remember that a single-layer reinforcement cage provides strength, but to increase reliability it is advisable to perform reinforcement in two layers.
After completing the pouring of concrete, allow the composition to acquire the necessary hardness and dry, which will take 30 days. The high strength of the monolithic structure allows it to be used as a basis for the construction of various buildings.
This type of ceiling covering in a planned garage is very practical. Indeed, thanks to its solid monolithic base, it can be used as a foundation when constructing a vehicle storage facility.
Specifics of installation of prefabricated monolithic slabs
The ceiling in the cellar can be formed using prefabricated monolithic slabs. To carry out construction activities, order special lifting equipment, which will significantly speed up the work.
Precast slabs are blocks that are laid between steel beams and then filled with a small layer of concrete
A number of difficulties arise associated with increased tolerances for the length and width of the slabs. They may simply not correspond to the actual storage dimensions. Considering that the length of the slabs ranges from 9 to 12 meters, before installation you should compare them with the dimensions of the building. If you plan to use monolithic prefabricated slabs, it is advisable to take this into account at the design stage. The width of the basement room must correspond to the parameters of the installed slab.
If the size of the slabs matches the basement, installation is carried out using a crane. Perform the activities in the following sequence:
- connect structural elements using steel profiles;
- fill the cavities in the joints with heat-insulating composition;
- fill the joint planes with concrete mortar;
- lay the roofing material on the surface using bitumen mastic.
What you will need
Filling the cellar ceiling begins with preparing the necessary materials:
- moisture-resistant plywood up to 15-20 mm thick;
- concrete, metal or wooden beams that will act as a supporting structure;
- wooden beams;
- support stands;
- concrete mortar;
- construction reinforcement Ø 15-20 mm;
- knitting wire.
Tools you will need:
- shovel;
- building level 1.5-2 m long;
- a container for mixing the solution manually or a concrete mixer;
- buckets;
- wood saw or hand circular saw;
- protective glasses;
- roulette;
- pencil.
We make frames and formwork
- Place load-bearing beams on the walls of the cellar. Concrete and metal are more durable than wood, even impregnated with antiseptic solutions.
In the photo - installation of a cellar ceiling made of wooden beams
- Start the installation by creating the formwork, make sure that there are no gaps between the plywood sheets, and they themselves should be intact. Select a moisture-resistant material, for example, laminated with a thickness of 20 mm. Please note that the weight of reinforced concrete will be more than 500 kg per 1 m2 with a layer thickness of 200 mm. Install formwork around the perimeter of the basement.
- Make a frame from reinforcing mesh using tying wire. Place the lower rods with their ends on the supporting beams. The success of construction will mainly depend on such a design.
Reinforcement frame of a basement under a residential building
- After laying the horizontal and vertical rows of reinforcement, securely secure their intersections with tying wire. This will increase the reliability and quality of the load-bearing beams. The cells should be 15x15 mm or 20x20 mm in size. After making the frame, check it for strength.
Concreting
The next stage is pouring the created structure with concrete, and this must be done quickly. Prepare a solution of cement, which will be the binder, and fillers - sand and crushed stone. You can prepare it by hand or use a concrete mixer.
Filling the reinforcement frame with concrete
It is necessary to pour the formwork in several passes, but at the same time you need to maintain one direction. Carefully compact the poured mixture so that there are no voids inside it.
It is very important that the ceiling slab is strong enough. Unevenness can be controlled by the building level.
Cover the concrete solution after concreting is completed from direct sunlight, wind and drafts. Make sure that the hardening slab is not subjected to any kind of mechanical stress.
Sprinkle it with water periodically throughout the week to ensure even hardening. Further work with the slab can be carried out after 21 days, and then remove the formwork.
Hidden metal cellar handles
The quality of a concrete floor primarily depends on the quality of building materials for it. The brand of solution should be no lower than M-250, and better yet M-400, where special heavy fillers are added to the composition.
Advice: before starting work, carry out the maximum calculation of the materials required for the manufacture of a concrete ceiling, which will make it possible to significantly save on construction.
Making your own concrete floor allows you to think through and install the necessary communications. If flooring is to be laid on top of the slab, level its surface with self-leveling mixtures. For the planned hatch into the basement, a secret cellar handle is suitable, which will not interfere with walking.
Insulation
In this case, you also cannot do without determining the type of construction, and you must decide for yourself what kind of ceiling you will have.
It is known that cellars are divided into three types based on design features:
- ground;
- recessed;
- underground.
By location:
- standing separately;
- under a residential building;
- under a barn, garage, etc.
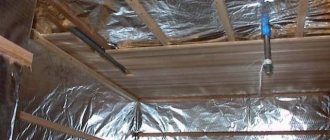
This information imposes certain requirements for the thermal insulation of the basement ceiling:
- an above-ground, buried or freestanding structure will have a roof. Therefore, it is insulated outside and inside, and a double layer of insulation is laid on the ceiling of the cellar;
- single-layer thermal insulation is used when constructing a storage facility on the ground floor or under the house;
- under a garage or under another outbuilding, the layer of insulation depends on whether the room is heated or not.
Traditionally, the ceiling is made double: expanded clay is used on top or covered with soil in a layer of up to 200 mm, and the main layer of thermal insulation is placed on the bottom.
There are two options:
- if the main covering of the cellar has good thermal insulation, the ceiling can be insulated with a small layer of thermal insulation material, covering it with a plastic decorative coating;
- when it is not possible to insulate the main floor of the basement or it is not possible to increase its thickness for better thermal protection, in the case where it is located under the garage, you will have to install a double layer of insulation in order to create a false ceiling from a moisture-resistant, vapor-proof material. An example is extruded polystyrene boards.
Advice: be sure to provide ventilation, which will prevent the formation of condensation in the cellar.
Device
If there is good insulation of the concrete basement floor under the house, thermal insulation is installed on the ceiling in the same way as on its walls.
The process can be divided into several stages:
- coating with waterproofing penetrating compounds;
- sticking insulation to the bottom of the concrete floor;
- vapor barrier.
Below are instructions on how to insulate the ceiling in a cellar under a residential building.
- At the first stage of work, use waterproofing compounds that will protect the basement from water ingress. They are usually sold in the form of mixtures that are ready to use. If the basement is large in area, use water-soluble compounds for treatment.
Waterproofing works
To apply the primer, use a brush or roller. Thermal insulation may only be glued once it has completely dried. The best slab options for such purposes are polystyrene foam and extruded polystyrene. You can also use fiberglass or basalt slabs, as well as cement-bonded particle boards.
- Installation on the basement ceiling is carried out using special adhesives, offered by retail chains in dry form for dilution with water. Apply to the surface with a notched trowel, which creates a relief surface that promotes good adhesion. Press the insulation board to the place where the adhesive is applied and secure it additionally with dowels along its edges and in the center.
Gluing insulation to the ceiling
- Attach a P/E film for vapor barrier on top of the glued slabs. If cement bonded particle boards are used, it is not needed.
Drawing of an underground cellar
Insulation in a cold basement
It is difficult, but quite justified, to install a false ceiling. This method is used for a cellar located under a garage, although it is also acceptable in other cases.
The process is divided into several stages:
- Pipes need to be installed.
- Assemble the fencing mesh.
- Paint the structure.
- Fill the voids with insulation.
Materials:
- waterproofing mixture;
- adhesive composition for polystyrene;
- red lead or paint;
- pipes Ø 25 mm;
- construction fittings or smooth metal rods Ø up to 12 mm;
- hooks with dowels;
- knitting steel wire.
- slab insulation;
- polyethylene film in rolls;
- cheap thermal insulation;
- sheet material for umbrella.
Tools:
- brush or roller;
- hammer;
- roulette;
- construction knife;
- notched spatula;
- hammer drill
Thermal insulation of the ceiling in a cold basement
- Fix Ø 25 mm pipes at a distance of 120-200 mm on the slab from the basement side, in increments of 500-600 mm. For example, use a hammer drill to punch holes and install hooks with dowels in them, to which you hang the pipes.
- After this, install steel rods with a diameter of up to 12 mm perpendicular to them in increments of 300 mm and tie them together with wire.
- Paint the structure with red lead or chromium oxide (green paint). In addition to them, you can use other waterproof roofing paint.
- Insert plastic bags with cheap insulation between the mesh and the floor slab. Their necks must be soldered.
Lay them on top of each other as tightly as possible so that there are no gaps. Remove condensation using umbrellas made of plastic, metal or waterproof plywood, with gutters on them to drain the moisture into a container.
Advice: cover the ceiling with wood if you store wine in barrels in your basement, rather than fruits and vegetables. First, make a wooden sheathing from beams, and then finish it with boards.
Remember that insulating the basement ceiling is a responsible job, because the safety of the harvest will depend on it. If you have basic construction skills, solving this problem will not be difficult for you. At the same time, insulating the cellar will not require significant financial expenses.
Use of wood
Are you planning to build a cellar with your own hands? Use wooden beams - a proven, easy-to-work material.
If you are building a house made of wood, you can cover the basement with wooden beams
Perform the activities in the following order:
- Treat all parts of the wood structure with an antiseptic.
- Wrap two layers of roofing felt around the supporting surfaces of the beams.
- Install wooden beams on the top surface of the cellar walls.
- Secure the end part of the beams with small strips, providing a base for the knurling boards.
- Lay the plank and secure it using self-tapping screws.
- Form a heat-insulating contour, coat with mastic, cover with roofing felt or roofing felt.
- Fill the structure with soil if no structure is planned to be built above the structure.
Pay attention to the presence of grooves in the basement walls necessary for installing load-bearing beams.
Ventilation
Ventilation in a cellar built in a house is extremely necessary; its absence will lead to the formation of condensation, the appearance of fungi and mold. As a result, the food in the basement will deteriorate, develop mold, and the cellar will slowly begin to deteriorate: shelves will rust, boards will rot, and electrical equipment will deteriorate.
By type, ventilation can be natural or forced. In the case when the inflow and outflow of air flows are sufficient to dry the room, natural ventilation is used.
If this is not enough, then you cannot do without the construction of forced ventilation. It will cost more, as it requires air pipes and special fans. Among other things, forced ventilation can serve as a source of additional cooling in summer, and heating in winter.
Application of rolled metal
Are you deciding what to cover your basement with? It is possible to use ordinary rails. I-beams are used as load-bearing beams and are highly durable.
The installation of railway profiles is carried out in special grooves provided in the walls of the building. This allows you to securely fix the structural elements. The length of the beams must correspond to the dimensions of the basement, the walls of which are the base for them.
Form the load-bearing surface using the following algorithm:
place steel reinforcement bars between the beams and secure them with wire;
- mount wooden formwork, lay a waterproofing coating on it;
- install a power frame under the formwork to support the concrete mass;
- fill the structure with solution, ensuring uniformity of the layer and continuity of work;
- lay the roofing material on the surface.
Option on load-bearing beams
To make a high-quality ceiling for your cellar, you can use load-bearing beams. Metal beams are best for this. If possible, you can even use ordinary rails, which can often be purchased at construction warehouses or scrap metal collection sites. Often the beams from which the ceiling of the structure is supposed to be made are ordered individually at factories.
Even ordinary rails are suitable as load-bearing beams. When choosing this method of creating a cellar floor, at the stage of its construction it is necessary to provide for the presence of special holes in the walls that are required for fastening the load-bearing beams. The ceiling of your cellar will experience significant stress. That is why the walls must also be as strong as possible, capable of supporting the weight of the beams and soil poured on top. By and large, the walls will be the “foundation” for the ceiling.
Special holes are provided in the walls for laying beams. The order of work is as follows:
- Load-bearing beams are laid in pre-prepared holes in the wall. By and large, this work can be done independently, but with several assistants, because even the rails have significant weight.
- In the space that will be formed after laying the load-bearing beams, it is necessary to mount reinforcing bars and then secure them with special wire. Next, the reliability of the connection and the durability of the beams are checked. If all is well, then wooden formwork is made and a waterproofing layer is applied to it.
- After installing the formwork, it is necessary to install supports that will be designed to take the load of the cement mortar.
- You can mix the cement mortar yourself or order it ready-made from any construction company. The solution must be poured as evenly as possible and without long breaks into the metal frame. All compartments of the frame must be filled with concrete; nothing should be left out. Upon completion of pouring, distribute the solution throughout the entire thickness of the structure.
- The ceiling that is obtained after using this method requires high-quality thermal insulation. In principle, any thermal insulation material is suitable for this.
As a result, you get a reliable floor slab that can withstand serious loads. In this case, the ceiling of the cellar will be perfectly strengthened, insulated and will not cause problems during operation. After all insulation work, the resulting floor must be covered with soil, making a small mound. In some cases, a gable roof is additionally installed, which will protect the cellar from precipitation.
Insulation works
The climatic parameters of the basement depend on the effectiveness of insulation. Use a mixture of wooden sawdust and cement mortar as thermal insulation, which is evenly applied to the surface in a layer 4 cm thick. Perform finishing measures after the composition has dried. It is advisable to use polystyrene foam, mineral wool or polystyrene foam.
Don't forget about the need for room ventilation. This will prevent condensation from forming.
Internal cellar
An internal cellar in a house has a number of advantages over a similar free-standing structure. All the disadvantages of a conventional cellar, such as the formation of condensation, mold, and trips through the territory, will disappear if the storage space for food is arranged underground. The process of arranging a basement that serves as a cellar requires certain skills and experience in this matter. However, with patience, hard work and armed with some theoretical knowledge, you can build an internal cellar yourself, without the involvement of specialists.
Building a cellar with your own hands
If you don’t have a cellar on your property, and you’re tired of storing vegetables and canned goods in filled pantries, you should think about building your own large cellar.
The construction of any cellar is a complex job, starting from the preparatory part with the plan and selection of materials, and ending with the actual installation of the structure in stages.
During construction, special attention should be paid to the walls, which will bear the entire weight of the structure, and the ceiling.
A poorly constructed ceiling can allow precipitation to pass through (and increase indoor humidity and reduce the shelf life of food), become covered with a network of cracks, and such a cellar threatens your health when you are in it (it can suddenly collapse, and it’s good if you or your loved ones will not be there at this moment).
Therefore, the ceiling is perhaps the most important part of the cellar.
We build a cellar in the countryside from bricks and fill everything from A to Z
First of all, you need to think about the location for the cellar, taking into account the following factors:
- The size of the future structure (so that it does not intersect with other ground-based buildings);
- Terrain of the site (it is better to install it on a high site);
- The type of soil in your area (the slopes and drainage capabilities of the soil depend on this);
- Groundwater level (the lower part of the cellar should be 0.5 meters above this level);
- Depth of soil freezing in winter.
Overlap
Covering an internal cellar is a complex and important moment, and it needs to be approached seriously. After all, in essence, the ceiling of the cellar is the floor of the room, where furniture will then be located, people will walk on it, etc. Hence, the ceiling must have increased strength.
To install the ceiling, channels of size 10-12 are laid on the walls every 50.0 cm. A reinforcing mesh of rods Ø 10-12 mm is laid in the gap between the channels or on them, which are welded (can be knitted with wire) to the beams. Along the perimeter of the channel, they are also attached to the reinforcing bars that remained when the floor was dismantled. If these rods are not there, then when pouring the walls it was necessary to take care of metal embedded parts to join them with the beams.
Below, under the beams, formwork is constructed from wooden panels on supports. In addition, when constructing formwork for pouring, it will be necessary to leave space for the subsequent installation of a door to the basement (lyady). When everything is ready, it will be possible to fill the entire structure with cement mortar. After the cement has completely hardened, which is about a month, the lower panels can be removed and you can begin decorating the floor in the room where you built the cellar.
Now about the thermal insulation of the ceiling and floor. Is it necessary? Yes it is necessary. Because in winter you will heat the floor, which is not at all necessary, but will only lead to excessive consumption of coolants, and therefore money. In the summer, when there is intense heat, it is necessary to insulate the interior of the cellar from heating, which can lead to spoilage of food. Thermal insulation is carried out in the process of laying decorative materials on the floor (linoleum, laminate, parquet, etc.)