The fastest and most economical way to organize interfloor separation and separate the residential part of the house from the attic and basement is to lay floor slabs on a brick wall. Monolithic structures are rarely preferred when for some reason it is impossible to use ready-made slabs, for example, the road does not allow a crane to approach the site.
Rules and technology for installing floor slabs
The whole process can be divided into four stages:
- preparing the horizontal plane of the foundation on which the slab blocks will be laid;
- ceiling installation;
- fastening to the foundation, this process is called anchoring;
- sealing gaps and technological holes.
Preparatory stage
Regardless of what materials the strip foundation was built from, there is always a high probability that its upper horizontal plane has a drop and unevenness. We need to get rid of them. How to do this depends on the magnitude of the difference.
- If this value is small, up to 5 cm, then leveling is carried out with a cement-sand mortar with or without the addition of crushed stone. In this case, the crushed stone must be of a fine fraction. A reinforcing mesh must be placed in the poured layer.
- If the difference is 5-10 cm, then leveling is carried out with bricks.
- If the value is more than 10 cm, then the foundation plane is leveled with a concrete reinforcing belt, which is poured into the installed formwork.
To avoid doing all this, you just need to accurately construct the foundation structure
Pay special attention to the horizontal position of the upper plane
Have you ever laid floor slabs yourself?
Not really
Installation of slabs
Before laying floor slabs on the foundation, you need to understand their layout. There are clear standards that must be taken into account.
- If a concrete foundation was poured, or it was assembled from foundation blocks, then the size of the support of the floor slabs on the foundation should not be less than 6 cm.
- If the foundation is a brick structure, then the support should not be less than 12.5 cm.
- The first and last slabs should not be laid on walls that are located along the slab products themselves. Be sure to leave gaps up to 25 cm wide, which will later need to be filled.
There are no strict rules in construction SNiPs regarding the presence or absence of a fastening mortar on which the floor is laid. But it's better to use it. Typically, a cement-sand mortar of at least M100 grade is used for this. It is kneaded with sifted sand so that there are no pebbles in it. The latter can cause distortion of the installed concrete products.
The installation rules contain several requirements that must be adhered to:
- The fastening solution is applied with a thickness of 2 cm. A reinforcement frame in the form of a lattice or individual longitudinal rods made of reinforcement with a diameter of 8-12 mm must be placed in it.
- Since the slabs used in private house construction are hollow products with holes at the ends, it is necessary to seal these holes on both sides before laying them on the foundation. Most often, a thermal insulation material is used for this, for example, mineral wool, which is wrapped in plastic film. After insulation, holes must be sealed with cement mortar.
- Slab products have two sides: one smooth, the other rough. Laying should be done with the smooth side down. It will form the ceiling in the basement. The thing is that concrete products are poured into molds. So the lower plane rests on a smooth metal surface, and the upper plane hardens in air, which is why it has roughness. It should be added that the lower smooth side always works in tension, and the upper side in compression. Therefore, a more powerful reinforcement cage is placed in the lower part than in the upper part.
- The installation sequence is determined by the house design. There are no strict requirements in this regard. But usually they begin to mount from one of the edges of the future structure, laying out the remaining elements in order. If a load-bearing wall rises inside the house, under which a foundation wall is erected, then the slabs should not cover it. That is, the supporting structure should rest on the foundation element, and not on the floor of the house.
- Don't neglect safety precautions. The main thing is to lift the load correctly. There is only one requirement here - the slings of the lifting mechanism must be positioned relative to each other at an angle of no more than 90°. Each plate is attached to the crane hook with four slings. The driver of the special equipment is aware of this, but it must be monitored.
- After installing concrete products on the mortar, you have 10 minutes to correct them. That is, move them closer to each other or align them at the ends. To do this, use crowbars.
Sealing joints and ends
To ensure reliable adhesion, the recesses are filled with concrete.
A very important point is sealing rust. A rust is where the long sides of two adjacent slabs meet. To obtain a solid and durable ceiling, all rustications must be filled with mortar. Round-hollow ones have special locks on the sides, made in the form of round recesses. When pouring rustications, these recesses are filled with concrete, ensuring reliable and high-quality adhesion. Such a prefabricated floor works almost like a monolith.
Among reinforced concrete ones, there may well be defective specimens with incorrectly made sides with locks. When connected to each other, the recess will be at the bottom, while at the top the structures fit tightly together. As you might guess, filling such rust with concrete is problematic at first glance. However, in practice, not everything is so complicated. To repair defective rust, adjacent slabs must be joined not end-to-end, but with a small gap of 2-3 cm. The gap must be made in the upper part of the ceiling, where they can be joined. From their lower part along the length of the rustication you need to tie a wooden board - formwork for pouring concrete mortar. The building mixture is poured into the rustication through the top mortar.
After the installation of the floors is completed, it is necessary to seal their ends to protect them from freezing. If the slab rests on an external wall, sealing the end will also reduce heat loss and prevent the cold from getting inside the house.
Sealing the end of the ceiling is necessary to protect the house from freezing.
To seal the ends of reinforced concrete structures, you can use one of the following methods: fill the voids of the pipes with mineral wool approximately 20-30 cm deep; close the voids with backing bricks on mortar, and then seal the surface with mortar; fill the voids of the pipes with light concrete mortar to a depth of 12-25 cm or install concrete plugs; You can also insert a one-and-a-half backing brick into the hole.
In some cases, the ceiling is located too close to the facing masonry. If there is no insulation between them, and the ends are not sealed, the structure will freeze in cold weather, becoming covered with ice in the room. Such a stove will be a source of cold in the room, and when the heating is turned on, “dew” will appear on its surface due to a sharp temperature difference. If the finished house already has similar slabs, you can solve the problem without dismantling the walls. To do this, using a hammer drill, a hole is drilled in the frozen pipes from the underside of the problematic ceiling. In the resulting hole you need to insert a tube inclined towards the outer wall, through which you should blow out the mounting wall. In this case, you should get a foam plug, going to a depth of about 10-20 cm. It will act as a heat insulator.
https://www.youtube.com/watch?v=auUgZAwXFvE
It is necessary to seal the ends not only of those slabs that rest on external walls, but also those that rest on permanent internal walls. In accordance with building codes, the ends are sealed starting from the third floor and below. For example, a two-story house has three floors: between the attic and the second floor, between the second and first floors, between the first floor and the basement. In this case, it is necessary to seal the ends in the attic floor to strengthen the structure, which can take a significant load from above. The ends should be filled with concrete mortar or laid with one-and-a-half bricks. It is more convenient and easier to do this before installation is completed. Good luck!
Installation
To install the slabs, three people will be required: the first one hangs the part from the crane, the other two install it on site. Sometimes during large-scale construction a fourth person is used to correct the work of the crane operator from the outside.
Installation work of floor slabs is carried out in accordance with the technology regulated by SNiP standards, as well as in accordance with the drawing and layout agreed upon in the project.
The thickness of the partition is calculated depending on the designed load. If reinforced concrete slabs are used, they must be at least 10 centimeters wide, for ribbed options - from 29 cm.
The concrete mixture is prepared immediately before installation. It is better to order it from specialized companies so that it has brand strength. The solution consumption rate is determined at the rate of 2-6 buckets for laying one slab.
In order to place the slab correctly and accurately, it does not need to be immediately unhooked from the crane slings. To begin with, with the suspensions tense, the ceiling is leveled, and then lowered completely. Next, builders check the height difference using a level. If a certain evenness cannot be achieved, then you will have to raise the slab again and adjust the height of the concrete solution.
Experts warn that it is better to install hollow core slabs on two short sides. In addition, you should not cover several spans with one ceiling, as it may burst in an unexpected place. If, nevertheless, the scheme provides for one slab for 2 spans, then several runs should be made with a grinder in the places of the jumpers. That is, an incision is made along the upper surface above the central partition. This ensures the direction of the crack in the event of a future split.
Prefabricated monolithic or hollow core floors have a standard length. Sometimes other dimensions are needed for construction, so they are divided with a saw with a diamond blade
It is important to remember that it is impossible to cut round hollow-core and flat slabs lengthwise, which is due to the location of the reinforcement in the support zones. But monoliths can be divided in any direction. Cutting a cast-in-place concrete block may require the use of rebar cutters and a sledgehammer
Cutting a cast-in-place concrete block may require the use of rebar cutters and a sledgehammer.
First you need to make a cut on the top surface along the intended line. Then a sledgehammer is used to break through the concrete in the void area and break the lower part of the slab. During work, a special lining is placed under the cut line, then at a certain depth of the hole made, a fracture will occur under its own weight. If the part is cut lengthwise, then it is better to do it along the hole. Internal reinforcing bars are cut with a gas tool or safe welding.
Professionals advise not to cut the reinforcement with a grinder until the very end; it is better to leave a few millimeters and break them with a crowbar or sledgehammer, since otherwise the disc may get stuck and break.
If the width of the slab is not enough, then it is proposed to make monolithic concrete screeds. Plywood formwork is installed below two adjacent slabs. U-shaped reinforcement is placed in it, the base of which lies in the recess, and the ends extend onto the floors. The structure is filled with concrete. After it dries, a general screed is made on top.
When the installation of the ceiling is completed, the process of laying the reinforcement begins. Anchoring is provided to fix the slabs and impart rigidity to the entire structure.
Recommendations for laying walls from twin blocks
Transportation and storage of twin blocks on the construction site
Transportation of twin blocks packed on a pallet is carried out by road. The vehicle used must have a body with a horizontal surface, opening or removable sides, and removable racks. When transporting products, it is necessary to ensure their protection from mechanical damage and moisture. To prevent damage to the blocks, each row of product pallets must be secured to the machine platform with fastening belts.
To unload pallets with twin blocks, soft slings should be used to ensure reliable fixation of the load and prevent damage to the edges of the products. The use of metal slings for this purpose leads to destruction of the product.
Twin blocks should be stored on pallets, which should be placed on specially prepared level areas. In order to protect twin blocks from rain and snow during storage, it is not recommended to remove the polyethylene sheet from the top of the pallet.
Preparatory activities
Laying twin blocks begins on a pre-prepared foundation. In most cases, in low-rise construction, the foundation is a reinforced concrete slab, the thickness and technical solution of which is determined by the design features of the building being constructed.
After the foundation has gained strength, they begin to build the walls. Initially, the locations of the external and internal walls are marked, and the installation locations of the corner blocks are also marked. Next, to prevent moisture penetration between the foundation and the supporting first row, waterproofing is performed. The latter is carried out using a waterproofing solution (waterproofing mastic, penetrating waterproofing, etc.) applied to the foundation in several layers. Also, for this purpose, roll waterproofing can be used (roofing material 1-2 layers), laid over a layer of cement-sand mortar 10 mm thick. In all cases, the width of the waterproofing coating should be slightly greater than the width of the wall.
Preparation of adhesive solution
For laying twin blocks, a thin-layer adhesive mortar is used based on a dry mixture consisting of Portland cement, finely ground sand and additives, intended for laying cellular concrete products. To prepare the adhesive solution, the dry mixture is mixed with water and thoroughly mixed using a mixer (a paddle mixer driven by an electric drill).
The preparation of the adhesive mixture must be carried out strictly in accordance with the manufacturer's instructions. The consistency of the adhesive mixture is important for adhesive masonry. The mixture is considered to have the required consistency if, when applied to the vertical surface of the twin block, it does not float away or fall into pieces. When working with glue, you must strictly follow the recommendations for use developed by the manufacturer.
Preparation of adhesive solution
Laying the first row
A layer of cement-sand mortar 10-15 mm thick is laid over the waterproofing layer, on which the corner blocks of the first row are installed. A control cord is stretched between the corner blocks. Next, the remaining blocks of the first row are laid. The position of the block is checked using a level; if necessary, it is adjusted using a rubber mallet.
The correctness of the corners of the building is controlled by the corner. The first row is the most important, as it will ensure the accuracy of laying subsequent rows. The base of the building must be made “recessed”, i.e. the overlying row of blocks should hang 40-50 mm above the plinth, with the height of the plinth at least 500 mm from the level of the walkway.
Laying the first row
Elimination of irregularities
Usually, when laying blocks of even the most ideal geometry, irregularities of 1 - 3 mm are formed. Each such protrusion of the previous row will certainly contribute to the unevenness of the next one, and due to the adhesive layer 1-3 mm thick, it is almost impossible to level out the resulting protrusions and depressions. Therefore, unevenness in the laid blocks is eliminated with a grater, sanding board or plane, then dust and small fragments are removed. Eliminating unevenness in the masonry will reduce glue consumption and increase the strength of the masonry.
Applying glue
The prepared glue, using a notched trowel or a spatula (comb tooth size 4-5 mm), selected depending on the thickness of the blocks, is evenly applied to the horizontal and vertical surface of the twin blocks with a layer of 1-3 mm. The adhesive mixture should be applied to the entire horizontal surface without leaving any free areas. The solution is applied to the vertical surface according to the diagram.
The applied solution on the block should have a groove-like shape. Gaps between tongue and groove and between grip pockets are not filled. In summer, before applying the adhesive solution, it is recommended to slightly moisten the surface of the blocks with water.
Manufacturing of additional blocks
Additional blocks are easily cut using a hand or electric saw. To ensure the accuracy of cutting blocks and maintaining right angles, a metal square is used.
ConstructionDialogue
The reliability of supporting the floors on load-bearing walls ensures safe, reliable and long-term operation of the entire building. The structural stability of engineering structures depends on proper execution. Therefore, the support of floor slabs on walls is regulated by SNiP.
Parameters that determined the amount of support
The depth of the ceiling on the walls depends on the following factors:
- purpose and type of buildings - residential, administrative, industrial;
- material and thickness of load-bearing walls;
- the size of the overlapped span;
- dimensions of reinforced concrete structures and their own weight;
- the type of loads acting on the floor (static or dynamic), which of them are permanent and which are temporary;
- magnitudes of point and distributed loads;
- seismicity of the construction area.
All the factors listed above must be taken into account when calculating the reliability of the structure.
In accordance with current regulatory documents, the support of the floor slab on a brick wall is taken from 9 to 12 cm, the final size is determined by engineering calculations during the design of the building.
With smaller overlaps, the heavy dead weight of the elements, combined with the existing loads, will have a direct impact on the edge of the masonry, which can lead to its gradual destruction.
On the other hand, a larger overlap will be a kind of pinching of reinforced concrete elements with the transfer of weight from the upper section of the wall to their ends. The result is cracking and slow destruction of the masonry walls.
Also, when the ends of the products approach the outer surfaces of the walls, heat loss in reinforced concrete elements increases with the formation of cold bridges, leading to the formation of cold floors.
The cost of parts is proportional to their length, so excessive pinching will lead to an increase in the cost of the structure.
Supporting unit for a floor slab on a brick wall
When erecting brick buildings with floors made of prefabricated reinforced concrete slabs, masonry is carried out in full thickness to the design bottom of the ceilings. Next, the bricks are laid only on the outside of the walls to form a niche into which the slabs can be laid.
In support units, it is important to comply with the following conditions:
- the ends should not rest against the brickwork, so for the overlap most often used in practice of 12 cm, the width of the niche is ≥ 13 cm;
- the mortar on which the slabs are laid is of the same brand as the masonry one;
- voids in the channels are sealed at the ends using concrete liners, which will protect the ends from destruction when compressed under loads. The production of concrete liners is carried out at factories with delivery upon purchase of slabs; in the absence of liners, channel voids are filled with B15 concrete directly at the construction site.
Slab reinforced concrete products are placed on the end brick walls with one side. In this case, the minimum support of the floor slab on the end walls is not standardized.
But in order to avoid destruction of the product when squeezing the hollow channel, the installation must be carried out in such a way that the masonry laid above the ceiling does not rest on the outermost void of the structure and the shoulders of the moments acting from the load must be of minimal values.
Purpose of floors
Reinforced concrete floor slabs are one of the main load-bearing structures of a building, so they receive enough attention during construction. The main function of reinforced concrete floors is to transfer and distribute the load to its own weight, and then to other elements of the building.
Based on their location, these building structures are divided into interfloor, basement and attic. The slabs are manufactured in a factory and come in several types:
- prefabricated monolithic;
- multi-hollow;
- made from heavy grades of concrete.
The main requirements that high-quality floors must have are strength, rigidity, fire resistance, sound and water resistance.
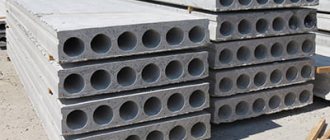
Most floor slabs are made with voids; this design is considered the most optimal in terms of weight and quality. Laying takes place on the load-bearing walls of the building, the pitch of which can be up to 9 m.
Hollow-core reinforced concrete slabs
In the construction of multi-storey buildings, hollow-core reinforced concrete products are used much more often than others. Depending on the method of preparation, they are divided into round-hollow and continuous molded.
Round-hollow slabs are the most popular types of slabs. They are most often used in the construction of houses. This type of flooring has been used for more than twenty years. The strength of these structures has been tested under high loads. A huge number of regulatory documents have been written on the topic of installation and production of round-hollow panels.
According to GOST 9561-91, the thickness of the product should be 220 mm, length - from 2.7 to 9 m. The width of reinforced concrete surfaces is 1, 1.2, 1.5 and 1.8 m. They are divided by serial numbers. In the production of such floors, reusable forms are used for pouring concrete.
Brick belt under the Mauerlat
The armored belt between the wall and the Mauerlat absorbs and distributes the loads from the roofing system and is necessary for a strong connection between the walls and the roof through the Mauerlat.
Laying features
Recommendations for the parameters and reinforcement of the brick belt:
- height 4-7 rows;
- the width is equal to the thickness of the wall;
- reinforcement - in each horizontal seam;
- reinforcement – a mesh of 5 mm wire with a mesh size of 3-4 cm;
- recommended displacement of seams between masonry bricks is 1/3 of the length;
- every third row is tied by laying bricks with a poke;
- the diameter of the threaded studs inserted into the masonry to tie the belt and the Mauerlat together is 12-16 mm;
- spacing of anchor studs – 1-1.5 m;
- The depth of fastener embedding is equal to the height of the belt.
The rules for constructing a brick belt under the Mauerlat are the same as for floor slabs.
Slab storage
Storage schemes for different types of products
After the scheme has been developed and the products have been purchased, they need to be placed on the building site for convenient installation in the design position. There are rules for storing materials:
- elements must be laid under a canopy;
- the storage location must be located within the access area of the crane;
- Pads are provided for support points.
Failure to comply with the last rule will result in a break in half. PC, PB and PT products work in such a way that the appearance of intermediate supports or a solid base leads to the appearance of cracks. Laying is done in the following order:
- wooden blocks or boards are laid on the ground under the edges of the slab;
- I transfer the ceiling element onto the boards using a crane from the machine;
- boards or bars are placed again on the laid slab;
- unload the second slab from the machine;
- repeat points 3 and 4, maximum storage height is 2.5 m.
Storage of slabs on site
To store slabs on site for a long time, the following rules should be observed:
- If the task is to store a large number of slabs, then the height of one stack should not be more than two and a half meters.
- Laying reinforced concrete slabs on top of each other without wooden spacers is strictly prohibited.
- Wood blocks are installed on both sides with a 20 cm indentation from the edge between each slab.
- The lowest slab should be laid on a large beam so that the slab cannot come into contact with the ground surface.
How to lay it correctly?
The technological map for the installation of such structures is developed depending on their type of structure and consists of laying PP on the working solution, at the joints.
In general, such work consists of 3 important stages:
- Preparation. Check the walls so that they do not diverge more than 10 mm in height; it is better if an armored belt is placed on the load-bearing walls at the installation sites, especially for those built from light concrete blocks. The place where the slabs are laid must be free of defects and clean.
- Selecting an installation scheme to ensure compliance with the design parameters for supporting the stacks.
- Laying the slabs involves an adjustment stage, when the slab hangs at a level of 40 cm above the site and the compliance of its location with the design marks is checked, and, if necessary, adjustments are made. The layout of the slabs is carried out exactly according to the design in compliance with the requirements of SNiP.
How to lay on load-bearing walls?
For small floor areas, the slabs are laid on load-bearing walls.
Algorithm for installing floors by a team consisting of a rigger and 2 installers:
- The rigger checks the cleanliness and serviceability of the mounting loops on the control panel.
- When detected, they are cleaned from concrete with a scalpel, and from contamination with an iron brush.
- A signal is given to the truck crane operator to supply slings.
- The hooks of the slings are attached alternately to the mounting loops.
- The command is given to the truck crane operator to tighten the branches of the slings.
- The strength of the hook is checked, after which the rigger must move to a safe place and give the command to the truck crane operator to raise the PP to a height of 20 cm.
- The reliability of the sling is monitored; if there are no comments, the rigger gives the command to the truck crane operator to move the PP to the installation area.
- The 2nd installer prepares the site for installing the slab, clears it of concrete buildup, pieces of ice and dirt.
- The first installer takes the prepared concrete mortar from the box with a shovel, applies it to the shelves of the crossbar, and uses a trowel to level the layer evenly.
- The 1st installer gives a signal to the truck crane operator that the PP is ready to supply.
- Installers accept the PP at a height of 200 mm from the required floor level and direct it to the installation site.
- The 1st installer gives a command to the truck crane operator to smoothly lower the panel, while both installers hold the panel during the lowering process.
- The 1st installer controls the accuracy of installation of the PP in height at the construction level; if necessary, together with the 2nd installer, they eliminate the detected deviations, changing the thickness of the mortar bed.
- The 1st installer controls the installation of the panel in plan and, if necessary, together with the 2nd installer, corrects its position with crowbars.
- The first installer gives the crane operator a signal to loosen the slings, they are removed from the mounting loops.
- The welder welds the embedded elements according to the design.
- Installers seal all joints with concrete mortar.
Installation of floor slabs - in the video:
Preparation stage before installation
In order to lay the floor slab correctly and evenly, it is necessary to form a flat surface of the upper edge of the supporting structure even at the stage of wall construction. For this purpose, special and precise construction equipment in the form of a laser level is used. During construction, position marks are installed on the walls 300 - 400 mm before the top edge and the last rows of blocks or bricks are laid with an accuracy of millimeters according to the level readings. In the case of using expanded clay concrete blocks for the construction of walls, in order to uniformly distribute the mass of the floor, the technology of arranging a monolithic belt is used.
Before laying, the slab is prepared. The holes at its end must be sealed. As a rule, for this purpose the empty space is filled with bricks and concreted in the gaps. It is possible to fill the holes with mineral wool.
What you should pay special attention to
It should be noted that the very last row of masonry (brick) should be the bond row. This implies the presence of only pokes in the top row of masonry load-bearing walls, when viewed from inside the workroom. If the thickness of the load-bearing wall is only one and a half bricks, then the very last row should be made in one of two ways. It is recommended to use a reinforced belt immediately before laying the mounted floor slabs on the walls. The blocks can be made of slag, gas silicate or foam concrete. The thickness of this layer is 150-200 mm. To do this, either the concrete solution is poured directly into the formwork, or it involves the use of special blocks that have a U-shape along the entire perimeter of the box. This means not only load-bearing walls, but also ordinary walls.
When using void-based structures, all holes should be sealed. This should be done before they are installed and while they are lying chaotically on the ground. Based on the GESN, we can say with confidence that only the side that rests on the outer part of the wall needs to be sealed, which will reduce the risk of freezing of the structure used. Also, similar manipulations should be carried out on the side that rests on the internal partition; this must be done to increase the strength of the structure. A more detailed technological map should be kept by the workers.
What to do with a cracked slab? Is it possible to cover a house with it?
But what to do if the slab is already cracked, and can it be used in the future?
In fact, builders quite often use cracked slabs for flooring, so if the cracks are small, further use of the slabs is possible. The main thing is not to load them too much and secure them additionally.
Here are some examples of where it is better to install cracked slabs:
- lower it onto the outer or load-bearing wall by 0.1-0.15 m. In this case, the slab will rest on three walls at once, not only with its short edges, but also with its long one. Additional fastening of the slab is provided by the higher walls, which press it securely. This technique is usually used for slabs with fairly large cracks;
- lay the slab in place of the installation of the brick partition, which will subsequently support it;
- mount the broken slab between two intact ones. During installation, rustles form between the slabs, which are then carefully sealed with mortar, creating an almost monolithic ceiling;
- lay the slab in place with minimal stress. It can be used for attic floors, where there are practically no loads, the main thing is that the structural elements of the roof do not rest on it;
- in case of significant damage to the surface of the slab, when the crack is large (about 4-10 mm) or there are several of them, you can use only its entire part, cutting off the damaged one.
If the installed broken slab does not inspire confidence in you, you can strengthen its strength by reinforcing the floor screed on the upper floor with reinforcement. The reinforced concrete screed will evenly distribute the loads between all slabs and strengthen the structure.
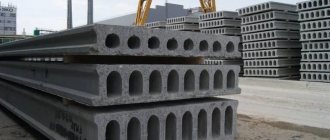
Dimensions of PC floor slabs
The dimensions of reinforced concrete hollow-core PC type can vary from 2.4 to 12 meters in length and from 1.0 m to 3.6 m in width, but wider than 1.8 meters are used extremely rarely in private housing construction.
Based on the size of your building and individual rooms, the sizes of the slabs are selected. Ideally, the entire set of floors should be calculated at the project stage. The presence of voids is convenient to use for laying electrical wiring and other networks.
Local factories for the production of concrete products can produce their standard sizes of products according to specifications, so everything needs to be carefully calculated. The supporting parts of structures must be respected for their proper operation and load-bearing capacity.
Requirements for floor slabs
The floor slab is the load-bearing element of the house structure and the most loaded part after the foundation. The reliability of the entire structure depends on it. The slab must comply with construction standards and GOST in terms of strength, deflection rigidity, and fire resistance.
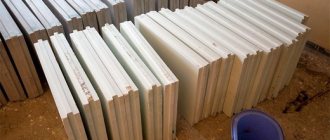
Ribbed floor slabs
Ribbed floor slabs are designed for industrial and public buildings. But they can also be used in the construction of private houses. Having low weight and high strength, they cover a large area. Their only drawback is the ribbed bottom surface, which will have to be covered with a suspended or suspended ceiling. This disadvantage can be turned into an advantage by using a loft style interior (attic).
The ribbed slab consists of a smooth top panel and reinforced longitudinal ribs at the bottom. Sometimes, to enhance rigidity, it may have transverse ribs.
Installation of floor slabs
The installation of the PP must be carried out on a prepared base, which must first be leveled horizontally according to the design. After the base has hardened, a 20mm thick layer of cement-sand mortar is applied around the perimeter of the supporting part and the slab is laid. The gaps between the side faces of the PP are filled with a solution.
What are the main types of reinforced concrete slabs?
Lightweight slabs 1.6PB and 3.1PB. They have a thickness of 160 mm and are used only in the construction of low-rise buildings.
PBs have the usual height for floor slabs of 220 mm.
Development is carried out on special machines where formwork is not used. After hardening, the workpiece is cut into slabs of equal size.
PNOs are lightweight, their thickness is 160 mm, and PCs have a standard height of 220 mm.
They are produced using older technology using formwork; reinforcing mesh and special void-forming structures are installed in the mold and concrete is poured. Smoothing is carried out on special vibrating machines.
Factories also produce special slabs that are used for construction in seismically active areas. Such slabs are called ribbed due to the presence of additional stiffeners on both sides.
How to properly lay floor slabs on walls - installation technology
The technology for carrying out the installation of floor panels includes the following main steps:
The floor slabs must be laid on a concrete mixture base
preparatory work. They provide for the transportation and storage of slabs at the construction site
It is important to prepare the supporting surface of the walls and know how to cut solid slabs into pieces if necessary; main installation activities. To implement them, it is necessary to prepare lifting equipment, the necessary building materials, and tools. Then the internal cavities should be sealed, laid and anchored.
Then the internal cavities should be sealed, laid and anchored.
Each stage has its own characteristics. Let us dwell on the nuances of performing operations.
Getting ready to lay floor slabs - preparatory activities
Preparation for installation of floor panels is a responsible process that includes the following steps:
- Preparing the site for placing lifting equipment
- Delivery of purchased panels to the construction site and storage.
- Preparation of equipment and tools.
- Cutting additional elements.
Let's look at the specifics of each stage.
To prepare the work site for the location of the crane, the following work must be performed:
- Remove large rocky inclusions and vegetation from the surface.
- Prepare convenient paths for the access of vehicles with slabs.
- Check the density of the soil, which should not be loose.
- Plan the surface of the work site.
Floor slabs should be laid as close to each other as possible
When carrying out construction activities in the spring or autumn, road slabs should be laid over the entire surface of the crane site to ensure a stable position. Transport the slabs to the installation site using a vehicle of the required carrying capacity with a body length corresponding to the dimensions of the products. Install wooden pads between the panels on the car body.
To prevent cracking, it is important to store the slabs correctly
Please note the following points:
- horizontal storage area;
- installation of wooden spacers of the same thickness.
It is important to avoid touching the hollow panels and to place the support bars in a vertical plane. To perform the work you will need the following equipment and tools:. To perform the work you will need the following equipment and tools:
To perform the work you will need the following equipment and tools:
- lifting equipment;
- slings;
- anchors for fixing slabs;
- massive sledgehammer;
- Bulgarian;
- assembly scrap;
- cement mortar;
- level, trowel and plumb line.
To prevent the slabs from freezing during the cold season, the ends must be sealed
To do this you need:
- Draw a chalk line corresponding to the required size.
- Place a pad over the cutting areas to make it difficult to chip off the concrete.
- Use a grinder to cut along the drawn line.
- Hit the top of the slab several times with a sledgehammer.
- Use a crowbar to break through the bottom of the slab and cut the reinforcing bars with a grinder.
Having completed the preparatory activities, proceed to the main stage of work - installation of the panels.
Scheme of laying slabs on the surface of load-bearing supports
Further procedure:
- Lay the cement mixture in a layer of 2-3 cm on the end plane of the load-bearing walls.
- Secure the floor slab to the lugs and move it to the installation site.
- Use a crowbar to guide the panel into the desired position.
- Check the size of the supporting surface and lower the slab.
- Disconnect the rigging and secure the products with anchors.
- Seal the gap between the ends of adjacent slabs.
When an increased space is formed between the slabs and the wall, formwork should be installed, reinforcement should be laid and concreting should be carried out. To ensure increased thermal insulation, seal the end channels using mineral wool, rubble bricks or concrete mixture to a depth of 20-25 cm on each side of the product. After sealing, cover the channels with cement mixture.
Life hacks and difficulties you may encounter
To lay a slab on a brick wall, its last layer must be bonded. The reinforcing belt can be erected using homemade formwork.
Filling the voids with mortar is required only in those areas that will go outside the building; this protects the structure from severe freezing. Installation of holes for communications must be done on the ground, when there is free access to the slabs, otherwise this may become a problem.
It is necessary to prepare the site for the crane in advance. If the soil at the construction site is loose and crumbly, then this will definitely lead to difficulties. Cranes should not be used near basements; the load on the ground may cause the slab to break. To do this you need to use equipment with a long boom.
If you need to order floor slabs, you should contact IS GROUP. We are ready to provide various designs to any region of the country. Here you can find various road slabs, airfield slabs, FBS blocks, PILES, floor slabs and many other reinforced concrete slabs. Delivery is carried out by rail. If there is no company in your city that can provide you with building materials, then be sure to contact us by phone +7 (495) 175 23 21.
Adjusting the dimensions of the floor slab
A decrease in the length or width of a reinforced concrete slab cannot be called a rare occurrence, since it is almost impossible to accurately select the material. To change the size of the slab, you need to cut it lengthwise or crosswise.
Cross section
The cross section makes the reinforced concrete slab shorter by a certain amount. To do this you need to do the following:
Cross cutting of slab
Mark the cutting line with chalk or marker. Lay the slab on pads on the ground, and the pad should exactly coincide with the cutting line. This is necessary for more convenient cutting of material. Make a cut on the top of the slab using a grinder or concrete disc. Next you need to make several blows with a sledgehammer or fist at the location of the voids
You should focus on the blows so that they land into the void and not into the rib. In this case, 3-4 hits will be enough.
In a similar way, all voids in the slab are broken through. After this, you need to knock down the ribs, for which you hit them with a fist from the side. Having punched through the voids and knocked down the ribs, they begin to punch through the lower part and free the reinforcement bars. The cleaned rods are cut using a grinder.
Lengthwise cut
To reduce the width of the floor slab, it is necessary to cut the product lengthwise. This process is a little easier, but may require much more time. This is explained as follows: the length of the slab is most often 6 meters, and the width is no more than 1.5 meters.
In principle, similar work is performed. A grinder is used to cut through the upper part, and then using a cam, the slabs are punched over the voids. Next, a crowbar is used to pierce the bottom of the slab through its entire length. If reinforcement bars get in the way, make a cut with a grinder.
How to divide reinforced concrete floors
In some cases it may be necessary to make the structure shorter. To cut reinforced concrete material, you will need a powerful grinder. But it is not necessary to completely cut the reinforced concrete structure.
It is enough to make a superficial cut and hit it with a sledgehammer; as soon as the reinforcing bars are visible, cut them with a grinder. In the case when it is necessary to separate not the transverse, but the longitudinal part, it will be necessary to cut the surface layer and the metal mesh, which acts as a reinforcing frame.
Laying
To carry out the installation work, a team of three working installers is required. The responsibilities of two include the tasks of slinging and correctly laying the slabs, the third ensures their connection and adjustment when lowering. Most reinforced concrete products are designed for installation using hinge technology.
Its essence is that the support should be carried out exclusively from the short ends. In this case, a solution with a thickness of at least 20 mm in a thick consistency is laid under the slab, and the crane operator provides tension on the cables, allowing the position to be adjusted using a crowbar. Conventional slabs are ready to withstand vertical loads for a long time.
- 70 mm for reinforced concrete floors with a length of up to 4 meters;
- 90 mm for reinforced concrete products with a length of over 4 meters.
In some cases, the overlap can reach 250 mm, providing rigid fixation to the supporting structure. When calculating the distance between the walls, the length of the slab minus 240 mm is taken into account, which provides 120 mm of support on each side, which guarantees reliable installation even if there are slight deviations when installing products.
For products of the PT brand, the minimum required support according to the technical documentation is 80 mm. In this case, the support points must be placed on all four sides of the product.
If the depth of support is insufficient, structural defects may appear over time in the form of cracks in the wall or on the floor slab, which may subsequently lead to their complete destruction.
READ MORE: How to make a rocking chair with your own hands from wood, rattan, metal
When laying bricks, the optimal thickness for walls is considered to be 380 mm. This parameter is also formed based on the load, which is implemented by floor slabs on both sides at a length of 240 mm. Another 140 mm of wall space is required to build a standard ventilation duct. Thus, the walls allow the installation of subsequent floors with the comfortable installation of floors.
If the width dimensions of the building being constructed do not correspond to the width dimensions of the slabs, the best solution would be to reduce the gaps into one common gap, which is covered by using monolithic technology. Sometimes it is difficult or simply impossible to do without monolithic sections in floors. Even in cases where projects provide all the required dimensions of the slabs and the ratio of dimensions between the walls, it may be necessary to install additional ventilation ducts and other systems that correct the dimensions.
Aspects of design of buildings and structures
At the design stage, it is important to take into account the permissible dimensions of the slabs and make calculations based on their dimensions. In practice, there are often cases when the construction process is carried out according to someone else’s design with the most convenient layout. For the successful implementation of such projects, it is necessary to adhere to strict compliance with the materials included in the project estimate. It is unacceptable to use projects for other types of materials using concrete floors that, due to their geometric dimensions, do not provide the required amount of overlap. In the event that the calculated data turns out to be incorrect and the length of the reinforced concrete products does not correspond to the actual ones, the available slabs for installation and installation must be chopped or sawed.
Ideally, in order to reduce construction costs to a minimum, it is necessary to install slabs of the required length and dimensions directly from the machine. At the same time, the costs of loading and unloading operations are reduced, and there is no need to equip a site for storing and stacking building materials. According to the storage rules, reinforced concrete products can only be laid on flat ground with wooden pads installed at a distance of 400 mm from the edge. The height of the stack cannot exceed 2.5 meters, and reinforced concrete products must be separated from each other by slats with a thickness of at least 25 mm. The slabs are stored under a canopy to prevent precipitation from getting onto the surface of future floors. Storage locations are selected based on accessibility during crane operation.
How to anchor slabs?
The project must have a diagram according to which the slabs are anchored - if there is none, you can use a standard one. After this, all the gaps between the panels and holes must be filled with mortar to create a monolithic structure. This provides the necessary rigidity, as well as the proper level of heat and sound insulation. If you have reason to believe that water has somehow gotten into the cavities inside the panels, be sure to get rid of it - this will require drilling holes. Otherwise, in winter at low temperatures, the water will turn into ice and destroy the ceiling.
Requirements regarding materials used
Bricks and other ceramic stones used in construction must comply with state standards for these types of building materials.
So, for example, the facing brick used for the outer verst must have a rectangular shape; it cannot have chipped corners and edges. The quality of materials must be checked by visual inspection by a mason. As for the mortar used for laying bricks, it must have a mobility of more than 7 cm. In winter construction conditions, lime, plasticizing and air-entraining chemical additives in the amount of 0.8 g per kilogram of cement must be added to the composition.
In the winter season, the temperature of the solution should be observed; it should be above +25C. The solution itself should be taken one grade higher than the one provided for by the project, if the ambient temperature is below -15C.
The regulations prohibit the use of bricks for which the appropriate documents confirming their quality have not been provided. carried out on metal pallets with a gap between pallets of at least 100 mm.
Every 3-4 rows between pallets there must be passages with a width of at least 70 cm. Packages with bricks can be stored in plastic bags in stacks on special pads with a stack height of no more than two tiers.
Delivery of the construction mixture to the site is carried out using dump trucks. To prevent delamination of the composition, the mixture must be supplied using a screw mechanism, which provides the ability to maintain the required temperature and the procedure for continuous mixing of the masonry mixture.
Calculation of parameters
According to regulatory documentation, the depth of support for floor slabs for brick supports is in the range of 9-12 cm. In this case, the minimum support depends on:
The minimum acceptable indicator is taken as the main indicator. So, for example, the smallest support for products along the length is:
The calculation takes into account the duration of the load, its nature - permanent or temporary. It is best to have the calculations carried out by a qualified builder or engineer.
Features of calculating wall thickness
- The thickness of the walls according to thermal engineering calculations does not always coincide with the calculation of the value based on strength characteristics. Naturally, the more severe the climate, the thicker the wall should be in terms of thermal performance indicators.
- But in terms of strength, for example, it is enough to lay out the outer walls in one or one and a half bricks. This is where it turns out to be “nonsense” - the thickness of the masonry, determined by thermal engineering calculations, often turns out to be excessive due to strength requirements.
- Therefore, laying solid brick walls from the point of view of material costs and subject to 100% use of its strength should only be done in the lower floors of high-rise buildings.
- In low-rise buildings, as well as in the upper floors of high-rise buildings, hollow or lightweight bricks should be used for external masonry; lightweight masonry can be used.
- This does not apply to external walls in buildings where there is a high percentage of humidity (for example, in laundries, baths). They are usually built with a protective layer of vapor barrier material on the inside and solid clay material.
Now I’ll tell you about the calculation used to determine the thickness of external walls.
It is determined by the formula:
B = 130*n -10, where
B – wall thickness in millimeters
130 – size of half a brick, taking into account the seam (vertical = 10mm)
n – integer half of a brick (= 120mm)
The calculated value of the solid masonry is rounded up to the whole number of half-bricks.
Based on this, the following values (in mm) of brick walls are obtained:
- 120
(a brick floor, but this is considered a partition); - 250
(into one); - 380
(at one and a half); - 510
(at two); - 640
(at two and a half); - 770
(at three o'clok).
In order to save material resources (bricks, mortar, fittings, etc.), the number of machine hours of mechanisms, the calculation of wall thickness is tied to the load-bearing capacity of the building. And the thermal component is obtained by insulating the facades of buildings.
How can you insulate the external walls of a brick building? In the article insulating a house with polystyrene foam from the outside, I indicated the reasons why brick walls cannot be insulated with this material. Check out the article.
The point is that brick is a porous and permeable material. And the absorbency of expanded polystyrene is zero, which prevents the migration of moisture outward. That is why it is advisable to insulate a brick wall with heat-insulating plaster or mineral wool slabs, the nature of which is vapor-permeable. Expanded polystyrene is suitable for insulating concrete or reinforced concrete bases. “The nature of the insulation must correspond to the nature of the load-bearing wall.”
There are many heat-insulating plasters
– the difference lies in the components. But the principle of application is the same. It is performed in layers and the total thickness can reach up to 150mm (for large values, reinforcement is required). In most cases, this value is 50 - 80 mm. It depends on the climate zone, the thickness of the base walls, and other factors. I will not go into detail, since this is the topic of another article. Let's return to our bricks.
The average wall thickness for ordinary clay bricks, depending on the area and climatic conditions of the area at the average winter ambient temperature, looks in millimeters something like this:
- — 5 degrees — thickness = 250;
- — 10 degrees = 380;
- — 20 degrees = 510;
- - 30 degrees = 640.
I would like to summarize the above.
We calculate the thickness of external brick walls based on the strength characteristics, and solve the heat-technical side of the issue using the method of wall insulation. As a rule, a design firm designs external walls without the use of insulation. If the house is uncomfortably cold and the need for insulation arises, then carefully consider the selection of insulation.
Features of single-row masonry
A brick house is a set of tightly connected small parts that create a monolithic structure. Any brick has three dimensions: length, width and height. When talking about laying in one row, it is meant that the thickness of this row is equal to the largest dimension. In the standard version of the brick it is 25 centimeters. Above twenty meters, bricks are not laid in one row due to a critical increase in load. In such cases, multi-row masonry is used.
A brick is a piece of heat-treated clay of a standard shape. Each side of the product has its own name. The pastel is the largest side, the middle side is the spoon, and the smallest end is the poke. Modern production quality is such that before laying it is advisable to make sure how accurately the sizes of the various batches of the resulting products match. The quality of the future design depends on this.
1 brick masonry is used for the construction of small buildings and partitions. An extremely important point regarding the future quality of the building is the geometry of the brick. The edges must strictly diverge at 90 degrees, otherwise structural defects cannot be avoided. To enhance the strength of the masonry, vertical seams must be made offset. The technique of displacing the suture is called ligation. Laying a row with the smallest surface of the brick facing outwards is called butting. If you lay the brick outward with the longer side, this is a spoon laying.
Single-row laying rule: the first and last rows are always bonded. In these cases, broken or damaged bricks are never used. Chain masonry is a method in which tie and spoon rows alternate all the time. The correct placement of the corners ensures the success of the remaining parts. When erecting a building, first two corners are made, which are connected by rows of bricks, then it is the turn of the third corner, which is also connected. The fourth corner creates a complete perimeter. Walls are always built by going around the perimeter. Under no circumstances should you build walls one at a time.
Features of the construction of load-bearing structures
features of wall masonry
Such walls are designed to form a rigid frame inside a building. The strength and reliability of the structure will depend on them. They bear the load not only on their own weight, but also take into account all the partitions, ceilings and roofs included in the building. That is why very important requirements are placed on them - and especially on the material from which they will be built. Built taking into account all recommendations, they will retain all the necessary heat-saving properties. When constructing external walls that will have a load-bearing function, their thickness must be at least 51 cm. According to the above requirements, this is a two-brick masonry. The maximum threshold used is also indicated - 64 cm (2.5 pieces). In the event that multi-storey construction is planned, the width of the load-bearing brick wall will be a uniform decrease as the height of the building increases: if at the level of the first floor it is 2.5 pieces, then from the fifth floor - only two
Will this affect thermal conductivity? No, this increase will be compensated by the fact that a large layer of thermal insulation will be used. For low-rise construction, it is also important to comply with the necessary requirements: the load-bearing wall should not be less than two units thick. However, reasonable savings are also possible: for its purposes, it is possible to reduce this figure to one and a half sizes. Don’t forget to look inside the room
Here it is also very important to follow certain recommendations:
- for load-bearing walls it is recommended to use a thickness of at least one brick;
- if we are talking about a partition (that is, simple zoning of space), then masonry half the size of the accepted unit is allowed.
In the latter case, there is a risk that the wall will not be rigid enough - in this case it will be necessary to level it and reinforce it with ordinary wire. It must be placed in mortar joints. You can also save money in this case by replacing the material with foam or aerated concrete.
Safety precautions
When performing work on the construction of external and internal load-bearing walls and partitions, strict compliance with the requirements of labor safety measures set out in SNiP 12-04-2002 (section 9) and SNiP 12-03-2001 Labor safety in construction is necessary. Part 1. General requirements.
Lifting building materials and products to the floor, moving them to workplaces must be carried out using lifting means and packaging means to prevent them from falling and being damaged.
Workers receiving loads at masons' workplaces must be trained and have a slinger's certificate. A stable radiotelephone connection must be established between the workers and the tower crane operator.
Before installing carpentry, all window and door openings in the external walls being constructed must be fenced or closed with safety shields (grids).
Prohibited
when laying masonry, stand on it with your feet or lean on it.
The flooring used must be of stock production only. It is prohibited
to use pallets, boxes, containers, as well as other objects not intended for these purposes as scaffolding .
The gap between the wall (partition) being erected and the working floor should not exceed 50 mm. The flooring of working scaffolds must be regularly (at least 2 times per shift) cleared of debris. Protective canopies with a plan size of at least 2 x 2 m must be installed over the working entrances to the section. The suspended scaffolds used must be of an inventory type only and subject to periodic inspection.
In areas of masonry of external walls, external inventory protective canopies must be installed in the form of flooring on brackets. The brackets are hung on steel clamp hooks attached to the wall being built along the course of its laying. The first row of protective canopies is installed at around 3.300, and is maintained until the completion of the construction of the external walls. The second row of protective canopies is installed on the external walls and is rearranged along the course of the masonry every 6 m. It is allowed to use the second row of flooring made of mesh materials with a cell size of no more than 50 x 50 mm.
All construction waste generated during the work must be collected in a special container (garbage container) and, as it accumulates, removed from the floor by tower crane for removal off the construction site. Removing construction and household waste by throwing it down through window or door openings or from balcony slabs is prohibited.
Quality control of brickwork work
— acceptance of previously completed installation work preceding brickwork
— quality control of building materials and products used for masonry and mounted lintels
— control of production operations related to the production of stone works and laying of lintels over openings
— acceptance control of completed stone work with execution of inspection reports for hidden work.
Acceptance of previously completed work prior to the construction of external and internal load-bearing walls and partitions should be carried out in accordance with the requirements of Section 2, paragraphs 2.111...2.113 of SNiP 3.03.01-87 and working drawings of the project.
Control of production operations is carried out according to the scheme of operational quality control of stone work and work on the installation of lintels over window and door openings of walls and partitions.
Basic options for houses with brick walls and concrete floors
In design developments for the construction of an individual brick house, one of the two most common options for the building frame can be used:
Both of these options can be used with equal success in the construction of individual residential buildings with brick walls. But if the first option - prefabricated reinforced concrete products - makes it possible to prepare a floor for brickwork quite quickly and regardless of the season, then the second allows for a free layout of the house, although this involves significant labor costs directly on the construction site.
Types and dimensions of bricks
Building material with this name is produced from different types of raw materials, and therefore can have completely different sizes, but we will discard adobe and other blocks, focusing on brick in the classical sense - the one that is white and red. Theoretically, blocks of any size can be made to order, but there are also standard dimensions, which in table form look like this:
- a simple single brick is 25 cm long, 12 cm wide and 6.5 cm thick;
- the thickened version has all the same parameters, except for the thickness, which here is already 8.8 cm - by the way, in the usual horizontal masonry it is perceived rather as height;
- a single brick of modular dimensions is slightly larger than a simple brick in length and width - 28.8 cm and 13.8 cm, respectively, but in thickness it is 2 mm less - it is 6.3 cm;
- a thickened brick of modular sizes has the length and width of a single modular size, and the thickness of a simple thickened one;
- the thickened version with a horizontal arrangement of voids has dimensions completely similar to the simple thickened one - 25 by 12 by 8.8 cm.